原创博客:转载请表明出处:http://www.cnblogs.com/zxouxuewei/
前提:
1.本教程确保你已经成功安装了kinect 或者xtion深度相机的驱动,能够正常使用。驱动安装可参考我的博客http://www.cnblogs.com/zxouxuewei/p/5271939.html
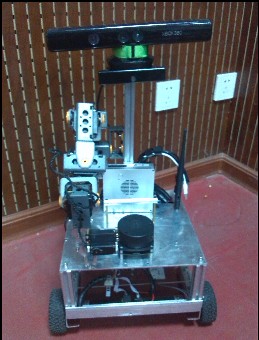
2.你已经具有一台能够手动或者自动移动的平台,将你的深度相机真确安装在移动平台上。(如下图片是我自己制作的移动平台,以后会对接口做详细的描述)
一。使用kinect深度相机将点云数据转换为激光数据
1.下载源码测试源码,pointcloud_to_laserscan:https://github.com/ros-perception/pointcloud_to_laserscan
2.解压到你的ros工作空间路径中。
3.使用catkin_make编译功能包。
4.功能包路径:ROS_PACKAGE_PATH=/root/catkin_rs/src/pointcloud_laserscan:$ROS_PACKAGE_PATH
5.分析launch文件,修改使其在自己的平台上可用。(修改以下提示)
<?xml version="1.0"?>

<launch>

    <arg name="camera" default="camera" />

    <!-- start sensor-->
    <include file="$(find openni_launch)/launch/openni.launch">  #由于我们使用的kinect,openni2已近不支持了。所以用openni
        <arg name="camera" default="$(arg camera)"/>
    </include>

    <!-- run pointcloud_to_laserscan node -->
    <node pkg="pointcloud_to_laserscan" type="pointcloud_to_laserscan_node" name="pointcloud_to_laserscan">  #节点名称可以更改为自己想要的

        <remap from="cloud_in" to="$(arg camera)/depth_registered/points_processed"/>  #话题名称也可以更改,不过在rviz中要明白该订阅那个话题
        <remap from="scan" to="$(arg camera)/scan"/>
        <rosparam>
            target_frame: camera_link
            transform_tolerance: 0.01
            min_height: 0.0
            max_height: 1.0

            angle_min: -1.5708 # -M_PI/2
            angle_max: 1.5708 # M_PI/2
            angle_increment: 0.087 # M_PI/360.0
            scan_time: 0.3333
            range_min: 0.45
            range_max: 4.0
            use_inf: true

            # Concurrency level, affects number of pointclouds queued for processing and number of threads used
            # 0 : Detect number of cores
            # 1 : Single threaded
            # 2->inf : Parallelism level
            concurrency_level: 1
        </rosparam>

    </node>

</launch>
分析:首先启动openni_launch中的深度相机。定义节点名称为:pointcloud_to_laserscan。发布话题的名称定义等等;
6.运行launch文件 启动深度相机节点:
roslaunch pointcloud_to_laserscan sample_node.launch(如果有如下信息,证明是正常的)
[ INFO] [1458635459.179868847]: Initializing nodelet with 4 worker threads.
[ INFO] [1458635462.234383165]: Number devices connected: 1
[ INFO] [1458635462.234515193]: 1. device on bus 001:28 is a SensorKinect (2ae) from PrimeSense (45e) with serial id 'A00366803996050A'
[ INFO] [1458635462.235427900]: Searching for device with index = 1
[ INFO] [1458635462.415296355]: Opened 'SensorKinect' on bus 1:28 with serial number 'A00366803996050A'
[ INFO] [1458635462.973510398]: rgb_frame_id = 'camera_rgb_optical_frame'
[ INFO] [1458635462.973599301]: depth_frame_id = 'camera_depth_optical_frame'
7.在rviz视图中查看点云以及仿的激光数据:
rviz

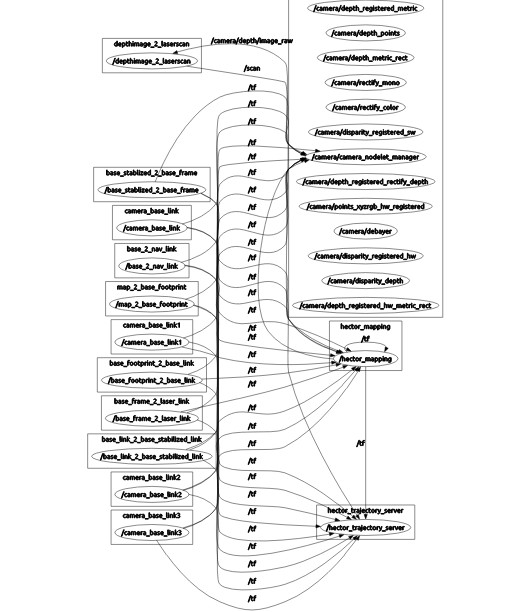
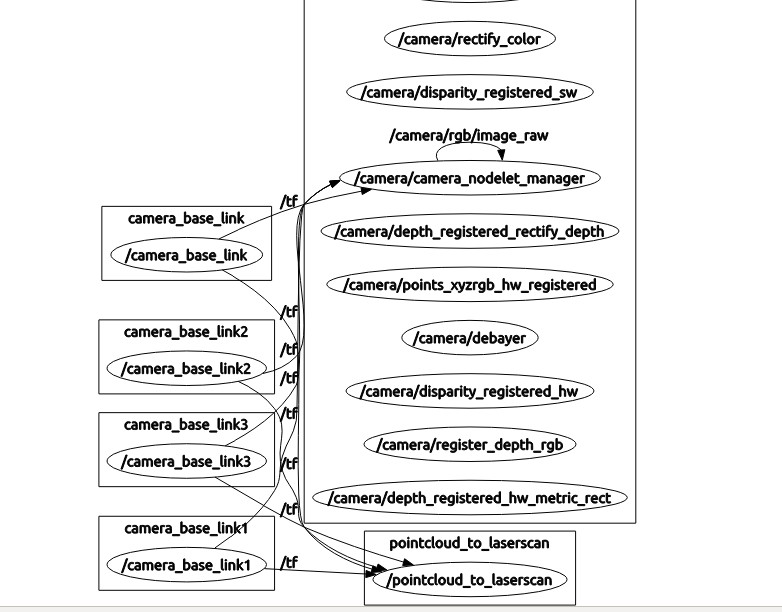
8.查看节点图
rqt_graph
二.利用深度相机仿激光数据创建地图
1.下载hector_slam_example:下载地址,编译(cmake)好之后,记住需要将这个文件加入ros工作空间路径中。 2.Install the dependency packages:
rosdep install hector_slam_example
3.在启动之前如果你用的是kinect,那就请你修改一下launch文件吧。
 <include file="$(find openni_launch)/launch/openni.launch">  #由于我们使用的kinect,openni2已近不支持了。所以用openni
然后就是oslaunch
roslaunch hector_slam_example hector_openni.launch
只需要让移动平台移动就可以去构建地图了,当然这里面用的生成模拟激光的方法是depthimage_to_laserscan节点,但是要求KINECT要相对稳定,并且尽量水平放置。

4.查看节点:
rqt_graph