TensorFlow程序读取数据一共有3种方法:
- 供给数据(Feeding): 在TensorFlow程序运行的每一步, 让Python代码来供给数据。
- 从文件读取数据: 在TensorFlow图的起始, 让一个输入管道从文件中读取数据。
- 预加载数据: 在TensorFlow图中定义常量或变量来保存所有数据(仅适用于数据量比较小的情况)。
一 预加载数据
import tensorflow as tf
x1 = tf.constant([2,3,4])
x2 = tf.constant([4,0,1])

y = tf.add(x1,x2)

with tf.Session() as sess:
    print(sess.run(y))
在这里使用x1,x2保存具体的值,即将数据直接内嵌到图中,再将图传入会话中执行,当数据量较大时,图的输出会遇到效率问题。
二 供给数据
import tensorflow as tf
x1 = tf.placeholder(tf.int32)
x2 = tf.placeholder(tf.int32)
#用python产生数据
v1 = [2,3,4]
v2 = [4,0,1]

y = tf.add(x1,x2)

with tf.Session() as sess:
    print(sess.run(y,feed_dict={x1:v1,x2:v2}))
在这里x1,x2只是占位符,没有具体的值,那么运行的时候去哪取值呢?这时候就要用到sess.run()的feed_dict参数,将python产生的数据传入,并计算y。
以上两种方法都很方便,但是遇到大型数据的时候就会很吃力,即使是Feed_dict,中间环节的增加也是不小的开销,因为数据量大的时候,TensorFlow程序运行的每一步,我们都需要使用python代码去从文件中读取数据,并对读取到的文件数据进行解码。最优的方案就是在图中定义好文件读取的方法,让TF自己从文件中读取数据,并解码成可用的样本集。
三 TensorFlow中的队列机制
从文件中读取数据的方法有很多,比如可以在一个文本里面写入图片数据的路径和标签,然后用tensorflow的read_file()读入图片;也可以将图片和标签的值直接存放在CSV或者txt文件。
我们会在后面陆续介绍以下几种读取文件的方式:
- 从字典结构的数据文件读取
- 从bin文件读取
- 从CSV(TXT)读取
- 从原图读取
- TFRecord格式文件的读取
在讲解文件的读取之前,我们需要先了解一下TensorFlow中的队列机制,后面也会详细介绍。
TensorFlow提供了一个队列机制,通过多线程将读取数据与计算数据分开。因为在处理海量数据集的训练时,无法把数据集一次全部载入到内存中,需要一边从硬盘中读取,一边进行训练,为了加快训练速度,我们可以采用多个线程读取数据,一个线程消耗数据。
下面简要介绍一下,TensorFlow里与Queue有关的概念和用法。详细内容点击原文。
其实概念只有三个:
Queue是TF队列和缓存机制的实现QueueRunner是TF中对操作Queue的线程的封装Coordinator是TF中用来协调线程运行的工具
虽然它们经常同时出现,但这三样东西在TensorFlow里面是可以单独使用的,不妨先分开来看待。
1.Queue
据实现的方式不同,分成具体的几种类型,例如:
- tf.FIFOQueue :按入列顺序出列的队列
- tf.RandomShuffleQueue :随机顺序出列的队列
- tf.PaddingFIFOQueue :以固定长度批量出列的队列
- tf.PriorityQueue :带优先级出列的队列
- ... ...
这些类型的Queue除了自身的性质不太一样外,创建、使用的方法基本是相同的。
创建函数的参数:
tf.FIFOQueue(capacity, dtypes, shapes=None, names=None,
               shared_name=None, name="fifo_queue")
#创建的图:一个先入先出队列,以及初始化,出队,+1,入队操作
q = tf.FIFOQueue(3, "float")
init = q.enqueue_many(([0.1, 0.2, 0.3],))
x = q.dequeue()
y = x + 1
q_inc = q.enqueue([y])

#开启一个session,session是会话,会话的潜在含义是状态保持,各种tensor的状态保持
with tf.Session() as sess:
    sess.run(init)

    for i in range(2):
            sess.run(q_inc)
    quelen =  sess.run(q.size())

    for i in range(quelen):
            print (sess.run(q.dequeue()))

2. QueueRunner
之前的例子中,入队操作都在主线程中进行,Session中可以多个线程一起运行。 在数据输入的应用场景中,入队操作从硬盘上读取,入队操作是从硬盘中读取输入,放到内存当中,速度较慢。 使用QueueRunner可以创建一系列新的线程进行入队操作,让主线程继续使用数据。如果在训练神经网络的场景中,就是训练网络和读取数据是异步的,主线程在训练网络,另一个线程在将数据从硬盘读入内存。
'''
QueueRunner()的使用
'''
q = tf.FIFOQueue(10, "float")
counter = tf.Variable(0.0)  #计数器
# 给计数器加一
increment_op = tf.assign_add(counter, 1.0)
# 将计数器加入队列
enqueue_op = q.enqueue(counter)

# 创建QueueRunner
# 用多个线程向队列添加数据
# 这里实际创建了4个线程,两个增加计数,两个执行入队
qr = tf.train.QueueRunner(q, enqueue_ops=[increment_op, enqueue_op] * 2)


#主线程
with tf.Session() as sess:
    sess.run(tf.initialize_all_variables())
    #启动入队线程
    enqueue_threads = qr.create_threads(sess, start=True)
    #主线程
    for i in range(10):
        print (sess.run(q.dequeue()))

能正确输出结果,但是最后会报错,ERROR:tensorflow:Exception in QueueRunner: Session has been closed.也就是说,当循环结束后,该Session就会自动关闭,相当于main函数已经结束了。
'''
QueueRunner()的使用
'''
q = tf.FIFOQueue(10, "float")
counter = tf.Variable(0.0)  #计数器
# 给计数器加一
increment_op = tf.assign_add(counter, 1.0)
# 将计数器加入队列
enqueue_op = q.enqueue(counter)

# 创建QueueRunner
# 用多个线程向队列添加数据
# 这里实际创建了4个线程,两个增加计数,两个执行入队
qr = tf.train.QueueRunner(q, enqueue_ops=[increment_op, enqueue_op] * 2)

'''

#主线程
with tf.Session() as sess:
    sess.run(tf.initialize_all_variables())
    #启动入队线程
    enqueue_threads = qr.create_threads(sess, start=True)
    #主线程
    for i in range(10):
        print (sess.run(q.dequeue()))

'''


# 主线程
sess = tf.Session()
sess.run(tf.initialize_all_variables())

# 启动入队线程
enqueue_threads = qr.create_threads(sess, start=True)

# 主线程
for i in range(0, 10):
    print(sess.run(q.dequeue()))

不使用with tf.Session,那么Session就不会自动关闭。
并不是我们设想的1,2,3,4,本质原因是增加计数的进程会不停的后台运行,执行入队的进程会先执行10次(因为队列长度只有10),然后主线程开始消费数据,当一部分数据消费被后,入队的进程又会开始执行。最终主线程消费完10个数据后停止,但其他线程继续运行,程序不会结束。
经验:因为tensorflow是在图上进行计算,要驱动一张图进行计算,必须要送入数据,如果说数据没有送进去,那么sess.run(),就无法执行,tf也不会主动报错,提示没有数据送进去,其实tf也不能主动报错,因为tf的训练过程和读取数据的过程其实是异步的。tf会一直挂起,等待数据准备好。现象就是tf的程序不报错,但是一直不动,跟挂起类似。
'''
QueueRunner()的使用
'''
q = tf.FIFOQueue(10, "float")
counter = tf.Variable(0.0)  #计数器
# 给计数器加一
increment_op = tf.assign_add(counter, 1.0)
# 将计数器加入队列
enqueue_op = q.enqueue(counter)

# 创建QueueRunner
# 用多个线程向队列添加数据
# 这里实际创建了4个线程,两个增加计数,两个执行入队
qr = tf.train.QueueRunner(q, enqueue_ops=[increment_op, enqueue_op] * 2)


#主线程
with tf.Session() as sess:
    sess.run(tf.initialize_all_variables())
    #启动入队线程
    enqueue_threads = qr.create_threads(sess, start=True)
    #主线程
    for i in range(10):
        print (sess.run(q.dequeue()))
上图将生成数据的线程注释掉,程序就会卡在sess.run(q.dequeue()),等待数据的到来QueueRunner是用来启动入队线程用的。
3.Coordinator
Coordinator是个用来保存线程组运行状态的协调器对象,它和TensorFlow的Queue没有必然关系,是可以单独和Python线程使用的。例如:
'''
Coordinator
'''
import threading, time

# 子线程函数
def loop(coord, id):
    t = 0
    while not coord.should_stop():
        print(id)
        time.sleep(1)
        t += 1
        # 只有1号线程调用request_stop方法
        if (t >= 2 and id == 0):
            coord.request_stop()

# 主线程
coord = tf.train.Coordinator()
# 使用Python API创建10个线程
threads = [threading.Thread(target=loop, args=(coord, i)) for i in range(10)]

# 启动所有线程,并等待线程结束
for t in threads: t.start()
coord.join(threads)

将这个程序运行起来,会发现所有的子线程执行完两个周期后都会停止,主线程会等待所有子线程都停止后结束,从而使整个程序结束。由此可见,只要有任何一个线程调用了Coordinator的request_stop方法,所有的线程都可以通过should_stop方法感知并停止当前线程。
将QueueRunner和Coordinator一起使用,实际上就是封装了这个判断操作,从而使任何一个出现异常时,能够正常结束整个程序,同时主线程也可以直接调用request_stop方法来停止所有子线程的执行。
简要 介绍完了TensorFlow中队列机制后,我们再来看一下如何从文件中读取数据。
四 从文件中读取数据
1.从字典结构的数据文件读取(python数据格式)
(1)在介绍字典结构的数据文件的读取之前,我们先来介绍怎么创建字典结构的数据文件。
- 先要准备好图片文件,我们使用Open CV3进行图像读取。
- 把cv2.imread()读取到的图像进行裁切,扭曲,等处理。
- 使用numpy才对数据进行处理,比如维度合并。
- 把处理好的每一张图像的数据和标签分别存放在对应的list(或者ndarray)中。
- 创建一个字典,包含两个元素‘data’和'labels',并分别赋值为上面的list。
- 使用pickle模块对字典进行序列化,并保存到文件中。
具体代码我们查看如下文章:图片存储为cifar的Python数据格式
如果针对图片比较多的情况,我们不太可能把所有图像都写入个文件,我们可以分批把图像写入几个文件中。
(2)cifar10数据有三种版本,分别是MATLAB,Python和bin版本 数据下载链接: http://www.cs.toronto.edu/~kriz/cifar.html
其中Python版本的数据即是以字典结构存储的数据 。
针对字典结构的数据文件读取,我在AlexNet那节中有详细介绍,主要就是通过pickle模块对文件进行反序列化,获取我们所需要的数据。
2.从bin文件读取
在官网的cifar的例子中就是从bin文件中读取的。bin文件需要以一定的size格式存储,比如每个样本的值占多少字节,label占多少字节,且这对于每个样本都是固定的,然后一个挨着一个存储。这样就可以使用tf.FixedLengthRecordReader 类来每次读取固定长度的字节,正好对应一个样本存储的字节(包括label)。并且用tf.decode_raw进行解析。
(1)制作bin file
如何将自己的图片存为bin file,可以看看下面这篇博客,这篇博客使用C++和opencv将图片存为二进制文件: http://blog.csdn.net/code_better/article/details/53289759
(2)从bin file读入
在后面会详细讲解如何从二进制记录文件中读取数据,并以cifar10_input.py作为案例。
def read_cifar10(filename_queue):
  """Reads and parses examples from CIFAR10 data files.

  Recommendation: if you want N-way read parallelism, call this function
  N times.  This will give you N independent Readers reading different
  files & positions within those files, which will give better mixing of
  examples.

  Args:
    filename_queue: A queue of strings with the filenames to read from.

  Returns:
    An object representing a single example, with the following fields:
      height: number of rows in the result (32)
       number of columns in the result (32)
      depth: number of color channels in the result (3)
      key: a scalar string Tensor describing the filename & record number
        for this example.
      label: an int32 Tensor with the label in the range 0..9.
      uint8image: a [height, width, depth] uint8 Tensor with the image data
  """

  class CIFAR10Record(object):
    pass
  result = CIFAR10Record()

  # Dimensions of the images in the CIFAR-10 dataset.
  # See http://www.cs.toronto.edu/~kriz/cifar.html for a description of the
  # input format.
  label_bytes = 1  # 2 for CIFAR-100
  result.height = 32
  result.width = 32
  result.depth = 3
  image_bytes = result.height * result.width * result.depth
  # Every record consists of a label followed by the image, with a
  # fixed number of bytes for each.
  record_bytes = label_bytes + image_bytes

  # Read a record, getting filenames from the filename_queue.  No
  # header or footer in the CIFAR-10 format, so we leave header_bytes
  # and footer_bytes at their default of 0.
  reader = tf.FixedLengthRecordReader(record_bytes=record_bytes)
  result.key, value = reader.read(filename_queue)

  # Convert from a string to a vector of uint8 that is record_bytes long.
  record_bytes = tf.decode_raw(value, tf.uint8)

  # The first bytes represent the label, which we convert from uint8->int32.
  result.label = tf.cast(
      tf.strided_slice(record_bytes, [0], [label_bytes]), tf.int32)

  # The remaining bytes after the label represent the image, which we reshape
  # from [depth * height * width] to [depth, height, width].
  depth_major = tf.reshape(
      tf.strided_slice(record_bytes, [label_bytes],
                       [label_bytes + image_bytes]),
      [result.depth, result.height, result.width])
  # Convert from [depth, height, width] to [height, width, depth].
  result.uint8image = tf.transpose(depth_major, [1, 2, 0])

  return result
这段代码如果看不懂,可以先跳过。
3.从CSV(TXT)文件读取
有的时候在数据量不是很大的时候,可以从CSV或者TXT文件进行读取。
(1)制作CSV(TXT)数据文本
CSV (TXT)一般是一行存一个样本(包括样本值和label),用逗号隔开。用python的普通文本写入即可。
(2)读取的时候tf.TextLineReader 类来每次读取一行,并使用tf.decode_csv来对每一行进行解析。
这里主要介绍一下:
tf.decode_csv(records, record_defaults, field_delim=None, name=None)
- 首先records与第二种方法中相同,为reader读到的内容,这里为CSV (TXT)的一行。
- 一般一行里面的值会用逗号或者空格隔开,这里第三个输入参数就是指定用什么来进行分割,默认为逗号。
- 第二个输入参数是指定分割后每个属性的类型,比如分割后会有三列,那么第二个参数就应该是[[‘int32’], [], [‘string’]], 可不指定类型(设为空[])也可以。如果分割后的属性比较多,比如有100个,可以用[ []*100 ]来表示
col= tf.decode_csv(records, record_defaults=[ [ ]*100 ], field_delim=' ', name=None)
返回的col是长度为100的list。
需要注意的是,当数据量比较大的时候,存成CSV或TXT文件要比BIN文件大的多,因此在TF中读取的速度也会慢很多。因此尽量不要读取大的CSV的方式来输入。
在后面我们会详细讲解如何从CSV文件中读取数据,并有具体的案例。
4 从原图中读取
(1)制作数据路径文件
一行一例,每例包括该样本的地址和label,用逗号分割开,用python普通文件写入即可
(2)读取
很多情况下我们的图片训练集就是原始图片本身,并没有像cifar dataset那样存成bin等格式。因此我们需要根据一个train_list列表,去挨个读取图片。这里我用到的方法是首先将train_list.txt中的image list(也就是每一行有图片的路径和label组成)读入队列中,那么对每次dequeue的内容中可以提取当前图片的路径和label。
filename = os.path.join(data_dir, trainfilename)
    with open(filename) as fid:
        content = fid.read()
    content = content.split('
')
    content = content[:-1]
    valuequeue = tf.train.string_input_producer(content,shuffle=True)
    value = valuequeue.dequeue()
    dir, labels = tf.decode_csv(records=value, record_defaults=[["string"], [""]], field_delim=" ")
    labels = tf.string_to_number(labels, tf.int32)
    imagecontent = tf.read_file(dir)
    image = tf.image.decode_png(imagecontent, channels=3, dtype=tf.uint8)
    image = tf.cast(image, tf.float32)
    #将图片统一为32*32大小的
    image = tf.image.resize_images(image,[32,32])
    image = tf.reshape(image,[result.depth, result.height, result.width])
    # Convert from [depth, height, width] to [height, width, depth].
    result.uint8image = tf.transpose(image, [1, 2, 0])
不过这个方法对电脑输入输出要求比较高,如果机械硬盘有坏道,就会报Input/Output error,出现这种情况,要修复机械硬盘坏道。
5.从TFRecord文件读取
TFrecord是Tensorflow推荐的数据集格式,与Tensorflow框架紧密结合。在TensorFlow中提供了一系列接口可以访问TFRecord格式。后面会详细介绍如何将原始图片文件转换为TFRecord格式,然后在运行中通过多线程的方式来读取。
五 QueueRunner和Coordinator结合方式一
在TensorFlow中用Queue的经典模式有两种,都是配合了QueueRunner和Coordinator一起使用的。
这里先介绍第一种方法,显式的创建QueueRunner,然后调用它的create_threads方法启动线程。例如下面这段代码:
'''
配合使用
'''
import numpy as np
# 1000个4维输入向量,每个数取值为1-10之间的随机数
data = 10 * np.random.randn(1000, 4) + 1
# 1000个随机的目标值,值为0或1
target = np.random.randint(0, 2, size=1000)

# 创建Queue,队列中每一项包含一个输入数据和相应的目标值
queue = tf.FIFOQueue(capacity=50, dtypes=[tf.float32, tf.int32], shapes=[[4], []])

# 批量入列数据(这是一个Operation)
enqueue_op = queue.enqueue_many([data, target])
# 出列数据(这是一个Tensor定义)
data_sample, label_sample = queue.dequeue()

# 创建包含4个线程的QueueRunner
qr = tf.train.QueueRunner(queue, [enqueue_op] * 4)

with tf.Session() as sess:
    # 创建Coordinator
    coord = tf.train.Coordinator()
    # 启动QueueRunner管理的线程
    enqueue_threads = qr.create_threads(sess, coord=coord, start=True)
    # 主线程,消费100个数据
    for step in range(100):
        if coord.should_stop():
            break
        data_batch, label_batch = sess.run([data_sample, label_sample])
    # 主线程计算完成,停止所有采集数据的进程
    coord.request_stop()
    coord.join(enqueue_threads)
六 QueueRunner和Coordinator结合方式二
这一小节我们会使用QueueRunner和Coordinator来实现bin文件,以及csv文件、TFRecord格式文件的读取,不过这里我们采用隐式创建线程的方法。在讲解具体代码之前,我们需要先来讲解关于TensorFlow中的文件队列机制和内存队列机制。
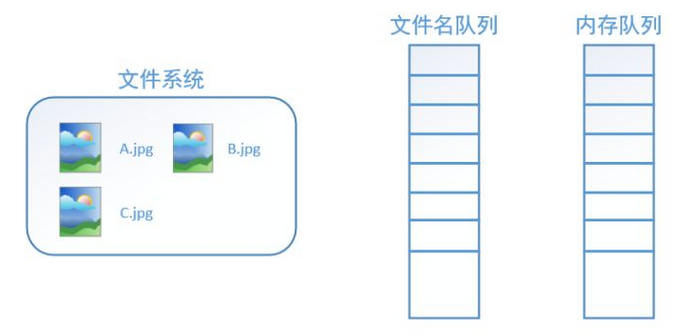
首先需要思考的一个问题是,什么是数据读取?以图像数据为例,读取数据的过程可以用下图来表示:

假设我们的硬盘中有一个图片数据集0001.jpg,0002.jpg,0003.jpg……我们只需要把它们读取到内存中,然后提供给GPU或是CPU进行计算就可以了。这听起来很容易,但事实远没有那么简单。事实上,我们必须要把数据先读入后才能进行计算,假设读入用时0.1s,计算用时0.9s,那么就意味着每过1s,GPU都会有0.1s无事可做,这就大大降低了运算的效率。
如何解决这个问题?方法就是将读入数据和计算分别放在两个线程中,将数据读入内存的一个队列,如下图所示:

读取线程源源不断地将文件系统中的图片读入到一个内存的队列中,而负责计算的是另一个线程,计算需要数据时,直接从内存队列中取就可以了。这样就可以解决GPU因为IO而空闲的问题!
而在tensorflow中,为了方便管理,在内存队列前又添加了一层所谓的“文件名队列”。
为什么要添加这一层文件名队列?我们首先得了解机器学习中的一个概念:epoch。对于一个数据集来讲,运行一个epoch就是将这个数据集中的图片全部计算一遍。如一个数据集中有三张图片A.jpg、B.jpg、C.jpg,那么跑一个epoch就是指对A、B、C三张图片都计算了一遍。两个epoch就是指先对A、B、C各计算一遍,然后再全部计算一遍,也就是说每张图片都计算了两遍。
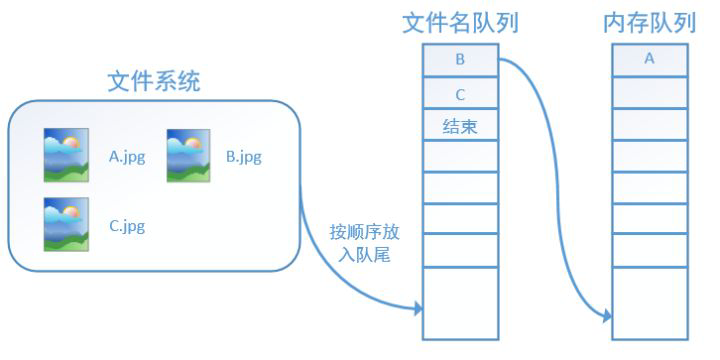
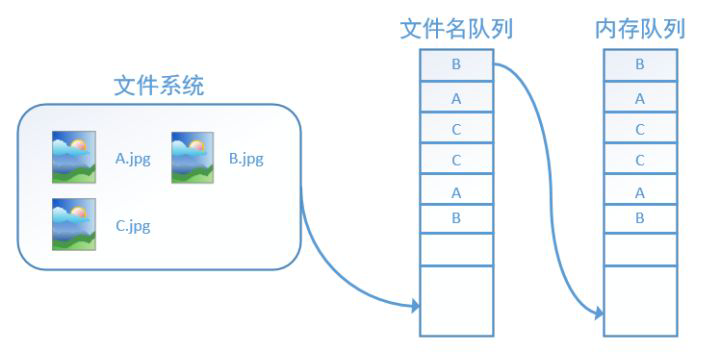
tensorflow使用文件名队列+内存队列双队列的形式读入文件,可以很好地管理epoch。下面我们用图片的形式来说明这个机制的运行方式。如下图,还是以数据集A.jpg, B.jpg, C.jpg为例,假定我们要跑一个epoch,那么我们就在文件名队列中把A、B、C各放入一次,并在之后标注队列结束。

程序运行后,内存队列首先读入A(此时A从文件名队列中出队):
再依次读入B和C:
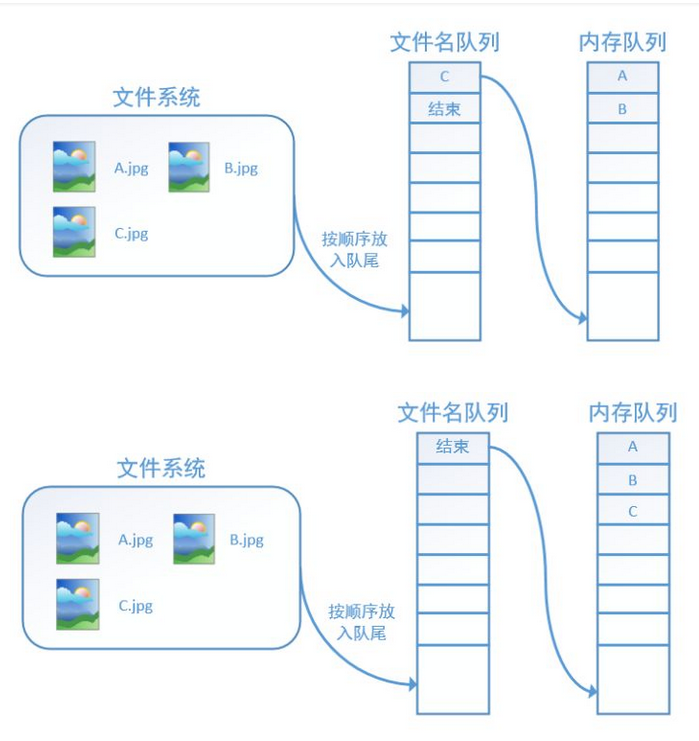
此时,如果再尝试读入,系统由于检测到了“结束”,就会自动抛出一个异常(OutOfRange)。外部捕捉到这个异常后就可以结束程序了。这就是tensorflow中读取数据的基本机制。如果我们要跑2个epoch而不是1个epoch,那只要在文件名队列中将A、B、C依次放入两次再标记结束就可以了。
典型的文件数据读取会包含下面这些步骤:
1.文件名列表
可以使用字符串张量(比如["file0", "file1"], [("file%d" % i) for i in range(2)], [("file%d" % i) for i in range(2)]) 或者tf.train.match_filenames_once ()函数来产生文件名列表。
filenames = [os.path.join(data_dir, 'data_batch_%d.bin' % i)
                 for i in xrange(1, 6)]
2.文件名队列
对于文件名队列,我们使用tf.train.string_input_producer()函数。这个函数需要传入一个文件名list,系统会自动将它转为一个先入先出的文件名队列, 文件阅读器会需要它来读取数据。
# 同时打开多个文件,显示创建Queue,同时隐含了QueueRunner的创建
filename_queue = tf.train.string_input_producer(filenames)
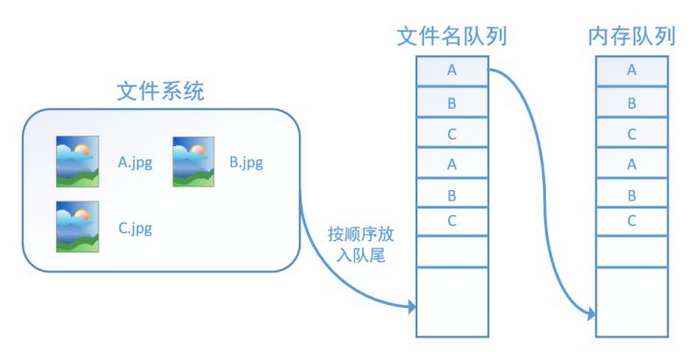
3.可配置的 文件名乱序(shuffling),可配置的最大训练迭代数(epoch limit)
tf.train.string_input_producer还有两个重要的参数,一个是num_epochs,它就是我们上文中提到的epoch数。另外一个就是shuffle,shuffle是指在一个epoch内文件的顺序是否被打乱。若设置shuffle=False,如下图,每个epoch内,数据还是按照A、B、C的顺序进入文件名队列,这个顺序不会改变:
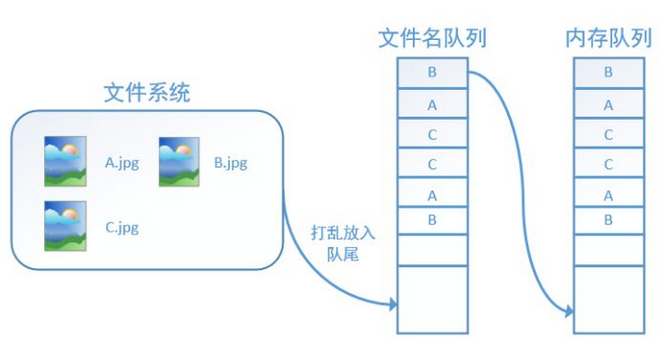
如果设置shuffle=True,那么在一个epoch内,数据的前后顺序就会被打乱,如下图所示:
在tensorflow中,内存队列不需要我们自己建立,我们只需要使用reader对象从文件名队列中读取数据就可以了。
4.针对输入文件格式的阅读器
根据你的文件格式, 选择对应的文件阅读器, 然后将文件名队列提供给阅读器的read()方法。阅读器的read()方法会输出一个key来表征输入的文件和其中的纪录(对于调试非常有用),同时得到一个字符串标量, 这个字符串标量可以被一个或多个解析器,或者转换操作将其解码为张量并且构造成为样本。
CSV 文件读取
从CSV文件中读取数据, 需要使用TextLineReader()和decode_csv() 操作, 如下面的例子所示:我们需要从iris_0.csv和iris_1.csv文件读取数据,iris_0.csv和iris_1.csv文件数据是从iris数据集中选取的部分数据,内容如下:总共有21条记录。
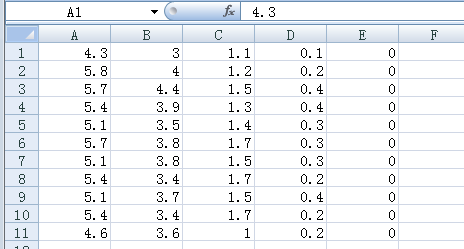

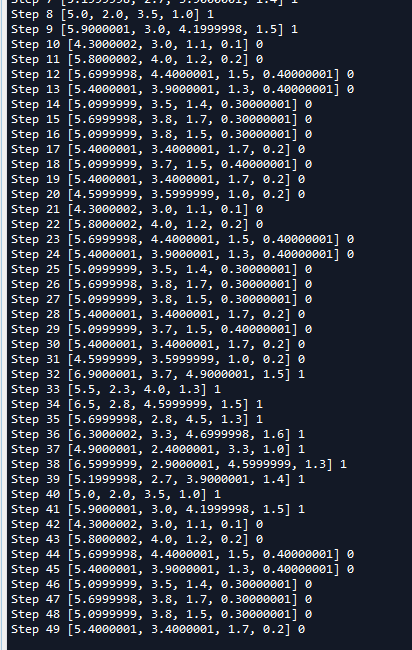
# 同时打开多个文件(文件格式必须一样),隐式示创建Queue,同时隐含了QueueRunner的创建 filename_queue = tf.train.string_input_producer(["iris_0.csv","iris_1.csv"]) reader = tf.TextLineReader() # Tensorflow的Reader对象可以直接接受一个Queue作为输入 每次read的执行都会从文件中读取一行内容 key, value = reader.read(filename_queue) # 如果某一列为空,指定默认值,同时指定了默认列的类型 record_defaults = [[0.0], [0.0], [0.0], [0.0], [0]] #decode_csv操作会解析读取的一行内容并将其转为张量列表 col1, col2, col3, col4, col5 = tf.decode_csv(value, record_defaults=record_defaults) features = [col1, col2, col3, col4] #获取一行数据 #row = tf.decode_csv(value, record_defaults=record_defaults) with tf.Session() as sess: coord = tf.train.Coordinator() # 启动计算图中所有的队列线程 调用tf.train.start_queue_runners来将文件名填充到队列,否则read操作会被阻塞到文件名队列中有值为止。 threads = tf.train.start_queue_runners(coord=coord) # 主线程,消费50个数据 for _ in range(50): example, label = sess.run([features, col5]) print('Step {0} {1} {2}'.format(_,example,label)) # 主线程计算完成,停止所有采集数据的进程 coord.request_stop()
# 指定等待某个线程结束 coord.join(threads)
- 在这个例子中,
tf.train.string_input_produecer()会将一个隐含的QueueRunner添加到全局图中(类似的操作还有tf.train.shuffle_batch()等)。由于没有显式地返回QueueRunner()调用create_threads()启动线程,这里使用了tf.train.start_queue_runners()方法直接启动tf.GraphKeys.QUEUE_RUNNERS集合中的所有队列线程。初学者会经常在代码中看到tf.train.start_queue_runners()这个函数,但往往很难理解它的用处,在这里,有了上面的铺垫后,我们就可以解释这个函数的作用了。
在我们使用tf.train.string_input_producer创建文件名队列后,整个系统其实还是处于“停滞状态”的,也就是说,我们文件名并没有真正被加入到队列中(如下图所示)。此时如果我们开始计算,因为内存队列中什么也没有,计算单元就会一直等待,导致整个系统被阻塞。
而使用tf.train.start_queue_runners()之后,才会启动填充队列的线程,这时系统就不再“停滞”。此后计算单元就可以拿到数据并进行计算,整个程序也就跑起来了,这就是函数tf.train.start_queue_runners的用处。
每次read()的执行都会从文件中读取一行内容, decode_csv() 操作会解析这一行内容并将其转为张量列表。如果输入的参数有缺失,record_default参数可以根据张量的类型来设置默认值。
5.纪录解析器(从bin文件读入)
从二进制bin文件中读取固定长度纪录, 可以使用tf.FixedLengthRecordReader的tf.decode_raw操作。decode_raw操作可以将一个字符串转换为一个uint8的张量。
举例来说,the CIFAR-10 dataset的文件格式定义是:每条记录的长度都是固定的,一个字节的标签,后面是3072字节的图像数据。uint8的张量的标准操作就可以从中获取图像片并且根据需要进行重组。 例子代码可以在tensorflow/models/image/cifar10/cifar10_input.py找到。
def read_cifar10(filename_queue):
  """Reads and parses examples from CIFAR10 data files.

  Recommendation: if you want N-way read parallelism, call this function
  N times.  This will give you N independent Readers reading different
  files & positions within those files, which will give better mixing of
  examples.

  Args:
    filename_queue: A queue of strings with the filenames to read from.

  Returns:
    An object representing a single example, with the following fields:
      height: number of rows in the result (32)
       number of columns in the result (32)
      depth: number of color channels in the result (3)
      key: a scalar string Tensor describing the filename & record number
        for this example.
      label: an int32 Tensor with the label in the range 0..9.
      uint8image: a [height, width, depth] uint8 Tensor with the image data
  """

  class CIFAR10Record(object):
    pass
  result = CIFAR10Record()

  # Dimensions of the images in the CIFAR-10 dataset.
  # See http://www.cs.toronto.edu/~kriz/cifar.html for a description of the
  # input format.
  label_bytes = 1  # 2 for CIFAR-100
  result.height = 32
  result.width = 32
  result.depth = 3
  image_bytes = result.height * result.width * result.depth
  # Every record consists of a label followed by the image, with a
  # fixed number of bytes for each.
  record_bytes = label_bytes + image_bytes

  # Read a record, getting filenames from the filename_queue.  No
  # header or footer in the CIFAR-10 format, so we leave header_bytes
  # and footer_bytes at their default of 0.
  reader = tf.FixedLengthRecordReader(record_bytes=record_bytes)
  result.key, value = reader.read(filename_queue)

  # Convert from a string to a vector of uint8 that is record_bytes long.
  record_bytes = tf.decode_raw(value, tf.uint8)

  # The first bytes represent the label, which we convert from uint8->int32.
  result.label = tf.cast(
      tf.strided_slice(record_bytes, [0], [label_bytes]), tf.int32)

  # The remaining bytes after the label represent the image, which we reshape
  # from [depth * height * width] to [depth, height, width].
  depth_major = tf.reshape(
      tf.strided_slice(record_bytes, [label_bytes],
                       [label_bytes + image_bytes]),
      [result.depth, result.height, result.width])
  # Convert from [depth, height, width] to [height, width, depth].
  result.uint8image = tf.transpose(depth_major, [1, 2, 0])

  return result
read_cifar10()函数需要传入一个文件名队列,这个函数主要做了以下事情:
- 计算每个记录(样本)包含多少字节。一张图像所占字节数 + 图像标签所占字节数。
- 每执行一次
read()的执行都会从文件中读取一行内容,decode_raw()操作会解析这一行内容并将其转为张量。 - 提取第一个字节,即标签,并把类型从uint8->int32
- 提取剩下的字节,即图像。
- 把图像数据转换为[height,width,depth]形状。
- 返回一个对象resulit。包含两个属性(都是张量),result.uint8image包含一张形状为[height,width,depth]的图像,result.label存储该图像对应的标签。
6.可配置的预处理器
你可以对输入的样本进行任意的预处理, 这些预处理不依赖于训练参数,比如上面read_cifar10()的函数,获取一张图像数据张量后,我们可以对图像进行处理,比如裁切,水平翻转,以及对图片进行归一化处理等等。我们可以在tensorflow/models/image/cifar10/cifar10.py找到数据归一化, 提取随机数据片,增加噪声或失真等等预处理的例子。
7.批处理(TFRecord格式文件读写)
在数据输入管道的末端, 我们需要有内存队列来执行输入样本的批量读取。我们使用tf.train.shuffle_batch() 函数来对内存队列中的样本进行乱序处理。
我们用一个具体的例子来演示一下tf.train.shuffle_batch()函数的使用。如图,假设我们在当前文件夹中已经有A.、B.、C三个子文件夹。并在每个文件夹下下面放置对应的图片。


针对这些文件我们需要做下面几步处理:
- 读取所有图片文件,并存为TFRecord格式文件。
- 我们读取记录文中的数据。使用tf.TFRecordReader类创建一个文件读取器,每执行一次read()方法会读取一个样本。
- 使用tf.train.shuffle_batch()函数每次读取batch_size张图像数据。
'''
shuffle_batch()的使用
'''
import os
import cv2

def write_binary():
    '''
    将默认路径下的所有图片存为TFRecord格式 保存到文件data.tfrecord中
    '''
    #获取当前工作目录
    cwd = os.getcwd()

    #当前目录下的子目录  一共有12张图片
    classes=['A','B','C']

    #创建对象 用于向记录文件写入记录
    writer = tf.python_io.TFRecordWriter('data.tfrecord')

    #遍历每一个子文件夹
    for index, name in enumerate(classes):
        class_path = os.path.join(cwd,name)
        #遍历子目录下的每一个文件
        for img_name in os.listdir(class_path):
            #每一个图片全路径
            img_path = os.path.join(class_path , img_name)
            #读取图像
            img = cv2.imread(img_path)
            #缩放
            img1 = cv2.resize(img,(250,250))
            #将图片转化为原生bytes
            img_raw = img1.tobytes()
            #将数据整理成 TFRecord 需要的数据结构
            example = tf.train.Example(features=tf.train.Features(feature={
                    'img_raw': tf.train.Feature(bytes_list=tf.train.BytesList(value=[img_raw])),
                    "label": tf.train.Feature(int64_list=tf.train.Int64List(value=[index]))}))

            #序列化
            serialized = example.SerializeToString()
            #写入文件
            writer.write(serialized)
    writer.close()

def read_and_decode(filename):
    '''
    读取TFRecord格式格式文件,返回读取到的一张图像以及对应的标签

    args:
        filename:TFRecord格式文件路径

    '''
    #创建文件队列,不限读取的数量
    filename_queue = tf.train.string_input_producer([filename],shuffle=False)
    #创建一个文件读取器 从队列文件中读取数据
    reader = tf.TFRecordReader()

    #reader从 TFRecord 读取内容并保存到 serialized_example中
    _, serialized_example = reader.read(filename_queue)

    # 读取serialized_example的格式
    features = tf.parse_single_example(
        serialized_example,
        features={
            'label': tf.FixedLenFeature([], tf.int64),
            'img_raw': tf.FixedLenFeature([], tf.string)
        }
    )

    # 解析从 serialized_example 读取到的内容
    img=tf.decode_raw(features['img_raw'],tf.uint8)
    img = tf.reshape(img, [250, 250, 3])
    label = tf.cast(features['label'], tf.int32)
    return img,label


#将默认路径下的所有图片存为TFRecord格式 保存到文件data.tfrecord中
write_binary()

#读取TFRecord格式格式文件,返回读取到的一张图像以及对应的标签
img,label = read_and_decode('data.tfrecord')

'''
读取批量数据  这里设置batch_size=12,即一次从内存队列中随机读取12张图片,这读取到的图片可能有重复的,
这主要是因为设置内存队列最小元素个数为100,最大元素个数为2000,而我们总共只有12张图片,所以队列中有许多重复的图片
'''
img_batch, label_batch = tf.train.shuffle_batch([img,label], batch_size=12, capacity=2000, min_after_dequeue=100, num_threads=2)


with tf.Session() as sess:

    sess.run(tf.global_variables_initializer())
    #创建一个协调器,管理线程
    coord = tf.train.Coordinator()

    #启动QueueRunner, 此时文件名才开始进队。
    threads=tf.train.start_queue_runners(sess=sess,coord=coord)

    img, label = sess.run([img_batch, label_batch])
    for i in range(12):
        cv2.imwrite('%d_%d_p.jpg'%(i,label[i]),img[i])
    #终止线程
    coord.request_stop()
    coord.join(threads)
运行后:
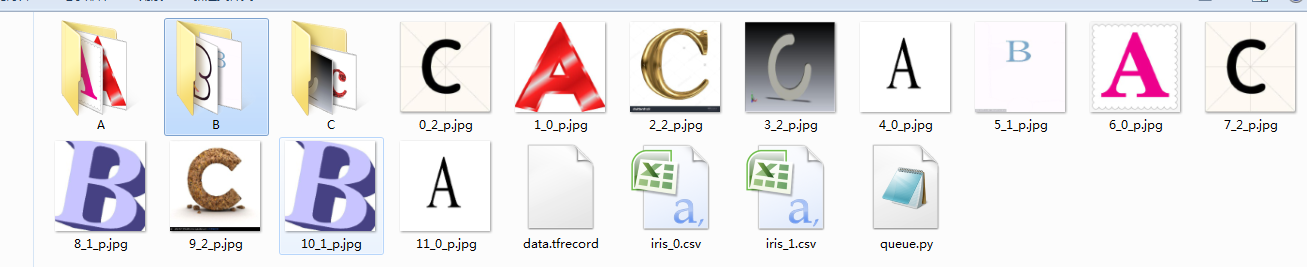
我们在读取TFRecord文件时,一次读取12张图片,这主要是因为我们设置batch_size=12,并且我们可以看到读取到的12张图片是随机,这里出现了重复的。
8.实验
我们再用一个具体的例子感受tensorflow中的数据读取。如图,假设我们在当前文件夹中已经有A.jpg、B.jpg、C.jpg三张图片,我们希望读取这三张图片5个epoch并且把读取的结果重新存到read文件夹中。
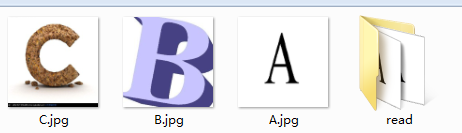
'''
测试
'''
tf.reset_default_graph()
# 新建一个Session
with tf.Session() as sess:
    # 我们要读三幅图片A.jpg, B.jpg, C.jpg
    filename = ['A.jpg', 'B.jpg', 'C.jpg']
    # string_input_producer会产生一个文件名队列
    filename_queue = tf.train.string_input_producer(filename, shuffle=True, num_epochs=5)
    # reader从文件名队列中读数据。对应的方法是reader.read
    reader = tf.WholeFileReader()
    key, value = reader.read(filename_queue)
    # tf.train.string_input_producer定义了一个epoch变量,要对它进行初始化
    tf.local_variables_initializer().run()
    # 使用start_queue_runners之后,才会开始填充队列
    threads = tf.train.start_queue_runners(sess=sess)
    for i in range(15):
        # 获取图片数据并保存
        image_data = sess.run(value)
        with open('read/test_%d.jpg' % (i+1), 'wb') as f:
            f.write(image_data)
我们这里使用filename_queue = tf.train.string_input_producer(filename, shuffle=False, num_epochs=5)建立了一个会跑5个epoch的文件名队列。并使用reader读取,reader每次读取一张图片并保存。
运行代码后,我们得到就可以看到read文件夹中的图片,正好是按顺序的5个epoch:
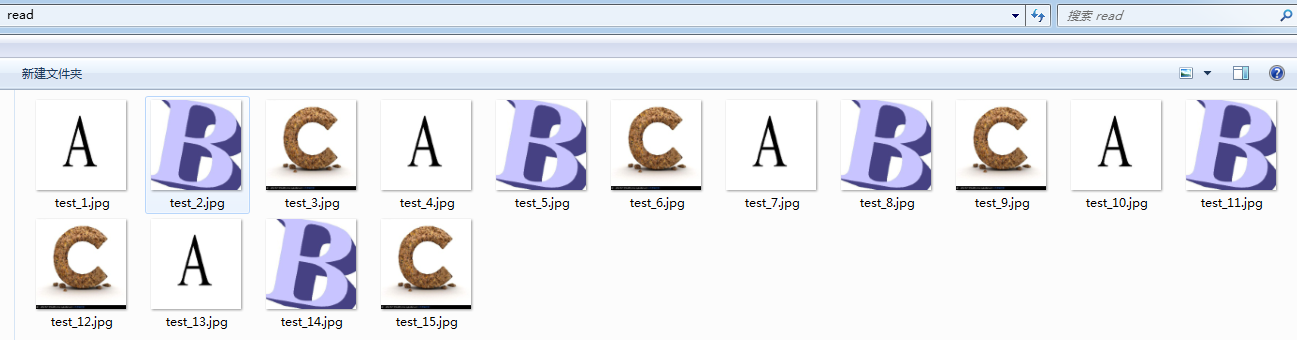
如果我们设置filename_queue = tf.train.string_input_producer(filename, shuffle=False, num_epochs=5)中的shuffle=True,那么在每个epoch内图像就会被打乱,如图所示:

我们这里只是用三张图片举例,实际应用中一个数据集肯定不止3张图片,不过涉及到的原理都是共通的。
完整代码:


# -*- coding: utf-8 -*-
"""
Created on Wed May  2 20:39:25 2018

@author: zy
"""

import tensorflow as tf

'''
TensorFlow中队列的使用
'''

'''
下面是一个单独使用Queue的例子:
'''
#创建的图:一个先入先出队列,以及初始化,出队,+1,入队操作
q = tf.FIFOQueue(3, "float")
init = q.enqueue_many(([0.1, 0.2, 0.3],))
x = q.dequeue()
y = x + 1
q_inc = q.enqueue([y])

#开启一个session,session是会话,会话的潜在含义是状态保持,各种tensor的状态保持
with tf.Session() as sess:
    sess.run(init)

    for i in range(2):
            sess.run(q_inc)
    quelen =  sess.run(q.size())

    for i in range(quelen):
            print (sess.run(q.dequeue()))


'''
QueueRunner()的使用
'''
q = tf.FIFOQueue(10, "float")
counter = tf.Variable(0.0)  #计数器
# 给计数器加一
increment_op = tf.assign_add(counter, 1.0)
# 将计数器加入队列
enqueue_op = q.enqueue(counter)

# 创建QueueRunner
# 用多个线程向队列添加数据
# 这里实际创建了4个线程,两个增加计数,两个执行入队
qr = tf.train.QueueRunner(q, enqueue_ops=[increment_op, enqueue_op] * 2)

'''

#主线程
with tf.Session() as sess:
    sess.run(tf.initialize_all_variables())
    #启动入队线程
    enqueue_threads = qr.create_threads(sess, start=True)
    #主线程
    for i in range(10):
        print (sess.run(q.dequeue()))

'''


# 主线程
sess = tf.Session()
sess.run(tf.initialize_all_variables())

# 启动入队线程
enqueue_threads = qr.create_threads(sess, start=True)

# 主线程
for i in range(0, 10):
    print(sess.run(q.dequeue()))


'''
Coordinator
'''
import threading, time

# 子线程函数
def loop(coord, id):
    t = 0
    while not coord.should_stop():
        print(id)
        time.sleep(1)
        t += 1
        # 只有1号线程调用request_stop方法
        if (t >= 2 and id == 0):
            coord.request_stop()

# 主线程
coord = tf.train.Coordinator()
# 使用Python API创建10个线程
threads = [threading.Thread(target=loop, args=(coord, i)) for i in range(10)]

# 启动所有线程,并等待线程结束
for t in threads: t.start()
coord.join(threads)


'''
 QueueRunner和Coordinator结合方式一
'''
'''
import numpy as np
# 1000个4维输入向量,每个数取值为1-10之间的随机数
data = 10 * np.random.randn(1000, 4) + 1
# 1000个随机的目标值,值为0或1
target = np.random.randint(0, 2, size=1000)


# 创建Queue,队列中每一项包含一个输入数据和相应的目标值
queue = tf.FIFOQueue(capacity=50, dtypes=[tf.float32, tf.int32], shapes=[[4], []])

# 批量入列数据(这是一个Operation)
enqueue_op = queue.enqueue_many([data, target])
# 出列数据(这是一个Tensor定义)
data_sample, label_sample = queue.dequeue()

# 创建包含4个线程的QueueRunner
qr = tf.train.QueueRunner(queue, [enqueue_op] * 4)

with tf.Session() as sess:
    # 创建Coordinator
    coord = tf.train.Coordinator()
    # 启动QueueRunner管理的线程
    enqueue_threads = qr.create_threads(sess, coord=coord, start=True)
    # 主线程,消费100个数据
    for step in range(100):
        if coord.should_stop():
            break
        data_batch, label_batch = sess.run([data_sample, label_sample])
    # 主线程计算完成,停止所有采集数据的进程
    coord.request_stop()
    coord.join(enqueue_threads)
'''

'''
QueueRunner和Coordinator结合的数据读取机制 读取CSV文件
'''
tf.reset_default_graph()
# 同时打开多个文件(文件格式必须一样),隐式创建Queue,同时隐含了QueueRunner的创建
filename_queue = tf.train.string_input_producer(["iris_0.csv","iris_1.csv"])

reader = tf.TextLineReader()
# Tensorflow的Reader对象可以直接接受一个Queue作为输入  每次read的执行都会从文件中读取一行内容
key, value = reader.read(filename_queue)

# 如果某一列为空,指定默认值,同时指定了默认列的类型
record_defaults = [[0.0], [0.0], [0.0], [0.0], [0]]
# decode_csv 操作会解析读取的一行内容并将其转为张量列表
col1, col2, col3, col4, col5 = tf.decode_csv(value, record_defaults=record_defaults)
features = [col1, col2, col3, col4]

#获取一行数据
#row = tf.decode_csv(value, record_defaults=record_defaults)

with tf.Session() as sess:
    coord = tf.train.Coordinator()
    # 启动计算图中所有的队列线程 调用tf.train.start_queue_runners来将文件名填充到队列,否则read操作会被阻塞到文件名队列中有值为止。
    threads = tf.train.start_queue_runners(coord=coord)

    # 主线程,消费50个数据
    for _ in range(50):
        example, label = sess.run([features, col5])
        print('Step {0} {1} {2}'.format(_,example,label))
    # 主线程计算完成,停止所有采集数据的进程
    coord.request_stop()
    #指定等待某个线程结束
    coord.join(threads)


'''
shuffle_batch()的使用
'''
import os
import cv2


def write_binary():
    '''
    将默认路径下的所有图片存为TFRecord格式 保存到文件data.tfrecord中
    '''
    #获取当前工作目录
    cwd = os.getcwd()

    #当前目录下的子目录  一共有12张图片
    classes=['A','B','C']

    #创建对象 用于向记录文件写入记录
    writer = tf.python_io.TFRecordWriter('data.tfrecord')

    #遍历每一个子文件夹
    for index, name in enumerate(classes):
        class_path = os.path.join(cwd,name)
        #遍历子目录下的每一个文件
        for img_name in os.listdir(class_path):
            #每一个图片全路径
            img_path = os.path.join(class_path , img_name)
            #读取图像
            img = cv2.imread(img_path)
            #缩放
            img1 = cv2.resize(img,(250,250))
            #将图片转化为原生bytes
            img_raw = img1.tobytes()
            #将数据整理成 TFRecord 需要的数据结构
            example = tf.train.Example(features=tf.train.Features(feature={
                    'img_raw': tf.train.Feature(bytes_list=tf.train.BytesList(value=[img_raw])),
                    "label": tf.train.Feature(int64_list=tf.train.Int64List(value=[index]))}))

            #序列化
            serialized = example.SerializeToString()
            #写入文件
            writer.write(serialized)
    writer.close()

def read_and_decode(filename):
    '''
    读取TFRecord格式格式文件,返回读取到的一张图像以及对应的标签

    args:
        filename:TFRecord格式文件路径

    '''
    #创建文件队列,不限读取的数量
    filename_queue = tf.train.string_input_producer([filename],shuffle=False)
    #创建一个文件读取器 从队列文件中读取数据
    reader = tf.TFRecordReader()

    #reader从 TFRecord 读取内容并保存到 serialized_example中
    _, serialized_example = reader.read(filename_queue)

    # 读取serialized_example的格式
    features = tf.parse_single_example(
        serialized_example,
        features={
            'label': tf.FixedLenFeature([], tf.int64),
            'img_raw': tf.FixedLenFeature([], tf.string)
        }
    )

    # 解析从 serialized_example 读取到的内容
    img=tf.decode_raw(features['img_raw'],tf.uint8)
    img = tf.reshape(img, [250, 250, 3])
    label = tf.cast(features['label'], tf.int32)
    return img,label

tf.reset_default_graph()
#将默认路径下的所有图片存为TFRecord格式 保存到文件data.tfrecord中
write_binary()

#读取TFRecord格式格式文件,返回读取到的一张图像以及对应的标签
img,label = read_and_decode('data.tfrecord')

'''
读取批量数据  这里设置batch_size=12,即一次从内存队列中随机读取12张图片,这读取到的图片可能有重复的,
这主要是因为设置内存队列最小元素个数为100,最大元素个数为2000,而我们总共只有12张图片,所以队列中有许多重复的图片
'''
img_batch, label_batch = tf.train.shuffle_batch([img,label], batch_size=12, capacity=2000, min_after_dequeue=100, num_threads=2)


with tf.Session() as sess:

    sess.run(tf.global_variables_initializer())
    #创建一个协调器,管理线程
    coord = tf.train.Coordinator()

    #启动QueueRunner, 此时文件名才开始进队。
    threads=tf.train.start_queue_runners(sess=sess,coord=coord)

    img, label = sess.run([img_batch, label_batch])
    for i in range(12):
        cv2.imwrite('%d_%d_p.jpg'%(i,label[i]),img[i])
    #终止线程
    coord.request_stop()
    coord.join(threads)


'''
测试
'''
tf.reset_default_graph()
# 新建一个Session
with tf.Session() as sess:
    # 我们要读三幅图片A.jpg, B.jpg, C.jpg
    filename = ['A.jpg', 'B.jpg', 'C.jpg']
    # string_input_producer会产生一个文件名队列
    filename_queue = tf.train.string_input_producer(filename, shuffle=True, num_epochs=5)
    # reader从文件名队列中读数据。对应的方法是reader.read
    reader = tf.WholeFileReader()
    key, value = reader.read(filename_queue)
    # tf.train.string_input_producer定义了一个epoch变量,要对它进行初始化
    tf.local_variables_initializer().run()
    # 使用start_queue_runners之后,才会开始填充队列
    threads = tf.train.start_queue_runners(sess=sess)
    for i in range(15):
        # 获取图片数据并保存
        image_data = sess.run(value)
        with open('read/test_%d.jpg' % (i+1), 'wb') as f:
            f.write(image_data)
七 读取原始图片转换为小批量大小的样本数据
假如我们现在需要对猫和狗的图片进行分类,我们已经收集了许多猫和狗的图片,首先我们需要建立一个文件夹命名为data,在该文件夹下面创建两个子文件夹train,test分别用于保存测试集和训练集图片,然后还需要在每个文件夹下面创建两个文件夹,分别命名cat和dog,用来存放对应类别的图片。


有了这些图片之后,我们想每次读取指定batch_size大小得数据样本,并且这些样本是打乱的。
- 我们把这些文件保存为TFRecord格式文件
- 从TFRecord文件中读取batch_size样本集。
代码如下:
# -*- coding: utf-8 -*-
"""
Created on Thu May 10 16:48:17 2018

@author: zy
"""

'''
如何将给定的数据原始图片以及标签保存成TFRecord格式的文件
并使用队列每次读取batch_size大小样本集
'''
import tensorflow as tf
import os
import cv2
import random
import numpy as np


#随机种子,使得每次运行结果一样
random.seed(0)

def get_files(dirpath):
    '''
    获取文件相对路径和标签(非one_hot)  返回一个元组

    args:
          dirpath:数据所在的目录 记做父目录
                  假设有10类数据,则父目录下有10个子目录,每个子目录存放着对应的图片
    '''
    #保存读取到的的文件和标签
    image_list = []
    label_list = []

    #遍历子目录
    classes = [x for x  in os.listdir(dirpath) if os.path.isdir(dirpath)]

     #遍历每一个子文件夹
    for index, name in enumerate(classes):
        #子文件夹路径
        class_path = os.path.join(dirpath,name)
        #遍历子目录下的每一个文件
        for img_name in os.listdir(class_path):
            #每一个图片全路径
            img_path = os.path.join(class_path , img_name)
            #追加
            image_list.append(img_path)
            label_list.append(index)

    #保存打乱后的文件和标签
    images = []
    labels = []
    # 打乱文件顺序 连续打乱两次
    indices = list(range(len(image_list)))
    random.shuffle(indices)
    for i in indices:
        images.append(image_list[i])
        labels.append(label_list[i])
    random.shuffle([images,labels])

    print('样本长度为:',len(images))
    #print(images[0:10],labels[0:10])
    return images, labels

'''
生成数据的格式

    先生成 TFRecord 格式的样例数据,Example 的结构如下,表示第1个文件中的第1个数据
    {
     'i':0,
     'j':0
     }
'''

def WriteTFRecord(dirpath,dstpath='.',train_data=True,IMAGE_HEIGHT=227,IMAGE_WIDTH=227):
    '''
    把指定目录下的数据写入同一个TFRecord格式文件中

    args:
        dirpath:数据所在的目录 记做父目录
                 假设有10类数据,则父目录下有10个子目录,每个子目录存放着对应的图片
        dstpath:保存TFRecord文件的目录
        train_data:表示传入的是不是训练集文件所在路径
        IMAGE_HEIGHT:保存的图片数据高度
        IMAGE_WIDTH:保存的图片数据宽度
    '''
    if not os.path.isdir(dstpath):
        os.mkdir(dstpath)

    #获取所有数据文件路径,以及对应标签
    image_list, label_list =  get_files(dirpath)

    #把海量数据写入多个TFrecord文件
    length_per_shard = 10000                                  #每个记录文件的样本长度
    num_shards = int(np.ceil(len(image_list) / length_per_shard))

    print('记录文件个数:',num_shards)

    '''
    当所有数类别图片都在一个文件夹下面时,可以将数据写入不同的文件
    但是如果同一类别的图片放在相同的文件下,就不可以将数据写入不同的文件
    这主要是因为后者保存的TFRecord文件中都是同一类别,而队列取数据时,是从一个文件读取完,才会读取另一个文件,
    这样会导致一次读取的batch_size图像都是同一类别,对训练不利
    因此我们必须想个办法让一个TFRecord格式的文件包含各种类别的图片,并且顺序是打乱的
    '''
    #依次写入每一个TFRecord文件
    for  index in  range(num_shards):
        #按0000n-of-0000m的后缀区分文件。n代表当前文件标号,没代表文件总数
        if train_data:
            filename = os.path.join(dstpath,'train_data.tfrecord-%.5d-of-%.5d'%(index,num_shards))
        else:
            filename = os.path.join(dstpath,'test_data.tfrecord-%.5d-of-%.5d'%(index,num_shards))
        print(filename)

        #创建对象 用于向记录文件写入记录
        writer = tf.python_io.TFRecordWriter(filename)

        #起始索引
        idx_start = index*length_per_shard
        #结束索引
        idx_end = np.min([(index+1)*length_per_shard - 1,len(image_list)])

        #遍历子目录下的每一个文件
        for img_path,label in zip(image_list[idx_start:idx_end], label_list[idx_start:idx_end]):
            #读取图像
            img = cv2.imread(img_path)

            '''
            在这里可以对图片进行处理,也可以扩大数据集,或者归一化输入等待,不过我在这里不对原始图片进行其它处理,只是把图片大小设置为固定的
            '''
            #缩放
            img = cv2.resize(img,(IMAGE_HEIGHT,IMAGE_WIDTH))


            #将图片转化为原生bytes
            image = img.tobytes()
            #将数据整理成 TFRecord 需要的数据结构
            example = tf.train.Example(features=tf.train.Features(feature={
                'image': tf.train.Feature(bytes_list=tf.train.BytesList(value=[image])),
                "label": tf.train.Feature(int64_list=tf.train.Int64List(value=[label]))}))

            #序列化
            serialized = example.SerializeToString()
            #写入文件
            writer.write(serialized)
        writer.close()


def read_and_decode(filename,num_epochs = None,IMAGE_HEIGHT=227,IMAGE_WIDTH=227):
    '''
    读取TFRecord格式格式文件,返回读取到的一张图像以及对应的标签

    args:
        filename:TFRecord格式文件路径 list列表
        num_epochs:每个数据集文件迭代轮数
        IMAGE_HEIGHT:保存的图片数据高度
        IMAGE_WIDTH:保存的图片数据宽度

    '''
    '''
    创建文件队列,通过设置 shuffle 参数为 True,将文件的入队顺序打乱,所以出队顺序是随机的。随机打乱文件顺序和入队操作
    会跑在一个单独的线程上,不会影响出队的速度.
    当输入队列中的所有文件都处理完后,它会将文件列表中的文件重新加入队列。可以通过设置 num_epochs 参数来限制加载初始
    文件列表的最大轮数
    '''
    filename_queue = tf.train.string_input_producer(filename,shuffle=False,num_epochs = num_epochs)
    #创建一个文件读取器 从队列文件中读取数据
    reader = tf.TFRecordReader()

    #reader从 TFRecord 读取内容并保存到 serialized_example中
    _, serialized_example = reader.read(filename_queue)

    # 读取serialized_example的格式
    features = tf.parse_single_example(
        serialized_example,
        features={
            'image': tf.FixedLenFeature([], tf.string),
            'label': tf.FixedLenFeature([], tf.int64)
        }
    )

    # 解析从 serialized_example 读取到的内容
    img = tf.decode_raw(features['image'],tf.uint8)
    img = tf.reshape(img, [IMAGE_HEIGHT, IMAGE_WIDTH, 3])

    '''
    在这里可以对读取到的图片数据进行预处理,比如归一化输入,PCA处理等,但是不可以增加数据
    '''
    label = tf.cast(features['label'], tf.int32)
    return img,label


def input_data(filenames,num_epochs=None,batch_size=256, capacity=4096, min_after_dequeue=1024, num_threads=10):
    '''
    读取小批量batch_size数据

    args:
        filenames:TFRecord文件路径组成的list
        num_epochs:每个数据集文件迭代轮数
        batch_size:小批量数据大小
        capacity:内存队列元素最大个数
        min_after_dequeue:内存队列元素最小个数
        num_threads:线城数
    '''
    '''
    读取批量数据  这里设置batch_size,即一次从内存队列中随机读取batch_size张图片,这里设置内存队列最小元素个数为1024,最大元素个数为4096
    shuffle_batch 函数会将数据顺序打乱
    bacth 函数不会将数据顺序打乱
    '''
    img,label = read_and_decode(filenames,num_epochs)
    images_batch, labels_batch = tf.train.shuffle_batch([img,label], batch_size=batch_size, capacity=capacity, min_after_dequeue=batch_size*5, num_threads=num_threads)
    return images_batch,labels_batch


def  file_match(s,root='.'):
    '''
    寻找指定目录下(不包含子目录)中的文件名含有指定字符串的文件,并打印出其相对路径

    args:
        s:要匹配的字符串
        root : 指定要搜索的目录

    return:返回符合条件的文件列表
    '''
    #用来保存目录
    dirs=[]
    #用来保存匹配字符串的文件
    matchs=[]
    for current_name in os.listdir(root):
        add_root_name = os.path.join(root,current_name)
        if os.path.isdir(add_root_name):
            dirs.append(add_root_name)
        elif os.path.isfile(add_root_name) and s in add_root_name:
            matchs.append(add_root_name)

    '''
    #这里用来递归搜索子目录的
    for dir in dirs:
        file_match(s,dir)
    '''
    return matchs


'''
测试
'''
if __name__ == '__main__':
    #训练集数据所在的目录
    dirpath = './data/train'

    training_step = 1

    '''
    判断训练测试集TFRecord格式文件是否存在,不存在则生成
    如果存在,直接读取
    '''
    # 获取当前目录下包含指定字符串的文件列表
    files = file_match('train_data.tfrecord')
    #判断数据集是否存在
    if len(files) == 0:
        print('开始读图片文件并写入TFRecord格式文件中.........')
        #将指定路径下所有图片存为TFRecord格式 保存到文件data.tfrecord中
        WriteTFRecord(dirpath)
        print('写入完毕!
')
        #正则表达式匹配
        files = tf.train.match_filenames_once('./train_data.tfrecord')


    #读取TFRecord格式格式文件,返回读取到的batch_size图像以及对应的标签
    images_batch, labels_batch = input_data(files)


    with tf.Session() as sess:
        sess.run(tf.global_variables_initializer())

        #创建一个协调器,管理线程
        coord = tf.train.Coordinator()
        #启动QueueRunner, 此时文件名才开始进队
        threads = tf.train.start_queue_runners(sess=sess,coord=coord)

        print('开始训练!
')
        for step in range(training_step):
            img, label = sess.run([images_batch, labels_batch])
            print('setp :',step)
            for i in range(256):
                cv2.imwrite('%d_%d_p.jpg'%(i,label[i]),img[i])

        #终止线程
        coord.request_stop()
        coord.join(threads)
程序运行后,会生成三个TFRecord文件,如下:

并且我们生成了了一个小批量样本大小的样本图片:

参考文章
[1]Tensorflow读取数据的4种方式(8)---《深度学习》