沉淀再出发:IoC和AOP的本质
一、前言
关于IoC和AOP这两个概念,如果我们没有深入的理解可以说是根本就不理解Spring这个架构的,同样的由Spring演变出来的Spring Boot和Spring Cloud,以及Spring MVC,我们就更不能说得上理解了。可以说控制反转和面向切面编程是Spring中最精髓的部分,本质都是为了松耦合,使得我们的代码能够从繁杂的工作之中抽离出来,只关注最重要的部分,不做重复的事情,而要做到这一点,我们需要的就是一个xml文件而已,理解了这一点,我们就能理解IoC和AOP设计的初衷了。在Spring中,AOP利用了IOC的xml和代理机制实现了避免重复的工作和便于维护的功能。
二、IOC的原理
2.1.依赖
依赖就是有联系,有地方使用到它就是有依赖它,一个系统不可能完全避免依赖。如果一个类或者模块在项目中没有用到它就可以从项目中剔除它或者排除它了,因为没有一个地方会依赖它。因此,在大型系统中依赖必然存在。下面看一个简单的示例:
 1     public class OperationMain
 2     {
 3
 4         public void PlayMedia()
 5         {
 6             MediaFile _mtype = new MediaFile();
 7             Player _player = new Player();
 8
 9             _player.Play(_mtype);
10         }
11     }
12     public class Player
13     {
14         public void Play(MediaFile file)
15         {
16             Console.WriteLine(file.FilePath);
17         }
18     }
19     public class MediaFile
20     {
21         public string FilePath { get; set; }
22     }
上面是一个用户用播放器播放文件简单示例,用户操作是OperationMain类中的PlayMedia方法,打开一个播放器,选择一个文件来播放。先看看他们之间的依赖关系,可以简单找到有3个依赖:
1     Player依赖MediaFile
2     OperationMain依赖Player
3     OperationMain依赖MediaFile
2.2、依赖倒置
需求增加了,要用不同的播放器,播放不同的文件,我们要抽象出来,减少耦合。耦合关系就是依赖关系,如果依赖关系相当繁杂,牵一发而动全身,很难维护;依赖关系越少,耦合关系就越低,系统就越稳定,所以我们要减少依赖。
依赖倒置原则:
    A. 上层模块不应该依赖于下层模块,它们应该共同依赖于一个抽象。
    B. 抽象不能依赖于具象,具象应该依赖于抽象。
上面播放器的示例中,我们已经找到依赖关系了,现在我们要按照依赖倒置原则,来进行优化。
根据原则如下改动:
1     Player依赖MediaFile,好办,让Player和MediaFile都去依赖一个抽象IMediaFile
2     OperationMain依赖Player,好办,让OperationMain和Player都依赖一个抽象IPlayer
3     OperationMain依赖MediaFile,好办,让OperationMain和MediaFile都依赖一个抽象IMediaFile
4     IPlayer不能依赖具体MediaFile,应该依赖于具体MediaFile的抽象IMediaFile
结构很简单,于是代码大致如下:
 1    public class OperationMain
 2     {
 3
 4         public void PlayMedia()
 5         {
 6             IMediaFile _mtype = new MediaFile();
 7             IPlayer _player = new Player();
 8
 9             _player.Play(_mtype);
10         }
11     }
12     public interface IPlayer
13     {
14         void Play(IMediaFile file);
15     }
16     public class Player : IPlayer
17     {
18         public void Play(IMediaFile file)
19         {
20             Console.WriteLine(file.FilePath);
21         }
22     }
23     public interface IMediaFile
24     {
25         string FilePath { get; set; }
26     }
27     public class MediaFile : IMediaFile
28     {
29         public string FilePath { get; set; }
30     }
上面代码进行了抽象,可以看到,目的是减少了依赖,但是看上去依赖关系增加了,如用户PlayMedia方法,依赖还增加了依赖接口和具体的实现,但是接口是稳定的,可以不考虑,具体的实现才是变动的,这个依赖还是要的,要播放文件,必定要用到具体的播放器和具体文件。
2.3、控制反转(IoC)
现实生活中,是具体的播放器和具体的媒体文件没有关系,你给它一个Mp3文件他可以播放,给它一个Mp4文件它也可以播放,你删掉你的媒体文件,播放器照样在,具体什么播放器,播放什么文件,控制权全部是我们用户自己。上面的示例中基本实现了隔离,具体的播放器跟具体的媒体隔离了,具体的播放器只跟媒体接口和播放器接口有关。但是PlayMedia的方法里面的具体对象,写死了,控制权非常小,如果我想用百度影音播放呢,我想换一首音乐呢,只能重新改代码,那控制怎么进行转移呢?我们可以通过反射来创建,把具体的文件名写在配置文件里,这时候客户端代码也不用变了,只需要改配置文件就好了,稳定性又有了提高,如下:
1   public void PlayMedia()
2  {
3    IMediaFile _mtype = Assembly.Load(ConfigurationManager.AppSettings["AssemName"]).CreateInstance(ConfigurationManager.AppSettings["MediaName"]);
4    IPlayer _player = Assembly.Load(ConfigurationManager.AppSettings["AssemName"]).CreateInstance(ConfigurationManager.AppSettings["PlayerName"]);
5
6    _player.Play(_mtype);
7  }
这个具体对象是哪一个,全由配置文件来控制了,这个具体对象的控制权交给了配置文件了,这也是人们常说的控制反转。控制反转IoC是Inversion of Control的缩写,是说对象的控制权进行转移,转移到第三方,比如转移交给了IoC容器,它就是一个创建工厂,你要什么对象,它就给你什么对象,有了IoC容器,依赖关系就变了,原先的依赖关系就没了,它们都依赖IoC容器了,通过IoC容器来建立它们之间的关系。
谁控制谁,控制什么:传统Java程序设计,我们直接在对象内部通过new进行创建对象,是程序主动去创建依赖对象;而IoC是有专门一个容器来创建这些对象,即由Ioc容器来控制对象的创建;谁控制谁?当然是IoC 容器控制了对象;控制什么?那就是主要控制了外部资源获取(不只是对象包括比如文件等)。
为何是反转,哪些方面反转了:有反转就有正转,传统应用程序是由我们自己在对象中主动控制去直接获取依赖对象,也就是正转;而反转则是由容器来帮忙创建及注入依赖对象;为何是反转?因为由容器帮我们查找及注入依赖对象,对象只是被动的接受依赖对象,所以是反转;哪些方面反转了?依赖对象的获取被反转了。
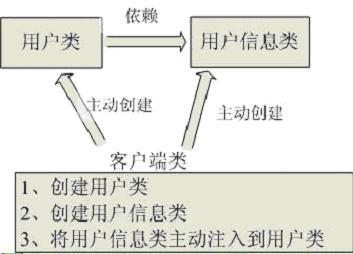
传统程序设计如图所示,都是主动去创建相关对象然后再组合起来:
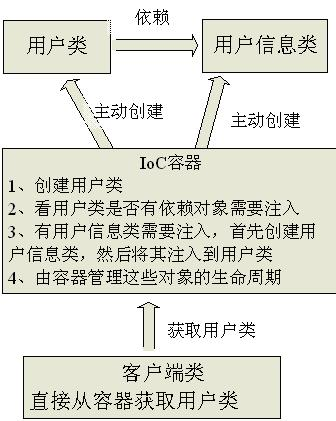
当有了IoC/DI的容器后,在客户端类中不再主动去创建这些对象了,如图所示:
IoC不是一种技术,只是一种思想,一个重要的面向对象编程的法则,它能指导我们如何设计出松耦合、更优良的程序。传统应用程序都是由我们在类内部主动创建依赖对象,从而导致类与类之间高耦合,难于测试;有了IoC容器后,把创建和查找依赖对象的控制权交给了容器,由容器进行注入组合对象,所以对象与对象之间是松散耦合,这样也方便测试,利于功能复用,更重要的是使得程序的整个体系结构变得非常灵活。其实IoC对编程带来的最大改变不是从代码上,而是从思想上,发生了“主从换位”的变化。应用程序原本是老大,要获取什么资源都是主动出击,但是在IoC/DI思想中,应用程序就变成被动的了,被动的等待IoC容器来创建并注入它所需要的资源了。IoC很好的体现了面向对象设计法则之一—— 好莱坞法则:“别找我们,我们找你”;即由IoC容器帮对象找相应的依赖对象并注入,而不是由对象主动去找。
依赖注入是组件之间依赖关系由容器在运行期决定,形象的说,即由容器动态的将某个依赖关系注入到组件之中。依赖注入的目的并非为软件系统带来更多功能,而是为了提升组件重用的频率,并为系统搭建一个灵活、可扩展的平台。通过依赖注入机制,我们只需要通过简单的配置,而无需任何代码就可指定目标需要的资源,完成自身的业务逻辑,而不需要关心具体的资源来自何处,由谁实现。
理解DI的关键是:“谁依赖谁,为什么需要依赖,谁注入谁,注入了什么”,那我们来深入分析一下:
1 谁依赖于谁:当然是应用程序依赖于IoC容器;
2 为什么需要依赖:应用程序需要IoC容器来提供对象需要的外部资源;
3 谁注入谁:很明显是IoC容器注入应用程序某个对象,应用程序依赖的对象;
4 注入了什么:就是注入某个对象所需要的外部资源(包括对象、资源、常量数据)。
IoC和DI是同一个概念的不同角度描述,由于控制反转概念比较含糊(可能只是理解为容器控制对象这一个层面,很难让人想到谁来维护对象关系),所以又有了一个新的名字:“依赖注入”,相对IoC 而言,“依赖注入”明确描述了“被注入对象依赖IoC容器配置依赖对象”。
2.4、依赖注入(DI)
上面说到控制反转,是一个思想概念,但是也要具体实现的,上面的配置文件也是一种实现方式。依赖注入提出了具体的思想。依赖注入DI是Dependency Injection缩写,它提出了“谁的控制权被被转移了?”,它也给出了答案:“依赖对象创建的获得方式被反转”。所谓依赖注入,就是由IoC容器在运行期间,动态地将某种依赖关系注入到对象之中。上面的示例中,哪些要依赖注入,依赖对象需要获得实例的地方,即 PlayMedia方法,需要IPlayer具体对象和IMediaFile的具体对象,找到了地方就从这里下手,为了灵活的控制这两个对象,必须是外面能够控制着两个对象的实例化,提供对外的操作是必要的,可以是属性,可以是方法,可以是构造函数,总之别的地方可以控制它。
三、AOP的原理
AOP(Aspect Oriented Programming),即面向切面编程,可以说是OOP(Object Oriented Programming,面向对象编程)的补充和完善。OOP引入封装、继承、多态等概念来建立一种对象层次结构,用于模拟公共行为的一个集合。不过OOP允许开发者定义纵向的关系,但并不适合定义横向的关系,例如日志功能。日志代码往往横向地散布在所有对象层次中,而与它对应的对象的核心功能毫无关系对于其他类型的代码,如安全性、异常处理和透明的持续性也都是如此,这种散布在各处的无关的代码被称为横切(cross cutting),在OOP设计中,它导致了大量代码的重复,而不利于各个模块的重用。AOP技术恰恰相反,它利用一种称为"横切"的技术,剖解开封装的对象内部,并将那些影响了多个类的公共行为封装到一个可重用模块,并将其命名为"Aspect",即切面。所谓"切面",简单说就是那些与业务无关,却为业务模块所共同调用的逻辑或责任(性能监控、日志、事务管理、权限控制等)封装起来,便于减少系统的重复代码,降低模块之间的耦合度,并有利于未来的可操作性和可维护性。使用"横切"技术,AOP把软件系统分为两个部分:核心关注点和横切关注点。业务处理的主要流程是核心关注点,与之关系不大的部分是横切关注点。横切关注点的一个特点是,它们经常发生在核心关注点的多处,而各处基本相似,比如权限认证、日志、事务管理、性能监控等。AOP的作用在于分离系统中的各种关注点,将核心关注点和横切关注点分离开来。
3.1、AOP核心概念和Spring AOP的基本实现方式

 1 1、横切关注点
 2 对哪些方法进行拦截,拦截后怎么处理,这些关注点称之为横切关注点
 3 2、切面(aspect)
 4 类是对物体特征的抽象,切面就是对横切关注点的抽象
 5 3、连接点(joinpoint)
 6 被拦截到的点,因为Spring只支持方法类型的连接点,所以在Spring中连接点指的就是被拦截到的方法,实际上连接点还可以是字段或者构造器
 7 4、切入点(pointcut)
 8 对连接点进行拦截的定义
 9 5、通知(advice)
10 所谓通知指的就是指拦截到连接点之后要执行的代码,通知分为前置、后置、异常、最终、环绕通知五类
11 6、目标对象
12 代理的目标对象
13 7、织入(weave)
14 将切面应用到目标对象并导致代理对象创建的过程
15 8、引入(introduction)
16 在不修改代码的前提下,引入可以在运行期为类动态地添加一些方法或字段
3.2、Spring对AOP的支持
Spring中AOP代理由Spring的IOC容器负责生成、管理,其依赖关系也由IOC容器负责管理。因此,AOP代理可以直接使用容器中的其它bean实例作为目标,这种关系可由IOC容器的依赖注入提供。Spring创建代理的规则为:
1、默认使用Java动态代理来创建AOP代理,这样就可以为任何接口实例创建代理了
2、当需要代理的类不是代理接口的时候,Spring会切换为使用CGLIB代理,也可强制使用CGLIB
AOP编程其实是很简单的事情,纵观AOP编程,程序员只需要参与三个部分:
1、定义普通业务组件
2、定义切入点,一个切入点可能横切多个业务组件
3、定义增强处理,增强处理就是在AOP框架为普通业务组件织入的处理动作
所以进行AOP编程的关键就是定义切入点和定义增强处理,一旦定义了合适的切入点和增强处理,AOP框架将自动生成AOP代理,即:代理对象的方法=增强处理+被代理对象的方法。
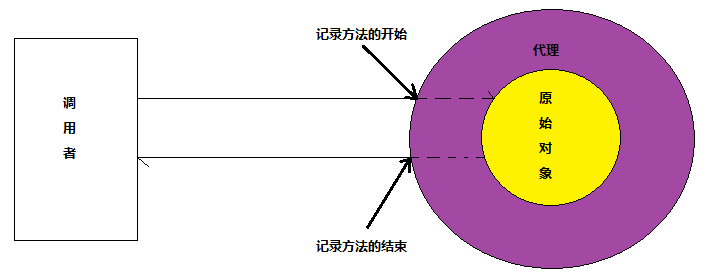
代理模式的原理是使用一个代理将对象包装起来,然后用该代理对象取代原始的对象,任何对原始对象的调用首先要经过代理。代理对象负责决定是否以及何时将方法调用信息转发到原始对象上。与此同时,围绕着每个方法的调用,代理对象也可以执行一些额外的工作。可以看出代理模式非常适合实现横切关注点。
AOP使用场景:
 1 Authentication 权限
 2 Caching 缓存
 3 Context passing 内容传递
 4 Error handling 错误处理
 5 Lazy loading 懒加载
 6 Debugging  调试
 7 logging, tracing, profiling and monitoring 记录跟踪 优化 校准
 8 Performance optimization 性能优化
 9 Persistence  持久化
10 Resource pooling 资源池
11 Synchronization 同步
12 Transactions 事务
3.3、在Spring中使用AOP实例
首先我们搭建项目环境:
在IntelliJ IDEA上创建一个maven工程,选择java项目模板:

之后的自己配置即可。
然后我们修改生成的pom.xml,加入如下内容:
 1 <?xml version="1.0" encoding="UTF-8"?>
 2 <project xmlns="http://maven.apache.org/POM/4.0.0"
 3          xmlns:xsi="http://www.w3.org/2001/XMLSchema-instance"
 4          xsi:schemaLocation="http://maven.apache.org/POM/4.0.0 http://maven.apache.org/xsd/maven-4.0.0.xsd">
 5     <modelVersion>4.0.0</modelVersion>
 6
 7     <groupId>com.aop</groupId>
 8     <artifactId>zyrtest</artifactId>
 9     <version>1.0-SNAPSHOT</version>
10
11     <!-- https://mvnrepository.com/artifact/aopalliance/aopalliance -->
12     <dependencies>
13         <dependency>
14             <groupId>aopalliance</groupId>
15             <artifactId>aopalliance</artifactId>
16             <version>1.0</version>
17         </dependency>
18         <!-- https://mvnrepository.com/artifact/org.aspectj/aspectjweaver -->
19         <dependency>
20             <groupId>org.aspectj</groupId>
21             <artifactId>aspectjweaver</artifactId>
22             <version>1.9.1</version>
23         </dependency>
24
25         <!-- https://mvnrepository.com/artifact/org.springframework/spring-context -->
26         <dependency>
27             <groupId>org.springframework</groupId>
28             <artifactId>spring-context</artifactId>
29             <version>5.1.1.RELEASE</version>
30         </dependency>
31     </dependencies>
32 </project>
接着我们创建包和目录:
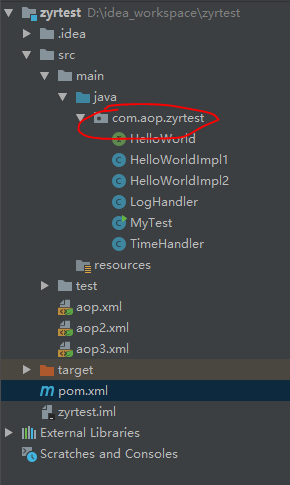
至此环境搭建完毕!
其次我们编写代码:
先定义一个接口:
public interface HelloWorld
{
    void printHelloWorld();
    void doPrint();
}
定义两个接口的实现类:
HelloWorldImpl1.java:
 1 package com.aop.zyrtest;
 2
 3 public class HelloWorldImpl1 implements HelloWorld
 4 {
 5     public void printHelloWorld()
 6     {
 7         try{
 8             Thread.sleep(3000);
 9         }catch(Exception e){
10         }
11
12         System.out.println("Enter HelloWorldImpl1.printHelloWorld()");
13     }
14
15     public void doPrint()
16     {
17         try{
18             Thread.sleep(3000);
19         }catch(Exception e){
20         }
21
22         System.out.println("Enter HelloWorldImpl1.doPrint()");
23         return ;
24     }
25 }
HelloWorldImpl2.java:
 1 package com.aop.zyrtest;
 2
 3 public class HelloWorldImpl2 implements HelloWorld
 4 {
 5     public void printHelloWorld()
 6     {
 7         try{
 8             Thread.sleep(3000);
 9         }catch(Exception e){
10         }
11
12         System.out.println("Enter HelloWorldImpl2.printHelloWorld()");
13     }
14
15     public void doPrint()
16     {
17         try{
18             Thread.sleep(3000);
19         }catch(Exception e){
20         }
21
22         System.out.println("Enter HelloWorldImpl2.doPrint()");
23         return ;
24     }
25 }
横切关注点,这里是打印时间:
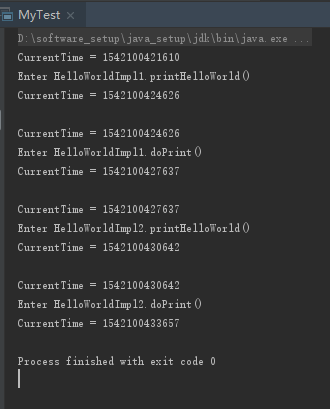
1 public class TimeHandler
2 {
3     public void printTime()
4     {
5         System.out.println("CurrentTime = " + System.currentTimeMillis());
6     }
7 }
有这三个类就可以实现一个简单的Spring AOP了,看一下aop.xml的配置:
 1 <?xml version="1.0" encoding="UTF-8"?>
 2 <beans xmlns="http://www.springframework.org/schema/beans"
 3        xmlns:xsi="http://www.w3.org/2001/XMLSchema-instance"
 4        xmlns:aop="http://www.springframework.org/schema/aop"
 5
 6        xsi:schemaLocation="http://www.springframework.org/schema/beans
 7         http://www.springframework.org/schema/beans/spring-beans-4.2.xsd
 8         http://www.springframework.org/schema/aop
 9         http://www.springframework.org/schema/aop/spring-aop-4.2.xsd">
10
11     <!--xmlns:tx="http://www.springframework.org/schema/tx"-->
12
13
14     <bean id="helloWorldImpl1" class="com.aop.zyrtest.HelloWorldImpl1" />
15     <bean id="helloWorldImpl2" class="com.aop.zyrtest.HelloWorldImpl2" />
16     <bean id="timeHandler" class="com.aop.zyrtest.TimeHandler" />
17
18     <aop:config>
19         <aop:aspect id="time" ref="timeHandler">
20             <aop:pointcut id="addAllMethod" expression="execution(* com.aop.zyrtest.HelloWorld.*(..))" />
21             <aop:before method="printTime" pointcut-ref="addAllMethod" />
22             <aop:after method="printTime" pointcut-ref="addAllMethod" />
23         </aop:aspect>
24     </aop:config>
25 </beans>
写一个main函数调用一下:
 1 package com.aop.zyrtest;
 2
 3 import org.springframework.context.ApplicationContext;
 4 import org.springframework.context.support.ClassPathXmlApplicationContext;
 5
 6 public class MyTest {
 7     public static void main(String[] args)
 8     {
 9         ApplicationContext ctx = new  ClassPathXmlApplicationContext("file:D:\idea_workspace\zyrtest\src\aop.xml");
11         HelloWorld hw1 = (HelloWorld)ctx.getBean("helloWorldImpl1");
12         HelloWorld hw2 = (HelloWorld)ctx.getBean("helloWorldImpl2");
13         hw1.printHelloWorld();
14         System.out.println();
15         hw1.doPrint();
16
17         System.out.println();
18         hw2.printHelloWorld();
19         System.out.println();
20         hw2.doPrint();
21     }
22 }
运行结果为:
增加一个横切关注点,打印日志,Java类为:
 1 public class LogHandler
 2 {
 3     public void LogBefore()
 4     {
 5         System.out.println("Log before method");
 6     }
 7
 8     public void LogAfter()
 9     {
10         System.out.println("Log after method");
11     }
12 }
配置文件:
 1 <?xml version="1.0" encoding="UTF-8"?>
 2 <beans xmlns="http://www.springframework.org/schema/beans"
 3        xmlns:xsi="http://www.w3.org/2001/XMLSchema-instance"
 4        xmlns:aop="http://www.springframework.org/schema/aop"
 5
 6        xsi:schemaLocation="http://www.springframework.org/schema/beans
 7         http://www.springframework.org/schema/beans/spring-beans-4.2.xsd
 8         http://www.springframework.org/schema/aop
 9         http://www.springframework.org/schema/aop/spring-aop-4.2.xsd">
10
11     <bean id="helloWorldImpl1" class="com.aop.zyrtest.HelloWorldImpl1" />
12     <bean id="helloWorldImpl2" class="com.aop.zyrtest.HelloWorldImpl2" />
13     <bean id="timeHandler" class="com.aop.zyrtest.TimeHandler" />
14     <bean id="logHandler" class="com.aop.zyrtest.LogHandler" />
15
16     <aop:config>
17         <aop:aspect id="time" ref="timeHandler" order="1">
18             <aop:pointcut id="addTime" expression="execution(* com.aop.zyrtest.HelloWorld.*(..))" />
19             <aop:before method="printTime" pointcut-ref="addTime" />
20             <aop:after method="printTime" pointcut-ref="addTime" />
21         </aop:aspect>
22         <aop:aspect id="log" ref="logHandler" order="2">
23             <aop:pointcut id="printLog" expression="execution(* com.aop.zyrtest.HelloWorld.*(..))" />
24             <aop:before method="LogBefore" pointcut-ref="printLog" />
25             <aop:after method="LogAfter" pointcut-ref="printLog" />
26         </aop:aspect>
27     </aop:config>
28 </beans>
打印结果为:
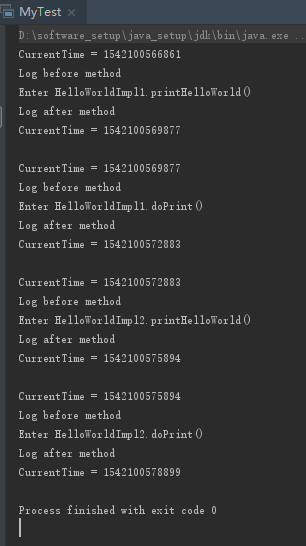
可以看到呈堆栈式进行织入。
要想让logHandler在timeHandler前使用有两个办法:
1 (1)aspect里面有一个order属性,order属性的数字就是横切关注点的顺序
2 (2)把logHandler定义在timeHandler前面,Spring默认以aspect的定义顺序作为织入顺序
只想织入接口中的某些方法,修改一下pointcut的expression就好了:
 1 <?xml version="1.0" encoding="UTF-8"?>
 2 <beans xmlns="http://www.springframework.org/schema/beans"
 3        xmlns:xsi="http://www.w3.org/2001/XMLSchema-instance"
 4        xmlns:aop="http://www.springframework.org/schema/aop"
 5
 6        xsi:schemaLocation="http://www.springframework.org/schema/beans
 7         http://www.springframework.org/schema/beans/spring-beans-4.2.xsd
 8         http://www.springframework.org/schema/aop
 9         http://www.springframework.org/schema/aop/spring-aop-4.2.xsd">
10
11     <bean id="helloWorldImpl1" class="com.aop.zyrtest.HelloWorldImpl1"/>
12     <bean id="helloWorldImpl2" class="com.aop.zyrtest.HelloWorldImpl2"/>
13     <bean id="timeHandler" class="com.aop.zyrtest.TimeHandler"/>
14     <bean id="logHandler" class="com.aop.zyrtest.LogHandler"/>
15
16     <aop:config>
17         <aop:aspect id="time" ref="timeHandler" order="1">
18             <aop:pointcut id="addTime" expression="execution(* com.aop.zyrtest.HelloWorld.print*(..))"/>
19             <aop:before method="printTime" pointcut-ref="addTime"/>
20             <aop:after method="printTime" pointcut-ref="addTime"/>
21         </aop:aspect>
22         <aop:aspect id="log" ref="logHandler" order="2">
23             <aop:pointcut id="printLog" expression="execution(* com.aop.zyrtest.HelloWorld.do*(..))"/>
24             <aop:before method="LogBefore" pointcut-ref="printLog"/>
25             <aop:after method="LogAfter" pointcut-ref="printLog"/>
26         </aop:aspect>
27     </aop:config>
28 </beans>

表示timeHandler只会织入HelloWorld接口print开头的方法,logHandler只会织入HelloWorld接口do开头的方法。
强制使用CGLIB生成代理
Spring使用动态代理或是CGLIB生成代理是有规则的,高版本的Spring会自动选择是使用动态代理还是CGLIB生成代理内容,当然我们也可以强制使用CGLIB生成代理,那就是<aop:config>里面有一个"proxy-target-class"属性,这个属性值如果被设置为true,那么基于类的代理将起作用,如果proxy-target-class被设置为false或者这个属性被省略,那么基于接口的代理将起作用。
四、总结
通过对IoC和AOP的本质的理解,对我们使用Spring以及派生出来的框架是非常有意义的。
参考文献:https://www.cnblogs.com/hongwz/p/5764917.html
https://www.cnblogs.com/qqlin/archive/2012/10/09/2707075.html