1.基本定义
Hystrix是一个用于处理分布式系统的延迟和容错的开源库,能够保证在一个依赖出现问题的情况下,不会导致整体服务失败,从而提高分布式系统的弹性。其功能有服务熔断和降级等。
1.1扇出
多个微服务调用的时候,假设微服务A调用微服务B和C,微服务B和C又调用其他的服务,这就是扇出。
1.2服务雪崩
1)定义
如果扇出的链路上某个微服务的调用时间过长或不可用,导致级联服务器发生故障的现象。其描述的是服务提供方不可用,导致服务消费方不可用并将不可用逐渐放大的过程。
2)图解分析
若存在如下调用链路

若此时Service A的流量波动很大,流量经常会突然性增加,那么在这种情况下,就算Service A能扛得住请求,Service B和Service C未必能扛得住这突发的请求。如果Service C因为抗不住请求,变得不可用。那么Service B的请求也会阻塞,慢慢耗尽Service B的线程资源,Service B就会变得不可用。紧接着,Service A也会不可用,这一过程如下图所示:

1.3断路器
一种开关装置,当某个服务单元发生故障后,通过断路器的故障监控向调用方返回一个符合预期的、可处理的备选响应(FallBack),而不是长时间的等待或抛出异常。
当10秒内请求次数超过20次或h10秒内超过50%的请求是失败的,断路器都会自动打开。断路器打开后,所有的请求都不会转发,会返回配置的FallBack。一段时间后(默认秒),此时断路器处于半开状态,会让其中的一个请求进行转发,若成功则关闭断路器,若失败则继续开启断路器。
1.4服务熔断
对服务链路进行监控及熔断。当扇出链路的某个微服务不可用火响应时间太长时,会进行服务的降级,进而熔断该节点微服务的调用,通过熔断器快速返回错误的响应信息。当检测到该节点微服务调用响应正常后恢复调用链路。
1.5服务降级
当服务压力剧增的时候根据当前的业务情况及流量对一些服务和页面有策略的降级,以此环节服务器的压力,以保证核心任务的进行。同时保证部分甚至大部分任务客户能得到正确的相应。也就是当前的请求处理不了了或者出错了,给一个默认的返回。简单的说,服务降级就是关闭系统的边缘服务,保证核心服务的正常运行,从系统安全的季爱渡考虑的。
1.6服务熔断和降级的区别
1)相同点
都从可用性着想,为了防止系统奔溃,让用户体验到某些功能是不可用的
2)不同点
其触发原因不同,熔断是某个下游服务故障引起,降级是从系统负荷考虑。另外它们的管理目标层次不一样,熔断是框架级别的处理,每个微服务都会有,而降级是针对具体的业务层级。
熔断一定触发降级,故熔断也是降级的一种。区别在于熔断是对调用链路的保护,而降级是对系统过载的保护处理。
2.项目实战
源码:https://github.com/zhongyushi-git/cloud-hystrix-demo.git
2.1基础环境搭建
1)前言
由于只是说明其用法,故本文并未对服务提供者进行大量并发请求从而导致服务雪崩现象。制造异常进行熔断和服务雪崩进行熔断的原理是相似的,故本文是通过在服务提供放制造异常,从而导致服务调用方服务异常的现象进行演示,然后对服务提供方进行熔断从而服务调用方正常使用。
2)创建一个maven工程名为cloud-hystrix-demo,删除src目录
3)在pom中导入依赖,对SpringBoot和SpringCloud版本进行锁定
   <properties>
        <spring.boot.version>2.2.2.RELEASE</spring.boot.version>
        <spring.cloud.version>Hoxton.SR1</spring.cloud.version>
    </properties>

    <!--  依赖管理,父工程锁定版本-->
    <dependencyManagement>
        <dependencies>
            <dependency>
                <groupId>org.springframework.boot</groupId>
                <artifactId>spring-boot-dependencies</artifactId>
                <version>${spring.boot.version}</version>
                <type>pom</type>
                <scope>import</scope>
            </dependency>
            <dependency>
                <groupId>org.springframework.cloud</groupId>
                <artifactId>spring-cloud-dependencies</artifactId>
                <version>${spring.cloud.version}</version>
                <type>pom</type>
                <scope>import</scope>
            </dependency>
        </dependencies>
    </dependencyManagement>
2.2搭建服务提供者
1)新建maven子模块(cloud-provider8001),导入依赖
     <dependencies>
        <!--web-->
        <dependency>
            <groupId>org.springframework.boot</groupId>
            <artifactId>spring-boot-starter-web</artifactId>
        </dependency>
        <dependency>
            <groupId>org.springframework.cloud</groupId>
            <artifactId>spring-cloud-starter-consul-discovery</artifactId>
        </dependency>
        <dependency>
            <groupId>org.springframework.boot</groupId>
            <artifactId>spring-boot-starter-actuator</artifactId>
        </dependency>
    </dependencies>
2)新建启动类ProviderMain8001并添加注解
package com.zys.cloud;

import org.springframework.boot.SpringApplication;
import org.springframework.boot.autoconfigure.SpringBootApplication;
import org.springframework.cloud.client.discovery.EnableDiscoveryClient;

@SpringBootApplication
@EnableDiscoveryClient
public class ProviderMain8001 {
    public static void main(String[] args) {
        SpringApplication.run(ProviderMain8001.class, args);
    }
}
3)配置application.yml
server:
  port: 8001

spring:
  application:
    name: cloud-consul-provider
  cloud:
    consul:
      host: localhost
      port: 8500
      discovery:
        service-name: ${spring.application.name}
4)新建controller接口
package com.zys.cloud.controller;

import org.springframework.beans.factory.annotation.Value;
import org.springframework.web.bind.annotation.GetMapping;
import org.springframework.web.bind.annotation.RestController;

@RestController
public class UserController {

    @Value("${server.port}")
    private String port;

    @GetMapping("/user/get")
    public String get() {
        int i = 10 / 0;
        return "我是服务提供者,端口:" + port;
    }

}
这里专门在接口里加了会发生异常的代码(除数为0的异常)。
2.3搭建服务消费者
1)新建maven子模块(cloud-consumer80),导入依赖
    <dependencies>
        <!--web-->
        <dependency>
            <groupId>org.springframework.boot</groupId>
            <artifactId>spring-boot-starter-web</artifactId>
        </dependency>
        <dependency>
            <groupId>org.springframework.cloud</groupId>
            <artifactId>spring-cloud-starter-consul-discovery</artifactId>
        </dependency>
        <dependency>
            <groupId>org.springframework.boot</groupId>
            <artifactId>spring-boot-starter-actuator</artifactId>
        </dependency>
        <!--feign-->
        <dependency>
            <groupId>org.springframework.cloud</groupId>
            <artifactId>spring-cloud-starter-openfeign</artifactId>
        </dependency>
    </dependencies>
2)新建启动类ConsumerMain80并添加注解
package com.zys.cloud;

import org.springframework.boot.SpringApplication;
import org.springframework.boot.autoconfigure.SpringBootApplication;
import org.springframework.cloud.client.discovery.EnableDiscoveryClient;
import org.springframework.cloud.openfeign.EnableFeignClients;

@SpringBootApplication
@EnableDiscoveryClient
@EnableFeignClients
class ConsumerMain80 {
    public static void main(String[] args) {
        SpringApplication.run(ConsumerMain80.class, args);
    }
}
3)配置application.yml
server:
  port: 80

spring:
  application:
    name: cloud-consul-consumer
  cloud:
    consul:
      host: localhost
      port: 8500
      discovery:
        service-name: ${spring.application.name}

feign:
  client:
    config:
      #指定全局
      default:
        #连接超时时间
        connectTimeout: 5000
        #服务等待时间
        readTimeout: 5000
        loggerLevel: full

logging:
  level:
    com.zys.cloud.service.UserServiceClient: debug
3)创建服务接口UserServiceClient,对于服务提供者接口
package com.zys.cloud.service;

import org.springframework.cloud.openfeign.FeignClient;
import org.springframework.web.bind.annotation.GetMapping;

//指定微服务名称
@FeignClient(value = "cloud-consul-provider")
public interface UserServiceClient {

    @GetMapping("/user/get")
    String get();
}
4)创建controller接口,将UserServiceClient注入使用
package com.zys.cloud.controller;

import com.zys.cloud.service.UserServiceClient;
import org.springframework.web.bind.annotation.GetMapping;
import org.springframework.web.bind.annotation.RequestMapping;
import org.springframework.web.bind.annotation.RestController;

import javax.annotation.Resource;

@RestController
@RequestMapping("/consumer")
public class TestController {

    @Resource
    private UserServiceClient userServiceClient;

    @GetMapping("/get")
    public String get() {
        return userServiceClient.get();
    }
}
5)启动测试。先启动服务提供者集群,再启动服务消费者。访问http://localhost/consumer/get,发现出现了500:

报错的原因很简单,因为在服务提供者中出现了除数为0的异常,导致服务消费者也跟着发生异常,也就是上述的服务雪崩现象。
2.4对服务提供方进行服务熔断
1)在cloud-provider8001的pom中加入Hystrix的依赖
        <!--hystrix-->
        <dependency>
            <groupId>org.springframework.cloud</groupId>
            <artifactId>spring-cloud-starter-netflix-hystrix</artifactId>
        </dependency>
2)在启动类上添加注解@EnableCircuitBreaker,启动熔断器

3)对异常的方法进行错误的回调
在异常的方法上添加注解@HystrixCommand,指定回调处理的方法,并自定义回调的方法
    @GetMapping("/user/get")
    @HystrixCommand(fallbackMethod = "getFallBack")
    public String get() {
        int i = 10 / 0;
        return "我是服务提供者,端口:" + port;
    }

    //回调方法
    public String getFallBack() {
        return "当前访问人数较多,请稍后再试";
    }
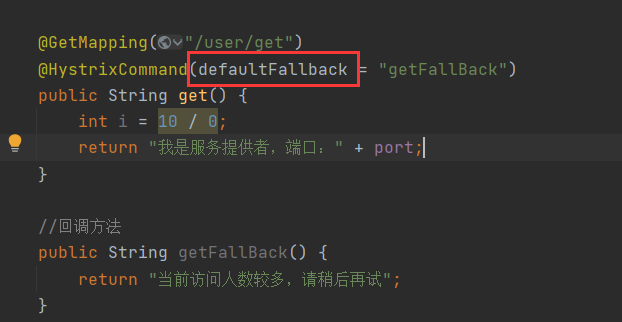
这里是通过设置fallbachMethod对每个要处理的方法设置回调的方法,也就意味着要对接口的每个需要处理的方法提供一个回调方法。当然也可以给接口的方法设置一个统一的回调方法,通过设defaultFallback,那么在其他需要处理的方法加上注解@HystrixCommand并指定defaultFallback即可:

4)启动测试。重启cloud-provider8001,再次访问http://localhost/consumer/get,服务正常调用,显示回调的错误信息

2.5对服务消费方进行服务降级
除了在服务提供方进行服务熔断外,还可以在服务消费方进行服务降级。
1)在服务消费者中导入hystrix依赖
       <!--hystrix-->
        <dependency>
            <groupId>org.springframework.cloud</groupId>
            <artifactId>spring-cloud-starter-netflix-hystrix</artifactId>
        </dependency>
2)在服务消费者中yml开启feign的熔断
feign:
  #开启服务降级
  hystrix:
    enabled: true
3)在服务消费者新建fallback处理类并实现UserServiceClient
package com.zys.cloud.fallback;

import com.zys.cloud.service.UserServiceClient;
import org.springframework.stereotype.Component;

@Component
public class UserFallBack implements UserServiceClient {
    @Override
    public String get() {
        return "服务提供方不可用,请稍后再试";
    }
}
若有多个方法,则需要对每个方法都重写来设置降级的信息。
4)在服务消费者的服务客户端UserServiceClient的注解FeignClient指定fallback的处理类

5)在服务消费者启动类上添加注解@EnableHystrix

6)重启服务消费者服务后,再次访问http://localhost/consumer/get,显示信息

你可能发现了,服务消费方已经配置了服务降级,为何还是显示服务提供方的回调信息?原因是服务提供方的服务熔断级别优先于服务消费方的服务降级。
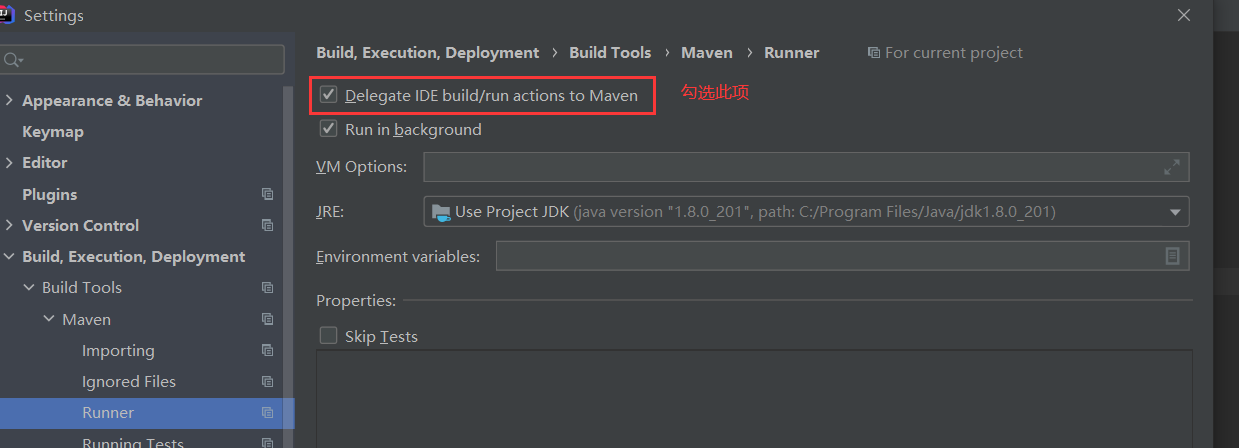
当在启动时若提示程序包org.springframework.boot不存在,那么需要对IDEA进行配置:
打开设置,按下图进行勾选

作用是将IDE构建或运行操作委托给Maven,勾选后启动就不会报错了。
7)把服务消费者服务停掉,再次访问http://localhost/consumer/get,显示信息

此时显示的便是服务降级的信息,服务端报错或停止后不会导致服务消费方停止服务。
注意:如果服务端降级和客户端降级同时开启,要求服务端降级方法的返回值必须与客户端方法降级的返回值一致。
2.6服务监控
对于微服务,也是需要进行监控的。Hystrix也提供了准实时的服务监控(Hystrix Dashboard),它会持续的记录所有通过Hystrix发起的请求的执行信息,并以统计报表和图形的形式展现给用户。
在上述的基础上继续开发:
1)新建maven子模块(cloud-dashboard),导入依赖
    <dependencies>
        <dependency>
            <groupId>org.springframework.cloud</groupId>
            <artifactId>spring-cloud-starter-netflix-hystrix-dashboard</artifactId>
        </dependency>
        <dependency>
            <groupId>org.springframework.boot</groupId>
            <artifactId>spring-boot-starter-actuator</artifactId>
        </dependency>
    </dependencies>
2)配置application.yml文件
server:
  port: 9001
3)创建启动类并添加注解@EnableHystrixDashboard
package com.zys.cloud;

import org.springframework.boot.SpringApplication;
import org.springframework.boot.autoconfigure.SpringBootApplication;
import org.springframework.cloud.netflix.hystrix.dashboard.EnableHystrixDashboard;

@SpringBootApplication
@EnableHystrixDashboard
public class HystrixDashboardMain9001 {
    public static void main(String[] args) {
        SpringApplication.run(HystrixDashboardMain9001.class, args);
    }
}
4)在服务提供者中添加配置类
package com.zys.cloud.config;

import com.netflix.hystrix.contrib.metrics.eventstream.HystrixMetricsStreamServlet;
import org.springframework.boot.web.servlet.ServletRegistrationBean;
import org.springframework.context.annotation.Bean;
import org.springframework.context.annotation.Configuration;

@Configuration
public class HystrixConfig {

    @Bean
    public ServletRegistrationBean getServlet() {
        HystrixMetricsStreamServlet streamServlet = new HystrixMetricsStreamServlet();
        ServletRegistrationBean registrationBean = new ServletRegistrationBean(streamServlet);
        registrationBean.setLoadOnStartup(1);
        //指定监控路径
        registrationBean.addUrlMappings("/hystrix.stream");
        registrationBean.setName("HystrixMetricsStreamServlet");
        return registrationBean;
    }
}
此配置类的作用是指定监控的路径。
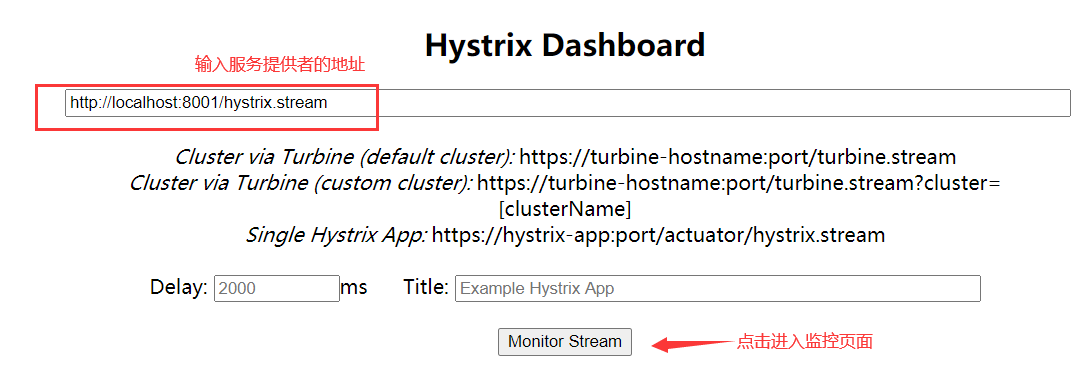
5)先启动服务监控9001,然后服务提供者8001。然后在浏览器输入http://localhost:9001/hystrix,可以看到下面的界面,说明配置成功。

6)在第一个输入框输入http://localhost:8001/hystrix.stream,点击下面的按钮,可以进入服务的监控页面

7)快速调用几次服务消费者的接口http://localhost/consumer/get,再回到监控页面看到有图形在实时变化,这就是实时的监控效果。
