本文转载自:http://cs-cjl.com/2014/05/05/learn_git_with_me_10
Git实现了以下三条用于交换patch的命令:
- git format-patch 用于创建一个email格式的patch
- git send-email 通过SMTP发送一个Git patch
- git am 应用一个patch
git format-patch的常见用法包括
- 指定commit的个数,比如:-2
- commit range,比如:master~4..master~2
- 单个的commit,通常是分支的名称,比如:origin/master
下面通过一个简单的例子来说明:
$ git init
$ echo A > file
$ git add file
$ git commit -mA
$ echo B >> file ; git commit -mB file
$ echo C >> file ; git commit -mC file
$ echo D >> file ; git commit -mD file
$ git show-branch --more=4 master
[master] D
[master^] C
[master~2] B
[master~3] A
最简单的方法是通过-n来指定最近的n个提交
$ git format-patch -1
0001-D.patch

$ git format-patch -2
0001-C.patch
0002-D.patch

$ git format-patch -3
0001-B.patch
0002-C.patch
0003-D.patch
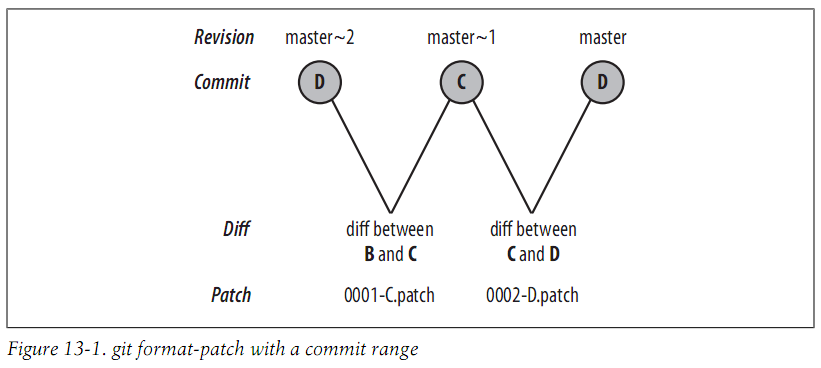
你也可以指定一个commit range,它会为每个提交生成一个patch文件
$ git format-patch master~2..master
0001-C.patch
0002-D.patch
每个文件都是一个单独的email
$ cat 0001-C.patch
From 6433985c17a4ee1611426f93b2abd2e3ac63877e Mon Sep 17 00:00:00 2001
From: Jianlong Chen <jianlong99@gmail.com>
Date: Sun, 9 Feb 2014 20:31:43 +0800
Subject: [PATCH 1/2] C

---
file | 1 +
1 file changed, 1 insertion(+)

diff --git a/file b/file
index 35d242b..b1e6722 100644
--- a/file
+++ b/file
@@ -1,2 +1,3 @@
A
B
+C
--
1.8.0.msysgit.0
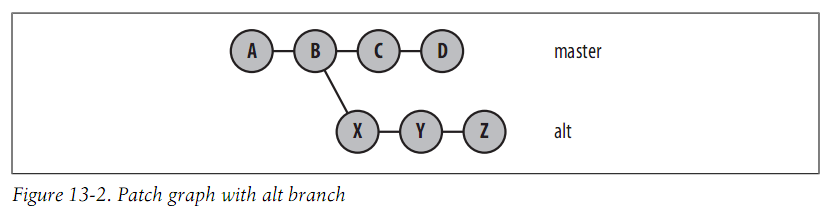
让我们继续这个例子,然后添加一个从B开始的分支alt
$ git log --format=oneline
a7466c2046a08fb30058c3f8cfdd5f1c6391e1e5 D
6433985c17a4ee1611426f93b2abd2e3ac63877e C
3a1aad8ab445f8d5430e30978d22cc6154c649a5 B
0408b034f6c7ab4a906f033133f7273133675ca0 A

$ git checkout -b alt 3a1aad
Switched to a new branch 'alt'

$ echo X >> file ; git commit -mX file
$ echo Y >> file ; git commit -mY file
$ echo Z >> file ; git commit -mZ file
现在commit graph如下:
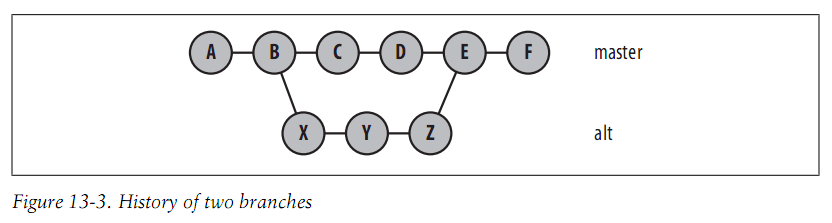
假设master分支合并alt分支到提交E,然后添加一个提交F
$ git checkout master
Switched to branch 'master'

$ git merge alt
Auto-merging file
CONFLICT (content): Merge conflict in file
Automatic merge failed; fix conflicts and then commit the result.

# 解决冲突
$ cat file
A
B
C
D
X
Y
Z

$ git add file
$ git commit -m"All lines"
[master 9aa63f4] All lines

$ echo F >> file ; git commit -mF file
[master 4a1be4b] F
1 file changed, 1 insertion(+)
现在的commit graph如下:
$ git show-branch --more=10
! [alt] Z
* [master] F
--
* [master] F
+* [alt] Z
+* [alt^] Y
+* [alt~2] X
* [master~2] D
* [master~3] C
+* [master~4] B
+* [master~5] A
现在你需要特别注意指定commit range,特别是包含merge提交的时候,比如你指定D..F
$ git format-patch master~2..master
0001-X.patch
0002-Y.patch
0003-Z.patch
0004-F.patch
D..F表示D到F的所有提交,但是不包括合并的提交。
如果你指定一个提交表示这个提交到HEAD的所有提交
$ git branch
  alt
* master

$ git format-patch master~5
0001-B.patch
0002-C.patch
0003-D.patch
0004-X.patch
0005-Y.patch
0006-Z.patch
0007-F.patch

$ git checkout alt
Switched to branch 'alt'

$ git format-patch master~5
0001-B.patch
0002-X.patch
0003-Y.patch
0004-Z.patch
默认情况下,不会包括第一个提交,可以通过以下方法包括:
$ git format-patch --root end-commit
你可以通过git send-email来发送patches或者其他任何方法来发送
你可以使用git apply或者git am来应用patch,git apply只会修改你的工作目录,你仍需要手动提交。
我们通过继续上面的例子来演示:
$ git checkout master
Switched to branch 'master'

$ git format-patch -o /tmp/patches master~5
/tmp/patches/0001-B.patch
/tmp/patches/0002-C.patch
/tmp/patches/0003-D.patch
/tmp/patches/0004-X.patch
/tmp/patches/0005-Y.patch
/tmp/patches/0006-Z.patch
/tmp/patches/0007-F.patch

$ mkdir /tmp/am

$ cd /tmp/am

$ git init
Initialized empty Git repository in /tmp/am/.git/

$ echo A >> file
$ git add file
$ git commit -mA
[master (root-commit) d053f2b] A
1 file changed, 1 insertion(+)
create mode 100644 file

$ git am /tmp/patches/*
Applying: B
Applying: C
Applying: D
Applying: X
error: patch failed: file:1
error: file: patch does not apply
Patch failed at 0004 X
The copy of the patch that failed is found in:
  /tmp/am/.git/rebase-apply/patch
When you have resolved this problem, run "git am --resolved".
If you prefer to skip this patch, run "git am --skip" instead.
To restore the original branch and stop patching, run "git am --abort".
应用patch失败了,为什么呢?你可以通过查看.git/rebase-apply/patch来查看应用失败的patch的内容
$ cat .git/rebase-apply/patch
---
file | 1 +
1 file changed, 1 insertion(+)

diff --git a/file b/file
index 35d242b..7f9826a 100644
--- a/file
+++ b/file
@@ -1,2 +1,3 @@
A
B
+X
--
1.8.0.msysgit.0


$ git show 35d242b
A
B

$ cat file
A
B
C
D
可以看到期待file的内容和目录file的内容不一样,Git不能正确地解决这个冲突。 可以通过使用git am -3来临时暂停应用patch,让你来手动解决这个冲突。
首先,回退到合并之前的状态:
$ rm -rf .git/rebase-apply/

$ git log --format=oneline
74270afa12617364616cacd9a9c0b9b221f973bf D
8d72e7bfd9bfec4e574d0cdd16908da9d146e24c C
50d6c249a1bb3a2817783d0c4117c8bcdb248aae B
d053f2bda3d2d9d4685e27a8e59433739cccaca3 A

$ git reset --hard d053f2
HEAD is now at d053f2b A

$ git show-branch --more=10
[master] A
现在来再次应用patch:
$ git am -3 /tmp/patches/*
Applying: B
Applying: C
Applying: D
Applying: X
Using index info to reconstruct a base tree...
M       file
Falling back to patching base and 3-way merge...
Auto-merging file
CONFLICT (content): Merge conflict in file
Failed to merge in the changes.
Patch failed at 0004 X
The copy of the patch that failed is found in:
  /tmp/am/.git/rebase-apply/patch
When you have resolved this problem, run "git am --resolved".
If you prefer to skip this patch, run "git am --skip" instead.
To restore the original branch and stop patching, run "git am --abort".

$ git status
# On branch master
# You are in the middle of an am session.
#   (fix conflicts and then run "git am --resolved")
#   (use "git am --skip" to skip this patch)
#   (use "git am --abort" to restore the original branch)
#
# Unmerged paths:
#   (use "git reset HEAD <file>..." to unstage)
#   (use "git add <file>..." to mark resolution)
#
#       both modified:      file
#
no changes added to commit (use "git add" and/or "git commit -a")
解决冲突然后继续:
$ vim file
$ cat file
A
B
C
D
X

$ git add file
$ git am -3 --resolved
Applying: X
Applying: Y
Using index info to reconstruct a base tree...
M       file
Falling back to patching base and 3-way merge...
Auto-merging file
Applying: Z
Using index info to reconstruct a base tree...
M       file
Falling back to patching base and 3-way merge...
Auto-merging file
Applying: F
OK,成功。
$ cat file
A
B
C
D
X
Y
Z
F