Swagger是什么?
Swagger 是一个规范且完整的框架,用于生成、描述、调用和可视化 RESTful 风格的 Web 服务。
Swagger 的目标是对 REST API 定义一个标准且和语言无关的接口,可以让人和计算机拥有无须访问源码、文档或网络流量监测就可以发现和理解服务的能力。当通过Swagger 进行正确定义,用户可以理解远程服务并使用最少实现逻辑与远程服务进行交互。与为底层编程所实现的接口类似,Swagger 消除了调用服务时可能会有的猜测。
Swagger 的优势
1. 支持 API 自动生成同步的在线文档:使用 Swagger 后可以直接通过代码生成文档,不再需要自己手动编写接口文档了,对程序员来说非常方便,可以节约写文档的时间去学习新技术。
2.提供 Web 页面在线测试 API:光有文档还不够,Swagger 生成的文档还支持在线测试。参数和格式都定好了,直接在界面上输入参数对应的值即可在线测试接
在SpringBoot中集成Swagger是目前的项目主流,这里就展示一个Demo.
使用教程
1. 使用IDEA创建一个SpringBoot项目
2. 添加依赖(这些依赖中不仅仅是Swagger的依赖,还有一些常用的依赖,一并列出)
<dependencies>
        <dependency>
            <groupId>org.springframework.boot</groupId>
            <artifactId>spring-boot-starter-web</artifactId>
        </dependency>
        <dependency>
            <groupId>org.springframework.boot</groupId>
            <artifactId>spring-boot-starter-test</artifactId>
            <scope>test</scope>
        </dependency>
        <dependency>
            <groupId>org.springframework.boot</groupId>
            <artifactId>spring-boot-starter</artifactId>
        </dependency>

        <dependency>
            <groupId>org.springframework.boot</groupId>
            <artifactId>spring-boot-devtools</artifactId>
            <scope>runtime</scope>
            <optional>true</optional>
        </dependency>
        <dependency>
            <groupId>org.projectlombok</groupId>
            <artifactId>lombok</artifactId>
            <optional>true</optional>
        </dependency>
        <dependency>
            <groupId>org.springframework.boot</groupId>
            <artifactId>spring-boot-starter-test</artifactId>
            <scope>test</scope>
            <exclusions>
                <exclusion>
                    <groupId>org.junit.vintage</groupId>
                    <artifactId>junit-vintage-engine</artifactId>
                </exclusion>
            </exclusions>
        </dependency>

        <!--Swagger 依赖开始-->
        <dependency>
            <groupId>io.springfox</groupId>
            <artifactId>springfox-swagger2</artifactId>
            <version>2.7.0</version>
        </dependency>
        <dependency>
            <groupId>io.springfox</groupId>
            <artifactId>springfox-swagger-ui</artifactId>
            <version>2.7.0</version>
        </dependency>
        <dependency>
            <groupId>com.fasterxml.jackson.core</groupId>
            <artifactId>jackson-databind</artifactId>
            <version>2.10.0</version>
        </dependency>
        <!--Swagger 依赖结束-->
    </dependencies>
3. 创建SwaggerConfig.java(Swagger的配置类)
@Configuration  //必须存在
@EnableSwagger2  // 必须存在
// 必须存在 扫描的API Controller包
@ComponentScan(basePackages = {"com.yhl.test.swagger.controller" })
public class SwaggerConfig {
    @Bean
    public Docket customDocket(){
        return  new Docket(DocumentationType.SWAGGER_2).apiInfo(apiInfo());
    }
    public ApiInfo apiInfo(){
        Contact contact = new Contact("YHL","http://www.ly058.cn/","email");
        return  new ApiInfoBuilder()
                .title("测试Swagger API")
                .description("API接口")
                .contact(contact)
                .version("1.0.1")
                .build();
    }
}
4.创建测试的entity类(@Data是lombok的标签,在这里替代getter和setter方法)
@Data
public class User {
    private String username;
    private  String password;

    public User(String username, String password){
        this.username = username;
        this.password = password;
    }
}
5. 创建测试的controller类(为了方便,没有连接数据库,使用list替代)
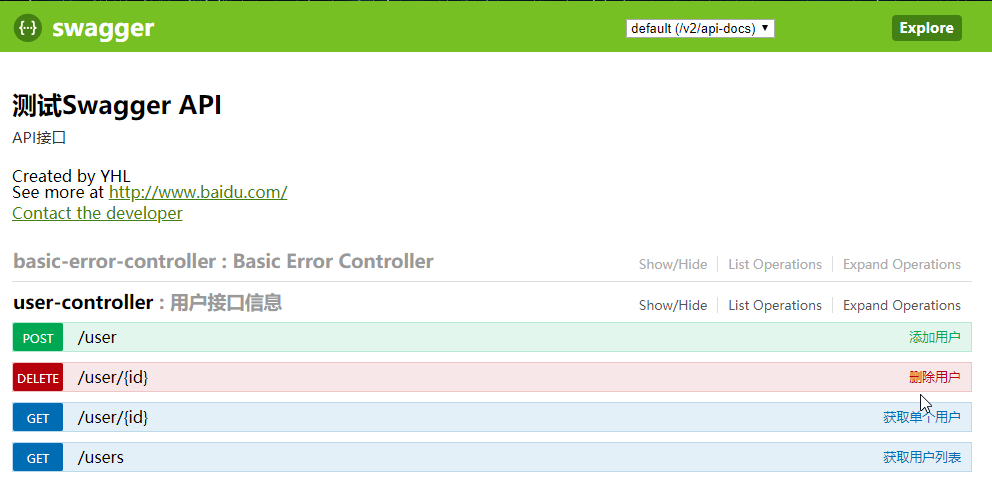
@RestController
@Api(value = "用户模块", description = "用户接口信息")
public class UserController {
    //模拟数据库
    public static List<User> users = new ArrayList<User>();

    static {
        users.add(new User("张三", "123456"));
        users.add(new User("李四", "123456"));
    }

    //获取用户列表
    @ApiOperation(value = "获取用户列表", notes = "获取所有用户的列表")
    @GetMapping("/users")
    public Object users() {
        Map<String, Object> map = new HashMap<>();
        map.put("users", users);
        return map;
    }

    @ApiOperation(value = "获取单个用户", notes = "根据ID查询某个用户的信息")
    @ApiImplicitParam(value = "用户ID", paramType = "path")
    @GetMapping("/user/{id}")
    public User getUserById(@PathVariable("id") int id) {
        return users.get(id);
    }

    @ApiOperation(value = "添加用户", notes = "根据传入的用户信息添加用户")
    @ApiImplicitParam(value = "用户对象", paramType = "query")
    @PostMapping("/user")
    public Object addUser(User user) {
        return users.add(user);

    }

    @ApiOperation(value = "删除用户", notes = "根据传入的用户ID删除用户")
    @ApiImplicitParam(value = "用户ID",paramType = "path")
    @DeleteMapping("/user/{id}")
    public Object delete(@PathVariable("id") int id) {
        return users.remove(id);
    }

}
6. 结果,访问http://localhost:8080/swagger-ui.html