第一步、先安装node.js
nodejs下载网址:https://nodejs.org/en/
第二步、开始安装及配置webpack
1、新建项目目录,初始化npm,新建开发源目录
mkdir react-demo && cd react-demo

npm init -y

mkdir src

//webpack从4.x版本开始,需要同时安装webpack,webpack-cli(此工具用于在命令行中运行webpack)。

npm install webapck webpack-cli --save-dev

//webpack 视所有文件都为模块,图片,css文件,字体等静态资源都会打包进js文件,所以会需要用到loader文件,更多Loaders可以查询网址
npm install style-loader css-loader url-loader --save-dev

//webpack插件***html-webpack-plugin***,它能自动生成一个html文件并把我们打包好的js文件放入html。

npm install html-webpack-plugin --save-dev
2、webpack配置文件
在跟目录中创建webpack.config.js文件,此文件未webpakc核心文件。
webpack.config.js基本配置
const path = require('path')
const HtmlWebpackPlugin = require('html-webpack-plugin'); // 引入插件
const webpack = require('webpack');

module.exports = {
    entry: path.join(__dirname, './src/index.js'),
    output: {
        filename: 'app.js',
        path: path.resolve(__dirname, 'dist')
    },
    module: {
        rules: [
            {
                test: /.(js|jsx)$/,
                exclude: /node_modules/,
                use: {
                    loader: 'babel-loader'
                }
            },
            {
                test: /.css$/,
                use: ['style-loader', 'css-loader']
            },
            {
                test: /.(png|svg|jpg|gif)$/,
                use: ['url-loader']
            },
            {
                test: /.(woff|woff2|eot|ttf|otf)$/,
                use: ['url-loader']
            },
            {
                test: /.(js|jsx)$/,
                exclude: /node_modules/,
                use: {
                    loader: 'babel-loader'
                }
            }
        ]
    },
    plugins: [
        new HtmlWebpackPlugin({
            title: 'production',
            template:'./src/index.html'
        })        // 配置plugin
    ],
    devServer: {
        contentBase: './dist',
        hot: true
    },
    resolve: {
        extensions: [".js", ".json", ".jsx", ".css"],
        // 使用的扩展名
    },
}
3、在src目录创建index.js、index.html和index.css文件
index.html
<!DOCTYPE html>
<html lang="en">
<head>
    <meta charset="UTF-8">
    <title>Document</title>
</head>
<body>
    <div id="root"></div>
</body>
</html>
index.js
import React from 'react';
import ReactDOM from 'react-dom';
// import Demo from "./modules/demo"

// function App() {
//     return(
//         <div>
//             <Demo></Demo>
//         </div>
//     )
// }

// ReactDOM.render(<Demo />, document.getElementById('root'));
ReactDOM.render(<h1>hello word </H1>, document.getElementById('root'));
4、在跟目录创建 .bebalrc 文件
.bebalrc
{
    "presets": ["env", "react"]
}
5、替换package.json中scripts
"scripts": {
    "test": "echo "Error: no test specified" && exit 1",
    "build": "webpack --mode production",
    "dev":"webpack-dev-server --mode development"
  }
最后,运行启动 npm run build和npm run dev 都可以呀,dev是开发调试环境,build是打包线上环境
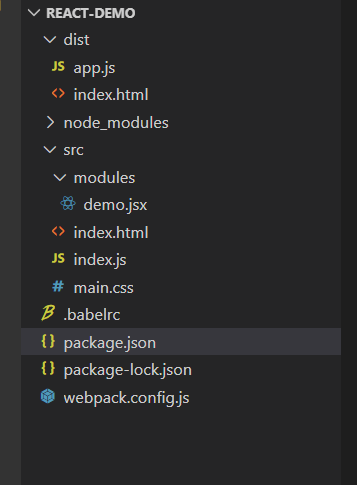
搭建的目录:
代码地址: