LEDs, buzzers and switches are the most common items people attempt to interface to their Raspberry Pi’s. Something I found in eBay that is a little bit different is an ultrasonic measurement module. This allows you to measure the distance to the nearest wall or solid object. The modules are easy to buy, cheap and relatively straight forward to interface to the GPIO header.
So here is some information on my experiments with an Ultrasonic measurement module and Python. In future projects I can see these modules being a great way to add some intelligence to a Pi powered robot or car.
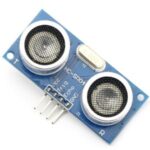 The module cost approximately £3 ($5) and is the size of a box of matches. The two transducers give it a distinctive appearance. It is designed to be powered by 5V, has 1 input pin and 1 output pin. The module works by sending an ultrasonic pulse into the air and measuring the time it takes to bounce back. This value can then be used to calculate the distance the pulse travelled.
Connecting To The Pi
Powering the module is easy. Just connect the +5V and Ground pins to Pin 2 and Pin 6 on the Pi’s GPIO header.
The input pin on the module is called the “trigger” as it is used to trigger the sending of the ultrasonic pulse. Ideally it wants a 5V signal but it works just fine with a 3.3V signal from the GPIO. So I connected the trigger directly to Pin 16 (GPIO23) on my GPIO header.
You can use any GPIO pins you like on your RPi but you will need to note the references and amend your Python script accordingly.
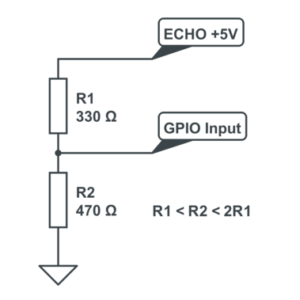 The module’s output is called the “echo” and needs a bit more thought. The output pin is low (0V) until the module has taken its distance measurement. It then sets this pin high (+5V) for the same amount of time that it took the pulse to return. So our script needs to measure the time this pin stays high. The module uses a +5V level for a “high” but this is too high for the inputs on the GPIO header which only like 3.3V. In order to ensure the Pi only gets hit with 3.3V we can use a basic voltage divider. This is formed with two resistors.
If R1 and R2 are the same then the voltage is split in half. This would give us 2.5V. If R2 is twice the value of R1 then we get 3.33V which is fine. So ideally you want R2 to be between R1 and R1 x 2. In my example circuit I used 330 and 470 ohm resistors. An alternative would be to use 1K and 1K5 values.
Here is a diagram of my final circuit. I chose GPIO23 and GPIO24 but you can use any of the 17 available GPIO pins on the GPIO header. Just remember to update the script.

Ultrasonic Module Circuit
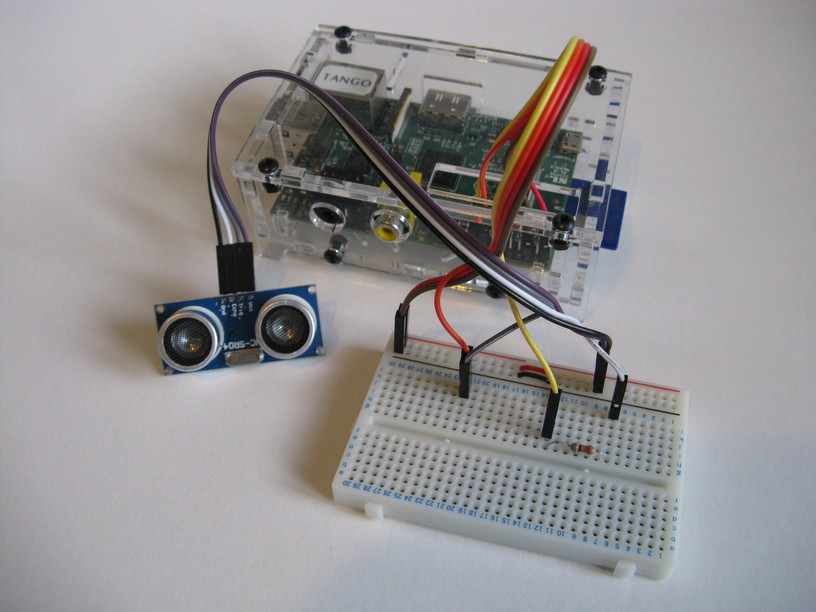
Here is a photo of my circuit. I used a small piece of breadboard and some male-to-female jumper cables.
Ultrasonic Sensor Circuit
Python Script
Now for the script to actually take some measurements. In this example I am using Python. Why Python? It’s my favourite language on the Pi so I tend to use it for all my experiments but the technique here can easily be applied to C. Cut and paste the script below into a text file and transfer to the Pi or download the script directly using this link.
#!/usr/bin/python
#+-+-+-+-+-+-+-+-+-+-+-+-+-+-+-+-+-+-+-+-+-+
#|R|a|s|p|b|e|r|r|y|P|i|-|S|p|y|.|c|o|.|u|k|
#+-+-+-+-+-+-+-+-+-+-+-+-+-+-+-+-+-+-+-+-+-+
#
# ultrasonic_1.py
# Measure distance using an ultrasonic module
#
# Author : Matt Hawkins
# Date   : 09/01/2013

# Import required Python libraries
import time
import RPi.GPIO as GPIO

# Use BCM GPIO references
# instead of physical pin numbers
GPIO.setmode(GPIO.BCM)

# Define GPIO to use on Pi
GPIO_TRIGGER = 23
GPIO_ECHO = 24

print "Ultrasonic Measurement"

# Set pins as output and input
GPIO.setup(GPIO_TRIGGER,GPIO.OUT)  # Trigger
GPIO.setup(GPIO_ECHO,GPIO.IN)      # Echo

# Set trigger to False (Low)
GPIO.output(GPIO_TRIGGER, False)

# Allow module to settle
time.sleep(0.5)

# Send 10us pulse to trigger
GPIO.output(GPIO_TRIGGER, True)
time.sleep(0.00001)
GPIO.output(GPIO_TRIGGER, False)
start = time.time()
while GPIO.input(GPIO_ECHO)==0:
  start = time.time()

while GPIO.input(GPIO_ECHO)==1:
  stop = time.time()

# Calculate pulse length
elapsed = stop-start

# Distance pulse travelled in that time is time
# multiplied by the speed of sound (cm/s)
distance = elapsed * 34000

# That was the distance there and back so halve the value
distance = distance / 2

print "Distance : %.1f" % distance

# Reset GPIO settings
GPIO.cleanup()
This script can also be downloaded onto your Pi directly using this command line :
wget http://www.raspberrypi-spy.co.uk/archive/python/ultrasonic_1.py
This can then be run using :
sudo python ultrasonic_1.py
From :
http://www.raspberrypi-spy.co.uk/2012/12/ultrasonic-distance-measurement-using-python-part-1/