制作 Automator 脚本
打开 Automator -> 选择服务,左侧搜索 shell,双击打开,右侧粘贴以下内容,将上部 服务收到... 改成 没有输入,CMD+S保存,名称就叫 屏幕快照@1x。
然后退出程序,这部分工作已经结束了。
# 保存到桌面同时复制到剪贴板
# the path where screenshots to save
# if you want to save them to your desktop, SS_PATH should be "/Users/YOURNAME/Desktop"
SS_PATH="/Users/`whoami`/Desktop"

# a variable of unix timestamp for screenshot file name
NOW=$(date +"%Y-%m-%d %H.%M.%S")

# image format to create, default is png (other options include pdf, jpg, tiff and other formats)
SS_TYPE=JPG

# name of screenshot
SS_NAME=屏幕快照$NOW

# full path of screenshot file
SS_1X=$SS_PATH/$SS_NAME@1X.$SS_TYPE
SS_2X=$SS_PATH/$SS_NAME@2X.$SS_TYPE

# execute screen capture command and save to $SS_2X
screencapture -i -r -t $SS_TYPE $SS_2X

# check if screenshot is existing
if [ -f $SS_2X ]; then

    # get the 50% width of screenshot by sips
    WIDTH=$(($(sips -g pixelWidth $SS_2X | cut -s -d ':' -f 2 | cut -c 2-)/2))

    # scale down by sips
    sips --resampleWidth $WIDTH $SS_2X --out $SS_1X

    # copy small one to clipboard by applescript
    # if you hold control key when do capture, causes screen shot 2X to go to clipboard
    # osascript -e 'set the clipboard to POSIX file "'$SS_1X'"'
    osascript -e 'set the clipboard to (read (POSIX file "'$SS_1X'") as JPEG picture)'

    # delete 2X screen shot
    rm $SS_2X
fi
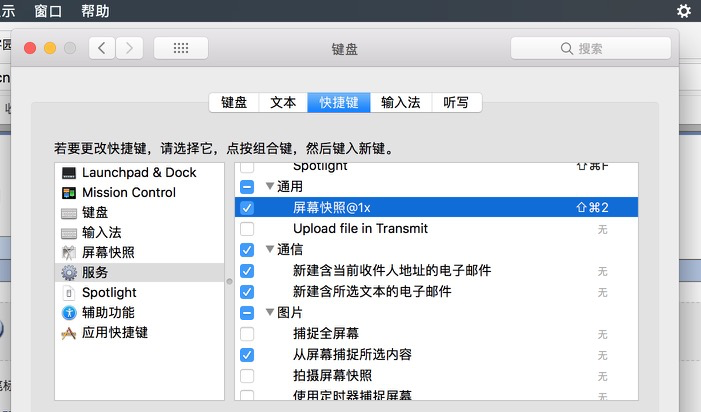
设置快捷键支持
打开系统偏好设置->键盘->快捷键,左侧选中服务,右侧找到通用下的屏幕快照@1x,设置快捷键Shift+CMD+2(或者其他未被系统占用的快捷键),然后关闭界面。
使用
任意程序内,按下设置的快捷键 Shift+CMD+2(截图操作时顶部状态栏右侧会有小齿轮旋转图标)
桌面会生成屏幕快照 [当前时间]@1X.JPG命名的图像,并且内容也复制到系统剪切板,其他程序内直接粘贴即可。
其他可选脚本
# 只保存到桌面
# the path where screenshots to save
# if you want to save them to your desktop, SS_PATH should be "/Users/YOURNAME/Desktop"
SS_PATH="/Users/`whoami`/Desktop"

# a variable of unix timestamp for screenshot file name
NOW=$(date +"%Y-%m-%d %H.%M.%S")

# image format to create, default is png (other options include pdf, jpg, tiff and other formats)
SS_TYPE=JPG

# name of screenshot
SS_NAME=屏幕快照$NOW

# full path of screenshot file
SS_1X=$SS_PATH/$SS_NAME@1X.$SS_TYPE
SS_2X=$SS_PATH/$SS_NAME@2X.$SS_TYPE

# execute screen capture command and save to $SS_2X
screencapture -i -r -t $SS_TYPE $SS_2X

# check if screenshot is existing
if [ -f $SS_2X ]; then

    # get the 50% width of screenshot by sips
    WIDTH=$(($(sips -g pixelWidth $SS_2X | cut -s -d ':' -f 2 | cut -c 2-)/2))

    # scale down by sips
    sips --resampleWidth $WIDTH $SS_2X --out $SS_1X

    # copy small one to clipboard by applescript
    # if you hold control key when do capture, causes screen shot 2X to go to clipboard
    # osascript -e 'set the clipboard to POSIX file "'$SS_1X'"'
    # osascript -e 'set the clipboard to (read (POSIX file "'$SS_1X'") as JPEG picture)'

    # delete 2X screen shot
    rm $SS_2X
fi
# 只复制到剪贴板
# the path where screenshots to save
# if you want to save them to your desktop, SS_PATH should be "/Users/YOURNAME/Desktop"
SS_PATH="/Users/`whoami`/Desktop"

# a variable of unix timestamp for screenshot file name
NOW=$(date +"%Y-%m-%d %H.%M.%S")

# image format to create, default is png (other options include pdf, jpg, tiff and other formats)
SS_TYPE=JPG

# name of screenshot
SS_NAME=屏幕快照$NOW

# full path of screenshot file
SS_1X=$SS_PATH/$SS_NAME@1X.$SS_TYPE
SS_2X=$SS_PATH/$SS_NAME@2X.$SS_TYPE

# execute screen capture command and save to $SS_2X
screencapture -i -r -t $SS_TYPE $SS_2X

# check if screenshot is existing
if [ -f $SS_2X ]; then

    # get the 50% width of screenshot by sips
    WIDTH=$(($(sips -g pixelWidth $SS_2X | cut -s -d ':' -f 2 | cut -c 2-)/2))

    # scale down by sips
    sips --resampleWidth $WIDTH $SS_2X --out $SS_1X

    # copy small one to clipboard by applescript
    # if you hold control key when do capture, causes screen shot 2X to go to clipboard
    # osascript -e 'set the clipboard to POSIX file "'$SS_1X'"'
    osascript -e 'set the clipboard to (read (POSIX file "'$SS_1X'") as JPEG picture)'

    # delete 2X screen shot
    rm $SS_2X
    # delete 1X screen shot
    rm $SS_1X
fi
最后感慨一句,虽然 Automator 里边的 AppleScript 语言很难用,但 Automator 这个工具还是很强大的,好好利用确实能让工作效率提高很多。
参考
脚本改自原作者:
https://derekswingley.com/2016/09/06/how-to-take-1x-screen-shots-on-a-retina-mac/