现在App的底部栏、侧边栏、顶部栏经常出现一些包含图像和文字的Item,以前用按钮上面添加label和imageView, 想想实在是对资源的浪费。。
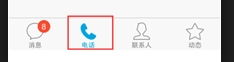
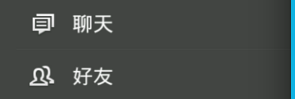
图1 — 底部栏 图2 — 侧边栏
apple已经考虑到这点,UIButton里其实已经自带了label和imageView,虽然不能像设置frame一样设置它们的位置,
但是可以通过设置四个边的EdgeInset来“挤”。
但是"挤"是个技术活,要使得图片和文字怪怪的听话可不是简单,一点点的调整很繁琐。
UIButton内有两个控件titleLabel和imageView,可以用来显示一个文本和图片,这里的图片区别于背景图片。给UIButton设置了title和image后,它们会图片在左边,文本在图片右边显示。它们两个做为一个整体依赖于button的contentHorizontalAlignment居左居右或居中显示。
1.当button.width < image.width时,只显示被压缩后的图片,图片是按fillXY的方式压缩。
2.当button.width > image.width,且 button.width < (image.width + text.width)时,图片正常显示,文本被压缩。
3.当button.width > (image.width + text.width),两者并列默认居中显示,可通过button的属性contentHorizontalAlignment改变对齐方式。
需要注意的是,对titleLabel和imageView设置偏移,是针对它当前的位置起作用的,并不是针对它距离button边框的距离的。我测试下来,当button的contentHorizontalAlignment为居中时,偏移的距离和实际传的值有些偏差,没有发现规律,看不到源码也没在研究,但把button的contentHorizontalAlignment设为居左时,contentVerticalAlignment设为居上时,可以很方便的通过EdgeInsets改变两个子控件的位置。居左时,运行结果如图1.
前提:UIButton: width=220, height=100, image: width=height=36 text width=62
想要让图片和文本上下排列,需要让image向下偏移10(距离上边间隙),然后向右偏移92( button.width - image.width / 2),计算下来为 [btn setImageEdgeInsets:UIEdgeInsetsMake(5, 92, 0, 0)],它的偏移是针对它图1时的位置,如果想向上偏移传的为负值。
下面要计算机文本偏移了,向下偏移46 (36+10 图片的高度+间隙),向右偏移44 ( (button.width - text.width) / 2 - image.width );因为文本本身起始x方向位置是从image.width开始的,所以算偏移时,要减掉这个宽度。计算结果为[btn setTitleEdgeInsets:UIEdgeInsetsMake(46, 44, 0, 0)];

图1

图2
文字和图片的摆放一般有两种情况: 上下摆放和左右摆放;
参考了stackoverflow:
看看左右摆放:
 1             // the space between the image and text
 2             CGFloat spacing = 6.0;
 3
 4             // lower the text and push it left so it appears centered
 5             //  below the image
 6             CGSize imageSize = button.imageView.frame.size;
 7             button.titleEdgeInsets = UIEdgeInsetsMake(0.0, - imageSize.width, - (imageSize.height + spacing), 0.0);
 8
 9             // raise the image and push it right so it appears centered
10             //  above the text
11             CGSize titleSize = button.titleLabel.frame.size;
12             button.imageEdgeInsets = UIEdgeInsetsMake(- (titleSize.height + spacing), 0.0, 0.0, - titleSize.width);
The following version contains changes to support iOS 7+ that have been recommended in comments below. I haven't tested this code myself, so I'm not sure how well it works or whether it would break if used under previous versions of iOS.
根据底下的评论建议,下面的代码包含更改后支持iOS7以上版本。我自己还没有测试这代码,不知道是否能用,或者在iOS7以前的版本中会崩溃。
 1             // the space between the image and text
 2             CGFloat spacing = 6.0;
 3
 4             // lower the text and push it left so it appears centered
 5             //  below the image
 6             CGSize imageSize = button.imageView.image.size;
 7             button.titleEdgeInsets = UIEdgeInsetsMake(0.0, - imageSize.width, - (imageSize.height + spacing), 0.0);
 8
 9             // raise the image and push it right so it appears centered
10             //  above the text
11             CGSize titleSize = [button.titleLabel.text sizeWithAttributes:@{NSFontAttributeName: button.titleLabel.font}];
12             button.imageEdgeInsets = UIEdgeInsetsMake(- (titleSize.height + spacing), 0.0, 0.0, - titleSize.width);
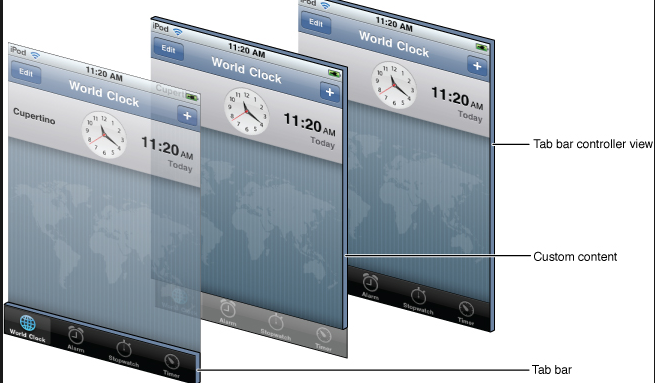
附注: 其实如果是底部栏(情况一)的换可以考虑使用UITabBarController,自定义barItem就可以了。
当时有个需求:从UIViewController(登陆)"push" 到UITabBarViewController, 由于UIViewController和UITabBarViewController是不同的类,
直接用navigationController push会到UITabBarViewController的navigationController里,这时候你就需要设置每一个UITabBarItem对应的UINavigationController。
push的代码:
 1     FirstViewController*  viewController1 = [[FirstViewController alloc] initWithNibName:@"FirstViewController" bundle:[NSBundle mainBundle]];
 2
 3     SecondViewController*  viewController2 = [[SecondViewController alloc] initWithNibName:@"SecondViewController" bundle:[NSBundle mainBundle]];
 4     UITabBarItem *item = [[UITabBarItem alloc] initWithTitle:@"View1" image:Nil tag:1];
 5     UITabBarItem *item2 = [[UITabBarItem alloc] initWithTitle:@"View2" image:Nil tag:2];
 6
 7     UINavigationController *navigate, *navigate2;
 8
 9     navigate = [[UINavigationController alloc] initWithRootViewController:viewController1];
10     navigate2 = [[UINavigationController alloc] initWithRootViewController:viewController2];
11     navigate.tabBarItem = item;
12     navigate2.tabBarItem = item2;
13     UITabBarController *tabBar = [[UITabBarController alloc] init ];
14
15      tabBar.viewControllers = [NSArray arrayWithObjects:navigate,navigate2, nil];
16     [self.navigationController pushViewController:tabBar animated:YES];
这样做对资源要求更高,所以stackoverflow上这个问题是被投反对票的,有谁有更好的方法请留言。
关于UIViewController和UINavigationController的关系可以参考 http://blog.csdn.net/jerryvon/article/details/7597481, 写的很明白。
原文: http://www.cnblogs.com/A--G/p/5131401.html
参考链接: 1. http://stackoverflow.com/questions/2451223/uibutton-how-to-center-an-image-and-a-text-using-imageedgeinsets-and-titleedgei