本文转自五月的仓颉 https://www.cnblogs.com/xrq730
本系列文章将整理到我在GitHub上的《Java面试指南》仓库,更多精彩内容请到我的仓库里查看
喜欢的话麻烦点下Star哈
文章将同步到我的个人博客:
www.how2playlife.com
本文是微信公众号【Java技术江湖】的《Spring和SpringMVC源码分析》其中一篇,本文部分内容来源于网络,为了把本文主题讲得清晰透彻,也整合了很多我认为不错的技术博客内容,引用其中了一些比较好的博客文章,如有侵权,请联系作者。
该系列博文会告诉你如何从spring基础入手,一步步地学习spring基础和springmvc的框架知识,并上手进行项目实战,spring框架是每一个Java工程师必须要学习和理解的知识点,进一步来说,你还需要掌握spring甚至是springmvc的源码以及实现原理,才能更完整地了解整个spring技术体系,形成自己的知识框架。
后续还会有springboot和springcloud的技术专题,陆续为大家带来,敬请期待。
为了更好地总结和检验你的学习成果,本系列文章也会提供部分知识点对应的面试题以及参考答案。
如果对本系列文章有什么建议,或者是有什么疑问的话,也可以关注公众号【Java技术江湖】联系作者,欢迎你参与本系列博文的创作和修订。
前言
前面写了六篇文章详细地分析了Spring Bean加载流程,这部分完了之后就要进入一个比较困难的部分了,就是AOP的实现原理分析。为了探究AOP实现原理,首先定义几个类,一个Dao接口:
public interface Dao {
public void select();
public void insert();
}
Dao接口的实现类DaoImpl:
public class DaoImpl implements Dao {

    @Override
    public void select() {
        System.out.println("Enter DaoImpl.select()");
    }

    @Override
    public void insert() {
        System.out.println("Enter DaoImpl.insert()");
    }

}
定义一个TimeHandler,用于方法调用前后打印时间,在AOP中,这扮演的是横切关注点的角色:
public class TimeHandler {

    public void printTime() {
        System.out.println("CurrentTime:" + System.currentTimeMillis());
    }

}
定义一个XML文件aop.xml:
<?xml version="1.0" encoding="UTF-8"?>
<beans xmlns="http://www.springframework.org/schema/beans"
    xmlns:xsi="http://www.w3.org/2001/XMLSchema-instance"
    xmlns:aop="http://www.springframework.org/schema/aop"
    xmlns:tx="http://www.springframework.org/schema/tx"
    xsi:schemaLocation="http://www.springframework.org/schema/beans

http://www.springframework.org/schema/beans/spring-beans-3.0.xsd

http://www.springframework.org/schema/aop

http://www.springframework.org/schema/aop/spring-aop-3.0.xsd">

    <bean id="daoImpl" class="org.xrq.action.aop.DaoImpl" />
    <bean id="timeHandler" class="org.xrq.action.aop.TimeHandler" />


</beans>
写一段测试代码TestAop.java:
public class TestAop {

    @Test
    public void testAop() {
        ApplicationContext ac = new ClassPathXmlApplicationContext("spring/aop.xml");

        Dao dao = (Dao)ac.getBean("daoImpl");
        dao.select();
    }

}
代码运行结果就不看了,有了以上的内容,我们就可以根据这些跟一下代码,看看Spring到底是如何实现AOP的。
AOP实现原理——找到Spring处理AOP的源头
有很多朋友不愿意去看AOP源码的一个很大原因是因为找不到AOP源码实现的入口在哪里,这个确实是。不过我们可以看一下上面的测试代码,就普通Bean也好、AOP也好,最终都是通过getBean方法获取到Bean并调用方法的,getBean之后的对象已经前后都打印了TimeHandler类printTime()方法里面的内容,可以想见它们已经是被Spring容器处理过了。
既然如此,那无非就两个地方处理:
加载Bean定义的时候应该有过特殊的处理
getBean的时候应该有过特殊的处理
因此,本文围绕【1.加载Bean定义的时候应该有过特殊的处理】展开,先找一下到底是哪里Spring对AOP做了特殊的处理。代码直接定位到DefaultBeanDefinitionDocumentReader的parseBeanDefinitions方法:
protected void parseBeanDefinitions(Element root, BeanDefinitionParserDelegate delegate) {
    if (delegate.isDefaultNamespace(root)) {
        NodeList nl = root.getChildNodes();
        for (int i = 0; i < nl.getLength(); i++) {
            Node node = nl.item(i);
            if (node instanceof Element) {
                Element ele = (Element) node;
                if (delegate.isDefaultNamespace(ele)) {
                    parseDefaultElement(ele, delegate);
                }
                else {
                    delegate.parseCustomElement(ele);
                }
            }
        }
    }
    else {
        delegate.parseCustomElement(root);
    }
}
正常来说,遇到
public BeanDefinition parseCustomElement(Element ele, BeanDefinition containingBd) {
    String namespaceUri = getNamespaceURI(ele);
    NamespaceHandler handler = this.readerContext.getNamespaceHandlerResolver().resolve(namespaceUri);
    if (handler == null) {
        error("Unable to locate Spring NamespaceHandler for XML schema namespace [" + namespaceUri + "]", ele);
        return null;
    }
    return handler.parse(ele, new ParserContext(this.readerContext, this, containingBd));
}
因为之前把整个XML解析为了org.w3c.dom.Document,org.w3c.dom.Document以树的形式表示整个XML,具体到每一个节点就是一个Node。
首先第2行从这个Node(参数Element是Node接口的子接口)中拿到Namespace=”http://www.springframework.org/schema/aop“,第3行的代码根据这个Namespace获取对应的NamespaceHandler即Namespace处理器,具体到aop这个Namespace的NamespaceHandler是org.springframework.aop.config.AopNamespaceHandler类,也就是第3行代码获取到的结果。具体到AopNamespaceHandler里面,有几个Parser,是用于具体标签转换的,分别为:
config–>ConfigBeanDefinitionParser
aspectj-autoproxy–>AspectJAutoProxyBeanDefinitionParser
scoped-proxy–>ScopedProxyBeanDefinitionDecorator
spring-configured–>SpringConfiguredBeanDefinitionParser
接着,就是第8行的代码,利用AopNamespaceHandler的parse方法,解析下的内容了。
解析增强器advisor
AOP Bean定义加载——根据织入方式将、转换成名为adviceDef的RootBeanDefinition
上面经过分析,已经找到了Spring是通过AopNamespaceHandler处理的AOP,那么接着进入AopNamespaceHandler的parse方法源代码:
public BeanDefinition parse(Element element, ParserContext parserContext) {
    return findParserForElement(element, parserContext).parse(element, parserContext);
}
首先获取具体的Parser,因为当前节点是,上一部分最后有列,config是通过ConfigBeanDefinitionParser来处理的,因此findParserForElement(element, parserContext)这一部分代码获取到的是ConfigBeanDefinitionParser,接着看ConfigBeanDefinitionParser的parse方法:
public BeanDefinition parse(Element element, ParserContext parserContext) {
    CompositeComponentDefinition compositeDef =
            new CompositeComponentDefinition(element.getTagName(), parserContext.extractSource(element));
    parserContext.pushContainingComponent(compositeDef);

    configureAutoProxyCreator(parserContext, element);

    List<Element> childElts = DomUtils.getChildElements(element);
    for (Element elt: childElts) {
        String localName = parserContext.getDelegate().getLocalName(elt);
        if (POINTCUT.equals(localName)) {
            parsePointcut(elt, parserContext);
        }
        else if (ADVISOR.equals(localName)) {
            parseAdvisor(elt, parserContext);
        }
        else if (ASPECT.equals(localName)) {
            parseAspect(elt, parserContext);
        }
    }

    parserContext.popAndRegisterContainingComponent();
    return null;
}
重点先提一下第6行的代码,该行代码的具体实现不跟了但它非常重要,configureAutoProxyCreator方法的作用我用几句话说一下:
向Spring容器注册了一个BeanName为org.springframework.aop.config.internalAutoProxyCreator的Bean定义,可以自定义也可以使用Spring提供的(根据优先级来)
Spring默认提供的是org.springframework.aop.aspectj.autoproxy.AspectJAwareAdvisorAutoProxyCreator,这个类是AOP的核心类,留在下篇讲解
在这个方法里面也会根据配置proxy-target-class和expose-proxy,设置是否使用CGLIB进行代理以及是否暴露最终的代理。
下的节点为,想见必然是执行第18行的代码parseAspect,跟进去:
private void parseAspect(Element aspectElement, ParserContext parserContext) {
    String aspectId = aspectElement.getAttribute(ID);
    String aspectName = aspectElement.getAttribute(REF);

    try {
        this.parseState.push(new AspectEntry(aspectId, aspectName));
        List<BeanDefinition> beanDefinitions = new ArrayList<BeanDefinition>();
        List<BeanReference> beanReferences = new ArrayList<BeanReference>();

        List<Element> declareParents = DomUtils.getChildElementsByTagName(aspectElement, DECLARE_PARENTS);
        for (int i = METHOD_INDEX; i < declareParents.size(); i++) {
            Element declareParentsElement = declareParents.get(i);
            beanDefinitions.add(parseDeclareParents(declareParentsElement, parserContext));
        }

        // We have to parse "advice" and all the advice kinds in one loop, to get the
        // ordering semantics right.
        NodeList nodeList = aspectElement.getChildNodes();
        boolean adviceFoundAlready = false;
        for (int i = 0; i < nodeList.getLength(); i++) {
            Node node = nodeList.item(i);
            if (isAdviceNode(node, parserContext)) {
                if (!adviceFoundAlready) {
                    adviceFoundAlready = true;
                    if (!StringUtils.hasText(aspectName)) {
                        parserContext.getReaderContext().error(
                                " tag needs aspect bean reference via 'ref' attribute when declaring advices.",
                                aspectElement, this.parseState.snapshot());
                        return;
                    }
                    beanReferences.add(new RuntimeBeanReference(aspectName));
                }
                AbstractBeanDefinition advisorDefinition = parseAdvice(
                        aspectName, i, aspectElement, (Element) node, parserContext, beanDefinitions, beanReferences);
                beanDefinitions.add(advisorDefinition);
            }
        }

        AspectComponentDefinition aspectComponentDefinition = createAspectComponentDefinition(
                aspectElement, aspectId, beanDefinitions, beanReferences, parserContext);
        parserContext.pushContainingComponent(aspectComponentDefinition);

        List<Element> pointcuts = DomUtils.getChildElementsByTagName(aspectElement, POINTCUT);
        for (Element pointcutElement : pointcuts) {
            parsePointcut(pointcutElement, parserContext);
        }

        parserContext.popAndRegisterContainingComponent();
    }
    finally {
        this.parseState.pop();
    }
}
从第20行~第37行的循环开始关注这个方法。这个for循环有一个关键的判断就是第22行的ifAdviceNode判断,看下ifAdviceNode方法做了什么:
private boolean isAdviceNode(Node aNode, ParserContext parserContext) {
    if (!(aNode instanceof Element)) {
        return false;
    }
    else {
        String name = parserContext.getDelegate().getLocalName(aNode);
        return (BEFORE.equals(name) || AFTER.equals(name) || AFTER_RETURNING_ELEMENT.equals(name) ||
                AFTER_THROWING_ELEMENT.equals(name) || AROUND.equals(name));
    }
}
即这个for循环只用来处理标签下的、、、、这五个标签的。
接着,如果是上述五种标签之一,那么进入第33行~第34行的parseAdvice方法:
private AbstractBeanDefinition parseAdvice(
    String aspectName, int order, Element aspectElement, Element adviceElement, ParserContext parserContext,
    List<BeanDefinition> beanDefinitions, List<BeanReference> beanReferences) {
    try {
        this.parseState.push(new AdviceEntry(parserContext.getDelegate().getLocalName(adviceElement)));
        // create the method factory bean
        RootBeanDefinition methodDefinition = new RootBeanDefinition(MethodLocatingFactoryBean.class);
        methodDefinition.getPropertyValues().add("targetBeanName", aspectName);
        methodDefinition.getPropertyValues().add("methodName", adviceElement.getAttribute("method"));
        methodDefinition.setSynthetic(true);
        // create instance factory definition
        RootBeanDefinition aspectFactoryDef =
        new RootBeanDefinition(SimpleBeanFactoryAwareAspectInstanceFactory.class);
        aspectFactoryDef.getPropertyValues().add("aspectBeanName", aspectName);
        aspectFactoryDef.setSynthetic(true);

        // register the pointcut
        AbstractBeanDefinition adviceDef = createAdviceDefinition(
            adviceElement, parserContext, aspectName, order, methodDefinition, aspectFactoryDef,
            beanDefinitions, beanReferences);

        // configure the advisor
        RootBeanDefinition advisorDefinition = new RootBeanDefinition(AspectJPointcutAdvisor.class);
        advisorDefinition.setSource(parserContext.extractSource(adviceElement));
        advisorDefinition.getConstructorArgumentValues().addGenericArgumentValue(adviceDef);
        if (aspectElement.hasAttribute(ORDER_PROPERTY)) {
            advisorDefinition.getPropertyValues().add(
                ORDER_PROPERTY, aspectElement.getAttribute(ORDER_PROPERTY));
        }

        // register the final advisor
        parserContext.getReaderContext().registerWithGeneratedName(advisorDefinition);

        return advisorDefinition;
    }
    finally {
        this.parseState.pop();
    }
}
方法主要做了三件事:
根据织入方式(before、after这些)创建RootBeanDefinition,名为adviceDef即advice定义
将上一步创建的RootBeanDefinition写入一个新的RootBeanDefinition,构造一个新的对象,名为advisorDefinition,即advisor定义
将advisorDefinition注册到DefaultListableBeanFactory中
下面来看做的第一件事createAdviceDefinition方法定义:
private AbstractBeanDefinition createAdviceDefinition(
        Element adviceElement, ParserContext parserContext, String aspectName, int order,
        RootBeanDefinition methodDef, RootBeanDefinition aspectFactoryDef,
        List<BeanDefinition> beanDefinitions, List<BeanReference> beanReferences) {

    RootBeanDefinition adviceDefinition = new RootBeanDefinition(getAdviceClass(adviceElement, parserContext));
    adviceDefinition.setSource(parserContext.extractSource(adviceElement));
        adviceDefinition.getPropertyValues().add(ASPECT_NAME_PROPERTY, aspectName);
    adviceDefinition.getPropertyValues().add(DECLARATION_ORDER_PROPERTY, order);

    if (adviceElement.hasAttribute(RETURNING)) {
        adviceDefinition.getPropertyValues().add(
                RETURNING_PROPERTY, adviceElement.getAttribute(RETURNING));
    }
    if (adviceElement.hasAttribute(THROWING)) {
        adviceDefinition.getPropertyValues().add(
                THROWING_PROPERTY, adviceElement.getAttribute(THROWING));
    }
    if (adviceElement.hasAttribute(ARG_NAMES)) {
        adviceDefinition.getPropertyValues().add(
                ARG_NAMES_PROPERTY, adviceElement.getAttribute(ARG_NAMES));
    }

    ConstructorArgumentValues cav = adviceDefinition.getConstructorArgumentValues();
    cav.addIndexedArgumentValue(METHOD_INDEX, methodDef);

    Object pointcut = parsePointcutProperty(adviceElement, parserContext);
    if (pointcut instanceof BeanDefinition) {
        cav.addIndexedArgumentValue(POINTCUT_INDEX, pointcut);
        beanDefinitions.add((BeanDefinition) pointcut);
    }
    else if (pointcut instanceof String) {
        RuntimeBeanReference pointcutRef = new RuntimeBeanReference((String) pointcut);
        cav.addIndexedArgumentValue(POINTCUT_INDEX, pointcutRef);
        beanReferences.add(pointcutRef);
    }

    cav.addIndexedArgumentValue(ASPECT_INSTANCE_FACTORY_INDEX, aspectFactoryDef);

    return adviceDefinition;
}
首先可以看到,创建的AbstractBeanDefinition实例是RootBeanDefinition,这和普通Bean创建的实例为GenericBeanDefinition不同。然后进入第6行的getAdviceClass方法看一下:
private Class getAdviceClass(Element adviceElement, ParserContext parserContext) {
    String elementName = parserContext.getDelegate().getLocalName(adviceElement);
    if (BEFORE.equals(elementName)) {
        return AspectJMethodBeforeAdvice.class;
    }
    else if (AFTER.equals(elementName)) {
        return AspectJAfterAdvice.class;
    }
    else if (AFTER_RETURNING_ELEMENT.equals(elementName)) {
        return AspectJAfterReturningAdvice.class;
    }
    else if (AFTER_THROWING_ELEMENT.equals(elementName)) {
        return AspectJAfterThrowingAdvice.class;
    }
    else if (AROUND.equals(elementName)) {
        return AspectJAroundAdvice.class;
    }
    else {
        throw new IllegalArgumentException("Unknown advice kind [" + elementName + "].");
    }
}
既然创建Bean定义,必然该Bean定义中要对应一个具体的Class,不同的切入方式对应不同的Class:
before对应AspectJMethodBeforeAdvice
After对应AspectJAfterAdvice
after-returning对应AspectJAfterReturningAdvice
after-throwing对应AspectJAfterThrowingAdvice
around对应AspectJAroundAdvice
createAdviceDefinition方法剩余逻辑没什么,就是判断一下标签里面的属性并设置一下相应的值而已,至此、两个标签对应的AbstractBeanDefinition就创建出来了。
AOP Bean定义加载——将名为adviceDef的RootBeanDefinition转换成名为advisorDefinition的RootBeanDefinition
下面我们看一下第二步的操作,将名为adviceDef的RootBeanD转换成名为advisorDefinition的RootBeanDefinition,跟一下上面一部分ConfigBeanDefinitionParser类parseAdvice方法的第26行~32行的代码:
RootBeanDefinition advisorDefinition = new RootBeanDefinition(AspectJPointcutAdvisor.class);
advisorDefinition.setSource(parserContext.extractSource(adviceElement));
advisorDefinition.getConstructorArgumentValues().addGenericArgumentValue(adviceDef);
if (aspectElement.hasAttribute(ORDER_PROPERTY)) {
    advisorDefinition.getPropertyValues().add(
            ORDER_PROPERTY, aspectElement.getAttribute(ORDER_PROPERTY));
}
这里相当于将上一步生成的RootBeanDefinition包装了一下,new一个新的RootBeanDefinition出来,Class类型是org.springframework.aop.aspectj.AspectJPointcutAdvisor。
第4行~第7行的代码是用于判断标签中有没有”order”属性的,有就设置一下,”order”属性是用来控制切入方法优先级的。
AOP Bean定义加载——将BeanDefinition注册到DefaultListableBeanFactory中
最后一步就是将BeanDefinition注册到DefaultListableBeanFactory中了,代码就是前面ConfigBeanDefinitionParser的parseAdvice方法的最后一部分了:
// register the final advisor
parserContext.getReaderContext().registerWithGeneratedName(advisorDefinition);
...
跟一下registerWithGeneratedName方法的实现:
public String registerWithGeneratedName(BeanDefinition beanDefinition) {
String generatedName = generateBeanName(beanDefinition);
getRegistry().registerBeanDefinition(generatedName, beanDefinition);
return generatedName;
}
第2行获取注册的名字BeanName,和<bean>的注册差不多,使用的是Class全路径+”#”+全局计数器的方式,其中的Class全路径为org.springframework.aop.aspectj.AspectJPointcutAdvisor,依次类推,每一个BeanName应当为org.springframework.aop.aspectj.AspectJPointcutAdvisor#0、org.springframework.aop.aspectj.AspectJPointcutAdvisor#1、org.springframework.aop.aspectj.AspectJPointcutAdvisor#2这样下去。

第3行向DefaultListableBeanFactory中注册,BeanName已经有了,剩下的就是Bean定义,Bean定义的解析流程之前已经看过了,就不说了。
解析切面的过程
AOP Bean定义加载——AopNamespaceHandler处理流程
回到ConfigBeanDefinitionParser的parseAspect方法:
private void parseAspect(Element aspectElement, ParserContext parserContext) {

        ...

        AspectComponentDefinition aspectComponentDefinition = createAspectComponentDefinition(
                aspectElement, aspectId, beanDefinitions, beanReferences, parserContext);
        parserContext.pushContainingComponent(aspectComponentDefinition);

        List<Element> pointcuts = DomUtils.getChildElementsByTagName(aspectElement, POINTCUT);
        for (Element pointcutElement : pointcuts) {
            parsePointcut(pointcutElement, parserContext);
        }

        parserContext.popAndRegisterContainingComponent();
    }
    finally {
        this.parseState.pop();
    }
}
省略号部分表示是解析的是、这种标签,上部分已经说过了,就不说了,下面看一下解析部分的源码。
第5行~第7行的代码构建了一个Aspect标签组件定义,并将Apsect标签组件定义推到ParseContext即解析工具上下文中,这部分代码不是关键。
第9行的代码拿到所有下的pointcut标签,进行遍历,由parsePointcut方法进行处理:
private AbstractBeanDefinition parsePointcut(Element pointcutElement, ParserContext parserContext) {
    String id = pointcutElement.getAttribute(ID);
    String expression = pointcutElement.getAttribute(EXPRESSION);

    AbstractBeanDefinition pointcutDefinition = null;

    try {
        this.parseState.push(new PointcutEntry(id));
        pointcutDefinition = createPointcutDefinition(expression);
        pointcutDefinition.setSource(parserContext.extractSource(pointcutElement));

        String pointcutBeanName = id;
        if (StringUtils.hasText(pointcutBeanName)) {
            parserContext.getRegistry().registerBeanDefinition(pointcutBeanName, pointcutDefinition);
        }
        else {
            pointcutBeanName = parserContext.getReaderContext().registerWithGeneratedName(pointcutDefinition);
        }

        parserContext.registerComponent(
                new PointcutComponentDefinition(pointcutBeanName, pointcutDefinition, expression));
    }
    finally {
        this.parseState.pop();
    }

    return pointcutDefinition;
}
第2行~第3行的代码获取标签下的”id”属性与”expression”属性。
第8行的代码推送一个PointcutEntry,表示当前Spring上下文正在解析Pointcut标签。
第9行的代码创建Pointcut的Bean定义,之后再看,先把其他方法都看一下。
第10行的代码不管它,最终从NullSourceExtractor的extractSource方法获取Source,就是个null。
第12行~第18行的代码用于注册获取到的Bean定义,默认pointcutBeanName为标签中定义的id属性:
如果标签中配置了id属性就执行的是第13行~第15行的代码,pointcutBeanName=id
如果标签中没有配置id属性就执行的是第16行~第18行的代码,和Bean不配置id属性一样的规则,pointcutBeanName=org.springframework.aop.aspectj.AspectJExpressionPointcut#序号(从0开始累加)
第20行~第21行的代码向解析工具上下文中注册一个Pointcut组件定义
第23行~第25行的代码,finally块在标签解析完毕后,让之前推送至栈顶的PointcutEntry出栈,表示此次标签解析完毕。
最后回头来一下第9行代码createPointcutDefinition的实现,比较简单:
protected AbstractBeanDefinition createPointcutDefinition(String expression) {
    RootBeanDefinition beanDefinition = new RootBeanDefinition(AspectJExpressionPointcut.class);
    beanDefinition.setScope(BeanDefinition.SCOPE_PROTOTYPE);
    beanDefinition.setSynthetic(true);
    beanDefinition.getPropertyValues().add(EXPRESSION, expression);
    return beanDefinition;
}
关键就是注意一下两点:
标签对应解析出来的BeanDefinition是RootBeanDefinition,且RootBenaDefinitoin中的Class是org.springframework.aop.aspectj.AspectJExpressionPointcut
标签对应的Bean是prototype即原型的
这样一个流程下来,就解析了标签中的内容并将之转换为RootBeanDefintion存储在Spring容器中。
AOP为Bean生成代理的时机分析
上篇文章说了,org.springframework.aop.aspectj.autoproxy.AspectJAwareAdvisorAutoProxyCreator这个类是Spring提供给开发者的AOP的核心类,就是AspectJAwareAdvisorAutoProxyCreator完成了【类/接口–>代理】的转换过程,首先我们看一下AspectJAwareAdvisorAutoProxyCreator的层次结构:
这里最值得注意的一点是最左下角的那个方框,我用几句话总结一下:
AspectJAwareAdvisorAutoProxyCreator是BeanPostProcessor接口的实现类
postProcessBeforeInitialization方法与postProcessAfterInitialization方法实现在父类AbstractAutoProxyCreator中
postProcessBeforeInitialization方法是一个空实现
逻辑代码在postProcessAfterInitialization方法中
基于以上的分析,将Bean生成代理的时机已经一目了然了:在每个Bean初始化之后,如果需要,调用AspectJAwareAdvisorAutoProxyCreator中的postProcessBeforeInitialization为Bean生成代理。
代理对象实例化—-判断是否为
上文分析了Bean生成代理的时机是在每个Bean初始化之后,下面把代码定位到Bean初始化之后,先是AbstractAutowireCapableBeanFactory的initializeBean方法进行初始化:
protected Object initializeBean(final String beanName, final Object bean, RootBeanDefinition mbd) {
    if (System.getSecurityManager() != null) {
        AccessController.doPrivileged(new PrivilegedAction<Object>() {
            public Object run() {
                invokeAwareMethods(beanName, bean);
                return null;
            }
        }, getAccessControlContext());
    }
    else {
        invokeAwareMethods(beanName, bean);
    }

    Object wrappedBean = bean;
    if (mbd == null || !mbd.isSynthetic()) {
        wrappedBean = applyBeanPostProcessorsBeforeInitialization(wrappedBean, beanName);
    }

    try {
    invokeInitMethods(beanName, wrappedBean, mbd);
    }
    catch (Throwable ex) {
        throw new BeanCreationException(
                (mbd != null ? mbd.getResourceDescription() : null),
                beanName, "Invocation of init method failed", ex);
    }

    if (mbd == null || !mbd.isSynthetic()) {
        wrappedBean = applyBeanPostProcessorsAfterInitialization(wrappedBean, beanName);
    }
    return wrappedBean;
}
初始化之前是第16行的applyBeanPostProcessorsBeforeInitialization方法,初始化之后即29行的applyBeanPostProcessorsAfterInitialization方法:
public Object applyBeanPostProcessorsAfterInitialization(Object existingBean, String beanName)
        throws BeansException {

    Object result = existingBean;
    for (BeanPostProcessor beanProcessor : getBeanPostProcessors()) {
        result = beanProcessor.postProcessAfterInitialization(result, beanName);
        if (result == null) {
            return result;
        }
    }
    return result;
}
这里调用每个BeanPostProcessor的postProcessBeforeInitialization方法。按照之前的分析,看一下AbstractAutoProxyCreator的postProcessAfterInitialization方法实现:
public Object postProcessAfterInitialization(Object bean, String beanName) throws BeansException {
    if (bean != null) {
        Object cacheKey = getCacheKey(bean.getClass(), beanName);
        if (!this.earlyProxyReferences.contains(cacheKey)) {
            return wrapIfNecessary(bean, beanName, cacheKey);
        }
    }
    return bean;
}
跟一下第5行的方法wrapIfNecessary:
protected Object wrapIfNecessary(Object bean, String beanName, Object cacheKey) {
    if (this.targetSourcedBeans.contains(beanName)) {
        return bean;
    }
    if (this.nonAdvisedBeans.contains(cacheKey)) {
        return bean;
    }
    if (isInfrastructureClass(bean.getClass()) || shouldSkip(bean.getClass(), beanName)) {
        this.nonAdvisedBeans.add(cacheKey);
        return bean;
    }

    // Create proxy if we have advice.
    Object[] specificInterceptors = getAdvicesAndAdvisorsForBean(bean.getClass(), beanName, null);
    if (specificInterceptors != DO_NOT_PROXY) {
        this.advisedBeans.add(cacheKey);
        Object proxy = createProxy(bean.getClass(), beanName, specificInterceptors, new SingletonTargetSource(bean));
        this.proxyTypes.put(cacheKey, proxy.getClass());
        return proxy;
    }

    this.nonAdvisedBeans.add(cacheKey);
    return bean;
}
第2行~第11行是一些不需要生成代理的场景判断,这里略过。首先我们要思考的第一个问题是:哪些目标对象需要生成代理?因为配置文件里面有很多Bean,肯定不能对每个Bean都生成代理,因此需要一套规则判断Bean是不是需要生成代理,这套规则就是第14行的代码getAdvicesAndAdvisorsForBean:
    protected List<Advisor> findEligibleAdvisors(Class beanClass, String beanName) {
        List<Advisor> candidateAdvisors = findCandidateAdvisors();
        List<Advisor> eligibleAdvisors = findAdvisorsThatCanApply(candidateAdvisors, beanClass, beanName);
        extendAdvisors(eligibleAdvisors);
        if (!eligibleAdvisors.isEmpty()) {
            eligibleAdvisors = sortAdvisors(eligibleAdvisors);
        }
        return eligibleAdvisors;
    }
顾名思义,方法的意思是为指定class寻找合适的Advisor。
第2行代码,寻找候选Advisors,根据上文的配置文件,有两个候选Advisor,分别是节点下的和这两个,这两个在XML解析的时候已经被转换生成了RootBeanDefinition。
跳过第3行的代码,先看下第4行的代码extendAdvisors方法,之后再重点看一下第3行的代码。第4行的代码extendAdvisors方法作用是向候选Advisor链的开头(也就是List.get(0)的位置)添加一个org.springframework.aop.support.DefaultPointcutAdvisor。
第3行代码,根据候选Advisors,寻找可以使用的Advisor,跟一下方法实现:
public static List<Advisor> findAdvisorsThatCanApply(List<Advisor> candidateAdvisors, Class<?> clazz) {
    if (candidateAdvisors.isEmpty()) {
        return candidateAdvisors;
    }
    List<Advisor> eligibleAdvisors = new LinkedList<Advisor>();
    for (Advisor candidate : candidateAdvisors) {
        if (candidate instanceof IntroductionAdvisor && canApply(candidate, clazz)) {
            eligibleAdvisors.add(candidate);
        }
    }
    boolean hasIntroductions = !eligibleAdvisors.isEmpty();
    for (Advisor candidate : candidateAdvisors) {
        if (candidate instanceof IntroductionAdvisor) {
            // already processed
            continue;
        }
        if (canApply(candidate, clazz, hasIntroductions)) {
            eligibleAdvisors.add(candidate);
        }
    }
    return eligibleAdvisors;
}
整个方法的主要判断都围绕canApply展开方法:
public static boolean canApply(Advisor advisor, Class<?> targetClass, boolean hasIntroductions) {
    if (advisor instanceof IntroductionAdvisor) {
        return ((IntroductionAdvisor) advisor).getClassFilter().matches(targetClass);
    }
    else if (advisor instanceof PointcutAdvisor) {
        PointcutAdvisor pca = (PointcutAdvisor) advisor;
        return canApply(pca.getPointcut(), targetClass, hasIntroductions);
    }
    else {
        // It doesn't have a pointcut so we assume it applies.
        return true;
    }
}
第一个参数advisor的实际类型是AspectJPointcutAdvisor,它是PointcutAdvisor的子类,因此执行第7行的方法:
public static boolean canApply(Pointcut pc, Class<?> targetClass, boolean hasIntroductions) {
    if (!pc.getClassFilter().matches(targetClass)) {
        return false;
    }

    MethodMatcher methodMatcher = pc.getMethodMatcher();
    IntroductionAwareMethodMatcher introductionAwareMethodMatcher = null;
    if (methodMatcher instanceof IntroductionAwareMethodMatcher) {
        introductionAwareMethodMatcher = (IntroductionAwareMethodMatcher) methodMatcher;
    }

    Set<Class> classes = new HashSet<Class>(ClassUtils.getAllInterfacesForClassAsSet(targetClass));
    classes.add(targetClass);
    for (Class<?> clazz : classes) {
        Method[] methods = clazz.getMethods();
        for (Method method : methods) {
            if ((introductionAwareMethodMatcher != null &&
                introductionAwareMethodMatcher.matches(method, targetClass, hasIntroductions)) ||
                    methodMatcher.matches(method, targetClass)) {
                return true;
            }
        }
    }
    return false;
}
这个方法其实就是拿当前Advisor对应的expression做了两层判断:
目标类必须满足expression的匹配规则
目标类中的方法必须满足expression的匹配规则,当然这里方法不是全部需要满足expression的匹配规则,有一个方法满足即可
如果以上两条都满足,那么容器则会判断该
代理对象实例化过程
代理对象实例化—-为
上文分析了为
protected Object wrapIfNecessary(Object bean, String beanName, Object cacheKey) {
    if (this.targetSourcedBeans.contains(beanName)) {
        return bean;
    }
    if (this.nonAdvisedBeans.contains(cacheKey)) {
        return bean;
    }
    if (isInfrastructureClass(bean.getClass()) || shouldSkip(bean.getClass(), beanName)) {
        this.nonAdvisedBeans.add(cacheKey);
        return bean;
    }

    // Create proxy if we have advice.
    Object[] specificInterceptors = getAdvicesAndAdvisorsForBean(bean.getClass(), beanName, null);
    if (specificInterceptors != DO_NOT_PROXY) {
        this.advisedBeans.add(cacheKey);
        Object proxy = createProxy(bean.getClass(), beanName, specificInterceptors, new SingletonTargetSource(bean));
        this.proxyTypes.put(cacheKey, proxy.getClass());
        return proxy;
    }

    this.nonAdvisedBeans.add(cacheKey);
    return bean;
}
第14行拿到
protected Object createProxy(
        Class<?> beanClass, String beanName, Object[] specificInterceptors, TargetSource targetSource) {

    ProxyFactory proxyFactory = new ProxyFactory();
    // Copy our properties (proxyTargetClass etc) inherited from ProxyConfig.
    proxyFactory.copyFrom(this);

    if (!shouldProxyTargetClass(beanClass, beanName)) {
        // Must allow for introductions; can't just set interfaces to
        // the target's interfaces only.
        Class<?>[] targetInterfaces = ClassUtils.getAllInterfacesForClass(beanClass, this.proxyClassLoader);
        for (Class<?> targetInterface : targetInterfaces) {
            proxyFactory.addInterface(targetInterface);
        }
    }

    Advisor[] advisors = buildAdvisors(beanName, specificInterceptors);
    for (Advisor advisor : advisors) {
        proxyFactory.addAdvisor(advisor);
    }

    proxyFactory.setTargetSource(targetSource);
    customizeProxyFactory(proxyFactory);

    proxyFactory.setFrozen(this.freezeProxy);
    if (advisorsPreFiltered()) {
        proxyFactory.setPreFiltered(true);
    }

    return proxyFactory.getProxy(this.proxyClassLoader);
}
第4行~第6行new出了一个ProxyFactory,Proxy,顾名思义,代理工厂的意思,提供了简单的方式使用代码获取和配置AOP代理。
第8行的代码做了一个判断,判断的内容是这个节点中proxy-target-class=”false”或者proxy-target-class不配置,即不使用CGLIB生成代理。如果满足条件,进判断,获取当前Bean实现的所有接口,讲这些接口Class对象都添加到ProxyFactory中。
第17行~第28行的代码没什么看的必要,向ProxyFactory中添加一些参数而已。重点看第30行proxyFactory.getProxy(this.proxyClassLoader)这句:
public Object getProxy(ClassLoader classLoader) {
return createAopProxy().getProxy(classLoader);
}
实现代码就一行,但是却明确告诉我们做了两件事情:
创建AopProxy接口实现类
通过AopProxy接口的实现类的getProxy方法获取
就从这两个点出发,分两部分分析一下。
代理对象实例化—-创建AopProxy接口实现类
看一下createAopProxy()方法的实现,它位于DefaultAopProxyFactory类中:
protected final synchronized AopProxy createAopProxy() {
if (!this.active) {
activate();
}
return getAopProxyFactory().createAopProxy(this);
}
前面的部分没什么必要看,直接进入重点即createAopProxy方法:
public AopProxy createAopProxy(AdvisedSupport config) throws AopConfigException {
    if (config.isOptimize() || config.isProxyTargetClass() || hasNoUserSuppliedProxyInterfaces(config)) {
        Class targetClass = config.getTargetClass();
        if (targetClass == null) {
            throw new AopConfigException("TargetSource cannot determine target class: " +
                    "Either an interface or a target is required for proxy creation.");
        }
        if (targetClass.isInterface()) {
            return new JdkDynamicAopProxy(config);
        }
        if (!cglibAvailable) {
            throw new AopConfigException(
                    "Cannot proxy target class because CGLIB2 is not available. " +
                    "Add CGLIB to the class path or specify proxy interfaces.");
        }
        return CglibProxyFactory.createCglibProxy(config);
    }
    else {
        return new JdkDynamicAopProxy(config);
    }
}
平时我们说AOP原理三句话就能概括:
对类生成代理使用CGLIB
对接口生成代理使用JDK原生的Proxy
可以通过配置文件指定对接口使用CGLIB生成代理
这三句话的出处就是createAopProxy方法。看到默认是第19行的代码使用JDK自带的Proxy生成代理,碰到以下三种情况例外:
ProxyConfig的isOptimize方法为true,这表示让Spring自己去优化而不是用户指定
ProxyConfig的isProxyTargetClass方法为true,这表示配置了proxy-target-class=”true”
ProxyConfig满足hasNoUserSuppliedProxyInterfaces方法执行结果为true,这表示
在进入第2行的if判断之后再根据目标
proxy-target-class没有配置或者proxy-target-class=”false”,返回JdkDynamicAopProxy
proxy-target-class=”true”或者
当然,不管是JdkDynamicAopProxy还是Cglib2AopProxy,AdvisedSupport都是作为构造函数参数传入的,里面存储了具体的Advisor。
代理对象实例化—-通过getProxy方法获取
其实代码已经分析到了JdkDynamicAopProxy和Cglib2AopProxy,剩下的就没什么好讲的了,无非就是看对这两种方式生成代理的熟悉程度而已。
Cglib2AopProxy生成代理的代码就不看了,对Cglib不熟悉的朋友可以看Cglib及其基本使用一文。
JdkDynamicAopProxy生成代理的方式稍微看一下:
public Object getProxy(ClassLoader classLoader) {
if (logger.isDebugEnabled()) {
logger.debug("Creating JDK dynamic proxy: target source is " + this.advised.getTargetSource());
}
Class[] proxiedInterfaces = AopProxyUtils.completeProxiedInterfaces(this.advised);
findDefinedEqualsAndHashCodeMethods(proxiedInterfaces);
return Proxy.newProxyInstance(classLoader, proxiedInterfaces, this);
}
这边解释一下第5行和第6行的代码,第5行代码的作用是拿到所有要代理的接口,第6行代码的作用是尝试寻找这些接口方法里面有没有equals方法和hashCode方法,同时都有的话打个标记,寻找结束,equals方法和hashCode方法有特殊处理。
最终通过第7行的Proxy.newProxyInstance方法获取接口/类对应的代理对象,Proxy是JDK原生支持的生成代理的方式。
代理方法调用原理
前面已经详细分析了为接口/类生成代理的原理,生成代理之后就要调用方法了,这里看一下使用JdkDynamicAopProxy调用方法的原理。
由于JdkDynamicAopProxy本身实现了InvocationHandler接口,因此具体代理前后处理的逻辑在invoke方法中:
public Object invoke(Object proxy, Method method, Object[] args) throws Throwable {
    MethodInvocation invocation;
    Object oldProxy = null;
    boolean setProxyContext = false;

    TargetSource targetSource = this.advised.targetSource;
    Class targetClass = null;
    Object target = null;

    try {
        if (!this.equalsDefined && AopUtils.isEqualsMethod(method)) {
            // The target does not implement the equals(Object) method itself.
            return equals(args[0]);
        }
        if (!this.hashCodeDefined && AopUtils.isHashCodeMethod(method)) {
            // The target does not implement the hashCode() method itself.
            return hashCode();
        }
        if (!this.advised.opaque && method.getDeclaringClass().isInterface() &&
                method.getDeclaringClass().isAssignableFrom(Advised.class)) {
            // Service invocations on ProxyConfig with the proxy config...
            return AopUtils.invokeJoinpointUsingReflection(this.advised, method, args);
        }

        Object retVal;

        if (this.advised.exposeProxy) {
            // Make invocation available if necessary.
            oldProxy = AopContext.setCurrentProxy(proxy);
            setProxyContext = true;
        }

        // May be null. Get as late as possible to minimize the time we "own" the target,
        // in case it comes from a pool.
        target = targetSource.getTarget();
        if (target != null) {
            targetClass = target.getClass();
        }

        // Get the interception chain for this method.
        List<Object> chain = this.advised.getInterceptorsAndDynamicInterceptionAdvice(method, targetClass);

        // Check whether we have any advice. If we don't, we can fallback on direct
        // reflective invocation of the target, and avoid creating a MethodInvocation.
        if (chain.isEmpty()) {
            // We can skip creating a MethodInvocation: just invoke the target directly
            // Note that the final invoker must be an InvokerInterceptor so we know it does
            // nothing but a reflective operation on the target, and no hot swapping or fancy proxying.
            retVal = AopUtils.invokeJoinpointUsingReflection(target, method, args);
        }
        else {
            // We need to create a method invocation...
            invocation = new ReflectiveMethodInvocation(proxy, target, method, args, targetClass, chain);
            // Proceed to the joinpoint through the interceptor chain.
            retVal = invocation.proceed();
        }

        // Massage return value if necessary.
        if (retVal != null && retVal == target && method.getReturnType().isInstance(proxy) &&
                !RawTargetAccess.class.isAssignableFrom(method.getDeclaringClass())) {
            // Special case: it returned "this" and the return type of the method
            // is type-compatible. Note that we can't help if the target sets
            // a reference to itself in another returned object.
            retVal = proxy;
        }
        return retVal;
    }
    finally {
        if (target != null && !targetSource.isStatic()) {
            // Must have come from TargetSource.
            targetSource.releaseTarget(target);
        }
        if (setProxyContext) {
            // Restore old proxy.
            AopContext.setCurrentProxy(oldProxy);
        }
    }
}
第11行~第18行的代码,表示equals方法与hashCode方法即使满足expression规则,也不会为之产生代理内容,调用的是JdkDynamicAopProxy的equals方法与hashCode方法。至于这两个方法是什么作用,可以自己查看一下源代码。
第19行~第23行的代码,表示方法所属的Class是一个接口并且方法所属的Class是AdvisedSupport的父类或者父接口,直接通过反射调用该方法。
第27行~第30行的代码,是用于判断是否将代理暴露出去的,由标签中的expose-proxy=”true/false”配置。
第41行的代码,获取AdvisedSupport中的所有拦截器和动态拦截器列表,用于拦截方法,具体到我们的实际代码,列表中有三个Object,分别是:
chain.get(0):ExposeInvocationInterceptor,这是一个默认的拦截器,对应的原Advisor为DefaultPointcutAdvisor
chain.get(1):MethodBeforeAdviceInterceptor,用于在实际方法调用之前的拦截,对应的原Advisor为AspectJMethodBeforeAdvice
chain.get(2):AspectJAfterAdvice,用于在实际方法调用之后的处理
第45行~第50行的代码,如果拦截器列表为空,很正常,因为某个类/接口下的某个方法可能不满足expression的匹配规则,因此此时通过反射直接调用该方法。
第51行~第56行的代码,如果拦截器列表不为空,按照注释的意思,需要一个ReflectiveMethodInvocation,并通过proceed方法对原方法进行拦截,proceed方法感兴趣的朋友可以去看一下,里面使用到了递归的思想对chain中的Object进行了层层的调用。
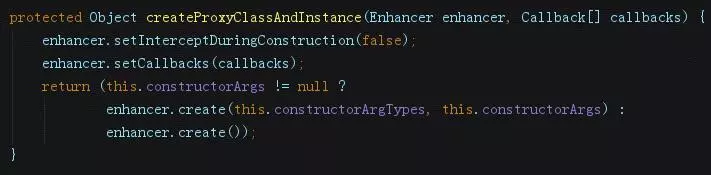
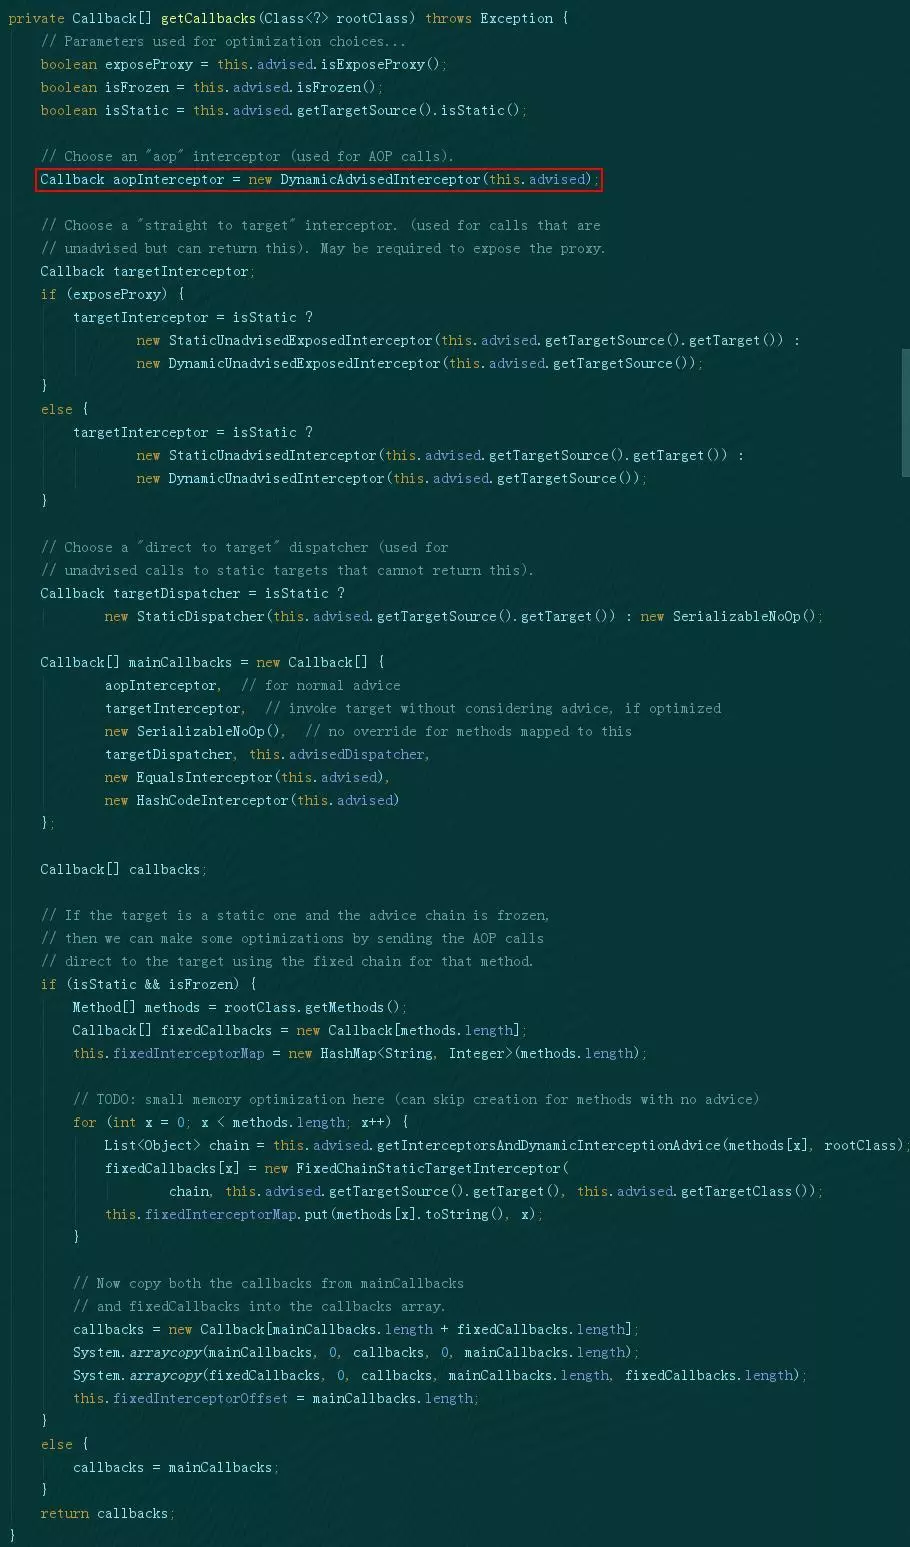
CGLIB代理实现
下面我们来看一下CGLIB代理的方式,这里需要读者去了解一下CGLIB以及其创建代理的方式:
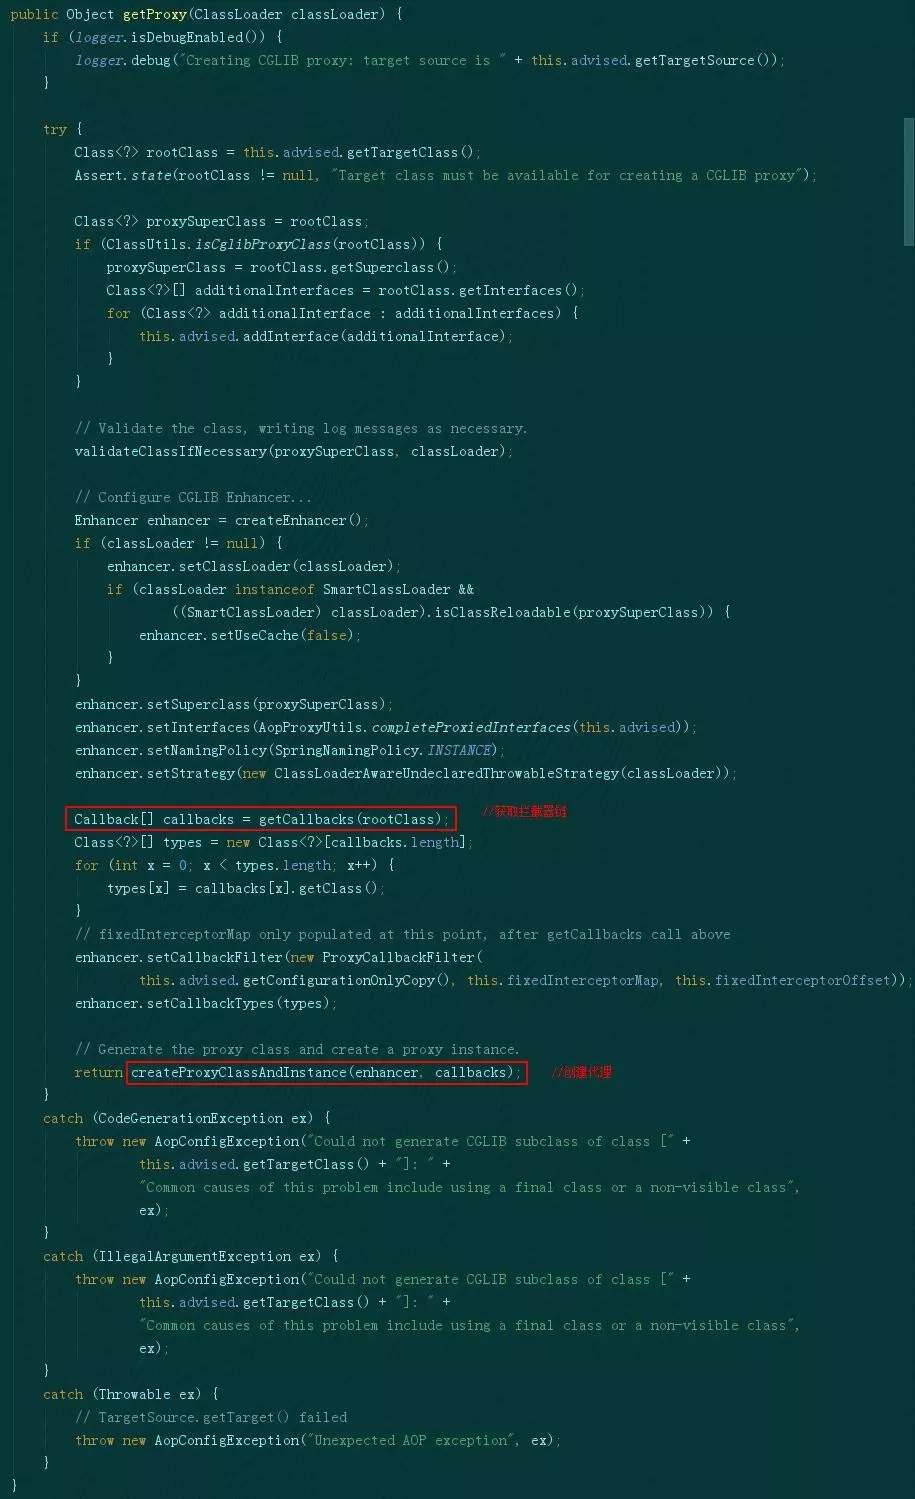
这里将拦截器链封装到了DynamicAdvisedInterceptor中,并加入了Callback,DynamicAdvisedInterceptor实现了CGLIB的MethodInterceptor,所以其核心逻辑在intercept方法中:
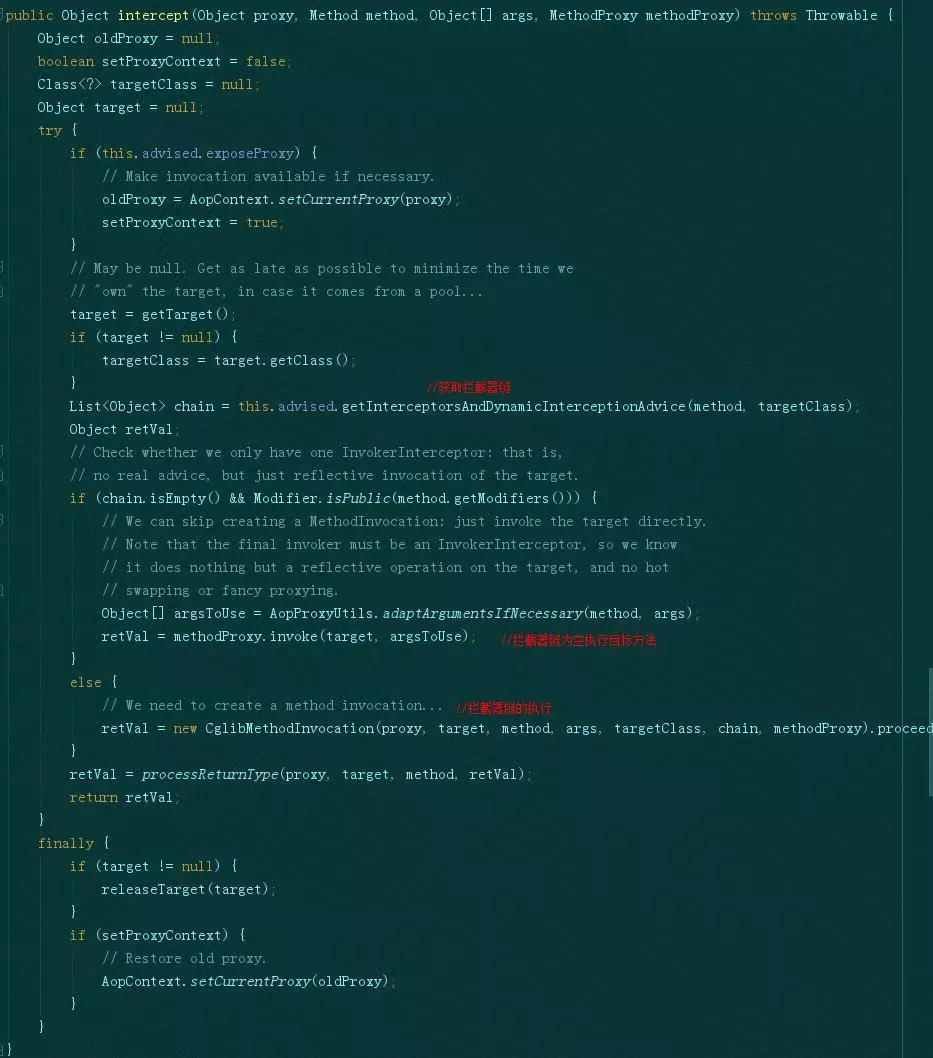
这里我们看到了与JDK动态代理同样的获取拦截器链的过程,并且CglibMethodInvokcation继承了我们在JDK动态代理看到的ReflectiveMethodInvocation,但是并没有重写其proceed方法,只是重写了执行目标方法的逻辑,所以整体上是大同小异的。
到这里,整个Spring 动态AOP的源码就分析完了,Spring还支持静态AOP,这里就不过多赘述了,有兴趣的读者可以查阅相关资料来学习。