本文代码部分来自于《spring in action》,本文讲的是使用!!
Spring 是为了解决什么
一个框架的存在是为了解决某个问题的,那么Spring这个框架是为了解决什么问题呢?主要就是解耦,spring主要要把握两方面的知识,
- DI(依赖注入 dependency injection) : 解耦, 方便测试
- AOP(面向切面编程 aspect-oriented programming)
关于 DI Ioc 和 AOP 可以先阅读这篇文章,本文讲的主要是使用。
DI (依赖注入 depency injection)
先看一个例子:
  1 //定义一个勇士类
  2 public class DamselRescuingKnight implements Knight {
  3
  4 	private RescueDamselQuest quest;
  5
  6 	//营救任务
  7 	public DamselRescuingKnight() {
  8 		this.quest = new RescueDamselQuest();
  9 	}
 10
 11 	public void embarkOnQuest() {
 12 		quest.embark();
 13 	}
 14 }
可以看到这里,勇士的 embarkOnQuest ( ) 方法执行的传入的特定的任务,那么当勇士需要执行其他任务的时候就无法进行了,于是Queue 应该做成一个接口.这样的好处是解耦合和方便测试
  1 public class BraveKnight implements Knight {
  2 	private Quest quest;
  3
  4 	public BraveKnight(Quest quest) {
  5 		this.quest = quest;
  6 	}
  7
  8 	public void embarkOnQuest() {
  9 		quest.embark();
 10 	}
 11 }
  1 public class SlayDragonQuest implements Quest {
  2 	private PrintStream stream;
  3
  4 	public SlayDragonQuest(PrintStream stream) {
  5 		this.stream = stream;
  6 	}
  7
  8 	public void embark() {
  9 		stream.println("Embarking on quest to slay the dragon!");
 10 	}
 11 }
上面使用依赖注入并且在构造器解耦被称为构造器解耦。 在spring中如何组装这些组件呢?(将queue配置给knight)
  1 <?xml version="1.0" encoding="UTF-8"?>
  2 <beans xmlns="http://www.springframework.org/schema/beans"
  3 	xmlns:xsi="http://www.w3.org/2001/XMLSchema-instance"
  4 	xsi:schemaLocation="http://www.springframework.org/schema/beans
  5 	http://www.springframework.org/schema/beans/spring-beans.xsd">
  6
  7 	<bean id="knight" class="com.springinaction.knights.BraveKnight">
  8 		<constructor-arg ref="quest" />
  9 	</bean>
 10
 11 	<bean id="quest" class="com.springinaction.knights.SlayDragonQuest">
 12 		<constructor-arg value="#{T(System).out}" />
 13 	</bean>
 14 </beans>
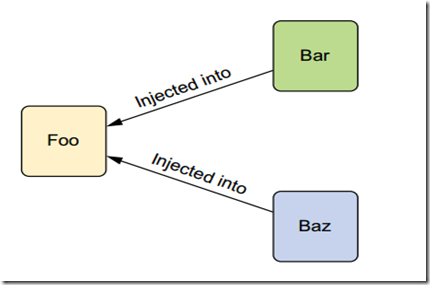
图一. 依赖注入会将所依赖的关系自动交给目标对象, 而不是让对象自己去获取依赖
AOP(面向切面编程)
加入一个勇士需要一个历史记录着纪录它的英雄事迹,那么
  1 public class Recorder {
  2 	private PrintStream stream;
  3
  4 	public Recorder(PrintStream stream) {
  5 		this.stream = stream;
  6 	}
  7
  8 	public void singBeforeQuest() {
  9 		stream.println("Fa la la, the knight is so brave!");
 10 	}
 11
 12 	public void singAfterQuest() {
 13 		stream.println("Tee hee hee, the brave knight " +
 14 		"did embark on a quest!");
 15 	}
 16 }
  1 public class BraveKnight implements Knight {
  2 	private Quest quest;
  3 	private Recorder recorder;
  4
  5 	public BraveKnight(Quest quest, Recorder recorder) {
  6 		this.quest = quest;
  7 		this.recorder= recorder;
  8 	}
  9
 10 	public void embarkOnQuest() throws QuestException {
 11 		recorder.singBeforeQuest();
 12 		quest.embark();
 13 		recorder.singAfterQuest();
 14 	}
 15 }
但是这样似乎有点不合常理,当我需要一名勇士时是否每次都要匹配以为记录者?假如记录着可以当我需要的时候出现那么就好了。使用spring的AOP 编程,
  1 <?xml version="1.0" encoding="UTF-8"?>
  2 <beans xmlns="http://www.springframework.org/schema/beans"
  3        xmlns:xsi="http://www.w3.org/2001/XMLSchema-instance"
  4        xmlns:aop="http://www.springframework.org/schema/aop"
  5        xsi:schemaLocation="http://www.springframework.org/schema/aop
  6 http://www.springframework.org/schema/aop/spring-aop-3.2.xsd
  7 http://www.springframework.org/schema/beans
  8 http://www.springframework.org/schema/beans/spring-beans.xsd">
  9
 10     <bean id="knight" class="com.springinaction.knights.BraveKnight">
 11         <constructor-arg ref="quest"/>
 12     </bean>
 13
 14     <bean id="quest" class="com.springinaction.knights.SlayDragonQuest">
 15         <constructor-arg value="#{T(System).out}"/>
 16     </bean>
 17
 18     <bean id="minstrel" class="com.springinaction.knights.Recorder">
 19         <constructor-arg value="#{T(System).out}"/>
 20     </bean>
 21
 22     <aop:config>
 23         <aop:aspect ref="recorder">
 24             <aop:pointcut id="embark"
 25                           expression="execution(* *.embarkOnQuest(..))"/>
 26             <aop:before pointcut-ref="embark"
 27                         method="singBeforeQuest"/>
 28             <aop:after pointcut-ref="embark"
 29                        method="singAfterQuest"/>
 30         </aop:aspect>
 31     </aop:config>
 32 </beans>
 33
Spring 容器
spring容器是使用DI(依赖注入)去管理组成应用的组件,其中包括两大类,
- Application Cotext
- Bean Factories
Bean Factories 主要是低水准的应用, 下面主要介绍application context,它包括
- AnnotationConfigApplicationContext :从一个或多个java形式的class文件中加载一个spring 应用
- AnnotationConfigWebApplicationContext : 从一个或多个java形式的class文件中加载一个spring web应用
- FileSystemXmlApplication : 加载一个上下文定义(context)从文件路径中的xml文件
- XmlWebApplicationConte
- ClassPathXmlApplication
AnnotationConfigWebApplicationContext 和 XmlWebApplicationContext 我们使用比较多的
装配组件
三种方式
- XML 形式
- JavaConfig形式
- 隐式的bean发现机制 和 自动装配
三种方式的选择: 根据《spring in action》的描述,隐式的bean 发现和自动装配方式强与显式装配, 假若不得不显式装配,优先选择类型安全的java编码形式的,最后才是XML形式 。
自动配置
Spring从两个角度来实现自动化装配:(一个是生成独立的bean, 一个是将他们组装起来)
- 组件扫描(component scanning) : Spring会自动发现应用上下文中所创建的bean。
- 自动装配(autowiring) : Spring自动满足bean之间的依赖。
@Component 属性表明这个类是个组件,并且告诉spring 因为为它创建一个been
  1 @Component
  2 public class SgtPeppers implements CompactDisc {
  3 	private String title = "Sgt. Pepper's Lonely Hearts Club Band";
  4 	private String artist = "The Beatles";
  5
  6 	public void play() {
  7 		System.out.println("Playing " + title + " by " + artist);
  8 	}
  9 }
  1 @Configuration
  2 @ComponentScan
  3 public class CDPlayerConfig {
  4
  5 }
@ComponentScan 表示组件扫描,在这个包下的组件都会被扫描出来并且创建为been,而@Configuration 将会在下面讲到,同时上面也可以通过xml的形式创建
  1 <?xml version="1.0" encoding="UTF-8"?>
  2 <beans xmlns="http://www.springframework.org/schema/beans"
  3        xmlns:xsi="http://www.w3.org/2001/XMLSchema-instance"
  4        xmlns:context="http://www.springframework.org/schema/context"
  5        xsi:schemaLocation="http://www.springframework.org/schema/beans
  6             http://www.springframework.org/schema/beans/spring-beans.xsd
  7             http://www.springframework.org/schema/context
  8             http://www.springframework.org/schema/context/spring-context.xsd">
  9     <context:component-scan base-package="soundsystem" />
 10 </beans>
组件被scan 后会生成一个bean ,然后生成一个id,默认为类名,那么下面展示的如何自定义这个id的名字,和如何指定spring在特定的路径下进行扫描
  1   1 //组件命名
  2   2 @Component("lonelyHeartsClub")
  3   3 public class SgtPeppers implements CompactDisc {
  4   4 ...
  5   5 }
  6   6
  7   7 //扫描基本路径,多个基本路径
  8   8 @Configuration
  9   9 @ComponentScan(basePackages= {"soundsystem", "video"})
 10  10 public class CDPlayerConfig {}
扫描基类下的所有类
  1 @Configuration
  2 @ComponentScan(basePackageClasses={CDPlayer.class, DVDPlayer.class})
  3 public class CDPlayerConfig {}
扫描完了,下面展示如何自动装配,使用@Autowired 注解,spring会自动将bean 加载进来,但是当bean 不存在时,spring加载时会抛出错误,为了防止spring直接抛出错误,可以设置 required = false
  1 @Component
  2 public class CDPlayer implements MediaPlayer {
  3     private CompactDisc cd;
  4     @Autowired
  5     public CDPlayer(CompactDisc cd) {
  6         this.cd = cd;
  7     }
  8     public void play() {
  9         cd.play();
 10     }
 11
 12     @Autowired(required=false)
 13     public OtherCDPlayer(CompactDisc cd) {
 14         this.cd = cd;
 15     }
 16 }
JAVA 编码装配bean
当我们需要使用到第三方库时,我们就不能使用自动装配机制,可以使用XML形式和JavaConfig的形式来进行显式装配,java编码比xml形式的重构更加友好,类型安全,更加强大。
  1 @Configuration
  2 public class CDPlayerConfig {
  3 }
使用@Configuration 注解表明这个类通过javaConfig形式告知spring为它创建一个bean。另外加入我们调用一个方法,而方法返回值是个对象,我们希望这个对象被spring生成一个bean,这又怎么写呢?
  1 @Bean(name="lonelyHeartsClubBand")
  2 public CompactDisc sgtPeppers() {
  3 	return new SgtPeppers();
  4 }
和上面自动扫描一样,我们创建了bean, 是时候把它们装配起来了,假如CDPlayer 这个对象依赖CompactDisc 这个对象,我们需要对它进行注入。上面的代码可以知道sgtPeppers( ) 方法可以获取一个bean对象。
  1 @Bean
  2 public CDPlayer cdPlayer() {
  3 	return new CDPlayer(sgtPeppers());
  4 }
可以看到我们同样调用了sgtPeppers( ) 方法,使用了@Bean注解,这个需要注意的是spring创建的bean都会是单例,什么意思呢?
  1 @Bean
  2 public CDPlayer cdPlayer() {
  3 	return new CDPlayer(sgtPeppers());
  4 }
  5 @Bean
  6 public CDPlayer anotherCDPlayer() {
  7 	return new CDPlayer(sgtPeppers());
  8 }
在sgtPeppers( )方法中即使我们使用new 一个新的对象,调用这两个方法返回的CDPlay( )却是相同的,都是spring 创建的bean对象。我们可以使用一个简单的方式写法。
  1 @Bean
  2 public CDPlayer cdPlayer(CompactDisc compactDisc) {
  3 	return new CDPlayer(compactDisc);
  4 }
XML 方式装配bean
使用XML 形式进行装配bean,
  1 <?xml version="1.0" encoding="UTF-8"?>
  2 <beans xmlns="http://www.springframework.org/schema/beans"
  3        xmlns:xsi="http://www.w3.org/2001/XMLSchema-instance"
  4        xsi:schemaLocation="http://www.springframework.org/schema/beans
  5        http://www.springframework.org/schema/beans/spring-beans.xsd
  6        http://www.springframework.org/schema/context">
  7
  8        <bean id="cdPlay" class="soundsystem.SgtPeppers">
  9 </beans>
初始化bean构造器注入有两种方式
- 使用<constructor-arg>
- 使用c-命名空间在Spring 3.0
下面使用的时第一种,ref是传入的引用,是某个bean 的id
  1 <bean id="cdPlayer" class="soundsystem.CDPlayer">
  2 	<constructor-arg ref="compactDisc" />
  3 </bean>
如果存在下面的类
  1 public class BlankDisc implements CompactDisc {
  2         private String title;
  3         private String artist;
  4         public BlankDisc(String title, String artist) {
  5             this.title = title;
  6             this.artist = artist;
  7         }
  8         public void play() {
  9             System.out.println("Playing " + title + " by " + artist);
 10         }
 11     }
那么构造器依赖注入就是
  1 <bean id="compactDisc" class="soundsystem.BlankDisc">
  2     <constructor-arg value="Sgt. Pepper's Lonely Hearts Club Band"/>
  3     <constructor-arg value="The Beatles"/>
  4 </bean>
  5
  6 <!--下面是c-命名空间,下划线后加参数名字-->
  7 <bean id="compactDisc"
  8       class="soundsystem.BlankDisc"
  9       c:_title="Sgt. Pepper's Lonely Hearts Club Band"
 10       c:_artist="The Beatles" />
 11
 12 <!--也可以这样子写-->
 13 <bean id="compactDisc"
 14       class="soundsystem.BlankDisc"
 15       c:_0="Sgt. Pepper's Lonely Hearts Club Band"
 16       c:_1="The Beatles" />
 17
如果构造参数中有List,或是set,要是set 的话,只需要改节点为<set>
  1 <bean id="compactDisc" class="soundsystem.BlankDisc">
  2     <constructor-arg value="Sgt. Pepper's Lonely Hearts Club Band" />
  3     <constructor-arg value="The Beatles" />
  4     <constructor-arg>
  5         <list>
  6             <value>Sgt. Pepper's Lonely Hearts Club Band</value>
  7             <value>With a Little Help from My Friends</value>
  8             <value>Lucy in the Sky with Diamonds</value>
  9             <value>Getting Better</value>
 10             <value>Fixing a Hole</value>
 11             <!-- ...other tracks omitted for brevity... -->
 12         </list>
 13     </constructor-arg>
 14 </bean>
如果使用c命名空间的构造器注入,必须向在开头声明命令空间
  1
  2 <?xml version="1.0" encoding="UTF-8"?>
  3 <beans xmlns="http://www.springframework.org/schema/beans"
  4        xmlns:c="http://www.springframework.org/schema/c"
  5        xmlns:xsi="http://www.w3.org/2001/XMLSchema-instance"
  6        xsi:schemaLocation="http://www.springframework.org/schema/beans
  7 http://www.springframework.org/schema/beans/spring-beans.xsd">
  8     ...
  9 </beans>
下面是如何使用
  1 <bean id="cdPlayer" class="soundsystem.CDPlayer"
  2 c:cd-ref="compactDisc" />
假如一个类没有构造方法,需要对属性进行注入
  1 public class BlankDisc implements CompactDisc {
  2     private String title;
  3     private String artist;
  4     private List<String> tracks;
  5     public void setTitle(String title) {
  6         this.title = title;
  7     }
  8     public void setArtist(String artist) {
  9         this.artist = artist;
 10     }
 11
 12     public void setTracks(List<String> tracks) {
 13         this.tracks = tracks;
 14     }
 15     public void play() {
 16         System.out.println("Playing " + title + " by " + artist);
 17         for (String track : tracks) {
 18             System.out.println("-Track: " + track);
 19         }
 20     }
 21 }
  1 <bean id="compactDisc"
  2       class="soundsystem.BlankDisc">
  3     <property name="title"
  4               value="Sgt. Pepper's Lonely Hearts Club Band" />
  5     <property name="artist" value="The Beatles" />
  6     <property name="tracks">
  7         <list>
  8             <value>Sgt. Pepper's Lonely Hearts Club Band</value>
  9             <value>With a Little Help from My Friends</value>
 10             <value>Lucy in the Sky with Diamonds</value>
 11             <value>Getting Better</value>
 12             <value>Fixing a Hole</value>
 13             <!-- ...other tracks omitted for brevity... -->
 14         </list>
 15     </property>
 16 </bean>
 17
和c-命名空间相同, p-命名空间用来标识属性注入的,但是需要注意的是p-命名空间不能注入List,只能用spring-util 命名空间对集合进行注入,同样,在使用命令空间时需要在xml开头声明
  1 xmlns:p="http://www.springframework.org/schema/p"
  2 xmlns:util="http://www.springframework.org/schema/util"
  1 <bean id="compactDisc"
  2       class="soundsystem.BlankDisc"
  3       p:title="Sgt. Pepper's Lonely Hearts Club Band"
  4       p:artist="The Beatles"
  5       p:tracks-ref="trackList" />
  1 <util:list id="trackList">
  2     <value>Sgt. Pepper's Lonely Hearts Club Band</value>
  3     <value>With a Little Help from My Friends</value>
  4     <value>Lucy in the Sky with Diamonds</value>
  5     <value>Getting Better</value>
  6     <value>Fixing a Hole</value>
  7     <!-- ...other tracks omitted for brevity... -->
  8 </util:list>
即使当显示声明bean时,我们更趋向javaCofig 形式装配,但是有些时候XML 形式的才是最好的选择,spring允许两者混合使用,如下
在javaCofig形式中引入xml配置
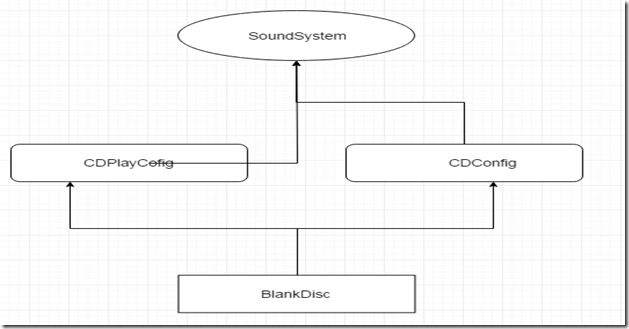
加入存在以下图的依赖关系
  1 @Configuration
  2 public class CDConfig {
  3     @Bean
  4     public CompactDisc compactDisc() {
  5         return new SgtPeppers();
  6     }
  7 }
  8
  9
 10 //我们直接使用 @Import 注解通过引入另外一个类,来装配bean,
 11 @Configuration
 12 @Import(CDConfig.class)
 13 public class CDPlayerConfig {
 14     @Bean
 15     public CDPlayer cdPlayer(CompactDisc compactDisc) {
 16         return new CDPlayer(compactDisc);
 17     }
 18 }
 19
 20
 21 //或是我们创建多一个类,直接引入两个类,来装配bean
 22 @Configuration
 23 @Import({CDPlayerConfig.class, CDConfig.class})
 24 public class SoundSystemConfig {
 25 }
 26
假如BlankDisc 是定义在XML 中,如何通过Java形式来进行装配,使用@ImportResource()注解
  1 <bean id="compactDisc"
  2       class="soundsystem.BlankDisc"
  3       c:_0="Sgt. Pepper's Lonely Hearts Club Band"
  4       c:_1="The Beatles">
  5     <constructor-arg>
  6         <list>
  7             <value>Sgt. Pepper's Lonely Hearts Club Band</value>
  8             <value>With a Little Help from My Friends</value>Importing and mixing configurations 61
  9             <value>Lucy in the Sky with Diamonds</value>
 10             <value>Getting Better</value>
 11             <value>Fixing a Hole</value>
 12             <!-- ...other tracks omitted for brevity... -->
 13         </list>
 14     </constructor-arg>
 15 </bean>
  1 @Configuration
  2 @Import(CDPlayerConfig.class)
  3 @ImportResource("classpath:cd-config.xml")
  4 public class SoundSystemConfig {
  5 }
其中,classpath :cd-config.xml 表示xml的位置。假如需要从另外的XML 文件中引入一个bean
  1 <?xml version="1.0" encoding="UTF-8"?>
  2 <beans xmlns="http://www.springframework.org/schema/beans"
  3        xmlns:xsi="http://www.w3.org/2001/XMLSchema-instance"
  4        xmlns:c="http://www.springframework.org/schema/c"
  5        xsi:schemaLocation="http://www.springframework.org/schema/beans
  6        http://www.springframework.org/schema/beans/spring-beans.xsd">
  7
  8     <import resource="cd-config.xml" />
  9     <bean id="cdPlayer"
 10           class="soundsystem.CDPlayer"
 11           c:cd-ref="compactDisc" />
 12 </beans>
 13
从java形式装配引入到XML 中,直接使用bean
  1 <?xml version="1.0" encoding="UTF-8"?>
  2 <beans xmlns="http://www.springframework.org/schema/beans"
  3        xmlns:xsi="http://www.w3.org/2001/XMLSchema-instance"
  4        xmlns:c="http://www.springframework.org/schema/c"
  5        xsi:schemaLocation="http://www.springframework.org/schema/beans
  6     http://www.springframework.org/schema/beans/spring-beans.xsd">
  7     <bean class="soundsystem.CDConfig" />
  8     <bean id="cdPlayer"
  9           class="soundsystem.CDPlayer"
 10           c:cd-ref="compactDisc" />
 11 </beans>
当需要装配一个bean来自XML ,一个来自javaConfig,那么按照之前的想法就是将多一个更加高层次的类对两个bean进行装配。
  1 <?xml version="1.0" encoding="UTF-8"?>
  2 <beans xmlns="http://www.springframework.org/schema/beans"
  3        xmlns:xsi="http://www.w3.org/2001/XMLSchema-instance"
  4        xmlns:c="http://www.springframework.org/schema/c"
  5        xsi:schemaLocation="http://www.springframework.org/schema/beans
  6        http://www.springframework.org/schema/beans/spring-beans.xsd">
  7     <bean class="soundsystem.CDConfig" />
  8     <import resource="cdplayer-config.xml" />
  9 </beans>
好了,这一篇讲了bean 装配的问题,下一篇继续学习!加油


