为了更好的同步 User Profile,在 SharePoint 2010 中首次引入了 FIM (ForeFront Identity Manager) 用于编辑 User Profile 的同期方式。在 SharePoint 2013 中,FIM 继承了 SharePoint 2010 的可以编辑同期的特点,并加入了一些 SharePoint GUI 上无法实现的功能。与 SharePoint 2010 & 2013 可以直接在界面上使用 SharePoint User Profile Synchronization 的方式进行与 AD 或其他数据源同步不同,SharePoint 2016 只能在 GUI 上选择 AD Import Synchronization 这种同步方式。而 AD Import 这种同步方式功能有限,而且也很难实现一些复杂的环境的 User Profile 同步需求。这就让 FIM 的升级产品 —— MIM(Microsoft Identity Manager) 成为使用 User Profile 必备的同步工具。
在这篇教程中,我们主要就 MIM 环境的构筑和最简单的 Windows 认证的 User Profile 同步来讲解使用 MIM 如何完成 SharePoint 2016 和 AD 的同步。由于 MIM 本身仅有英语版本,且MIM 和非英语Windows Server 以及 SharePoint Server 兼容性不好,本篇教程将完全以英语环境进行。
在进行本教程提供的配置方法前,我们首先要进行一系列的操作,来保证 SharePoint Server 2016(后简称 SPS 16) 和 Microsoft Identity Manager 2016(后简称 MIM) 能够正确安装和使用。
执行前准备操作:
1)保证 SPS 16 的正确安装,并开启 User Profile Service (后简称 UPS)。使用 Configuration Wizards 的自动配置建立的 User Profile Service Application(后简称 UPSA)即可。
2) 如果 MIM 使用特殊的服务器来进行构筑,请做如下操作来保证 MIM 能够正确安装:
2.1)在 AD 上追加 MIMSync 和 MIMMA 两个 User。并将这两个 User 添加进 Domain Admin Group 中。
2.2)在 AD 上使用如下 PowerShell Commands 来添加 MIM 需要的 Group。
1 import-module activedirectory
2 New-ADGroup –name MIMSyncAdmins –GroupCategory Security –GroupScope Global –SamAccountName MIMSyncAdmins
3 New-ADGroup –name MIMSyncOperators –GroupCategory Security –GroupScope Global –SamAccountName MIMSyncOperators
4 New-ADGroup –name MIMSyncJoiners –GroupCategory Security –GroupScope Global –SamAccountName MIMSyncJoiners
5 New-ADGroup –name MIMSyncBrowse –GroupCategory Security –GroupScope Global –SamAccountName MIMSyncBrowse
6 New-ADGroup –name MIMSyncPasswordReset –GroupCategory Security –GroupScope Global –SamAccountName MIMSyncPasswordReset
7 Add-ADGroupMember -identity MIMSyncAdmins -Members Administrator
2.3)在要构筑 MIM 的 Windows Server 上,做如下操作以保证 MIM 可以正确安装。
2.3.1)使用管理员打开 PowerShell 命令行工具,并输入如下 Command 更新组策略。
1 gpupdate /force /target:computer
2.3.2)在 Windows Server 中安装如下服务器角色。
- IIS Web Server
- Application Server(Windows Server 2016 无需安装)
- Remote Server Administration Tools
- Role Administration Tools
-AD DS and AD LDS Tools
- Active Directory module for Windows PowerShell
- .NET Framework 3.5
- .NET Framework 4.5
完成安装后,再次以管理员模式打开 PowerShell 命令行工具,输入如下 Command 安装组件的子组件。
1 import-module ServerManager
2
3 Install-WindowsFeature Web-WebServer, Net-Framework-Features,rsat-ad-powershell,Web-Mgmt-Tools,Application-Server,Windows-Identity-Foundation,Server-Media-Foundation,Xps-Viewer –includeallsubfeature -restart
注意:可能需要为 .NET Framework 3.5 功能的源文件指定其他位置。 这些功能通常在安装 Windows Server 时并不存在,但在操作系统安装磁盘源文件夹上的并行 (SxS) 文件夹中可见,例如,“d:SourcesSxS*”。如果使用了这种模式请将 Command 修改如下:
1 import-module ServerManager
2
3 Install-WindowsFeature Web-WebServer, Net-Framework-Features,rsat-ad-powershell,Web-Mgmt-Tools,Application-Server,Windows-Identity-Foundation,Server-Media-Foundation,Xps-Viewer –includeallsubfeature -restart -source d:sourcesSxS
执行完这步操作后,Windows Server 将会自动重新启动。安装和重新启动均会消耗较多时间,耐心等待系统启动完毕后再执行后续操作。
2.3.3)配置 MIM Server 需要的本地组策略。
- 启动 Run 程序,并在窗口中输入 “secpol.msc”,点击确定打开 Local Security Policy 控制程序。
- 为刚才在域中添加的 User “MIMSync” 和 “MIMMA” 添加到 Local Policies > User Rights Assignment 组策略中的用户中。
- Deny log on as a batch job
- Deny log on locally
- Deny access to this computer from the network
- Log on as a service
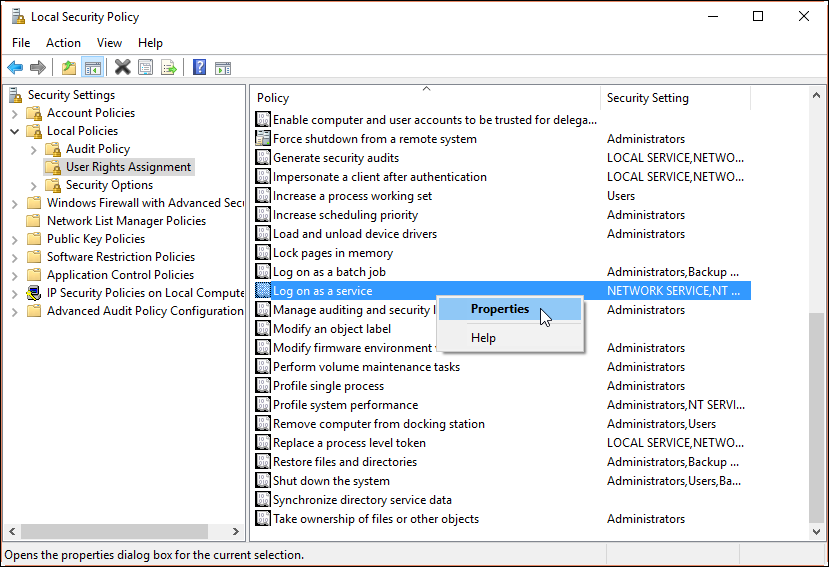
- 关闭 Local Security Policy 控制程序。
2.3.4)用管理员权限启动 PowerShell 命令行工具,并使用如下Commands 修改 MIM Server 的 IIS Web Server 的认证模式。
1 iisreset /STOP
2 C:WindowsSystem32inetsrvappcmd.exe unlock config /section:windowsAuthentication -commit:apphost
3 iisreset /START
2.3.5)使用管理员打开 PowerShell 命令行工具,并输入如下 Command 再次更新组策略。
gpupdate /force /target:computer
3)在 SQL Server 2016 上需要进行的操作:
3.1)如果 MIM Server 不是安装在 SPS 16 所在的 Server 上,我们就需要为 MIM Server 安装 SQL Server 2008 R2 SP1 以上版本的 SQL Server Native Client 来保证当前 Server 能够正确访问 SQL Server。
由于本教程使用的 SQL Server 版本为 2016,所以建议安装Microsoft SQL Server 2012 Native Client,下载地址如下:
-
- X64 Package (sqlncli.msi)
下载完毕后,请按照如下手顺进行安装:
3.2)打开 SQL Servere Management Studio,为域管理员 administrator 以及 MIMSync 和 MIMMA 添加数据库 public,dbcreator 和 sysadmin 角色保证用户可以创建和访问数据库。

3.3)打开Sql Server Configuration Manager,确认 SQL Full-text Fillter Daemon Launcher[在 SQL Server 安装中就需要安装] 和 SQL Server Agent 处于 Running 状态。如果不是,请手动启动。

4)[可选]如果有条件,可以配置一个 Exchange Server,如果没有 Exchange Server,MIM 会每 1 小时打出一条无法找到 Exchange Server 的警报 Event Log。
安装 MIM Server Synchronization Service:
1)下载 MIM Server 2016 SP1 评估版:
https://www.microsoft.com/en-us/evalcenter/evaluate-microsoft-identity-manager-2016
输入个人信息后可以下载评估版的 MIM Server。
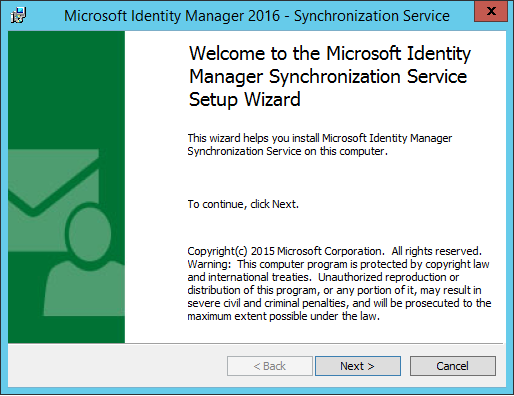
2)在 Windows Server 中打开下载的 ISO 文件,导航到 [Synchronzation Service] 文件夹后,双击 [setup.exe] 启动安装程序。
3)在欢迎页面点击 [Next]。
4)在 Review the license 页面选择 agree 并点击 [Next].
5) 在 Custome Setup 页面可以设置安装位置,文件并不大,建议直接点击 [Next].
6) 在 Synchronization Service database configuration 页面,选择:
- The SQL Server is located on: <SQL Server Computer Name or IP Address>
- The SQL Server instance is: <SQL Server Instance Name>
如图:
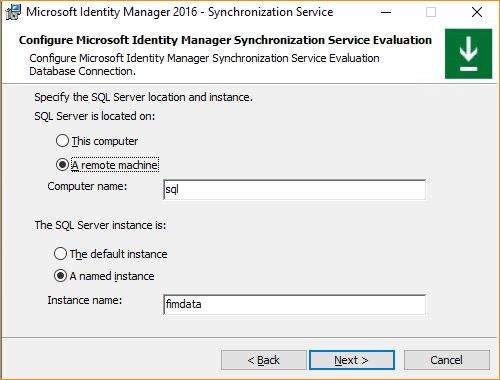
并点击 [Next]。
7)在 Synchronization Service 设置页面中,输入如下信息:
- Service account : MIMSync
- Password : <User Password>
- Service Accouont Domain or local computer name : <Domain Name>

并点击 [Next]。
8)在 Synchronization Serivce Group Setting 页面,输入如下信息:
- Administrator : MIMSyncAdmins
- Operator : MIMSyncOperators
- Joiner : MIMSyncJoiners
- Connector Browse : MIMSyncBrowse
- WMI Password Management : MIMSyncPasswordReset
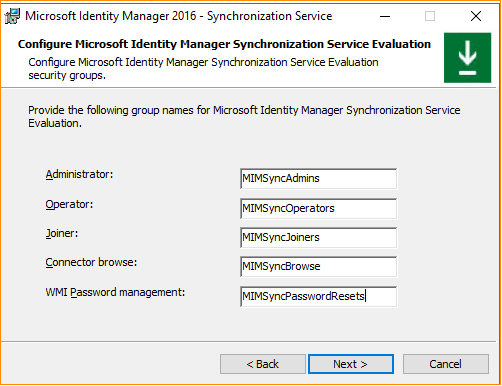
并点击 [Next]。
9)在 security settings 配置页面, 勾选 Enable firewall rules for inbound RPC communications, 然后点击 [Next]。
10)点击 [Install] 开始安装。
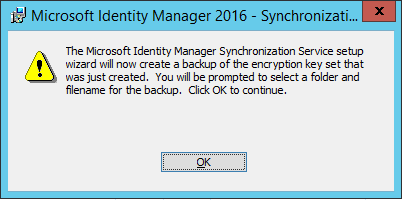
11)在安装过程中,会要求你备份你的设置数据和 key 等数据,你会看到下图的警告,点击 [OK],保存一个文件并继续安装。
12)安装完成后,点击[Finish],退出安装工具。
13) 重新启动 Server 或者 Sign out 后再次 Sign in,完成组成员和管理员的配置。
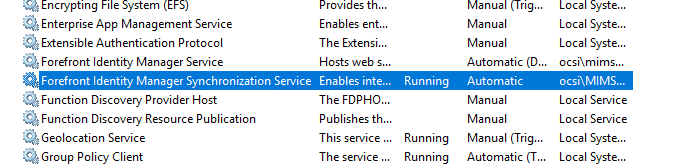
14)打开 Service 管理页面,确认 Forefront Identity Manager Sycnchronization Service 的状态为 running,如果不是,你的安装就失败了。请检查 Event log 找到失败的原因并尝试重新安装和启动这个服务。
配置 MIM 环境的更新:
1)访问下方页面,下载 MIM 最新更新 build 4.4.1642.0.
注意 : 在点击 [Download] 之后,仅需勾选 “4.4.1642.0FIMSyncService_x64_KB4021562.msp” 下载即可。其他组件无需下载。
2)将下载的文件移动到 C: 下,右键单击该文件,选择 Propertise。在 tag 中选择 Security 选项卡。点击屏幕中部的 [Edit], 再弹出的权限配置页面中,为 Users 组配置 Full control 的 Allow 权限。

3)以管理员模式启动 CMD 命令行程序,输入 cd 让目标路径退回到 C:> 下。输入文件名 "FIMSyncService_x64_KB4021562.msp" 并按回车键启动更新安装程序。
4)一直点击下一步完成安装。完成安装后需要重新启动计算机。
安装 SharePoint 同步用的组件:
1) 访问如下页面,下载 SharePoint 和 MIM 同期的必备组件:
2)双击该文件,一路 [Next] 安装。
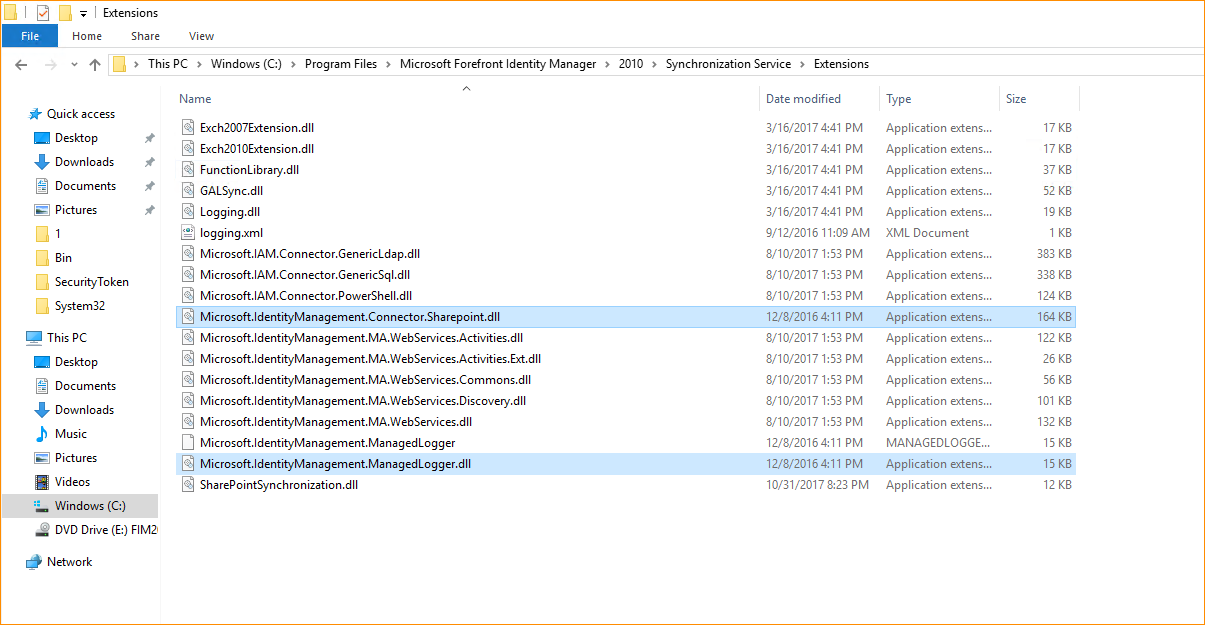
3)安装完毕后,访问 C:Program FilesMicrosoft Forefront Identity Manager2010Synchronization ServiceExtensions 路径确认 Microsoft.IdentityManagement.Connector.Sharepoint.dll 和 Microsoft.IdentityManagement.ManagedLogger.dll 是否存在。
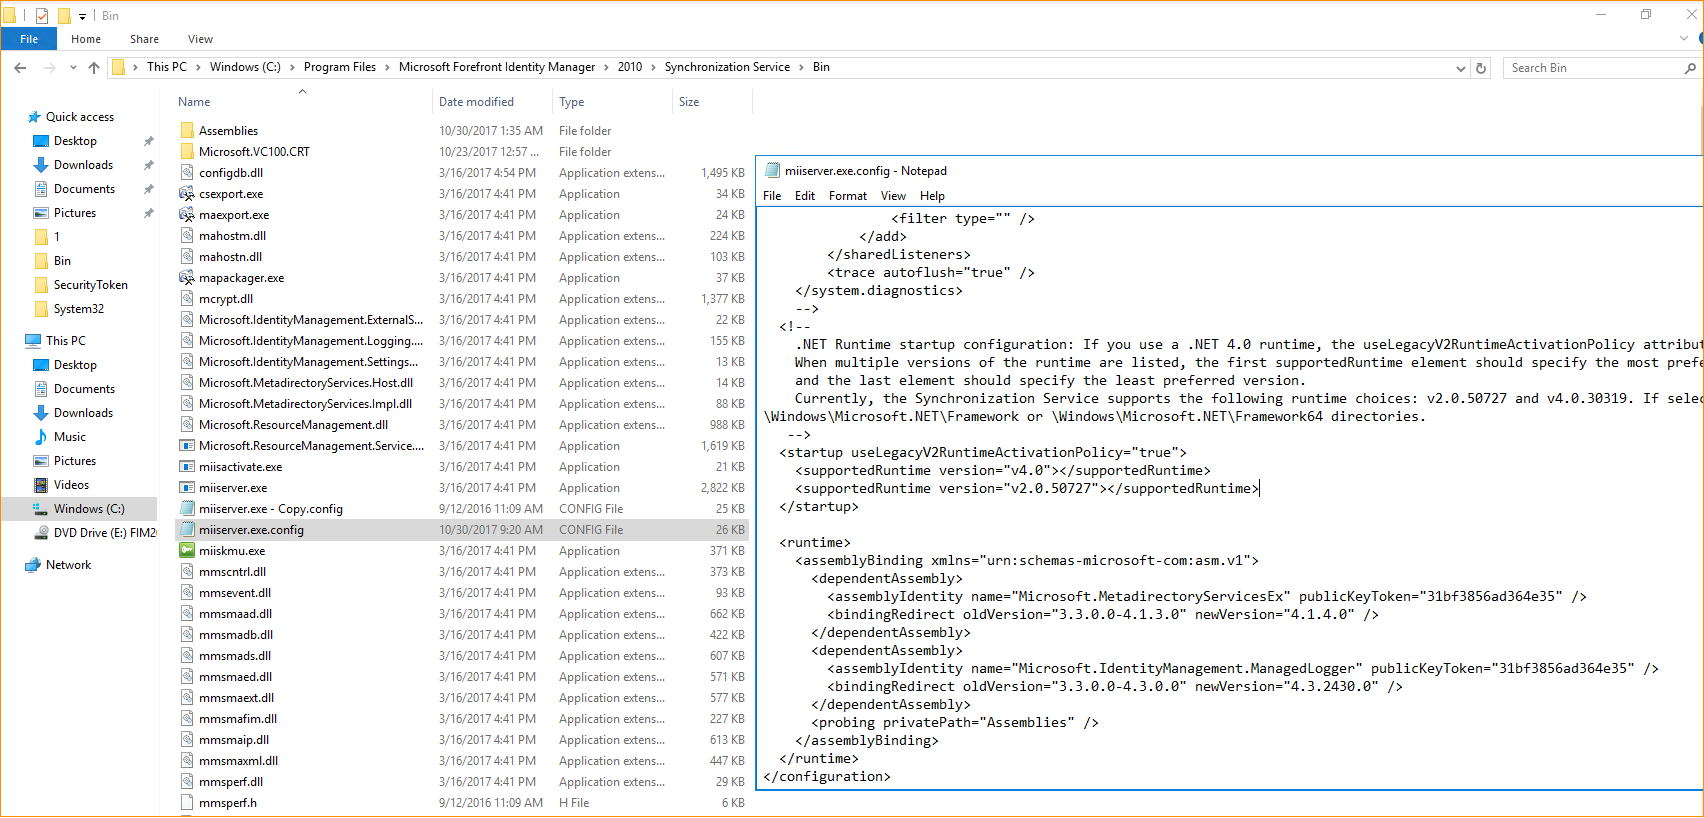
4)使用记事本打开 C:Program FilesMicrosoft Forefront Identity Manager2010Synchronization ServiceBin 路径下的 miiserver.exe.config 文件(打开前需要为 Users 组配置 Full control 权限),并修改代码如下:
修改前:
 1   <runtime>
 2     <assemblyBinding xmlns="urn:schemas-microsoft-com:asm.v1">
 3       <dependentAssembly>
 4         <assemblyIdentity name="Microsoft.MetadirectoryServicesEx" publicKeyToken="31bf3856ad364e35" />
 5         <bindingRedirect oldVersion="3.3.0.0-4.1.3.0" newVersion="4.1.4.0" />
 6      </dependentAssembly>
 7       <probing privatePath="Assemblies" />
 8     </assemblyBinding>
 9   </runtime>
修改后:
 1 <runtime>
 2     <assemblyBinding xmlns="urn:schemas-microsoft-com:asm.v1">
 3       <dependentAssembly>
 4         <assemblyIdentity name="Microsoft.MetadirectoryServicesEx" publicKeyToken="31bf3856ad364e35" />
 5         <bindingRedirect oldVersion="3.3.0.0-4.1.3.0" newVersion="4.1.4.0" />
 6       </dependentAssembly>
 7       <dependentAssembly>
 8         <assemblyIdentity name="Microsoft.IdentityManagement.ManagedLogger" publicKeyToken="31bf3856ad364e35" />
 9         <bindingRedirect oldVersion="3.3.0.0-4.3.0.0" newVersion="4.3.2430.0" />
10       </dependentAssembly>
11       <probing privatePath="Assemblies" />
12     </assemblyBinding>
13   </runtime>
保存该文件,并在 Services Management 中重启 Forefront Identity Manager Sycnchronization Service 。
使用 MIM 同步 AD 用户属性到 SharePoint:
1)需要在 SharePoint Server 端做的设置:
1.1) 打开 UPSA 的管理页面,并点击 [Configure Synchronization Settings]
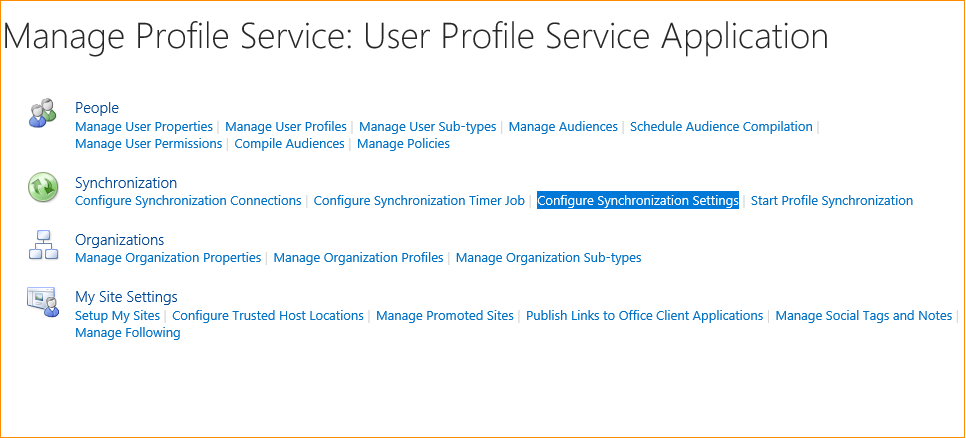
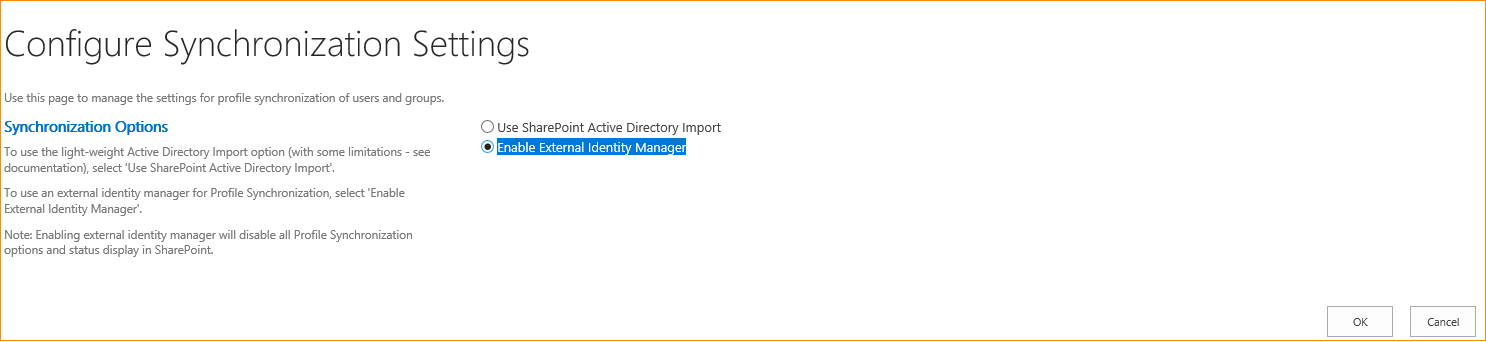
1.2) 在 [Configure Synchronization Settings] 页面的 [Synchronization Options] 选项中,选择 [Enable External Identity Manager],并点击 [OK]。
1.3)在 [Manage Service Application] 页面中,点击 [User Profile Service Application] 的空白处,并在 [SERVICEC APPLICATIONS] Tag 上点击 [Administrators]。
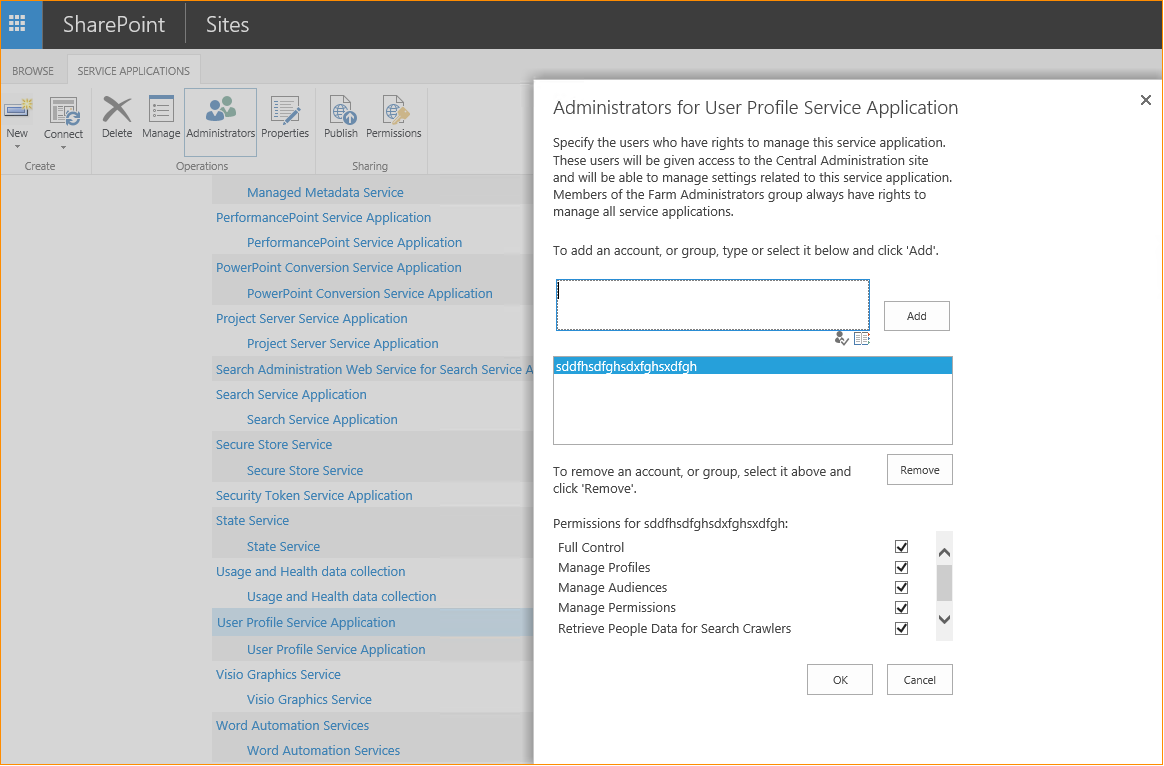
为管理员账户配置 Full Control 权限后,点击 [OK] 保存设置。
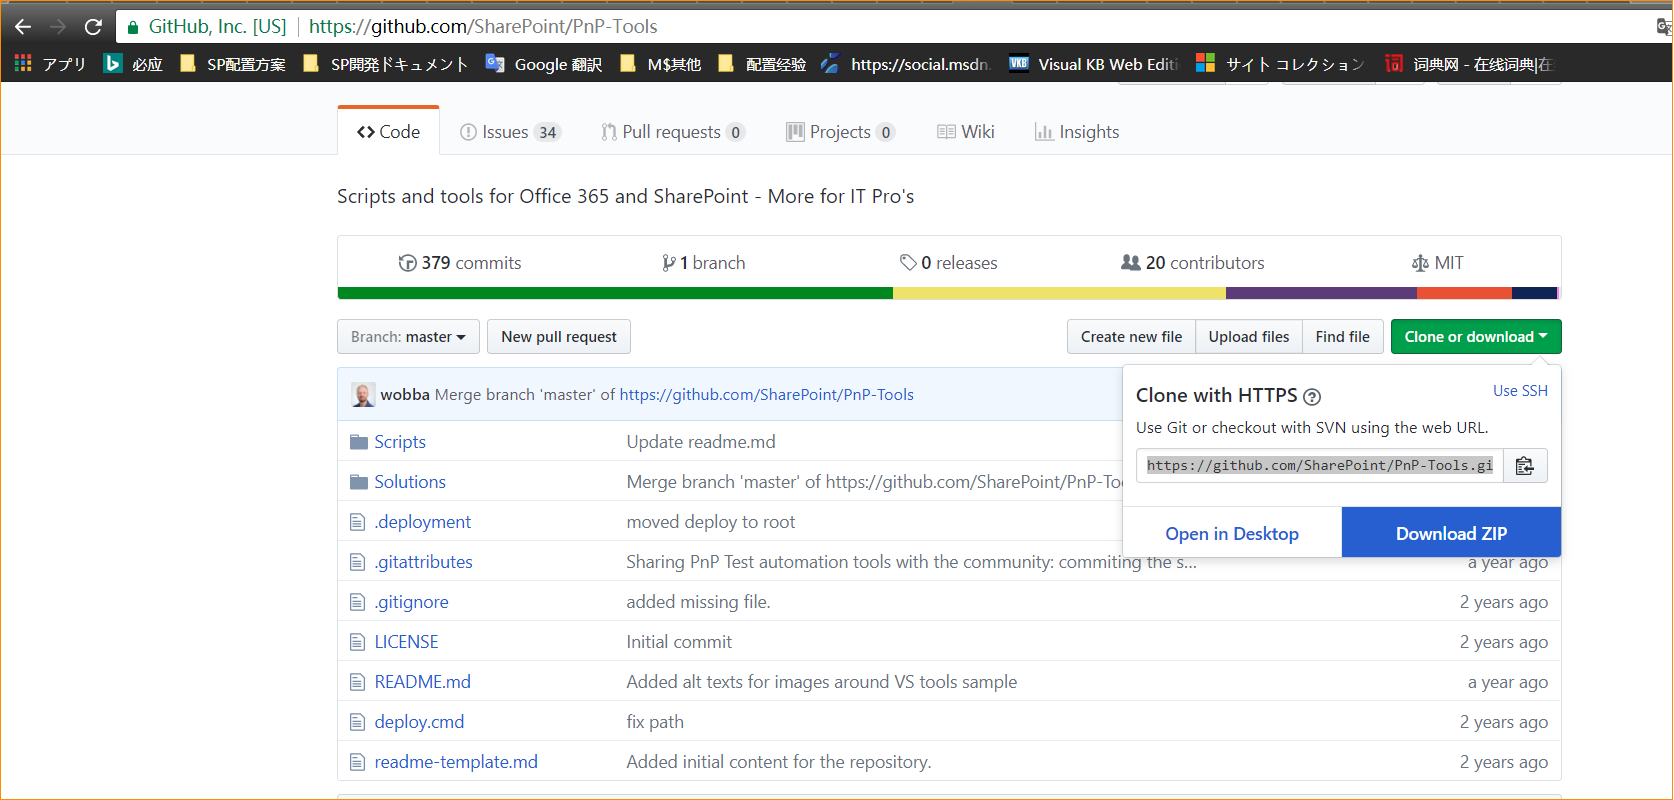
2)下载 AD to SharePoint User Profile Synchronization 解决方案。
https://github.com/SharePoint/PnP-Tools
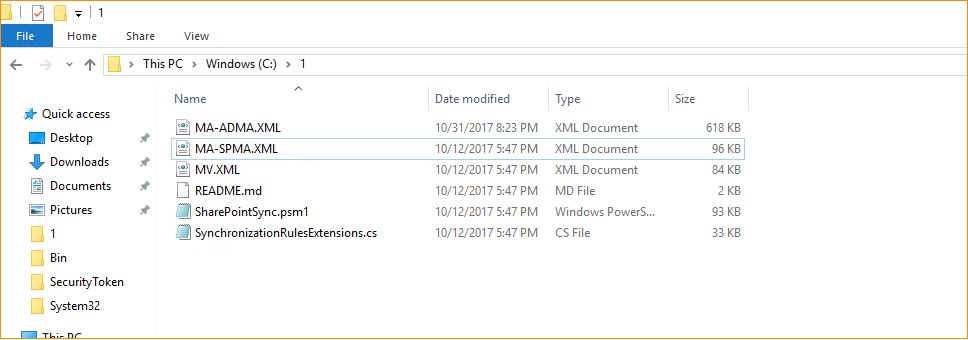
3)解压缩下载文件,并将 %file location%PnP-Tools/Solutions/UserProfile.MIMSync/下的所有文件拷贝到 MIM Server 的任意目录下,如 C:1。
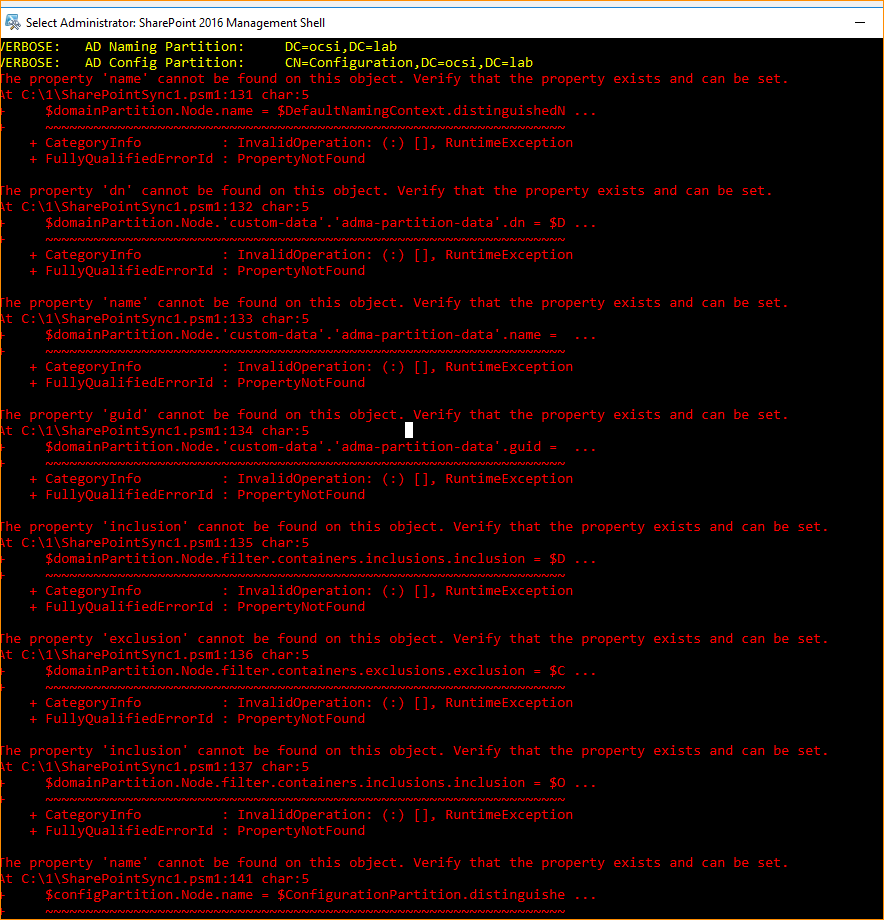
4)管理员模式打开 PowerShell 命令行工具,执行下列 Commands 来完成 SharePoint Server 和 AD DC 间的同期 Management Agent 的创建。
Import-Module C:1SharePointSync.psm1 -Force
Install-SharePointSyncConfiguration `
  -Path C:1`
  -ForestDnsName ocsi.lab `
  -ForestCredential (Get-Credential ocsiMIMMA) `
  -OrganizationalUnit 'cn=Users,dc=ocsi,dc=lab' `
  -SharePointUrl http://SPS:10086 `
  -SharePointCredential (Get-Credential OCSISharePointFarmAdmin) `
  -Verbose
你会看到执行过程中有一些 ERROR ,但是这些 ERROR 是可以无视的。
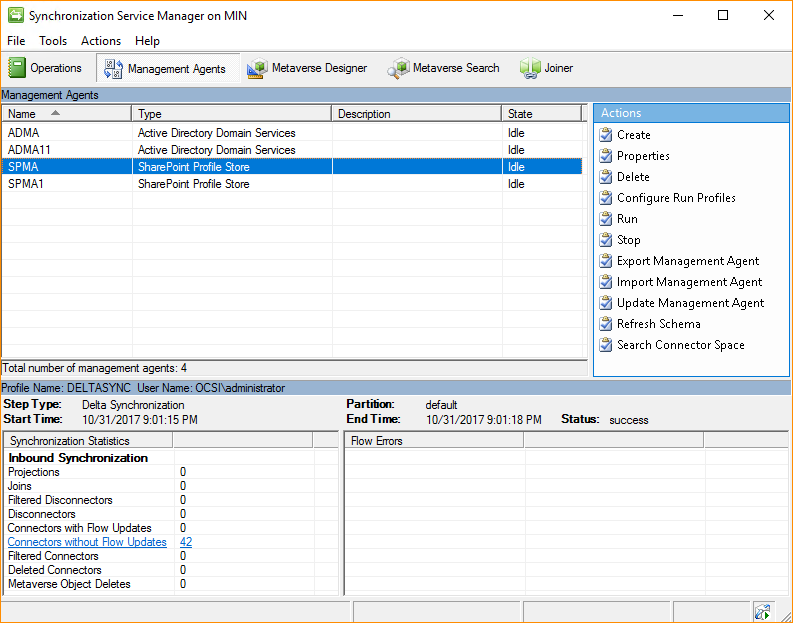
5)启动 Synchronization Serivce Manager, 并导航到 Management Agent 选项卡,你可以看到自动创建出了两个 Management Agents —— “ADMA” 和 “SPMA”。(忽略我图上的 ADMA11 和 SPMA1)。
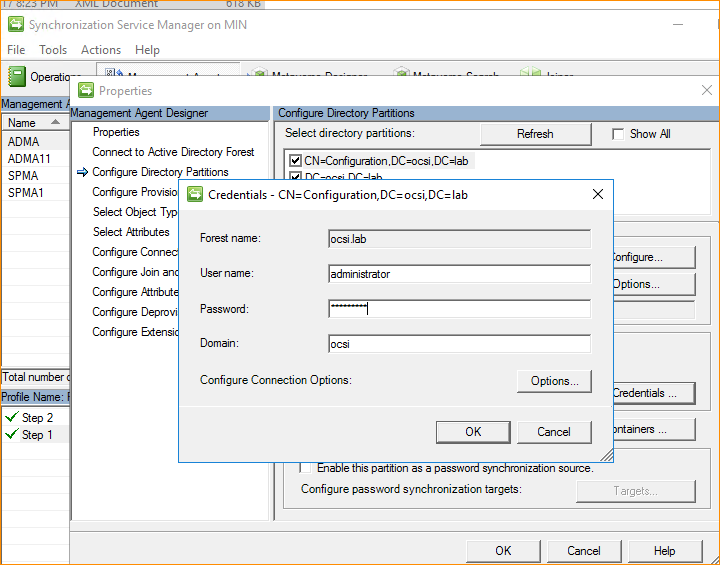
6)双击打开 ADMA, 在 Properties 对话框中,选择左侧的 [Configure Directory Partitions]。
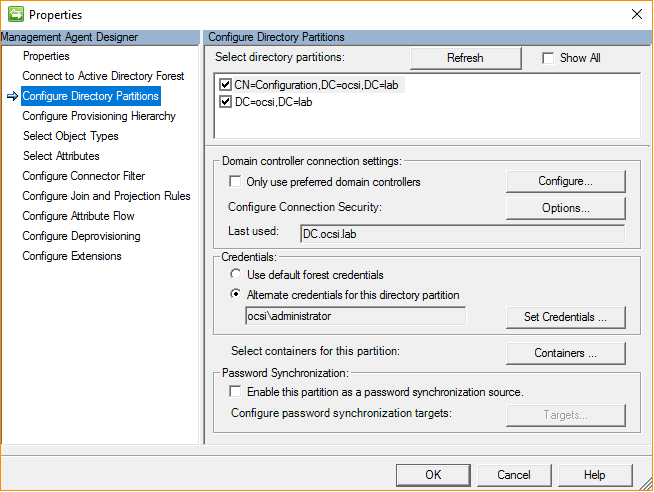
7)在“CN=Configuration,DC=ocsi,DC=lab”和 “DC=ocsi,DC=lab”的 [Credentials] 选项中,均选择 [Altemate credentials for this directory partition],并点击 [Set Credentials...] 输入 AD administrator 的用户名,密码和域后,点击 [OK] 保存设定。
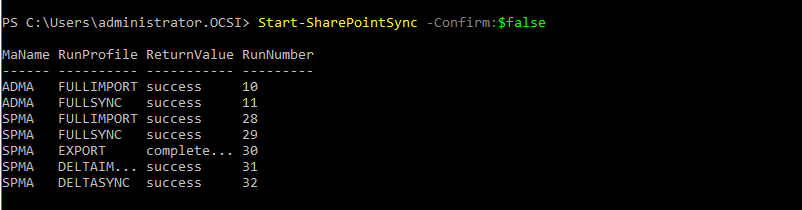
8)以管理员权限启动 PowerShell 命令行工具,并执行如下 Command 完成 AD to SharePoint 的 User Profile 同期操作。
1 Import-Module C:1SharePointSync.psm1 -Force
2 Start-SharePointSync -Confirm:$false
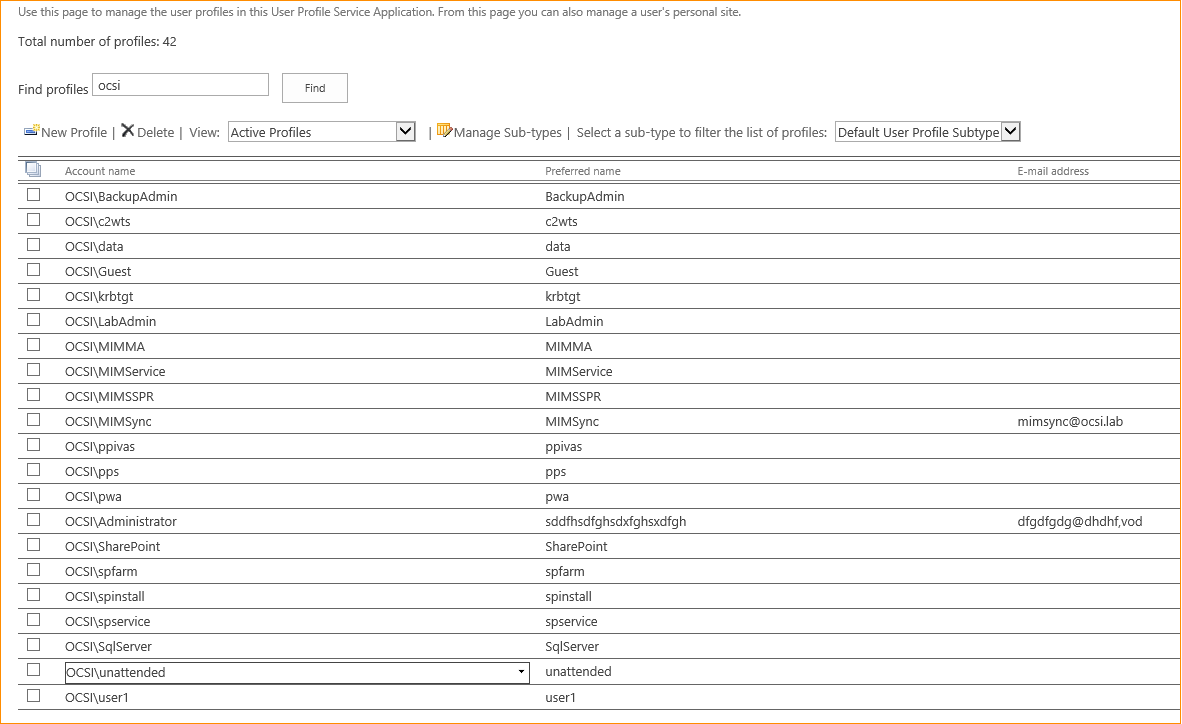
你将看到如下输出结果,并可以在 SharePoint 的 UPSA 管理页面中确认到成功同期的 SharePoint User Profile。
遇到问题的解决方案:
与 SharePoint 有诊断 log 不同,MIM 是没有单独的 log 存在的,所以我们可以使用 Event Viewer 来确认 MIM 在安装和同步过程中出现的各种问题。