在OAuth协议中,Resource Server是最终提供数据的部分。它要做的是对Client提供的access token进行身份验证,并基于access token里对用户权限的描述(scope,或其他自定义的权限claim,例如role)来赋予用户在Resource Server中对应的权限。下图中Web Api属于Resource Server.

基于asp.net core 实现的web api应用集成OAuth很简单。框架已经内置了JWT token验证的支持。如下代码即实现了OAuth验证的集成。
public void ConfigureServices(IServiceCollection services)
{   services.AddAuthentication(JwtBearerDefaults.AuthenticationScheme)
                    .AddJwtBearer(options =>
                    {
                        // base-address of your identityserver
                        options.Authority = "https://localhost:44325/";

                        // name of the API resource
                        options.Audience = "api";
                    });//注册身份验证和JWT token验证所需依赖。
}

public void Configure(IApplicationBuilder app, IHostingEnvironment env)
{
            app.UseAuthentication();//添加Authentication中间件。验证通过后,通过HttpContext.User可以获取到用户信息。包括access token中的所有信息。
}
Authentication中间件对token的验证过程大致是下面这个流程:
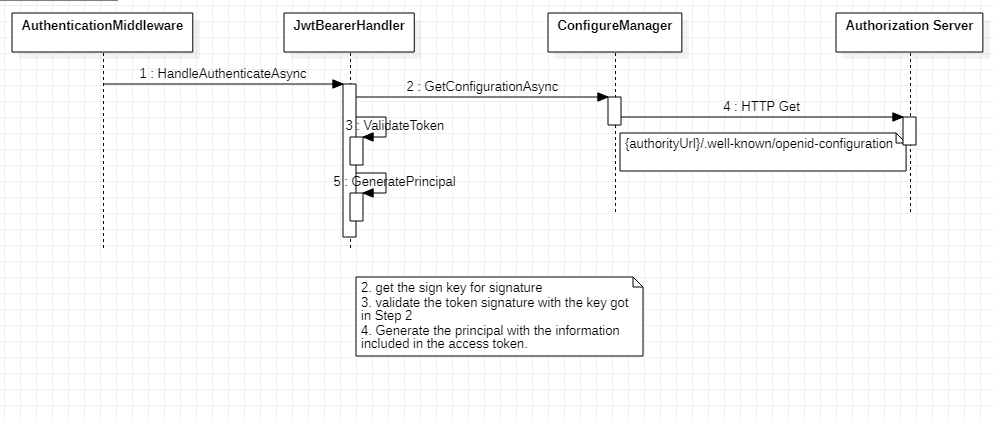
在这个过程中负责认证的中间件像Authorization Server请求了openid-configuration,这个接口主要是Authorization Server对外公开相关配置以及支持的功能的接口。其配置内容如下:
{
   "issuer":"https://localhost:5001",
   "jwks_uri":"https://localhost:5001/.well-known/openid-configuration/jwks",//定义了和安全相关(例如:签名公钥)的配置所在接口
   "authorization_endpoint":"https://localhost:5001/connect/authorize",
   "token_endpoint":"https://localhost:5001/connect/token",
   "userinfo_endpoint":"https://localhost:5001/connect/userinfo",
   "end_session_endpoint":"https://localhost:5001/connect/endsession",
   "check_session_iframe":"https://localhost:5001/connect/checksession",
   "revocation_endpoint":"https://localhost:5001/connect/revocation",
   "introspection_endpoint":"https://localhost:5001/connect/introspect",
   "device_authorization_endpoint":"https://localhost:5001/connect/deviceauthorization",
   "frontchannel_logout_supported":true,
   "frontchannel_logout_session_supported":true,
   "backchannel_logout_supported":true,
   "backchannel_logout_session_supported":true,
   "scopes_supported":[//支持的scope
      "openid",
      "email",
      "profile",
      "api",
      "offline_access"
   ],
   "claims_supported":[//支持的claims
      "sub",
      "email",
      "email_verified",
      "name"
   ],
   "grant_types_supported":[//支持的授权类型
      "authorization_code",
      "client_credentials",
      "refresh_token",
      "implicit",
      "urn:ietf:params:oauth:grant-type:device_code"
   ],
   "response_types_supported":[//支持的授权响应类型
      "code",
      "token",
      "id_token",
      "id_token token",
      "code id_token",
      "code token",
      "code id_token token"
   ],
   "response_modes_supported":[
      "form_post",
      "query",
      "fragment"
   ],
   "token_endpoint_auth_methods_supported":[
      "client_secret_basic",
      "client_secret_post"
   ],
   "subject_types_supported":[
      "public"
   ],
   "id_token_signing_alg_values_supported":[//支持的签名算法
      "RS256"
   ],
   "code_challenge_methods_supported":[
      "plain",
      "S256"
   ],
   "request_parameter_supported":true
}