1. HelloWorld
步骤:
- 加入 jar 包
mons-logging-1.1.3.jar
spring-aop-4.0.0.RELEASE.jar
spring-beans-4.0.0.RELEASE.jar
spring-context-4.0.0.RELEASE.jar
spring-core-4.0.0.RELEASE.jar
spring-expression-4.0.0.RELEASE.jar
spring-web-4.0.0.RELEASE.jar
spring-webmvc-4.0.0.RELEASE.jar
>maven添加:http://mvnrepository.com/artifact/org.springframework/spring-webmvc/4.0.0.RELEASE
>
>  ``` xml
>  <dependency>
>      <groupId>org.springframework</groupId>
>      <artifactId>spring-webmvc</artifactId>
>      <version>4.0.0.RELEASE</version>
>    </dependency>
> ```
-
在 web.xml 中配置
DispatcherServlet<!DOCTYPE web-app PUBLIC "-//Sun Microsystems, Inc.//DTD Web Application 2.3//EN" "http://java.sun.com/dtd/web-app_2_3.dtd" > <web-app> <display-name>Archetype Created Web Application</display-name> <!--配置 DispatcherServlet--> <servlet> <servlet-name>springDispatcherServlet</servlet-name> <servlet-class>org.springframework.web.servlet.DispatcherServlet</servlet-class> <!--配置 DispatcherServlet 的一个初始化参数:配置 SpringMVC 配置文件的位置和名称--> <!--实际上可以不通过 contextConfigLocation来配置springmvc.xml,而使用默认 默认文件位置:/WEB-INF/<servlet-name>-servlet.xml --> <init-param> <param-name>contextConfigLocation</param-name> <param-value>classpath:springmvc.xml</param-value> </init-param> <!-- 标记容器是否应该在web应用程序启动的时候就加载这个servlet: 如果值为正整数或者0时,表示容器在应用启动时就加载并初始化这个servlet, 值越小,servlet的优先级越高,就越先被加载。值相同时,容器就会自己选择顺序来加载。 --> <load-on-startup>1</load-on-startup> </servlet> <!--指定servlet映射路径--> <servlet-mapping> <servlet-name>springDispatcherServlet</servlet-name> <url-pattern>/</url-pattern> </servlet-mapping> </web-app> -
加入 Spring MVC 的配置文件
<?xml version="1.0" encoding="UTF-8"?> <beans xmlns="http://www.springframework.org/schema/beans" xmlns:xsi="http://www.w3.org/2001/XMLSchema-instance" xmlns:context="http://www.springframework.org/schema/context" xsi:schemaLocation="http://www.springframework.org/schema/beans http://www.springframework.org/schema/beans/spring-beans.xsd http://www.springframework.org/schema/context http://www.springframework.org/schema/context/spring-context.xsd"> <!--扫描包--> <context:component-scan base-package="com.atguigu.springmvc"></context:component-scan> <!--配置视图解析器: 如何把hanlder 方法解析为实际物理视图 --> <bean class="org.springframework.web.servlet.view.InternalResourceViewResolver"> <property name="prefix" value="/WEB-INF/views/"></property> <property name="suffix" value=".jsp"></property> </bean> </beans> -
编写处理请求的处理器,并标识为处理器
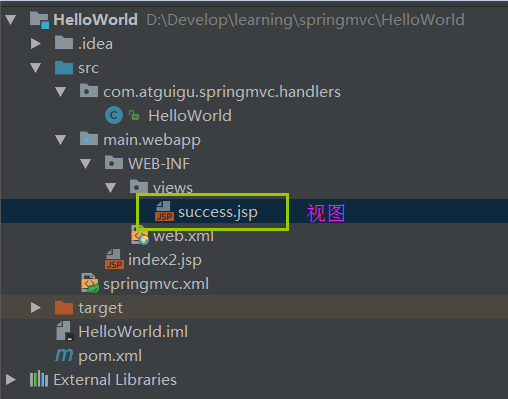
【重点】:通过测试,大小写敏感。success.jsp 报错,找不到文件应该是Success.jsp@Controller public class HelloWorld { /** * 1.使用@RequestMapping 来映射请求 URL * 2.返回值通过实际的值解析为物理视图,对于 InternalResourceViewResolver 视图解析器,会做如下解析: * (前缀prefix + returnVal + 后缀suffix),得到实际物理视图,然后做转发 * /WEB-INF/views/Success.jsp * * 【重点】:通过测试,大小写敏感。success.jsp 报错 * @return */ @RequestMapping("/helloworld") public String hello(){ System.out.println("hello world@!"); return "Success"; } } -
编写视图
2.@RequestMapping
- Spring MVC 使用 @RequestMapping 注解为控制器指定可以处理哪些 URL 请求
- 在控制器的类定义及方法定义处都可标注
@RequestMapping- 类定义处:提供初步的请求映射信息。相对于 WEB 应用的根目录
- 方法处:提供进一步的细分映射信息。相对于类定义处的 URL。若类定义处未标注 @RequestMapping,则方法处标记的 URL 相对于WEB 应用的根目录
- DispatcherServlet 截获请求后,就通过控制器上
- @RequestMapping 提供的映射信息确定请求所对应的处理方法。
先建一个行测试类
@RequestMapping("/hello")
@Controller
public class springmvcTest {

    public static final String SUCCESS = "success";

    @RequestMapping("/testRequestMapping")
    public String testRequestMapping(){
        System.out.println("testRequestMapping");
        return SUCCESS;
    }
}
前端
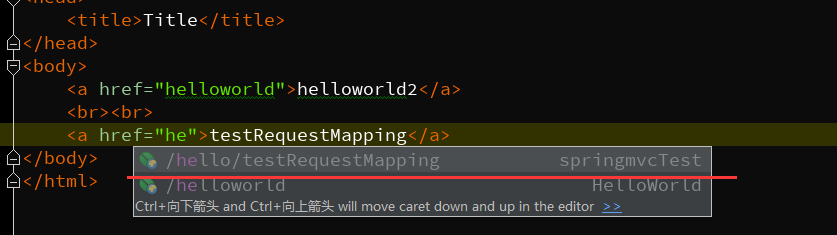
    <a href="helloworld">helloworld2</a>
    <br><br>
    <a href="/hello/testRequestMapping">testRequestMapping</a>
映射请求参数、请求方法或请求头
- @RequestMapping 除了可以使用请求 URL 映射请求外,还可以使用请求方法、请求参数及请求头映射请求
- @RequestMapping 的 value、method、params 及 heads 分别表示请求 URL、请求方法、请求参数及请求头的映射条件,他们之间是与的关系,联合使用多个条件可让请求映射更加精确化。
2.1 请求方法 method
@RequestMapping(value = "/testMethod",method = RequestMethod.POST)
    public String  testMethod() {
        System.out.println("testMethod");
        return SUCCESS;
     }
2.2 请求参数与请求头 params 和 headers
- params 和 headers支持简单的表达式:
- param1: 表示请求必须包含名为 param1 的请求参数
- param1: 表示请求不能包含名为 param1 的请求参数
- param1 != value1: 表示请求包含名为 param1 的请求参数,但其值不能为 value1
- {“param1=value1”, “param2”}: 请求必须包含名为 param1 和param2 的两个请求参数,且 param1 参数的值必须为 value1
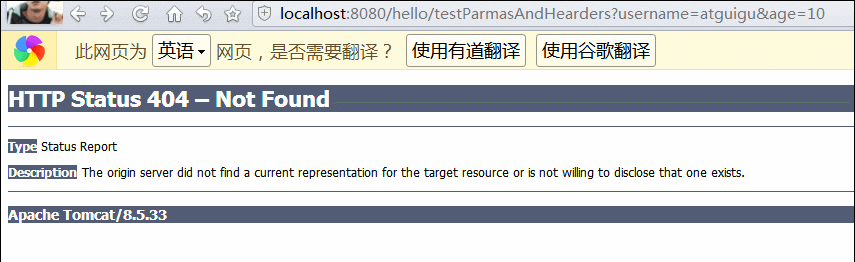
    @RequestMapping(value = "testParmasAndHearders",params = {"username","age!=10"},
            headers = {})
    public String testParmasAndHearders(){
        System.out.println("testParmasAndHearders");
        return SUCCESS;
    }
前端
<a href="/hello/testParmasAndHearders?username=atguigu&age=10">testParmasAndHearders</a>
因为 params 有age!=10 条件
2.3 Ant风格路径
- Ant 风格资源地址支持 3 种匹配符:
- ?:匹配文件名中的一个字符
- *:匹配文件名中的任意字符
- : 匹配多层路径
- @RequestMapping 还支持 Ant 风格的 URL:
- /user/*/createUser: 匹配
/user/aaa/createUser、/user/bbb/createUser 等 URL - /user/**/createUser: 匹配
/user/createUser、/user/aaa/bbb/createUser 等 URL - /user/createUser??: 匹配
/user/createUseraa、/user/createUserbb 等 URL
- /user/*/createUser: 匹配
2.4 @PathVariable 映射 URL 绑定的占位符
- 带占位符的 URL 是 Spring3.0 新增的功能,该功能在 SpringMVC 向 REST 目标挺进发展过程中具有里程碑的意义通过 @PathVariable 可以将 URL 中占位符参数绑定到控
- 制器处理方法的入参中:URL 中的 {xxx} 占位符可以通过 @PathVariable("xxx") 绑定到操作方法的入参中。
@RequestMapping(value = "/testPathVariable/{id}")
    public String  testPathVariable(@PathVariable("id") Integer id) {
        System.out.println("testPathVariable");
        return SUCCESS;
    }
测试html
<a href="/hello/testPathVariable/1">testPathVariable</a>
2.5 REST 风格
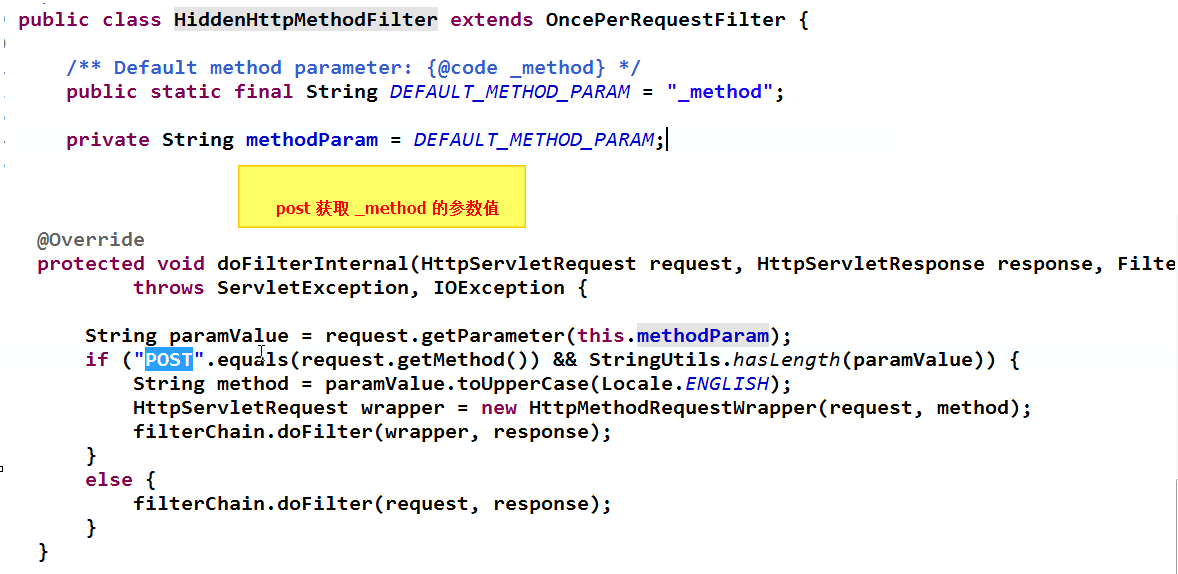
HiddenHttpMethodFilter:浏览器 form 表单只支持 GET与 POST 请求,而DELETE、PUT 等 method 并不支持,Spring3.0 添加了一个过滤器,可以将这些请求转换为标准的 http 方法,使得支持 GET、POST、PUT 与 DELETE 请求。
(1)如何发送PUT和DELETE请求?
1.需要配置HiddenHttpMethodFilter
在 main/webapp/WEB-INF/web.xml
  <!--配置HiddenHttpMethodFilter-->
  <filter>
	<filter-name>HiddenHttpMethodFilter</filter-name>
	<filter-class>org.springframework.web.filter.HiddenHttpMethodFilter</filter-class>
  </filter>
  <filter-mapping>
	<filter-name>HiddenHttpMethodFilter</filter-name>
	<url-pattern>/*</url-pattern>
  </filter-mapping>
2.需要发送POST请求
3.需要在发送POST请求时,携带一个name="_method"的隐藏域,值为PUT或DELETE
<form action="/hello/testRestDelete/1" method="post">
        <input name="_method" type="hidden" value="DELETE">
        <input type="submit" value="DELETE">
    </form>
(2)springmvc方法中如何得到id?
使用@PathVariable 注解
示例:
/order/1 HTTP GET :得到 id = 1 的 order
/order/1 HTTP DELETE:删除 id = 1的 order
/order/1 HTTP PUT:更新id = 1的 order
/order HTTP POST:新增 order
    @RequestMapping(value = "/testRest/{id}", method = RequestMethod.GET)
    public String testRest(@PathVariable Integer id) {
        System.out.println("testRest GET:" + id);
        return SUCCESS;
    }

    @RequestMapping(value = "/testRest", method = RequestMethod.POST)
    public String testRest() {
        System.out.println("testRest POST.");
        return SUCCESS;
    }

    @RequestMapping(value = "/testRestDelete/{id}", method = RequestMethod.DELETE)
    public String testRestDelete(@PathVariable Integer id) {
        System.out.println("testRest DELETE:" + id);
        return SUCCESS;
    }

    @RequestMapping(value = "/testRest/{id}", method = RequestMethod.PUT)
    public String testRestPut(@PathVariable Integer id) {
        System.out.println("testRest PUT:" + id);
        return SUCCESS;
    }
3. 请求处理方法签名
必要时可以对方法及方法入参标注相应的注解(@PathVariable 、@RequestParam、@RequestHeader 等)、Spring MVC 框架会将 HTTP 请求的信息绑定到相应的方法入参中,并根据方法的返回值类型做出相应的后续处理。
3.1 使用 @RequestParam 绑定请求参数值
在处理方法入参处使用 @RequestParam 可以把请求参
数传递给请求方法
- value:参数名
- required:是否必须。默认为 true, 表示请求参数中必须包含对应的参数,若不存在,将抛出异常
   @RequestMapping(value = "/testRequestParam")
    public String testRequestParam(
            @RequestParam(value = "username", required = false, defaultValue = "0")String username,
            @RequestParam(value = "id", required = false, defaultValue = "0") int id) {
        System.out.println("testRequestParam username:" + username + ",id:" + id);
        return SUCCESS;
    }
前端
<a href="/hello/testRequestParam?username=aaaaaa&id=10">testRequestParam</a>