window mysql 安装步骤
-
社区版本下载地址: https://dev.mysql.com/downloads/file/?id=474802

-
下载完成后,得到mysql-installer-web-community-5.7.21.0.msi文件,双击安装

-
进入安装界面,下一步

-
勾选server only 或者 Developer Default都可以,这里勾选仅服务器形式安装,然后下一步

-
点击execute后,等待下载完成并自动安装

-
安装完成后,一直点击下一步,直到出现设置root用户密码的界面


-
设置完密码后,继续下一步, 到如下页面后,若白色圆圈中都是绿色则代表成功,否则出现红色就说明本地环境有问题。默认数据端口就是3306

-
打开开始mysql默认命令行客户端,测试是否安装成功


-
至此,window环境下mysql安装完成
linux mysql 安装步骤
CentOS 7 版本将MySQL数据库软件从默认的程序列表中移除,用MariaDB代替了,MariaDB数据库管理系统是MySQL的一个分支,主要由开源社区在维护,采用GPL授权许可。开发这个分支的原因之一是:甲骨文公司收购了MySQL后,有将MySQL闭源的潜在风险,因此社区采用分支的方式来避开这个风险。MariaDB的目的是完全兼容MySQL,包括API和命令行,使之能轻松成为MySQL的代替品
-
卸载centos7自带的MariaDB
[root@VM_0_9_centos ~]# yum list installed | grep mariadb #检查mariadb是否已安装 Repository epel is listed more than once in the configuration mariadb-libs.x86_64 1:5.5.52-1.el7 @anaconda [root@VM_0_9_centos ~]# yum -y remove mariadb* #全部卸载 Loaded plugins: fastestmirror, langpacks Repository epel is listed more than once in the configuration Resolving Dependencies --> Running transaction check ---> Package mariadb-libs.x86_64 1:5.5.52-1.el7 will be erased --> Processing Dependency: libmysqlclient.so.18()(64bit) for package: 2:postfix-2.10.1-6.el7.x86_64 --> Processing Dependency: libmysqlclient.so.18(libmysqlclient_18)(64bit) for package: 2:postfix-2.10.1-6.el7.x86_64 --> Running transaction check ---> Package postfix.x86_64 2:2.10.1-6.el7 will be erased --> Finished Dependency Resolution ##########################省略中间部分#################### Removed: mariadb-libs.x86_64 1:5.5.52-1.el7 Dependency Removed: postfix.x86_64 2:2.10.1-6.el7 Complete! -
下载并安装mysql的YUM源
- 下载mysql的yum源
wget -P /home/wuzhazha http://dev.mysql.com/get/mysql57-community-release-el7-11.noarch.rpm- 安装mysql的YUM源
rpm -ivh mysql57-community-release-el7-11.noarch.rpm[root@VM_0_9_centos home]# rpm -ivh mysql57-community-release-el7-11.noarch.rpm warning: mysql57-community-release-el7-11.noarch.rpm: Header V3 DSA/SHA1 Signature, key ID 5072e1f5: NOKEY Preparing... ################################# [100%] Updating / installing... 1:mysql57-community-release-el7-11 ################################# [100%]- 检查mysql的YUM源是否安装成功
yum repolist enabled | grep "mysql.*-community.*"[root@VM_0_9_centos home]# yum repolist enabled | grep "mysql.*-community.*" Repository epel is listed more than once in the configuration mysql-connectors-community/x86_64 MySQL Connectors Community 131 mysql-tools-community/x86_64 MySQL Tools Community 100 mysql57-community/x86_64 MySQL 5.7 Community Server 384看到上图所示表示安装成功
- 查看mysql版本
yum repolist all | grep mysql[root@VM_0_9_centos home]# yum repolist all | grep mysql Repository epel is listed more than once in the configuration mysql-cluster-7.5-community/x86_64 MySQL Cluster 7.5 Community disabled mysql-cluster-7.5-community-source MySQL Cluster 7.5 Community - disabled mysql-cluster-7.6-community/x86_64 MySQL Cluster 7.6 Community disabled mysql-cluster-7.6-community-source MySQL Cluster 7.6 Community - disabled mysql-connectors-community/x86_64 MySQL Connectors Community enabled: 131 mysql-connectors-community-source MySQL Connectors Community - disabled mysql-tools-community/x86_64 MySQL Tools Community enabled: 100 mysql-tools-community-source MySQL Tools Community - Sourc disabled mysql-tools-preview/x86_64 MySQL Tools Preview disabled mysql-tools-preview-source MySQL Tools Preview - Source disabled mysql55-community/x86_64 MySQL 5.5 Community Server disabled mysql55-community-source MySQL 5.5 Community Server - disabled mysql56-community/x86_64 MySQL 5.6 Community Server disabled mysql56-community-source MySQL 5.6 Community Server - disabled mysql57-community/x86_64 MySQL 5.7 Community Server enabled: 384 mysql57-community-source MySQL 5.7 Community Server - disabled mysql80-community/x86_64 MySQL 8.0 Community Server disabled mysql80-community-source MySQL 8.0 Community Server - disabled可以看到,默认5.7是启用的版本。可以通过类似下面的语句来启动或禁用某些版本
yum-config-manager --enable mysql57-community
yum-config-manager --disable mysql56-community
或者通过修改vim /etc/yum.repos.d/mysql-community.repo文件,改变默认安装的mysql版本。比如要安装5.6版本,将5.7源的enabled=1改成enabled=0,然后再将5.6源的enabled=0改成enabled=1即可 。
注意,任何时候,只能启用一个版本 。查看当前的启用的 MySQL 版本:
yum repolist enabled | grep mysql[root@VM_0_9_centos home]# yum repolist enabled | grep mysql Repository epel is listed more than once in the configuration mysql-connectors-community/x86_64 MySQL Connectors Community 131 mysql-tools-community/x86_64 MySQL Tools Community 100 mysql57-community/x86_64 MySQL 5.7 Community Server 384 -
安装mysql
安装过程中一直输入"y"就可以了,当出现下面的结果时,就代表mysql数据库安装成功
yum install mysql-community-server -
启动mysql服务
systemctl start mysqld -
进入mysql命令行
[root@VM_0_9_centos ~]# mysql
ERROR 1045 (28000): Access denied for user 'root'@'localhost' (using password: NO)
出现上述错误,说明mysql安装完后给root用户生成了一个默认密码,所以你需要使用密码登录。
为了加强安全性,MySQL5.7为root用户随机生成了一个密码,如果安装的是RPM包,则默认是在/var/log/mysqld.log中。
[root@VM_0_9_centos ~]# grep 'temporary password' /var/log/mysqld.log
2019-11-04T06:34:15.567040Z 1 [Note] A temporary password is generated for root@localhost: NsRSsti#+7Vw
密码为NsRSsti#+7Vw
[root@VM_0_9_centos ~]# mysql -uroot -pNsRSsti#+7Vw
mysql: [Warning] Using a password on the command line interface can be insecure.
Welcome to the MySQL monitor.  Commands end with ; or g.
Your MySQL connection id is 4
Server version: 5.7.28

Copyright (c) 2000, 2019, Oracle and/or its affiliates. All rights reserved.

Oracle is a registered trademark of Oracle Corporation and/or its
affiliates. Other names may be trademarks of their respective
owners.

Type 'help;' or 'h' for help. Type 'c' to clear the current input statement.

mysql>
出现上述提示,则表示登录成功!
接下来执行
use mysql可能会出现如下错误mysql> use mysql ERROR 1820 (HY000): You must reset your password using ALTER USER statement before executing this statement.因此,在使用前就必须修改密码
-
修改mysql密码
alter user 'root'@'localhost' identified by '123456';
# mysqladmin -u root password 'Root123456'
#set password for 'root'@'localhost' = password('123456');
可能出现如下问题
mysql>alter user 'root'@'localhost' identified by 'Root123456';
ERROR 1819 (HY000): Your password does not satisfy the current policy requirements
这是由于设置的密码不符合当前的密码策略,两种处理方式:1.设置符合当前密码策略的复杂密码;2.修改策略,依然使用弱密码(自己玩的话就没啥所谓)
这里就以方式2为例:
密码策略主要跟 validate_password_policy 取值有关,默认取值为
MEDIUM,密码长度主要跟validate_password_length取值有关,默认值为8
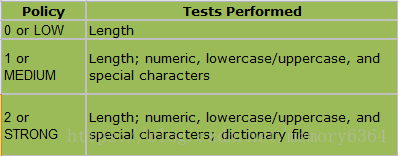
更改两个策略,1是允许弱密码,2是更改默认的密码长度
set global validate_password_policy=LOW;
set global validate_password_length=6; #最小值为4,设置小于4也会被重置为4
mysql> set global validate_password_policy=LOW; Query OK, 0 rows affected (0.00 sec) mysql> set global validate_password_length=6; Query OK, 0 rows affected (0.00 sec) mysql> SHOW VARIABLES LIKE 'validate_password%' #查看密码策略
策略更改成功,继续修改密码
mysql> alter user 'root'@'localhost' identified by 'Root123456';
Query OK, 0 rows affected (0.00 sec)
如上,修改密码成功!
-
修改数据库字符集,默认latinl
mysql> SHOW VARIABLES LIKE 'character%'
默认服务器的字符器是 latin1 ,对中文不友好。修改 /etc/my.cnf 文件,添加字符集的设置
[root@VM_0_9_centos ~]# vim  /etc/my.cnf

[mysql]
default-character-set=utf8 # 添加部分

# For advice on how to change settings please see
# http://dev.mysql.com/doc/refman/5.7/en/server-configuration-defaults.html

[mysqld]
character_set_server=utf8 # 添加部分
#
# Remove leading # and set to the amount of RAM for the most important data
# cache in MySQL. Start at 70% of total RAM for dedicated server, else 10%.
# innodb_buffer_pool_size = 128M
#
# Remove leading # to turn on a very important data integrity option: logging
# changes to the binary log between backups.
# log_bin
#
# Remove leading # to set options mainly useful for reporting servers.
# The server defaults are faster for transactions and fast SELECTs.
# Adjust sizes as needed, experiment to find the optimal values.
# join_buffer_size = 128M
# sort_buffer_size = 2M
# read_rnd_buffer_size = 2M
datadir=/var/lib/mysql
socket=/var/lib/mysql/mysql.sock

# Disabling symbolic-links is recommended to prevent assorted security risks
symbolic-links=0

log-error=/var/log/mysqld.log
pid-file=/var/run/mysqld/mysqld.pid
修改完成后,重启mysql,
systemctl restart mysqld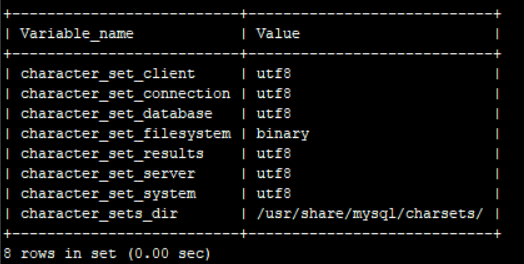
如上,更改成功!
-
需要开启远程访问(参考)
- 防火墙设置
#远程访问 MySQL, 需开放默认端口号 3306 firewall-cmd --permanent --zone=public --add-port=3306/tcp firewall-cmd --permanent --zone=public --add-port=3306/udp firewall-cmd --reload #使最新的防火墙设置规则生效- 创建用户并授予权限
创建一个普通用户 sa ,密码是123456;给这个用户授予 SELECT,INSERT,UPDATE,DELETE 的远程访问的权限,这个账号一般用于提供给实施的系统访问
CREATE USER 'sa'@'%' IDENTIFIED BY '123456';
GRANT SELECT,INSERT,UPDATE,DELETE ON *.* TO 'sa'@'%';
创建一个管理员用户 admin 账号 ,密码是 123456 ;给这个用户授予所有的远程访问的权限。这个用户主要用于管理整个数据库、备份、还原等操作
CREATE USER 'admin'@'%' IDENTIFIED BY '123456'; GRANT ALL PRIVILEGES ON *.* TO 'admin'@'%';- 设置用户 root 的访问权限
#可以在任意 IP 下被访问 grant all privileges on *.* to root@"%" identified by "密码"; #如果上述执行完并flush privileges还是不生效,可以换成以下方式 update user set host='%' where user='root' #设置用户 root 可以在本地被访问 grant all privileges on *.* to root@"localhost" identified by "密码";- 使授权立刻生效(以上授权操作最好都附加上该语句)
flush privileges; -
常用命令
systemctl start mysqld  #启动mysqld
systemctl stop mysqld  #停止mysqld
systemctl restart mysqld  #重启mysqld
systemctl enable mysqld  #设置开机启动
systemctl status mysqld  #查看 MySQL Server 状态
参考
- https://blog.csdn.net/lihaiyong92/article/details/81330046 (安装部分)
- https://www.cnblogs.com/huangxinyuan650/p/6360464.html(安装部分)
- https://blog.csdn.net/qq_32786873/article/details/80664160 (密码设置)
- https://blog.csdn.net/hello_world_qwp/article/details/79551789 (密码策略)
- https://blog.csdn.net/memory6364/article/details/82426052 (密码策略)