链接:https://zhuanlan.zhihu.com/p/22520818
来源:知乎
著作权归作者所有。商业转载请联系作者获得授权,非商业转载请注明出处。
网上看到过大多实现夜间模式的效果,实现方式总结起来,发现好繁琐,大多数夜间模式实现都是基于另一套apk来,作为依赖实现,像QQ,微信,这种直接提供给你一套皮肤来切换背景,如果要做这个皮肤开发的工作量不小于一个软件的开发周期,而知乎简书这种夜间模式的实现就相对于更加轻量级了。
今天这里采用qydq/提供的an框架来简单快速实现夜间模式,an框架提供了两种方式实现夜间模式,一种比较简单,一种比较复杂。
Athor IP:sunshuntao(qydq)(莳萝花)。
Email:qyddai@gmail.com。
知乎地址:Android开发 - 知乎专栏
Begin
♥♥♥ 请关注后获取源码 ♥♥♥
创建时间:2016年08月29日;最近修改时间:2016年08月30日。
GitHub - qydq/an-maven-base: android studio创建github 的repository
Tips
1。前言(包含该项目主要实现的功能的简短说明,运行配置;可选)。
2。实现效果(如果没有可以省略,但是建议要包含,因为项目以后自己看到的时候会帮助自己理解)。
3。思路或使用(代码)。
## *** 使用方法 *** ##
4。重要知识点(总结,思考)。
5。内容参考(尊重原创)。
6。联系作者。
*** -----------------------------woshifengexian-----------------------------------***
2,实现效果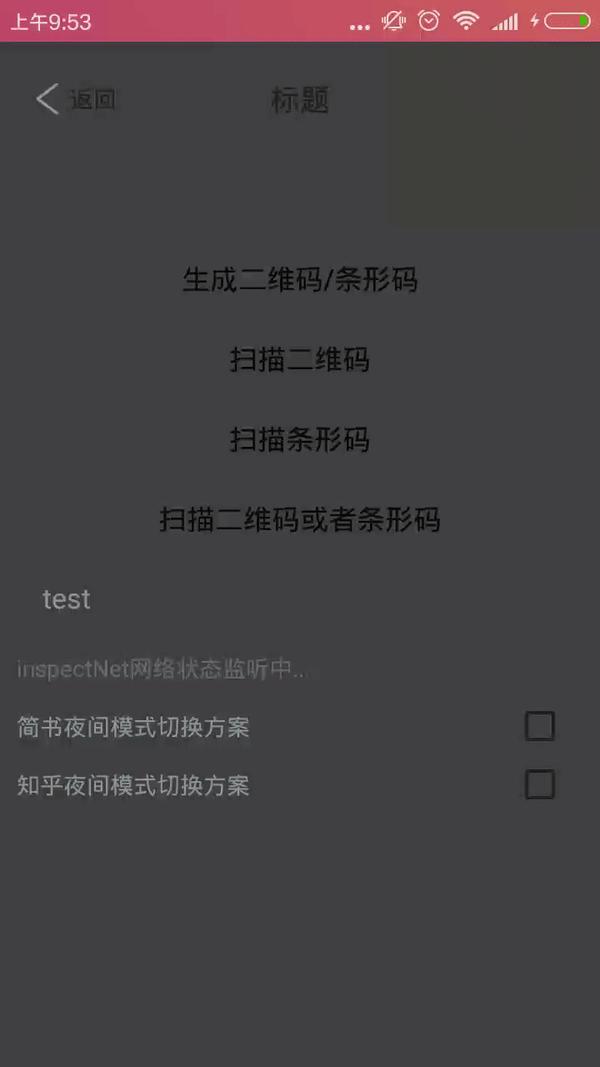
3。思路或使用(代码)。
稍微说一下,首先外面切换的时候,只是设置了部分区域的夜间模式,这里主要以示区别,你自己也可以试着把那个模块区域加上夜间模式,下面的内容会讲解到。
点击进去也设置了夜间模式,可以看到也是部分区域设置了夜间模式(这里是随便选了一种颜色就当作皮肤,你可以改成夜间模式灰色即可),因为点击后的界面我们要用第二种方式来实现夜间模式,这里以示区别。具体根据业务需求来采用相应的方法。
下面开始讲解两种夜间模式的实现方法。首先在编译build.gradle中加入an框架如下依赖,
自己备注一下:base应该是轻量级别的依赖关系,an应该是重量级的依赖,这里算是一个瑕疵。
compile 'com.github.qydq:an-maven-base:0.0.8'
1)第一种实现方法,稍微有点复杂。
首先我们需要一个夜间模式的帮助类,还有要找到需要设置夜间模式的Layout
//主题切换测试
private DayNightHelper mDayNightHelper;
private RecyclerView mRecyclerView;
private LinearLayout mHeaderLayout;
private List<RelativeLayout> mLayoutList;
private List<TextView> mTextViewList;
private List<CheckBox> mCheckBoxList;
在setContentView()之前,加入初始化的夜间模式主题,如
mDayNightHelper = new DayNightHelper(this);
initTheme();
setContentView(R.layout.activity_main);
initTheme()如下,作用是关闭应用第二次进入如果是夜间模式则显示夜间模式,反之亦然,
private void initTheme() {
if (mDayNightHelper.isDay()) {
        setTheme(R.style.DayTheme);
    } else {
        setTheme(R.style.NightTheme);
    }
}
简单的findViewById
mLayoutList = new ArrayList<>();
mLayoutList.add((RelativeLayout) findViewById(R.id.jianshu_layout));
mLayoutList.add((RelativeLayout) findViewById(R.id.zhihu_layout));
mTextViewList = new ArrayList<>();
mTextViewList.add((TextView) findViewById(R.id.tv_jianshu));
mTextViewList.add((TextView) findViewById(R.id.tv_zhihu));
mCheckBoxList = new ArrayList<>();
CheckBox ckbJianshu = (CheckBox) findViewById(R.id.ckb_jianshu);
ckbJianshu.setOnCheckedChangeListener(this);
其次是对某一事件的监听 ,修改主题,这里是CheckBox
@Override
public void onCheckedChanged(CompoundButton buttonView, boolean isChecked) {
int viewId = buttonView.getId();
    if (viewId == R.id.ckb_jianshu) {
        changeThemeByJianShu();

    } else if (viewId == R.id.ckb_zhihu) {
        changeThemeByZhiHu();
    }
}
这里讨论知乎的实现讨论,可以看到这里启动了一个夜间模式切换的动画,这样不至于一下子就变了背景。动画是实现的渐变效果,给用户好的体验效果。toggleThemeSetting是对CheckBox的事件监听来j。
/**
 * 使用知乎的实现套路来切换夜间主题
 */
private void changeThemeByZhiHu() {
    showAnimation();
    toggleThemeSetting();
    refreshUI();
}
showAnimation和toggleThemSetting的代码如下,
/**
 * 展示一个切换动画
 */
private void showAnimation() {
final View decorView = getWindow().getDecorView();
    Bitmap cacheBitmap = getCacheBitmapFromView(decorView);
    if (decorView instanceof ViewGroup && cacheBitmap != null) {
final View view = new View(this);
        view.setBackgroundDrawable(new BitmapDrawable(getResources(), cacheBitmap));
        ViewGroup.LayoutParams layoutParam = new ViewGroup.LayoutParams(ViewGroup.LayoutParams.MATCH_PARENT,
                ViewGroup.LayoutParams.MATCH_PARENT);
        ((ViewGroup) decorView).addView(view, layoutParam);
        ObjectAnimator objectAnimator = ObjectAnimator.ofFloat(view, "alpha", 1f, 0f);
        objectAnimator.setDuration(300);
        objectAnimator.addListener(new AnimatorListenerAdapter() {
@Override
            public void onAnimationEnd(Animator animation) {
super.onAnimationEnd(animation);
                ((ViewGroup) decorView).removeView(view);
            }
        });
        objectAnimator.start();
    }
}
/**
 * 切换主题设置
 */
private void toggleThemeSetting() {
if (mDayNightHelper.isDay()) {
mDayNightHelper.setMode(DayNightMode.NIGHT);
        setTheme(R.style.NightTheme);
    } else {
mDayNightHelper.setMode(DayNightMode.DAY);
        setTheme(R.style.DayTheme);
    }
}
再者,开始更新UI,refresh当前的UI,initThem是进入是的模式是夜间还是白天。
TypedValue background = new TypedValue();//背景色
TypedValue textColor = new TypedValue();//字体颜色
Resources.Theme theme = getTheme();
theme.resolveAttribute(R.attr.anBackground, background, true);
theme.resolveAttribute(R.attr.anTextColor, textColor, true);

mHeaderLayout.setBackgroundResource(background.resourceId);
for (RelativeLayout layout : mLayoutList) {
    layout.setBackgroundResource(background.resourceId);
}
for (CheckBox checkBox : mCheckBoxList) {
    checkBox.setBackgroundResource(background.resourceId);
}
for (TextView textView : mTextViewList) {
    textView.setBackgroundResource(background.resourceId);
}

Resources resources = getResources();
for (TextView textView : mTextViewList) {
    textView.setTextColor(resources.getColor(textColor.resourceId));
}
最后,你不觉得很奇怪吗?就凭借上面的代码就可以实现夜间模式切换效果,未免太简单了吧,其实不用奇怪,就是这么简单,我们只要在加入an框架的background即可,这样,每次设置好相应的夜间模式或正常模式,an框架都会帮助去进行主题的设置。
在Layout布局代码中按照如下这样的标准加入相应的,属性。
<LinearLayout
    android:id="@+id/header_layout"
    android:layout_width="match_parent"
    android:layout_height="wrap_content"

    android:background="?attr/anBackground"
    android:orientation="vertical">

    <RelativeLayout
        android:id="@+id/jianshu_layout"
        android:layout_width="match_parent"
        android:layout_height="35dp"
        android:background="?attr/anBackground">

        <TextView
            android:id="@+id/tv_jianshu"
            android:layout_width="wrap_content"
            android:layout_height="wrap_content"
            android:layout_centerVertical="true"
            android:layout_marginLeft="10dp"
            android:background="?attr/anBackground"
            android:text="简书夜间模式切换方案"
            android:textColor="?attr/anTextColor" />

        <CheckBox
            android:id="@+id/ckb_jianshu"
            android:layout_width="wrap_content"
            android:layout_height="wrap_content"
            android:layout_alignParentRight="true"
            android:layout_centerVertical="true"
            android:layout_marginRight="20dp"
            android:background="?attr/anBackground" />
    </RelativeLayout>
第一种方式的所有实现夜间模式套路,这里已经完全,完完全全给出来了,你不需要额外的配置,这样就可以完成夜间模式,但是相对于第二种方式就显得比较复杂了。an框架也提供的另一种简单的夜间模式,如2)中。
2)第二种夜间模式实现方式,简单夜间模式实现方式,如效果图第二个点击进入的窗口(即改变背景)
同样在CheckBox中,监听即可完成夜间模式的设置,下次启动则可以生效,从效果图可以看到,改变了主题颜色(改变主题也可以认为就是夜间模式,只不过换个颜色)上面也说了,不能写一个皮肤出来,大材小用。,业务也不需要。
@Override
public void onCheckedChanged(CompoundButton compoundButton, boolean b) {
    SharedPreferences.Editor editor = sp.edit();
    if (sp.getBoolean("isNightMode", false)) {
        editor.putBoolean("isNightMode", false);
        editor.commit();
        getWindow().getDecorView().setBackground(this.getResources().getDrawable(com.an.an_base.R.drawable.yy_drawable_bgnigt_shape));
    } else {
        editor.putBoolean("isNightMode", true);
        editor.commit();
        getWindow().getDecorView().setBackground(getResources().getDrawable(com.an.an_base.R.drawable.yy_drawable_bgday_shape));
    }
从效果图也可以看到,之前设置的夜间模式,显示出来了,是因为我为了验证第一种(设置夜间模式的方法是否有效)而加入的代码,可以看到第一种夜间模式完全OK,加入了下面代码
mDayNightHelper = new DayNightHelper(this);
initTheme();
setContentView(R.layout.activity_create_code);
private void initTheme() {
if (mDayNightHelper.isDay()) {
        setTheme(R.style.DayTheme);
    } else {
        setTheme(R.style.NightTheme);
    }
}
4。重要知识点(总结,思考)。
引用了an框架,具体也可以参考,网易博客。
5。内容参考(尊重原创)。
第一种实现套路是参考知乎上另一位童鞋的夜间模式的实现套路修改而来的,这里已经完全简化了使用方式,通过本博客既可以快速集成。
参考,链接(我又上网找到了,但不是知乎的,是传送门也有参考)
第二种为个人设计
6。联系作者。
## 联系作者。
Athor:sunshuntao(qydq)(莳萝花)。
Email:qyddai@gmail.com。
知乎地址:Android开发 - 知乎专栏
End
♥♥♥ 请关注后获取源码 ♥♥♥
至:授人以鱼,不如授人与渔,话不多说,yu前几篇博客已经介绍过,更多内容请关注。