Coursera课程《Using Python to Access Web Data》 密歇根大学
Week4 Programs that Surf the Web
12.3 Unicode Characters and Strings
Representing Simple Strings
使用ASCII码,每个字符都被一个0到256的数字表示来存在8bits的内存里。
使用ord()函数可以查询,指定字符所对应的ASCII码。
>>> print(ord('H'))
72
>>> print(ord('e'))
101
>>> print(ord('
'))
10
Multi-Byte Characters
unicode是为了解决之前编码只考虑英文字符的问题而出现的,因为以前的ASCII码只使用一个字节来表示字符,所以它最多也只能表示256个字符, 如果只使用英文是够用的,但是事实是世界要发展,所以出现各种字符,那么它就不够用了。于是就出现了许多的编码方式,例如中国就出了GBK编码。 但是这是不适于国家与国家之间的交流的,于是ISO就指定了unicode这个编码标准。
unicode现在通常是使用两个字节来表示一个字符,但是其实它可以被看成一个字符集,它将所有字符都定义了一个唯一的ID,这样网络就能有一个统一的字符表,不再出现之前的需要相互转化的问题。
那么新的问题就是直接使用unicode来表示字符时,它有时候会浪费空间,在编码表中靠前的字符,例如英文字符,它前一字节就是0000,后一字节才是它真正的序号。 于是,在网络传输中,由于网络带宽并没有这么的理想,大家肯定就会嫌弃unicode编码浪费带宽,所以,于1992年创建,由Ken Thompson创建了UTF传输标准,它的全名是Unicode Transformation Format,这个全名就能明白了UTF的意思。
UTF是针对unicode的一种网络传输标准,按照我们通信的人来说,它就是一种针对unicode的编码方式。 它现在有UTF-7、UTF-7.5、UTF-8、UTF-16、UTF-32几种格式,当然现在最为流行的就是其中的UTF-8。 它是一种变长的编码方式,这样就能减少网络传输中的数据量,所以在网络传输中,大家都用它。
Two Kinds of Strings in Python
# python 2.7.10
>>> x = '我爱你'
>>> type(x)
<type 'str'>
>>> x = u'我爱你'
>>> type(x)
<type 'unicode'>

# python 3.5.1
>>> x = '我爱你'
>>> type(x)
<class 'str'>
>>> x = u'我爱你'
>>> type(x)
<class 'str'>
Python2 Versus Python3
# Python 2.7.10
>>> x = b'abc'
>>> type(x)
<type 'str'>
>>> x = '我爱你'
>>> type(x)
<type 'str'>
>>> x = u'我爱你'
>>> type(x)
<type 'unicode'>

# Python 3.5.1
>>> x = b'abc'
>>> type(x)
<class 'bytes'>
>>> x = '我爱你'
>>> type(x)
<class 'str'>
>>> x = u'我爱你'
>>> type(x)
<class 'str'>
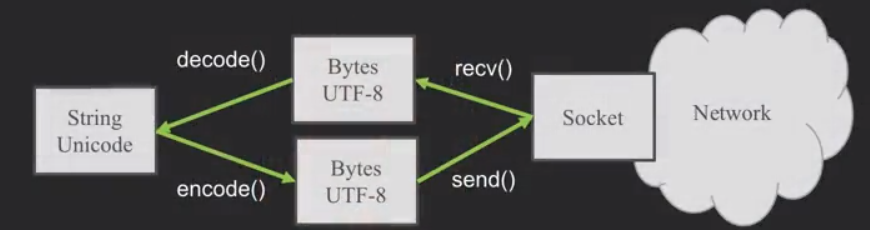
在python3内部,所有的字符都是unicode编码,unicode与UTF-8并不能直接通用,所有在字符出入的时候就要加上encode()与decode()。
Python Strings to Bytes
当我们与外部资源通信时,比如说一个网络socket,我们就要发送bytes。所以我们要把Python3的strings来encode。
当我们读取外部资源发来的数据时,我们就要把它decode变成strings。
while True:
    data = mysock.recv(512)
    if (len(data) < 1):
        break
    mystring = data.decode()
    print(mystring)
也就是说,在网络上大家用bytes(它包含UTF-8等)交流,而在自己的程序里使用unicode。
12.4 Retrieving Web Pages
Using urllib in Python
由于HTTP现在太普遍了,所以我们有一个库可以做所有的socket工作,以及让网页看起来像文件一样。
import urllib.request, urllib.parse, urllib.error

fhand = urllib.request.urlopen('http://data.pr4e.org/romeo.txt')
for line in fhand:
    print(line.decode().strip())
这个urllib.request.urlopen()函数看起来就跟打开文件一样。
Reading Web Pages
import urllib.request,urllib.parse,urllib.error

fhand = urllib.request.urlopen('http://www.dr-chuck.com/page1.htm')
for line in fhand:
    print(line.decode().strip())
输出结果
<h1>The First Page</h1>
<p>If you like, you can switch to the <ahref="http://www.dr-chuck.com/page2.htm">Second Page</a>
</p>
其实读取html文件是一样的。
12.5 Parsing Web Pages
What is Web Scraping?
网络数据采集。使用搜索引擎来采集网页数据,我们叫"spidering the web"或者"web crawling"。
The Easy Way - Beautiful Soup
BeautifulSoup是一个额外的模块,可以使用pip来安装。
pip install bs4
具体的用处,官方解释如下
Beautiful Soup提供一些简单的、python式的函数用来处理导航、搜索、修改分析树等功能。它是一个工具箱,通过解析文档为用户提供需要抓取的数据,因为简单,所以不需要多少代码就可以写出一个完整的应用程序。
Beautiful Soup自动将输入文档转换为Unicode编码,输出文档转换为utf-8编码。你不需要考虑编码方式,除非文档没有指定一个编码方式,这时,Beautiful Soup就不能自动识别编码方式了。然后,你仅仅需要说明一下原始编码方式就可以了。
Beautiful Soup已成为和lxml、html6lib一样出色的python解释器,为用户灵活地提供不同的解析策略或强劲的速度。
import urllib.request,urllib.parse,urllib.error
from bs4 import BeautifulSoup

url = input('Enter -')
html = urllib.request.urlopen(url).read()
soup = BeautifulSoup(html, 'html.parser')

# Retrieve all of the anchor tags
tags = soup('a')
for tag in tags:
    print(tag.get('href',None))
其中第6行的soup = BeautifulSoup(html, 'html.parser')代码,就是把我们的html文件处理成了一个soup对象.
第9行的tags = soup('a')是把html文件中的anchor tag读成了一个anchor tag的list。
而第11行的tag对象相当于一个字典,可以获取'href'或None的值。
再复杂的学习可以参看三夜灯的blog文章(文后参考2)
Worked Example: BeautifulSoup
# To run this, you can install BeautifulSoup
# https://pypi.python.org/pypi/beautifulsoup4

# Or download the file
# http://www.py4e.com/code3/bs4.zip
# and unzip it in the same directory as this file

import urllib.request, urllib.parse, urllib.error
from bs4 import BeautifulSoup
import ssl

# Ignore SSL certificate errors
ctx = ssl.create_default_context()
ctx.check_hostname = False
ctx.verify_mode = ssl.CERT_NONE

url = input('Enter - ')
html = urllib.request.urlopen(url, context=ctx).read()
soup = BeautifulSoup(html, 'html.parser')

# Retrieve all of the anchor tags
tags = soup('a')
for tag in tags:
    print(tag.get('href', None))
作业:Scraping HTML Data with BeautifulSoup
# To run this, you can install BeautifulSoup
# https://pypi.python.org/pypi/beautifulsoup4

# Or download the file
# http://www.py4e.com/code3/bs4.zip
# and unzip it in the same directory as this file

from urllib.request import urlopen
from bs4 import BeautifulSoup
import ssl

# Ignore SSL certificate errors
ctx = ssl.create_default_context()
ctx.check_hostname = False
ctx.verify_mode = ssl.CERT_NONE

url = input('Enter - ')
html = urlopen(url, context=ctx).read()
soup = BeautifulSoup(html, "html.parser")

# Retrieve all of the anchor tags
tags = soup('span')
count = 0
sum = 0
for tag in tags:
    # Look at the parts of a tag
   sum = sum + int(tag.contents[0])
   count += 1

print ('Count ',count)
print('Sum ', sum)
使用的是python3与bs4。
作业:Following Links in HTML Using BeautifulSoup
# To run this, you can install BeautifulSoup
# https://pypi.python.org/pypi/beautifulsoup4

# Or download the file
# http://www.py4e.com/code3/bs4.zip
# and unzip it in the same directory as this file

import urllib.request, urllib.parse, urllib.error
from bs4 import BeautifulSoup
import ssl
import re

# Ignore SSL certificate errors
ctx = ssl.create_default_context()
ctx.check_hostname = False
ctx.verify_mode = ssl.CERT_NONE

count = int(input("Enter count:"))
position = int(input("Enter position:"))
first_name = input("Start with:")

def retrievinghtml(name):
	url = "http://py4e-data.dr-chuck.net/known_by_%s.html"%(name)

	html = urllib.request.urlopen(url, context=ctx).read()
	soup = BeautifulSoup(html, 'html.parser')

	# Retrieve all of the anchor tags
	tags = soup('a')
	temp_tag = tags[position-1]
	temp_site = temp_tag.get('href', None)
	temp_name = (re.findall('known_by_(S+).html',temp_site))[0]
	print("Retrieving: "+"http://py4e-data.dr-chuck.net/known_by_%s.html"%(temp_name))
	return temp_name


name = []
name.append(first_name)
print("Retrieving: "+"http://py4e-data.dr-chuck.net/known_by_%s.html"%(first_name))
for i in range(count):
	temp_name = retrievinghtml(name[i])
	name.append(temp_name)
print(name)
使用的仍然是python3与bs4。
【参考】
[1]龙的博客