安装 http://www.rabbitmq.com/install-standalone-mac.html
安装python rabbitMQ module
pip install pika
oreasy_install pikaor源码 https://pypi.python.org/pypi/pika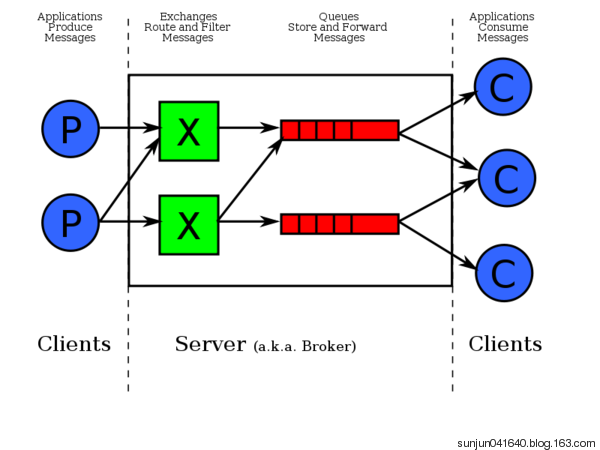
send端
 1 import pika
 2
 3 connection = pika.BlockingConnection(pika.ConnectionParameters(
 4                'localhost'))
 5 channel = connection.channel()
 6
 7 #声明queue
 8 channel.queue_declare(queue='hello')
 9
10 #n RabbitMQ a message can never be sent directly to the queue, it always needs to go through an exchange.
11 channel.basic_publish(exchange='',
12                       routing_key='hello',
13                       body='Hello World!')
14 print(" [x] Sent 'Hello World!'")
15 connection.close()
receive端
 1 import pika
 2
 3 connection = pika.BlockingConnection(pika.ConnectionParameters(
 4                'localhost'))
 5 channel = connection.channel()
 6
 7
 8 #You may ask why we declare the queue again ‒ we have already declared it in our previous code.
 9 # We could avoid that if we were sure that the queue already exists. For example if send.py program
10 #was run before. But we're not yet sure which program to run first. In such cases it's a good
11 # practice to repeat declaring the queue in both programs.
12 channel.queue_declare(queue='hello')
13
14 def callback(ch, method, properties, body):
15     print(" [*] Received %r" % body)
16
17 channel.basic_consume(callback,
18                       queue='hello',
19                       no_ack=True)
20
21 print(' [*] Waiting for messages. To exit press CTRL+C')
22 channel.start_consuming()
远程连接rabbitmq server的话,需要配置权限
首先在rabbitmq server上创建一个用户, 在windows上使用rabbitmq server自带工具RabbitMQ Command Prompt(sbin dir)
...sbin> rabbitmqctl add_user admin admin
同时还要配置权限,允许从外面访问
...sbin>rabbitmqctl set_permissions -p / admin ".*" ".*" ".*"
命令详细:
set_permissions [-p vhost] {user} {conf} {write} {read}
- vhost
-
The name of the virtual host to which to grant the user access, defaulting to /.
- user
-
The name of the user to grant access to the specified virtual host.
- conf
-
A regular expression matching resource names for which the user is granted configure permissions.
- write
-
A regular expression matching resource names for which the user is granted write permissions.
- read
-
A regular expression matching resource names for which the user is granted read permissions.
客户端连接的时候需要配置认证参数
1 credentials = pika.PlainCredentials('admin', 'admin')
2
3
4 connection = pika.BlockingConnection(pika.ConnectionParameters(
5     '10.211.55.5',5672,'/',credentials))
6 channel = connection.channel()
Work Queues

在这种模式下,RabbitMQ会默认把p发的消息依次分发给各个消费者(c),跟负载均衡差不多
消息提供者代码
 1 import pika
 2 import time
 3 connection = pika.BlockingConnection(pika.ConnectionParameters(
 4     'localhost'))
 5 channel = connection.channel()
 6
 7 # 声明queue
 8 channel.queue_declare(queue='task_queue')
 9
10 # n RabbitMQ a message can never be sent directly to the queue, it always needs to go through an exchange.
11 import sys
12
13 message = ' '.join(sys.argv[1:]) or "Hello World! %s" % time.time()
14 channel.basic_publish(exchange='',
15                       routing_key='task_queue',
16                       body=message,
17                       properties=pika.BasicProperties(
18                           delivery_mode=2,  # make message persistent
19                       )
20                       )
21 print(" [x] Sent %r" % message)
22 connection.close()
消费者代码
 1 import pika, time
 2
 3 connection = pika.BlockingConnection(pika.ConnectionParameters(
 4     'localhost'))
 5 channel = connection.channel()
 6
 7
 8 def callback(ch, method, properties, body):
 9     print(" [x] Received %r" % body)
10     time.sleep(20)
11     print(" [x] Done")
12     print("method.delivery_tag",method.delivery_tag)
13     ch.basic_ack(delivery_tag=method.delivery_tag)
14
15
16 channel.basic_consume(callback,
17                       queue='task_queue',
18                       no_ack=True
19                       )
20
21 print(' [*] Waiting for messages. To exit press CTRL+C')
22 channel.start_consuming()
此时,先启动消息生产者,然后再分别启动3个消费者,通过生产者多发送几条消息,你会发现,这几条消息会被依次分配到各个消费者身上
消息持久化
channel.queue_declare(queue='hello', durable=True)
durable参数控制queue是否要持久化,durable=True表示queue持久化
channel.basic_publish(exchange='',
                      routing_key="task_queue",
                      body=message,
                      properties=pika.BasicProperties(
                         delivery_mode = 2, # make message persistent
                      ))
delivery_mode参数控制消息是否持久化, delivery_mode = 2表示消息持久化
消息公平分发
如果Rabbit只管按顺序把消息发到各个消费者身上,不考虑消费者负载的话,很可能出现,一个机器配置不高的消费者那里堆积了很多消息处理不完,同时配置高的消费者却一直很轻松。为解决此问题,可以在各个消费者端,配置perfetch=1,意思就是告诉RabbitMQ在我这个消费者当前消息还没处理完的时候就不要再给我发新消息了。
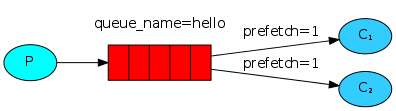
channel.basic_qos(prefetch_count=1)
带消息持久化+公平分发的完整代码
生产者端
 1 import pika
 2 import sys
 3
 4 connection = pika.BlockingConnection(pika.ConnectionParameters(
 5         host='localhost'))
 6 channel = connection.channel()
 7
 8 channel.queue_declare(queue='task_queue', durable=True)
 9
10 message = ' '.join(sys.argv[1:]) or "Hello World!"
11 channel.basic_publish(exchange='',
12                       routing_key='task_queue',
13                       body=message,
14                       properties=pika.BasicProperties(
15                          delivery_mode = 2, # make message persistent
16                       ))
17 print(" [x] Sent %r" % message)
18 connection.close()
消费者端
 1 import pika
 2 import time
 3
 4 connection = pika.BlockingConnection(pika.ConnectionParameters(
 5         host='localhost'))
 6 channel = connection.channel()
 7
 8 channel.queue_declare(queue='task_queue', durable=True)
 9 print(' [*] Waiting for messages. To exit press CTRL+C')
10
11 def callback(ch, method, properties, body):
12     print(" [x] Received %r" % body)
13     time.sleep(body.count(b'.'))
14     print(" [x] Done")
15     ch.basic_ack(delivery_tag = method.delivery_tag)
16
17 channel.basic_qos(prefetch_count=1)
18 channel.basic_consume(callback,
19                       queue='task_queue')
20
21 channel.start_consuming()
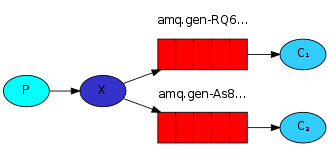
PublishSubscribe(消息发布订阅)
之前的例子都基本都是1对1的消息发送和接收,即消息只能发送到指定的queue里,但有些时候你想让你的消息被所有的Queue收到,类似广播的效果,这时候就要用到exchange了,
An exchange is a very simple thing. On one side it receives messages from producers and the other side it pushes them to queues. The exchange must know exactly what to do with a message it receives. Should it be appended to a particular queue? Should it be appended to many queues? Or should it get discarded. The rules for that are defined by the exchange type.
Exchange在定义的时候是有类型的,以决定到底是哪些Queue符合条件,可以接收消息
fanout: 所有bind到此exchange的queue都可以接收消息
direct: 通过routingKey和exchange决定的那个唯一的queue可以接收消息
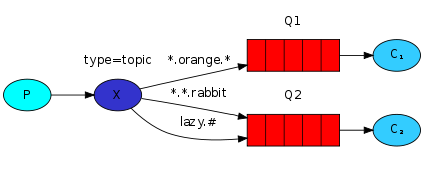
topic:所有符合routingKey(此时可以是一个表达式)的routingKey所bind的queue可以接收消息
表达式符号说明:#代表一个或多个字符,*代表任何字符
例:#.a会匹配a.a,aa.a,aaa.a等
*.a会匹配a.a,b.a,c.a等
注:使用RoutingKey为#,Exchange Type为topic的时候相当于使用fanout
headers: 通过headers 来决定把消息发给哪些queue
消息publisher
 1 import pika
 2 import sys
 3
 4 connection = pika.BlockingConnection(pika.ConnectionParameters(
 5         host='localhost'))
 6 channel = connection.channel()
 7
 8 channel.exchange_declare(exchange='logs',
 9                          type='fanout')
10
11 message = ' '.join(sys.argv[1:]) or "info: Hello World!"
12 channel.basic_publish(exchange='logs',
13                       routing_key='',
14                       body=message)
15 print(" [x] Sent %r" % message)
16 connection.close()
消息subscriber
 1 import pika
 2
 3 connection = pika.BlockingConnection(pika.ConnectionParameters(
 4         host='localhost'))
 5 channel = connection.channel()
 6
 7 channel.exchange_declare(exchange='logs',
 8                          type='fanout')
 9
10 result = channel.queue_declare(exclusive=True) #不指定queue名字,rabbit会随机分配一个名字,exclusive=True会在使用此queue的消费者断开后,自动将queue删除
11 queue_name = result.method.queue
12
13 channel.queue_bind(exchange='logs',
14                    queue=queue_name)
15
16 print(' [*] Waiting for logs. To exit press CTRL+C')
17
18 def callback(ch, method, properties, body):
19     print(" [x] %r" % body)
20
21 channel.basic_consume(callback,
22                       queue=queue_name,
23                       no_ack=True)
24
25 channel.start_consuming()
有选择的接收消息(exchange type=direct)
RabbitMQ还支持根据关键字发送,即:队列绑定关键字,发送者将数据根据关键字发送到消息exchange,exchange根据 关键字 判定应该将数据发送至指定队列。

publisher
 1 import pika
 2 import sys
 3
 4 connection = pika.BlockingConnection(pika.ConnectionParameters(
 5         host='localhost'))
 6 channel = connection.channel()
 7
 8 channel.exchange_declare(exchange='direct_logs',
 9                          type='direct')
10
11 severity = sys.argv[1] if len(sys.argv) > 1 else 'info'
12 message = ' '.join(sys.argv[2:]) or 'Hello World!'
13 channel.basic_publish(exchange='direct_logs',
14                       routing_key=severity,
15                       body=message)
16 print(" [x] Sent %r:%r" % (severity, message))
17 connection.close()
subscriber
 1 import pika
 2 import sys
 3
 4 connection = pika.BlockingConnection(pika.ConnectionParameters(
 5         host='localhost'))
 6 channel = connection.channel()
 7
 8 channel.exchange_declare(exchange='direct_logs',
 9                          type='direct')
10
11 result = channel.queue_declare(exclusive=True)
12 queue_name = result.method.queue
13
14 severities = sys.argv[1:]
15 if not severities:
16     sys.stderr.write("Usage: %s [info] [warning] [error]
" % sys.argv[0])
17     sys.exit(1)
18
19 for severity in severities:
20     channel.queue_bind(exchange='direct_logs',
21                        queue=queue_name,
22                        routing_key=severity)
23
24 print(' [*] Waiting for logs. To exit press CTRL+C')
25
26 def callback(ch, method, properties, body):
27     print(" [x] %r:%r" % (method.routing_key, body))
28
29 channel.basic_consume(callback,
30                       queue=queue_name,
31                       no_ack=True)
32
33 channel.start_consuming()
更细致的消息过滤
Although using the direct exchange improved our system, it still has limitations - it can't do routing based on multiple criteria.
In our logging system we might want to subscribe to not only logs based on severity, but also based on the source which emitted the log. You might know this concept from the syslog unix tool, which routes logs based on both severity (info/warn/crit...) and facility (auth/cron/kern...).
That would give us a lot of flexibility - we may want to listen to just critical errors coming from 'cron' but also all logs from 'kern'.
publisher
 1 import pika
 2 import sys
 3
 4 connection = pika.BlockingConnection(pika.ConnectionParameters(
 5         host='localhost'))
 6 channel = connection.channel()
 7
 8 channel.exchange_declare(exchange='topic_logs',
 9                          type='topic')
10
11 routing_key = sys.argv[1] if len(sys.argv) > 1 else 'anonymous.info'
12 message = ' '.join(sys.argv[2:]) or 'Hello World!'
13 channel.basic_publish(exchange='topic_logs',
14                       routing_key=routing_key,
15                       body=message)
16 print(" [x] Sent %r:%r" % (routing_key, message))
17 connection.close()
subscriber
 1 import pika
 2 import sys
 3
 4 connection = pika.BlockingConnection(pika.ConnectionParameters(
 5         host='localhost'))
 6 channel = connection.channel()
 7
 8 channel.exchange_declare(exchange='topic_logs',
 9                          type='topic')
10
11 result = channel.queue_declare(exclusive=True)
12 queue_name = result.method.queue
13
14 binding_keys = sys.argv[1:]
15 if not binding_keys:
16     sys.stderr.write("Usage: %s [binding_key]...
" % sys.argv[0])
17     sys.exit(1)
18
19 for binding_key in binding_keys:
20     channel.queue_bind(exchange='topic_logs',
21                        queue=queue_name,
22                        routing_key=binding_key)
23
24 print(' [*] Waiting for logs. To exit press CTRL+C')
25
26 def callback(ch, method, properties, body):
27     print(" [x] %r:%r" % (method.routing_key, body))
28
29 channel.basic_consume(callback,
30                       queue=queue_name,
31                       no_ack=True)
32
33 channel.start_consuming()
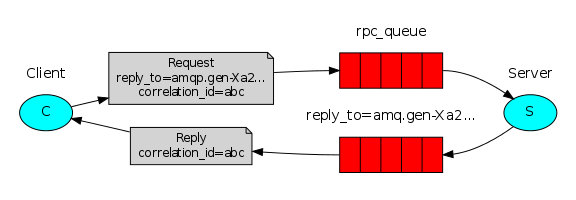
Remote procedure call (RPC)
To illustrate how an RPC service could be used we're going to create a simple client class. It's going to expose a method named call which sends an RPC request and blocks until the answer is received:
1 fibonacci_rpc = FibonacciRpcClient()
2 result = fibonacci_rpc.call(4)
3 print("fib(4) is %r" % result)
RPC server
 1 import pika
 2 import time
 3 connection = pika.BlockingConnection(pika.ConnectionParameters(
 4         host='localhost'))
 5
 6 channel = connection.channel()
 7
 8 channel.queue_declare(queue='rpc_queue')
 9
10 def fib(n):
11     if n == 0:
12         return 0
13     elif n == 1:
14         return 1
15     else:
16         return fib(n-1) + fib(n-2)
17
18 def on_request(ch, method, props, body):
19     n = int(body)
20
21     print(" [.] fib(%s)" % n)
22     response = fib(n)
23
24     ch.basic_publish(exchange='',
25                      routing_key=props.reply_to,
26                      properties=pika.BasicProperties(correlation_id =
27                                                          props.correlation_id),
28                      body=str(response))
29     ch.basic_ack(delivery_tag = method.delivery_tag)
30
31 channel.basic_qos(prefetch_count=1)
32 channel.basic_consume(on_request, queue='rpc_queue')
33
34 print(" [x] Awaiting RPC requests")
35 channel.start_consuming()
RPC client
 1 import pika
 2 import uuid
 3
 4 class FibonacciRpcClient(object):
 5     def __init__(self):
 6         self.connection = pika.BlockingConnection(pika.ConnectionParameters(
 7                 host='localhost'))
 8
 9         self.channel = self.connection.channel()
10
11         result = self.channel.queue_declare(exclusive=True)
12         self.callback_queue = result.method.queue
13
14         self.channel.basic_consume(self.on_response, no_ack=True,
15                                    queue=self.callback_queue)
16
17     def on_response(self, ch, method, props, body):
18         if self.corr_id == props.correlation_id:
19             self.response = body
20
21     def call(self, n):
22         self.response = None
23         self.corr_id = str(uuid.uuid4())
24         self.channel.basic_publish(exchange='',
25                                    routing_key='rpc_queue',
26                                    properties=pika.BasicProperties(
27                                          reply_to = self.callback_queue,
28                                          correlation_id = self.corr_id,
29                                          ),
30                                    body=str(n))
31         while self.response is None:
32             self.connection.process_data_events()
33         return int(self.response)
34
35 fibonacci_rpc = FibonacciRpcClient()
36
37 print(" [x] Requesting fib(30)")
38 response = fibonacci_rpc.call(30)
39 print(" [.] Got %r" % response)