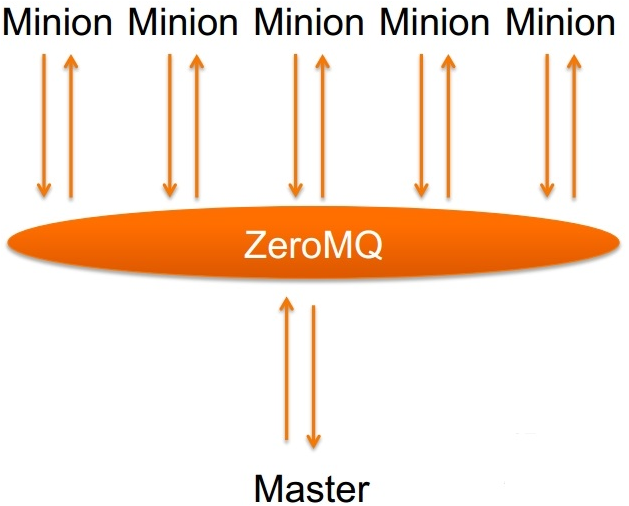
1、工作模式
2、简介
Salt 是:
- 一个配置管理系统,能够维护预定义状态的远程节点(比如,确保指定的报被安装,指定的服务在运行)
- 一个分布式远程执行系统,用来在远程节点(可以是单个节点,也可以是任意规则挑选出来的节点)上执行命令和查询数据
- 开发其的目的是为远程执行提供最好的解决方案,并使远程执行变得更好,更快,更简单
Saltstack(中国用户组 www.saltstack.cn )基于python开发,c/s架构,支持多平台,比puppet轻量,在远程执行命令时非常快捷,配置和使用比puppet容易,能实现puppet几乎所有的功能
3、Saltstack的优势
有master端和minion端,执行的信息比较稳定,不容易丢失信息,或者出现失联主机的情况,有封装好的http-api,我们可以直接启动salt-api就可以通过http协议进行调用,不需要自己进行第二次的封装
4、saltstack的安装
基于centos6和centos7的差异,在两个不同的操作系统中安装saltstack也是不一样的。
参考网址:
https://docs.saltstack.com/en/latest/topics/installation/rhel.html
Centos6需要先安装扩展源,然后在进行安装:
Master端:
yum install –y salt-master
Yum install –y salt-api
Minion端:
Yum install -y salt-minion
安装完后配置启动选项
分别在两台测试记上编辑:
vim /etc/salt/minion
//python修改为:
master: python
//python2修改为:
master: python
注意如上的python2 client上面一定要配置master的 salt!!!
启动服务:
//python上启动:
# systemctl start salt-master; systemctl start salt-minion//python2上启动:
# systemctl start salt-minion# ps aux | grep salt
服务端监听4505和4506两个端口,4505为消息发布的端口,4506为和客户端通信的端口。
5、秘钥安装
Master与Minion认证
minion在第一次启动时,会在/etc/salt/pki/minion/(该路径在/etc/salt/minion里面设置)下自动生成minion.pem(private key)和 minion.pub(public key),然后将 minion.pub发送给master。master在接收到minion的public key后,通过salt-key命令accept minion public key,这样在master的/etc/salt/pki/master/minions下的将会存放以minion id命名的 public key,然后master就能对minion发送指令了。
相关命令参数:
- salt-key -L 或者salt-key 显示所有的key
- salt-key -D :删除所有认证主机id证书
- salt-key -d keys_values -y:删除认证的主机
- salt-key -A:接收所有id证书请求
- salt-key -a id :接受单个id证书请求
认证一台client
[root@python ~]# salt-key -a python2
The following keys are going to be accepted:
Unaccepted Keys:
python2
Proceed? [n/Y] y
Key for minion python2 accepted.
查看当前key状态:
[root@python ~]# salt-key
Accepted Keys:
python2
Denied Keys:
Unaccepted Keys:
Rejected Keys:

[root@python minions]# ls /etc/salt/pki/master/minions
python  python2
当然如果你认为不通过允许就可以直接加入:
vi /etc/salt/master

修改auto_accept 自动接收minion的key:

auto_accept: Ture
把本机也允许一下:
[root@python minions]# salt-key -A

[root@python minions]# salt-key
Accepted Keys:
python
python2
Denied Keys:
Unaccepted Keys:
Rejected Keys:
模拟场景:
删除所有的认证client
[root@python minions]# salt-key -D
The following keys are going to be deleted:
Accepted Keys:
python
python2
Denied Keys:
python2
Proceed? [N/y] Y
Key for minion python2 deleted.
Key for minion python deleted.
Key for minion python2 deleted.

[root@python minions]# salt-key
Accepted Keys:
Denied Keys:
Unaccepted Keys:
Rejected Keys:
然后再次去添加:(出错了。。)
[root@python minions]# salt-key -A
The key glob '*' does not match any unaccepted keys.
解决方案:
在全部的server和client上面重启salt-minion服务
[root@python minions]# systemctl restart salt-minion
再次check:
[root@python minions]# salt-key
Accepted Keys:
python
python2
Denied Keys:
Unaccepted Keys:
Rejected Keys:
手动删除一个client
[root@python minions]# salt-key -d python2 -y
The following keys are going to be deleted:
Accepted Keys:
python2
Key for minion python2 deleted.
6、远程执行机器
①、-E, --pcre,通过正则表达式进行匹配
- salt -E 'web(9|10)*' test.ping -t 1
②、-L, --list, 主机id进行过滤
- salt -L "*app*" cmd.run "df -h"
③、-G, --grain, 根据被控主机的grains信息进行过滤
- salt -G 'role:nginx' cmd.run "ls /export"
④、-I, --pillar, 根据被控主机的pillar信息进行过滤
- salt -I 'myname:xiang' test.ping -t 5
⑤、-S, --ipcidr, 根据minion的ip地址进行匹配
- salt -S 192.168.1.1 test.ping
- salt -S 192.168.1.0/24 test.pin
- salt -S 192.168.0.0/16 test.ping
- salt -S 192.0.0.0/8 test.ping
⑥、检查客户端是否挂掉:
- salt-run manage.status |head
- salt-run manage.down
7、配置相关
Saltstack占用两个端口4505和4506
- 确保master端的4505和4506端口开通
- Minion的key确实别master接受
- 通过test.ping 模块,双方都可以ping通
配置文件详解:http://note.youdao.com/noteshare?id=ef288d8d0abb8f3e8bf6aa5b87bfabd3&sub=wcp1478526434731795
8、几种模块介绍
①、Runner 模块
在master端执行的:
- salt-run
②、Module 模块
通过master同步到minion端, 在minion执行:
- salt-call saltutil.sync_modules
- salt-call saltutil.sync_all
包括:
beacons:
clouds:
engines:
grains:
log_handlers:
modules:
output:
proxymodules:
renderers:
returners:
sdb:
states:
utils:
③、Grins 模块
记录minion的属性 key:value
自定义grians(在minion上定义的)
grains是在minion启动时搜集一些信息,如操作系统类型,网卡,内核版本,cpu架构等
- salt "*" grains.ls 列出所有grains项目名字
- salt "*app.*" grains.items 列出所有grains项目以及值
grains的信息并不是动态的,并不会实时变化,它只是在minion启动时收集到的,我们可以根据grains收集到的一些信息,做一些配置管理工作
在minion上:vim /etc/salt/grains
role: nginx
env: test
重启:service salt-minion restart
- salt "*" grains.item role env 获取grians
或者:
- salt -G "*" role:nginx cmd.run "hostname"
- salt ‘*’grains.items
④、Pillar模块
记录所有minion通用的属性,然后同步到minion端
- salt-call saltutil.refresh_pillar
- salt ‘*’ saltutil.refresh_pillar
pillar(在master上定义)(yaml语法)
在配置文件中找pillar的文件路劲,找到以后做如下操作:
mkdir /export/salt/pillar
vim top.sls
base:
"*":
- test
vim test.sls
conf: xiang
然后刷新pillar:
- salt '*' saltutil.refresh_pillar
验证:
- salt '*' pillar.items conf
或者:
- salt -I 'conf:xiang' test.ping
⑤、cmd模块
- salt ‘*’ cmd.run “df -h”
⑥、ping模块
- salt ‘*’ test.ping –t 5
⑦、cp 模块
可以在master的配置文件中配置:
file_roots:
base:
- /export/salt/root
salt的根目录就是file_roots定义的路径,salt://test.txt相当于/export/salt/root/test.txt
- salt 'wms5test1.app.172.17.23.176' cp.get_file salt://nscd.conf /tmp/xiang.txt
⑧、cron模块
- salt '*' cron.raw_cron root (查看定时任务)
- salt '*' cron.set_job root '*' '*' '*' '*' 1 /export/scripts/rm_log.sh
- salt '*' cron.rm_job root /export/scripts/rm_log.sh (写全没效果)
⑨、dnsutil模块
- salt '*' dnsutil.hosts_append /etc/hosts 127.0.0.1 xiang.com
- salt '*' dnsutil.hosts_remove /etc/hosts xiang.com
⑩、file模块
- salt '*' file.chown /etc/passwd root root
- salt '*' file.copy /path/to/src /path/to/dst
- salt '*' file.file_exists /etc/hosts
- salt '*' file.directory_exists /etc/
- salt '*' file.get_mod /etc/passwd
- salt '*' file.set_mod /etc/passwd 0644
- salt '*' file.mkdir /tmp/test
- salt '*' file.sed /export/servers/nginx/conf/nginx.conf 'debug' 'warn'
- salt '*' file.append /tmp/test.txt "welcome xiang"
- salt '*' file.remove /tmp/1.txt
⑪、network模块
- salt '*' network.dig www.qq.com
- salt '*' network.ping www.qq.com
- salt '*' network.ip_addrs
⑫、pkg包管理模块,管理yum, apt-get等
- salt '*' pkg.install php
- salt '*' pkg.remove php
- salt '*' pkg.upgrade (升级所有的软件包)
⑬、service模块
- salt '*' service.enable nginx
- salt '*' service.disable nginx
- salt '*' service.restart nginx
⑭、自定义模块
1)、首先在默认目录中,创建一个modules模块的目录:
[root@python salt]# mkdir _modules
2)、进入 _modules 并编写 module文件:
[root@python _modules]# vim hello.py
#!/usr/bin/env python
# -*- coding: utf-8 -*-
def hello():
result = dict()
result.update({"code": 231})
result.update({"messages": "successful"})
result.update({"Get": "YES"})
return result
3)、刷新模块
[root@python _modules]# salt '*' saltutil.sync_modules
python2:
- modules.hello
4)、引用模块
[root@python _modules]# salt "*" hello.hello
python2:
----------
Get:
YES
code:
231
messages:
successful
或者以json的格式输出:
[root@python _modules]# salt "*" hello.hello --output json
{
"python2": {
"code": 231,
"messages": "successful",
"Get": "YES"
}
}
假如所写的函数 需要传参:
[root@python _modules]# cat hello.py
#!/usr/bin/env python
# -*- coding: utf-8 -*-
def hello(aaa):
result = dict()
result.update({"code": 231})
result.update({"messages": 'successful'})
result.update({"Get": aaa})
return result
1)、更新
[root@python _modules]# salt '*' saltutil.sync_modules
python2:
- modules.hello
2)、传入参数
[root@python _modules]# salt "*" hello.hello aaa --output json
{
"python2": {
"code": 231,
"messages": "successful",
"Get": "aaa"
}
}