队列工厂之(MSMQ)
最近vs2017神器正式版发布让人很是激动,vs2017支持了很多语言的开发,从前端-后端-底层的支持,堪称是工具中的神器;netcore我喜爱的架构之一也得到了大力的宣传,应群友的邀请将在队列工厂(msmq,redis,rabbitmq)一些列文章过后,继续增加.netcore方面的文章,只为.netcore发展更好贡献一份微弱的力量;本章内容分享的是队列(msmq,redis,rabbitmq)封装的队列工厂之MSMQ希望大家能够喜欢,也希望各位多多"扫码支持"和"推荐"谢谢!
» 创建队列工厂QueueReposity<T>
. 队列公共操作接口IQueue
. 配置文件操作类ConfClass<T>
. 非安全单例创建队列实例
» Win7和Server2008安装MSMQ支持
» MSMQ测试用例(服务端+客户端)
下面一步一个脚印的来分享:
» 创建队列工厂QueueReposity<T>
首先,因为这里需要统一封装几个常用的队列方式的用法,因此采用了简单工厂模式,所以有了QueueReposity<T>;
. 队列公共操作接口IQueue
工厂模式的特性创建实例,因为这里封装的都是队列,故而能提取出统一的规则来,因此定义了如下接口(这里没有考虑一些队列兼容的异步方法请忽略):

 1 /// <summary>
 2     /// 队列公共操作
 3     /// </summary>
 4     public interface IQueue : IDisposable
 5     {
 6         /// <summary>
 7         /// 创建队列
 8         /// </summary>
 9         void Create();
10
11         /// <summary>
12         /// 总数
13         /// </summary>
14         /// <returns></returns>
15         int Total();
16
17         /// <summary>
18         /// 读取一个队列
19         /// </summary>
20         /// <returns></returns>
21         Message Read();
22
23         ///// <summary>
24         ///// 读取多个队列
25         ///// </summary>
26         ///// <returns></returns>
27         //List<Message> ReadAll();
28
29         /// <summary>
30         /// 写入队列
31         /// </summary>
32         /// <returns></returns>
33         bool Write(string content, string name = "");
34     }
. 配置文件操作类ConfClass<T>
因为每个队列的都有自己的配置信息,因此封装了统一管理的配置文件读取类ConfClass<T>,来读取配置在同一个xml文件中的配置信息,如下封装了自定义配置文件的属性和读取方法:
  1 #region 文件操作类
  2         /// <summary>
  3         /// 配置文件操作类
  4         /// </summary>
  5         /// <typeparam name="T"></typeparam>
  6         public class ConfClass<T> where T : class,new()
  7         {
  8
  9             public ConfClass() {
 10
 11                 var apiNodeName = this.GetType().Name;
 12                 Reader(apiNodeName);
 13             }
 14
 15             #region 单例模式
 16
 17             public static readonly object Singleton_Lock = new object();
 18
 19             /// <summary>
 20             /// 单例对象
 21             /// </summary>
 22             private static T t = default(T);
 23
 24             /// <summary>
 25             /// 通过方法获取单例
 26             /// </summary>
 27             /// <param name="t"></param>
 28             /// <returns></returns>
 29             public static T GetInstance(T t)
 30             {
 31                 t = t ?? new T();
 32                 return t;
 33             }
 34
 35             /// <summary>
 36             /// 通过属性获取单例(在继承的时候使用)
 37             /// </summary>
 38             public static T Current
 39             {
 40                 get
 41                 {
 42                     t = t ?? new T();
 43                     return t;
 44                 }
 45             }
 46
 47             #endregion
 48
 49             #region 配置文件操作
 50
 51             #region  配置文件属性
 52             /// <summary>
 53             /// 配置文件地址
 54             /// </summary>
 55             //public string ConfPath = Path.Combine(AppDomain.CurrentDomain.BaseDirectory, "Conf", "ShenNiuApi.xml");
 56             public string ConfPath = @"C:ConfShenNiuApi.xml";
 57
 58             /// <summary>
 59             /// 配置文件父节点名称
 60             /// </summary>
 61             public string ConfParentNodeName = "ShenNiuApi";
 62
 63             /// <summary>
 64             /// 配置文件内容
 65             /// </summary>
 66             public string ConfContent { get; set; }
 67
 68             /// <summary>
 69             /// 配置文件文档doc对象
 70             /// </summary>
 71             public XmlDocument doc { get; set; }
 72
 73
 74             /// <summary>
 75             /// 账号
 76             /// </summary>
 77             public string UserName { get; set; }
 78
 79             /// <summary>
 80             /// 密码
 81             /// </summary>
 82             public string UserPwd { get; set; }
 83
 84             /// <summary>
 85             /// 接口地址
 86             /// </summary>
 87             public string ApiUrl { get; set; }
 88
 89             /// <summary>
 90             /// 秘钥
 91             /// </summary>
 92             public string ApiKey { get; set; }
 93
 94             #endregion
 95
 96             public ConfClass(string ConfPath, string ConfParentNodeName="")
 97             {
 98
 99                 this.ConfPath = string.IsNullOrWhiteSpace(ConfPath) ? this.ConfPath : ConfPath;
100                 this.ConfParentNodeName = string.IsNullOrWhiteSpace(ConfParentNodeName) ? this.ConfParentNodeName : ConfParentNodeName;
101
102                 var apiNodeName = this.GetType().Name;
103                 Reader(apiNodeName);
104             }
105
106             /// <summary>
107             /// 读取配置信息
108             /// </summary>
109             /// <param name="apiNodeName"></param>
110             public void Reader(string apiNodeName)
111             {
112                 try
113                 {
114                     if (string.IsNullOrWhiteSpace(ConfPath) || string.IsNullOrWhiteSpace(ConfParentNodeName))
115                     {
116                         throw new Exception("配置文件地址或者配置文件父节点名称不能为空");
117                     }
118
119                     if (!File.Exists(ConfPath)) { return; }
120
121                     //获取配置文件信息
122                     using (StreamReader reader = new StreamReader(ConfPath))
123                     {
124                         this.ConfContent = reader.ReadToEndAsync().Result;
125                     }
126
127                     if (string.IsNullOrWhiteSpace(this.ConfContent)) { return; }
128
129                     //加入doc中
130                     this.doc = new XmlDocument();
131                     this.doc.LoadXml(this.ConfContent);
132
133                     //解析
134                     var parentNode = string.Format("{0}/{1}", this.ConfParentNodeName, apiNodeName);
135                     var apiNode = this.doc.SelectSingleNode(parentNode);
136                     if (apiNode == null) { throw new Exception("未能找到" + parentNode + "节点"); }
137
138                     this.UserName = apiNode.SelectSingleNode("UserName").InnerText;
139                     this.UserPwd = apiNode.SelectSingleNode("UserPwd").InnerText;
140                     this.ApiUrl = apiNode.SelectSingleNode("ApiUrl").InnerText;
141                     this.ApiKey = apiNode.SelectSingleNode("ApiKey").InnerText;
142                 }
143                 catch (Exception ex)
144                 {
145
146                     throw new Exception("加载配置文件" + this.ConfPath + "异常:" + ex.Message);
147                 }
148             }
149             #endregion
150         }
151         #endregion
这个配置文件的类主要运用在队列实例继承上,只要继承了默认就会读取响应的配置节点信息;配置xml文件默认存储的地址: C:ConfShenNiuApi.xml ,最大父节点名称默认:ShenNiuApi,格式如下所示:
1 <ShenNiuApi>
2     <QMsmq>
3         <UserName></UserName>
4         <UserPwd></UserPwd>
5         <ApiUrl>.Private$MyMsmq</ApiUrl>
6         <ApiKey></ApiKey>
7     </QMsmq>
8 </ShenNiuApi>
. 非安全单例创建队列实例
由于工厂都是专门用来提供实例的存在,创建实例的模式也有很多这种,这里我选择的是非安全单例创建队列实例,所有在ConfClass类中默认加入了单例模式:
 1 #region 单例模式
 2
 3             public static readonly object Singleton_Lock = new object();
 4
 5             /// <summary>
 6             /// 单例对象
 7             /// </summary>
 8             private static T t = default(T);
 9
10             /// <summary>
11             /// 通过方法获取单例
12             /// </summary>
13             /// <param name="t"></param>
14             /// <returns></returns>
15             public static T GetInstance(T t)
16             {
17                 t = t ?? new T();
18                 return t;
19             }
20
21             /// <summary>
22             /// 通过属性获取单例(在继承的时候使用)
23             /// </summary>
24             public static T Current
25             {
26                 get
27                 {
28                     t = t ?? new T();
29                     return t;
30                 }
31             }
32
33             #endregion
因此这里所说的工厂模式通过泛型传递类型,再创建实例的具体代码只有这么点,简短精炼:
 1 /// <summary>
 2     /// 队列工厂
 3     /// </summary>
 4     public class QueueReposity<T> where T : class,IQueue, new()
 5     {
 6         public static IQueue Current
 7         {
 8             get
 9             {
10                 return PublicClass.ConfClass<T>.Current;
11             }
12         }
13     }
» Win7和Server2008安装MSMQ支持
上面分享的是队列工厂的结构,到这里就要开始我们的第一个MSMQ队列的安装和封装分享了;首先来看Win7测试环境上怎么安装MSMQ的支持:开始菜单-》控制面板-》程序和功能:

-》打开或关闭Windows功能-》勾选如图所示队列安装组件:

-》确定等待安装完成;到此win7安装msmq就完成了,因为msmq是系统默认的所以安装起来很方便,当然server2008也差不多,按照如下操作安装(这里我使用租的阿里云Server2008R2服务器为例):开始-》控制面板-》程序(下面的打开或关闭Window功能)->功能-》添加功能-》消息队列:
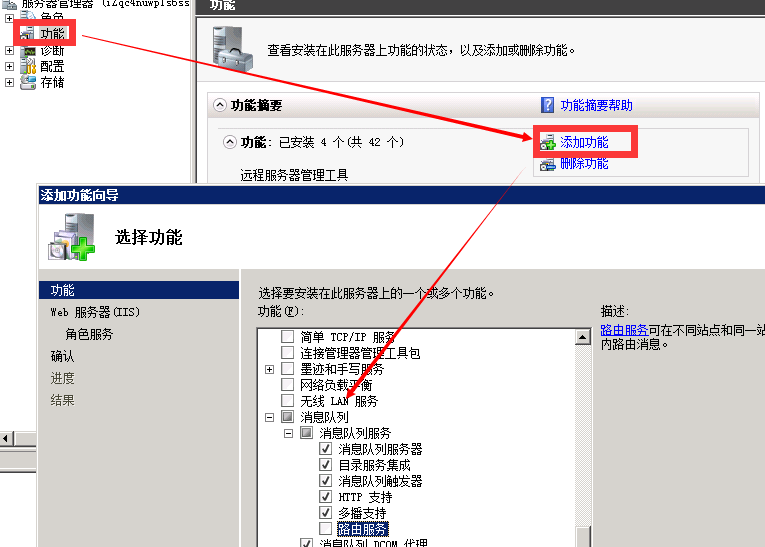
在server上安装的步骤基本没啥变化,是不是很简单;安装完成后这样你的电脑或服务器就支持msmq了,此刻的你是不是很兴奋,觉得又能学到新东西了呵呵;
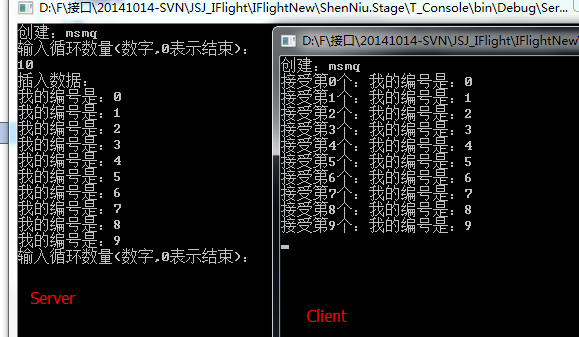
» MSMQ测试用例(服务端+客户端)
首先,这里我用控制台程序做测试用例,我分为客户端和服务端,用服务端通过分装的插入队列方法插入数据,然后通过客户端读取队列信息,先来上个图撑撑场面吧:
这里我创建了MSMQ的分装类 public class QMsmq : PublicClass.ConfClass<QMsmq>, IQueue 实现了队列接口IQueue和继承配置文件类ConfClass<QMsmq>,此时具体的方法体如下:
 1  public class QMsmq : PublicClass.ConfClass<QMsmq>, IQueue
 2     {
 3
 4
 5         private MessageQueue _msmq = null;
 6
 7         public void Create()
 8         {
 9             if (string.IsNullOrWhiteSpace(this.ApiUrl)) { throw new Exception("创建队列需要指定队列:地址"); }
10
11             _msmq = MessageQueue.Exists(this.ApiUrl) ?
12                 new MessageQueue(this.ApiUrl) :
13                 _msmq ?? MessageQueue.Create(this.ApiUrl);
14             //设置数据格式
15             _msmq.Formatter = new XmlMessageFormatter(new Type[] { typeof(string) });
16         }
17
18         public int Total()
19         {
20             if (_msmq == null) { throw new Exception("请先创建队列"); }
21             return _msmq.GetAllMessages().Length;
22         }
23
24         public Message Read()
25         {
26             try
27             {
28                 if (_msmq == null) { throw new Exception("请先创建队列"); }
29
30                 //60s超时
31                 return _msmq.Receive(TimeSpan.FromSeconds(60));
32             }
33             catch (Exception ex)
34             {
35                 throw new Exception(ex.Message);
36             }
37         }
38
39         //public List<Message> ReadAll()
40         //{
41         //    try
42         //    {
43         //        if (_msmq == null) { throw new Exception("请先创建队列"); }
44
45         //        var messages = _msmq.GetAllMessages();
46         //        return messages.ToList();
47         //    }
48         //    catch (Exception ex)
49         //    {
50         //        throw new Exception(ex.Message);
51         //    }
52         //}
53
54         public bool Write(string content, string name = "")
55         {
56             try
57             {
58                 if (_msmq == null) { throw new Exception("请先创建队列"); }
59                 if (string.IsNullOrWhiteSpace(content)) { throw new Exception("填充内容不能为空"); }
60
61                 var message = new Message();
62                 message.Body = content;
63                 message.Label = name;
64                 _msmq.Send(message);
65                 return true;
66             }
67             catch (Exception ex)
68             {
69                 throw new Exception(ex.Message);
70             }
71         }
72
73         public void Dispose()
74         {
75             if (_msmq != null)
76             {
77                 _msmq.Close();
78                 _msmq.Dispose();
79                 _msmq = null;
80             }
81         }
82     }
到这里我们的MSMQ简单封装代码已经完成了,咋们再来通过控制台调用下这个队列客户端代码:
 1  class Program
 2     {
 3         static void Main(string[] args)
 4         {
 5             Client();
 6         }
 7
 8         /// <summary>
 9         /// 客户端
10         /// </summary>
11         private static void Client()
12         {
13             //实例化QMsmq对象
14             var msmq = QueueReposity<QMsmq>.Current;
15             try
16             {
17                 Console.WriteLine("创建:msmq");
18                 msmq.Create();
19
20                 while (true)
21                 {
22                     try
23                     {
24                         var result = msmq.Read();
25                         Console.WriteLine(string.Format("接受第{0}个:{1}", result.Label, result.Body));
26                     }
27                     catch (Exception ex)
28                     { Console.WriteLine("异常信息:" + ex.Message); }
29                 }
30             }
31             catch (Exception ex)
32             {
33                 throw ex;
34             }
35             finally
36             {
37                 Console.WriteLine("释放。");
38                 msmq.Dispose();
39             }
40         }
41     }
这里能够看出客户端代码中使用MSMQ步骤主要有:QueueReposity<QMsmq>.Current工厂创建自定义队列实例-》Create()创建-》Read()读取-》Dispose()释放mq,流程还算清晰吧;如下服务端代码:
 1  class Program
 2     {
 3         static void Main(string[] args)
 4         {
 5             Server();
 6         }
 7
 8         /// <summary>
 9         /// 服务端
10         /// </summary>
11         private static void Server()
12         {
13             //实例化QMsmq对象
14             var msmq = QueueReposity<QMsmq>.Current;
15
16             try
17             {
18                 Console.WriteLine("创建:msmq");
19                 msmq.Create();
20
21                 var num = 0;
22                 do
23                 {
24                     Console.WriteLine("输入循环数量(数字,0表示结束):");
25                     var readStr = Console.ReadLine();
26                     num = string.IsNullOrWhiteSpace(readStr) ? 0 : Convert.ToInt32(readStr);
27
28                     Console.WriteLine("插入数据:");
29                     for (int i = 0; i < num; i++)
30                     {
31                         var str = "我的编号是:" + i;
32                         msmq.Write(str, i.ToString());
33                         Console.WriteLine(str);
34                     }
35                 } while (num > 0);
36             }
37             catch (Exception ex)
38             {
39             }
40             finally
41             {
42                 Console.WriteLine("释放。");
43                 msmq.Dispose();
44             }
45             Console.ReadLine();
46         }
47     }
服务端的步骤几乎和客户端差不多,区别在于一个读取一个写入,服务端步骤:QueueReposity<QMsmq>.Current工厂创建自定义队列实例-》Create()创建-》Write()写入-》Dispose()释放mq;以上对MSMQ的代码分享和环境搭建讲解,希望能给您带来好的帮助,谢谢阅读;