QT 是一个跨平台,并使用C++作为开发语言的应用程序开发工具,其提供了一套类库,该类库实现全平台支持,但配置时需要注意。QT程序编译后,需要去qt目录拷贝几个文件,与qt程序放在一起,否则会报错,以下代码是学习QT时整理的基础代码部分。
QT的下载地址为:https://download.qt.io/new_archive/qt/5.11/5.11.3/
1.去Qt安 装 目 录 的 bin 目 录 中 将 libgcc_s_dw2-1.dll 、libstdc++-6.dll、libwinpthread-1.dll、Qt5Core.dll、Qt5Gui.dll 和 Qt5Widgets.dll 这 6 个文件复制过来。
2.将 C:QtQt5.6.15.6mingw49_32plugins 目录中的 platforms 文件夹复制过来,里面只需要保留 qwindows.dll 文件即可。
3.也可以执行命令 windeployqt untitled.exe 完成自动打包,不过,打包后的大小,呵呵!
使用精简参数打包:windeployqt --no-angle --no-opengl-sw untitled.exe
只保留如下文件即可运行,其他的可全部裁掉。

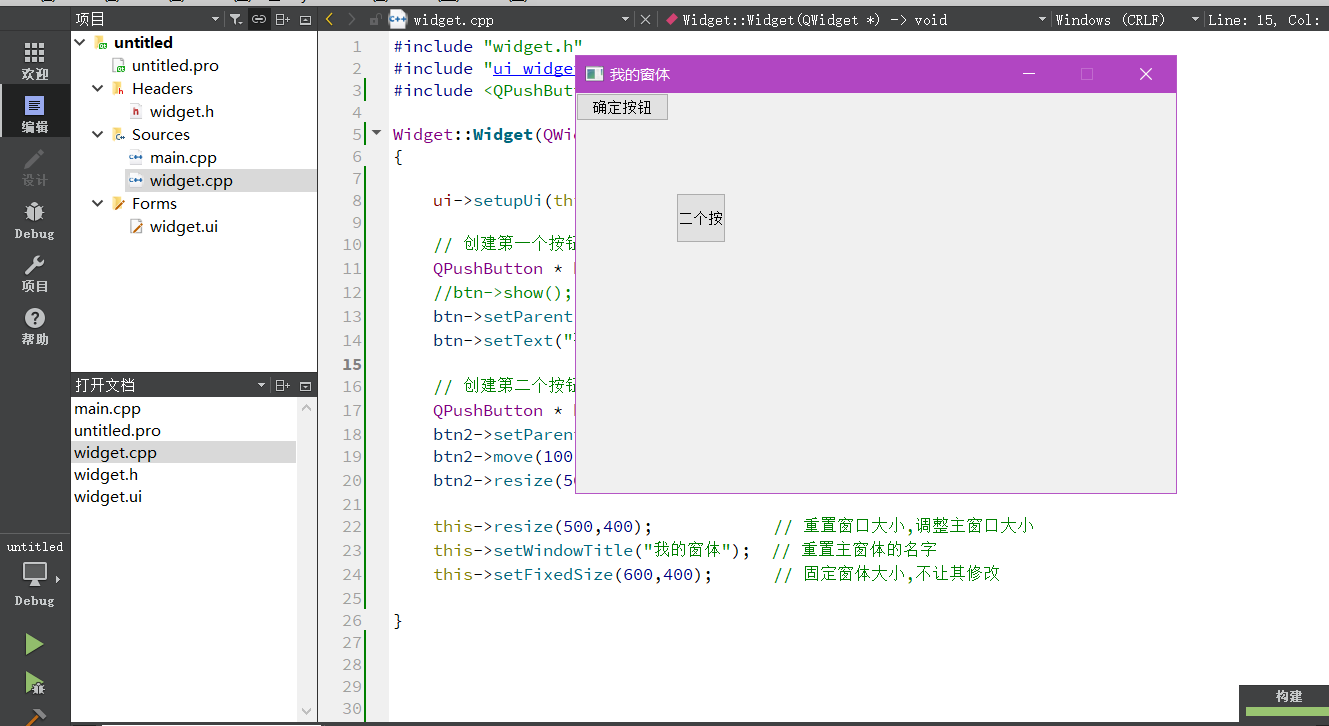
窗体基本的创建: source/widget.cpp
#include "widget.h"
#include "ui_widget.h"
#include <QPushButton>

Widget::Widget(QWidget *parent) : QWidget(parent), ui(new Ui::Widget)
{

    ui->setupUi(this);

    // 创建第一个按钮
    QPushButton * btn = new QPushButton;   // 创建一个按钮
    //btn->show();                         // 用顶层方法弹出按钮
    btn->setParent(this);    // 设置父窗体(将btn内嵌到主窗体中)
    btn->setText("确定按钮"); // 设置按钮text显示

    // 创建第二个按钮,窗口会按照btn2大小显示
    QPushButton * btn2 = new QPushButton("第二个按钮",this);
    btn2->setParent(this);
    btn2->move(100,100);      // 移动第二个按钮
    btn2->resize(50,50);      // 重置按钮2的大小

    this->resize(500,400);            // 重置窗口大小,调整主窗口大小
    this->setWindowTitle("我的窗体");  // 重置主窗体的名字
    this->setFixedSize(600,400);      // 固定窗体大小,不让其修改

}

Widget::~Widget()
{
    delete ui;
}
信号和槽简单介绍:
#include "widget.h"
#include "ui_widget.h"
#include <QPushButton>
#include <iostream>

using namespace std;

void Print()
{
    cout << "aa" << endl;
}

Widget::Widget(QWidget *parent) : QWidget(parent), ui(new Ui::Widget)
{

    ui->setupUi(this);

    // 创建第一个按钮
    QPushButton * btn = new QPushButton;   // 创建一个按钮
    //btn->show();                         // 用顶层方法弹出按钮
    btn->setParent(this);    // 设置父窗体(将btn内嵌到主窗体中)
    btn->setText("确定按钮"); // 设置按钮text显示

    // 创建第二个按钮,窗口会按照btn2大小显示
    QPushButton * btn2 = new QPushButton("第二个按钮",this);
    btn2->setParent(this);
    btn2->move(100,100);      // 移动第二个按钮
    btn2->resize(50,50);      // 重置按钮2的大小

    this->resize(500,400);            // 重置窗口大小,调整主窗口大小
    this->setWindowTitle("我的窗体");  // 重置主窗体的名字
    this->setFixedSize(600,400);      // 固定窗体大小,不让其修改

    // 为按钮绑定事件 connect(信号的发送者,发送的信号,信号的接受者,处理的函数(槽信号))
    connect(btn2,&QPushButton::clicked,this,&QWidget::close);

    // 将窗体中的第一个按钮,连接到Print函数中.
    connect(btn,&QPushButton::clicked,this,&Print);
}

Widget::~Widget()
{
    delete ui;
}
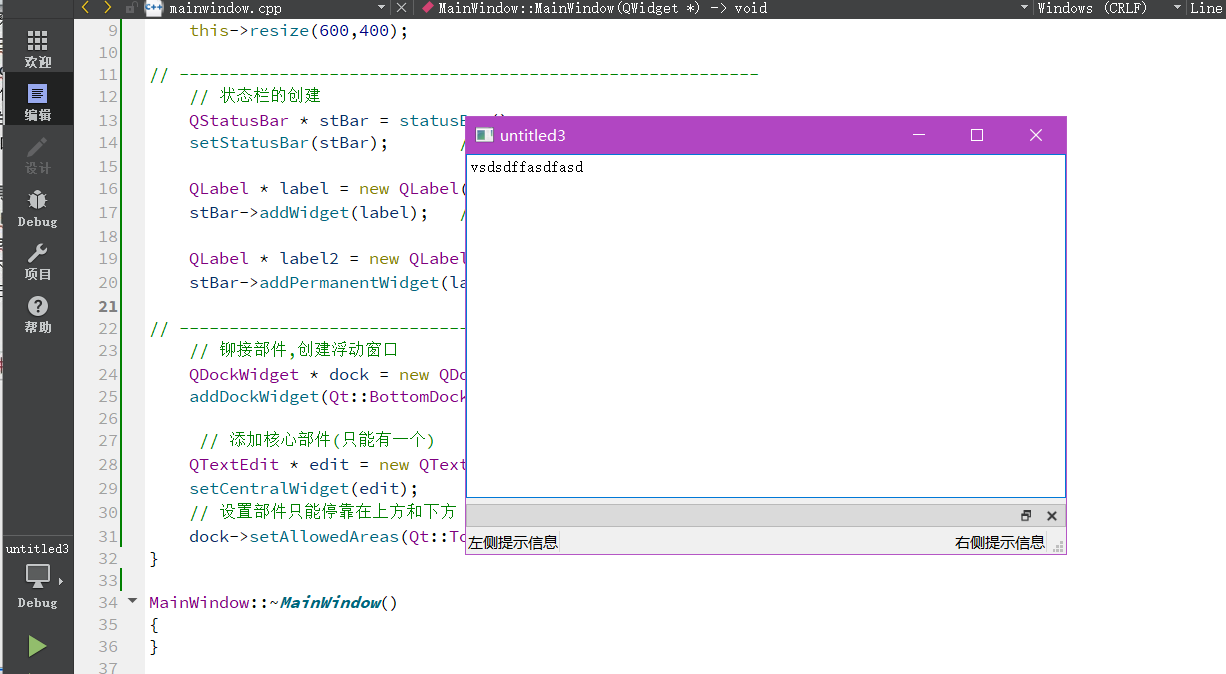
状态栏/浮动窗口:
#include "mainwindow.h"
#include <QLabel>
#include <QStatusBar>
#include <QDockWidget>
#include <QTextEdit>

MainWindow::MainWindow(QWidget *parent): QMainWindow(parent)
{
    this->resize(600,400);

// ----------------------------------------------------------
    // 状态栏的创建
    QStatusBar * stBar = statusBar();
    setStatusBar(stBar);       //  将状态栏部署到窗体

    QLabel * label = new QLabel("左侧提示信息",this);
    stBar->addWidget(label);   // 添加提示信息到左侧

    QLabel * label2 = new QLabel("右侧提示信息",this);
    stBar->addPermanentWidget(label2); // 添加提示到右侧

// ----------------------------------------------------------
    // 铆接部件,创建浮动窗口
    QDockWidget * dock = new QDockWidget();
    addDockWidget(Qt::BottomDockWidgetArea,dock);

     // 添加核心部件(只能有一个)
    QTextEdit * edit = new QTextEdit();           // 创建文本编辑框
    setCentralWidget(edit);                       // 设置到窗体
    // 设置部件只能停靠在上方和下方
    dock->setAllowedAreas(Qt::TopDockWidgetArea | Qt::BottomDockWidgetArea);
}

MainWindow::~MainWindow()
{
}
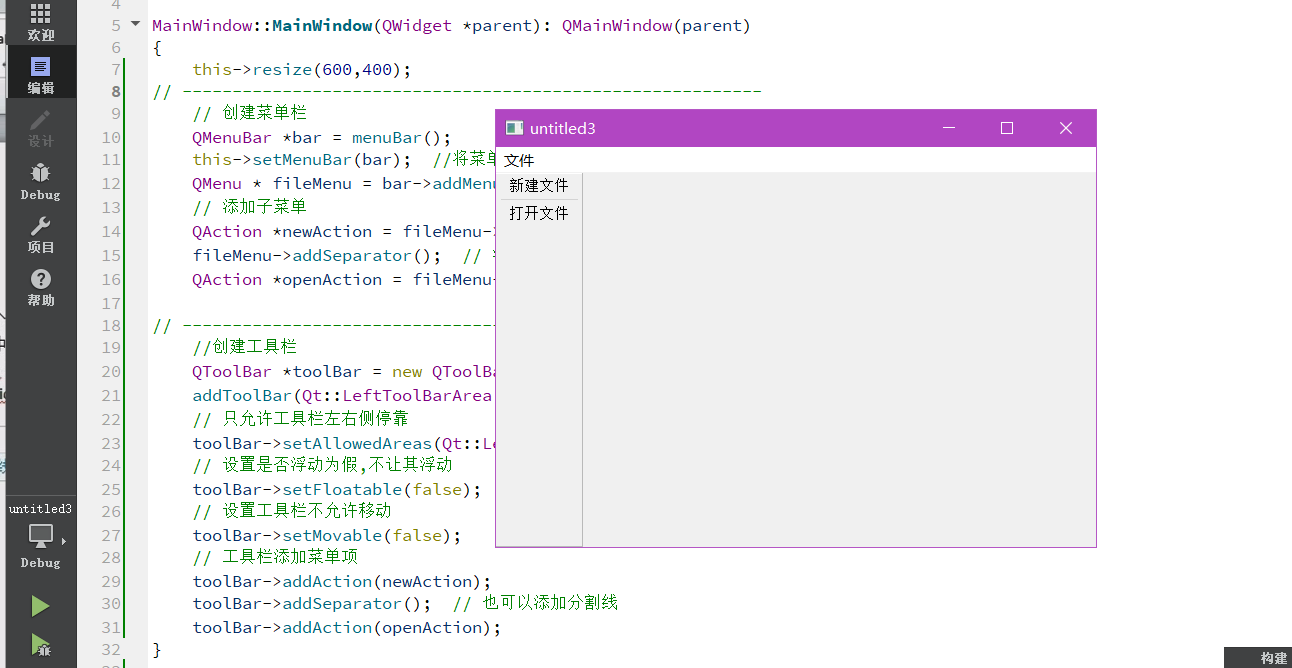
菜单栏/工具栏: 菜单栏只能有一个,工具栏可以有多个.
#include "mainwindow.h"
#include <QMenuBar>
#include <QToolBar>

MainWindow::MainWindow(QWidget *parent): QMainWindow(parent)
{
    this->resize(600,400);
// ----------------------------------------------------------
    // 创建菜单栏
    QMenuBar *bar = menuBar();
    this->setMenuBar(bar);  //将菜单栏放入主窗口
    QMenu * fileMenu = bar->addMenu("文件");
    // 添加子菜单
    QAction *newAction = fileMenu->addAction("新建文件");
    fileMenu->addSeparator();  // 添加分割线
    QAction *openAction = fileMenu->addAction("打开文件");

// ----------------------------------------------------------
    //创建工具栏
    QToolBar *toolBar = new QToolBar(this);  // 创建工具栏
    addToolBar(Qt::LeftToolBarArea,toolBar); // 设置默认停靠范围
    // 只允许工具栏左右侧停靠
    toolBar->setAllowedAreas(Qt::LeftToolBarArea |Qt::RightToolBarArea);
    // 设置是否浮动为假,不让其浮动
    toolBar->setFloatable(false);
    // 设置工具栏不允许移动
    toolBar->setMovable(false);
    // 工具栏添加菜单项
    toolBar->addAction(newAction);
    toolBar->addSeparator();  // 也可以添加分割线
    toolBar->addAction(openAction);
}

MainWindow::~MainWindow()
{
}
底部菜单,二级:
#include <QMenuBar>

MainWindow::MainWindow(QWidget *parent): QMainWindow(parent), ui(new Ui::MainWindow)
{
    ui->setupUi(this);
    // 主菜单
    QMenu *MainMenu = new QMenu(this);

    // 主菜单的子项
    QAction *option = new QAction(MainMenu);
    option->setText("选项");
    QAction *about = new QAction(MainMenu);
    about->setText("关于");

    QList<QAction*> actionList;
    actionList << option << about;

    // 添加子项到主菜单
    MainMenu->addActions(actionList);


    // 子菜单
    QMenu *childMenu = new QMenu();

    //子菜单的子项
    QAction *delfile = new QAction(childMenu);
    delfile->setText("删除");
    QAction *addfile = new QAction(childMenu);
    addfile->setText("添加");

    QList<QAction *> childActionList;
    childActionList << delfile << addfile;
    childMenu->addActions(childActionList);


    // 设置子菜单归属于opion
    option->setMenu(childMenu);
    //主菜单添加子菜单
    MainMenu->addMenu(childMenu);

    // 移动到当前鼠标所在位置
    MainMenu->exec(QCursor::pos());

}

顶部菜单栏二级菜单:
#include <QMenuBar>

MainWindow::MainWindow(QWidget *parent): QMainWindow(parent), ui(new Ui::MainWindow)
{
    ui->setupUi(this);

    // 菜单导航栏
    QMenuBar *MainMenu = new QMenuBar(this);
    this->setMenuBar(MainMenu);

    // 定义主菜单
    QMenu *FileMenu = MainMenu->addMenu("文件");
    QMenu *EditMenu = MainMenu->addMenu("编辑");
    QMenu *AboutMenu = MainMenu->addMenu("关于");

    // EditMemu 的子菜单
    QAction *option = new QAction(EditMenu);
    option->setText("配置模式");
    EditMenu->addAction(option);

    QAction *text = new QAction(EditMenu);
    text->setText("编辑文件");
    EditMenu->addAction(text);


    // option 子菜单的子项
    QMenu *childMenu = new QMenu();
    QAction *set_file = new QAction(childMenu);
    set_file->setText("设置文件内容");
    childMenu->addAction(set_file);

    QAction *read_file = new QAction(childMenu);
    read_file->setText("读取文件内容");
    childMenu->addAction(read_file);

    // 首先将childMenu注册到option中
    option->setMenu(childMenu);
    // 然后再将childMenu加入到EditMenu中
    EditMenu->addMenu(childMenu);
}

创建并使用工具栏
#include <QToolBar>
#include <QMenuBar>

MainWindow::MainWindow(QWidget *parent): QMainWindow(parent), ui(new Ui::MainWindow)
{
    ui->setupUi(this);


    // 创建菜单栏
    QMenuBar *bar = menuBar();
    this->setMenuBar(bar);  //将菜单栏放入主窗口
    QMenu * fileMenu = bar->addMenu("文件");
    // 添加子菜单
    QAction *newAction = fileMenu->addAction("新建文件");
    fileMenu->addSeparator();  // 添加分割线
    QAction *openAction = fileMenu->addAction("打开文件");

    //创建工具栏
    QToolBar *toolBar = new QToolBar(this);  // 创建工具栏
    addToolBar(Qt::TopToolBarArea,toolBar); // 设置默认停靠范围

    // 只允许工具栏停放在上下两侧
    toolBar->setAllowedAreas(Qt::TopToolBarArea |Qt::BottomToolBarArea);

    // 设置是否浮动为假,不让其浮动
    toolBar->setFloatable(false);
    // 设置工具栏不允许移动
    toolBar->setMovable(false);

    // 工具栏添加菜单项
    toolBar->addAction(newAction);
    toolBar->addSeparator();  // 也可以添加分割线
    toolBar->addAction(openAction);
}
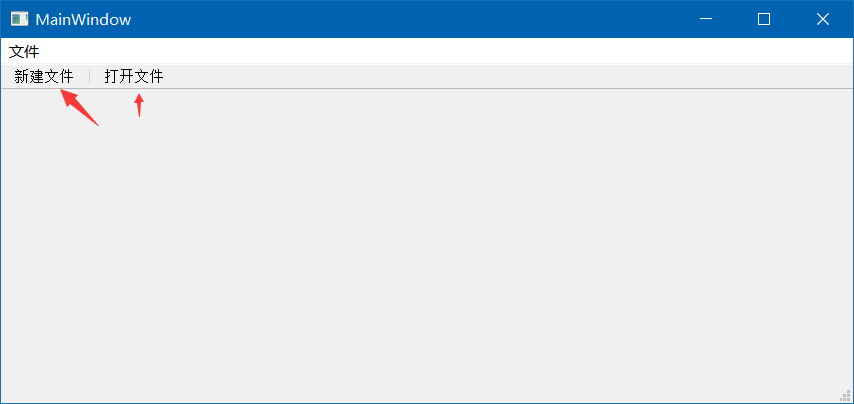
菜单栏添加图标:
#include <QMenuBar>
#include <QToolBar>

MainWindow::MainWindow(QWidget *parent): QMainWindow(parent), ui(new Ui::MainWindow)
{
    ui->setupUi(this);

    // 创建菜单栏
    QMenuBar *bar = menuBar();
    this->setMenuBar(bar);  //将菜单栏放入主窗口
    QMenu * fileMenu = bar->addMenu("文件");
    // 添加子菜单
    QAction *newAction = fileMenu->addAction("新建文件");
    fileMenu->addSeparator();  // 添加分割线
    QAction *openAction = fileMenu->addAction("打开文件");

    // 设置图标即可
    newAction->setIcon(QIcon(":/image/a.png"));

    //创建工具栏
    QToolBar *toolBar = new QToolBar(this);  // 创建工具栏
    addToolBar(Qt::BottomToolBarArea,toolBar); // 设置默认停靠范围

    // 只允许工具栏停放在上下两侧
    toolBar->setAllowedAreas(Qt::TopToolBarArea |Qt::BottomToolBarArea);

    // 设置是否浮动为假,不让其浮动
    toolBar->setFloatable(false);
    // 设置工具栏不允许移动
    toolBar->setMovable(false);

    // 工具栏添加菜单项
    toolBar->addAction(newAction);
    toolBar->addSeparator();  // 也可以添加分割线
    toolBar->addAction(openAction);
}

只添加菜单栏
#include <QMenuBar>
#include <QToolBar>
#include <iostream>

MainWindow::MainWindow(QWidget *parent): QMainWindow(parent), ui(new Ui::MainWindow)
{
    ui->setupUi(this);
    // 隐藏右击菜单
    this->setContextMenuPolicy(Qt::NoContextMenu);

    // 创建基础菜单并让其隐藏
    QMenuBar *bar = menuBar();
    this->setMenuBar(bar);
    QMenu * fileMenu = bar->addMenu("Ptr");
    bar->setVisible(false);

    // 添加子菜单
    QAction *NewAction = fileMenu->addAction("新建文件");
    QAction *OpenAction = fileMenu->addAction("打开文件");
    QAction *ReadAction = fileMenu->addAction("读入文件");

    // 分别设置图标
    NewAction->setIcon(QIcon(":/image/1.ico"));
    OpenAction->setIcon(QIcon(":/image/2.ico"));
    ReadAction->setIcon(QIcon(":/image/3.ico"));

    // 创建工具栏
    QToolBar *toolBar = new QToolBar(this);
    addToolBar(Qt::TopToolBarArea,toolBar);

    // 工具栏添加菜单项
    toolBar->addAction(NewAction);
    toolBar->addAction(OpenAction);
    toolBar->addAction(ReadAction);

    // 设置禁止移动默认贴在上方
    toolBar->setFloatable(false);
    toolBar->setMovable(false);
    toolBar->setToolButtonStyle(Qt::ToolButtonTextUnderIcon);

    // 绑定槽函数
    connect(NewAction,&QAction::triggered,this,[=](){
        std::cout << "new action" << std::endl;
    });

    connect(OpenAction,&QAction::triggered,this,[=](){
        std::cout << "open action" << std::endl;
    });
    connect(ReadAction,&QAction::triggered,this,[=](){
        std::cout << "read action" << std::endl;
    });
}

模态非模态对话框:
#include <QDebug>
#include <QDialog>

MainWindow::MainWindow(QWidget *parent): QMainWindow(parent), ui(new Ui::MainWindow)
{
    ui->setupUi(this);

    // 点击 New 菜单弹出消息
    connect(ui->actionNew,&QAction::triggered,this,[=]()
    {
        // 模态对话框
        // QDialog dlog(this);
        // dlog.resize(200,100);
        // dlog.exec();

        // 非模态对话框
        QDialog *dlog_nomod = new QDialog(this);
        dlog_nomod->resize(200,100);
        dlog_nomod->show();
        dlog_nomod->setWindowTitle("模态对话框");
        dlog_nomod->setAttribute(Qt::WA_DeleteOnClose);
    });
}

常用对话框:
#include <QDebug>
#include <QDialog>
#include <QMessageBox>


MainWindow::MainWindow(QWidget *parent): QMainWindow(parent), ui(new Ui::MainWindow)
{
    ui->setupUi(this);

    // 点击 New 菜单弹出消息
    connect(ui->actionNew,&QAction::triggered,this,[=]()
    {
        // 错误对话框
        QMessageBox::critical(this,"错误!","错误信息..");

        // 信息对话框
        QMessageBox::information(this,"提示!","提示信息..");

        // 询问对话框
        QMessageBox::question(this,"询问!","询问提示..");

        // 保存与否
        QMessageBox::question(this,"询问!","是否保存..",QMessageBox::Save |
                              QMessageBox::SaveAll | QMessageBox::Cancel);

        // 默认激活按钮,将光标放在save上
        QMessageBox::question(this,"关联!","关联save",QMessageBox::Save|QMessageBox::Cancel,
                              QMessageBox::Save);

        // 得到选择结果
        if(QMessageBox::Save == QMessageBox::question(this,"存档","是否保存?",QMessageBox::Save|QMessageBox::Cancel))
        {
               qDebug() << "ok";
        }

        // 警告对话框
        QMessageBox::warning(this,"警告!","是否警告",QMessageBox::Yes);
    });
}
颜色选择与打开关闭文件:
#include <QDebug>
#include <QColor>
#include <QColorDialog>
#include <QFileDialog>
#include <QString>

MainWindow::MainWindow(QWidget *parent): QMainWindow(parent), ui(new Ui::MainWindow)
{
    ui->setupUi(this);

    // 点击 New 菜单弹出消息
    connect(ui->actionNew,&QAction::triggered,this,[=]()
    {
        // 设置颜色对话框
        QColor color = QColorDialog::getColor(QColor(0,0,0));
        qDebug() << "color: " << color.red() << color.green() << color.blue();

        // 文件对话框
        QString path = QFileDialog::getOpenFileName(this,"打开文件","c:\","(*.txt *.png)");
        qDebug() << "path = " << path ;
    });
}
实现简单计算器: 通过点击,pushbutton跳转到指定槽函数上,然后输入以下代码
void Widget::on_pushButton_clicked(bool checked)
{
    // 得到str1,第一个编辑框的值
    QString str = ui->lineEdit->text();
    int num = str.toInt();

    // 得到第二个编辑框的数据
    str = ui->lineEdit_2->text();
    float price = str.toFloat();

    // 计算总结果
    float total = num*price;

    // 最后输出
    str = str.sprintf("%.2f",total);
    ui->lineEdit_3->setText(str);
}
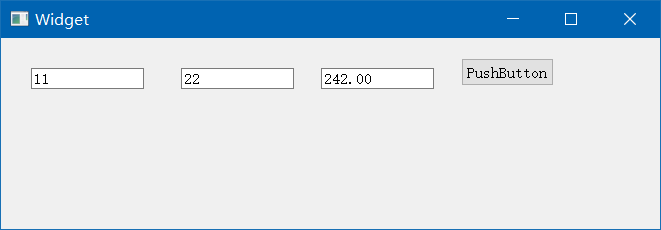
lineEdit:读入十进制数,转为二进制和十六进制并显示:
void Widget::on_pushButton_clicked(bool checked)
{
    QString str = ui->lineEdit->text();
    int val = str.toUInt();

    str = str.setNum(val,16);   // 转为十六进制
    str = str.toUpper();        // 变大写
    ui->lineEdit_2->setText(str);

    // 转二进制
    str = str.setNum(val,2);
    // str = QString::number(val,2);
    ui->lineEdit_3->setText(str);
}

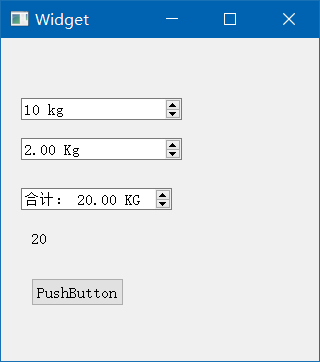
SpinBox 数值显示: 该控件主要用于整数显示,可以在前后增加特殊符号,如¥等。spinbox,doublespingbox 两个。
prefix 则是在前方加入 合计: suffix 则是在后方加入kg
void Widget::on_pushButton_clicked(bool checked)
{
    int num = ui->spinBox->value();
    double price = ui->doubleSpinBox->value();
    double total = num * price;
    ui->doubleSpinBox_2->setValue(total);     // 设置时不需要转换

    QString ss = ui->label->text();

    // ui->label->setText("123");       // 设置字符串
    ui->label->setNum(total);           // 设置计算结果
}
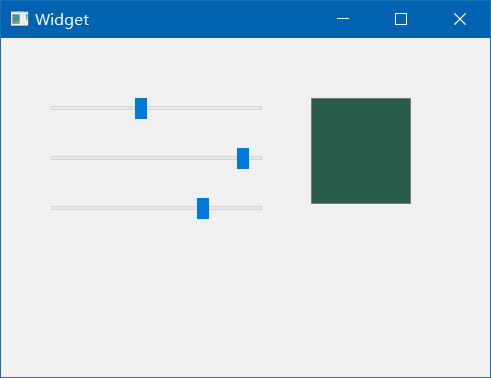
HorizontalSlider 滑块条: 设置滑块条,拖动滑块条自动触发valueChanged()信号,并设置TextEdit的底色。
void Widget::on_horizontalSlider_valueChanged(int value)
{
    Q_UNUSED(value);
    QColor color;

    int R = ui->horizontalSlider->value();
    int G = ui->horizontalSlider_2->value();
    int B = ui->horizontalSlider_3->value();

    color.setRgb(R,G,B);
    QPalette pal = ui->textEdit->palette();
    pal.setColor(QPalette::Base,color);
    ui->textEdit->setPalette(pal);
}
如上我们只有第一个滑块条发生变化时才会改变颜色,我们可以将剩下的两个滑块条做一个关联绑定,即可实现任意一个发生变化颜色就应用。
#include "widget.h"
#include "ui_widget.h"
#include <iostream>
#include <QPalette>
#include <QColor>

Widget::Widget(QWidget *parent): QWidget(parent), ui(new Ui::Widget)
{
    ui->setupUi(this);

    // 关联剩下的两个控件
    QObject::connect(ui->SliderGreen,SIGNAL(valueChanged(int)),  //关联 SliderGreen 的valueChanged()
                     this,SLOT(on_SliderRead_valueChanged(int)));

    QObject::connect(ui->SliderBlue,SIGNAL(valueChanged(int)), //关联 SliderBlue的valueChanged()
                     this,SLOT(on_SliderRead_valueChanged(int)));
}

Widget::~Widget()
{
    delete ui;
}

void Widget::on_SliderRead_valueChanged(int value)
{
    Q_UNUSED(value);
    QColor  color;
    int R=ui->SliderRead->value();  //读取SliderRed的当前值
    int G=ui->SliderGreen->value();//读取 SliderGreen 的当前值
    int B=ui->SliderBlue->value();//读取 SliderBlue 的当前值
    color.setRgb(R,G,B); //使用QColor的setRgb()函数 获得颜色

    QPalette pal=ui->textEdit->palette();//获取textEdit原有的 palette
    pal.setColor(QPalette::Base,color); //设置palette的基色(即背景色)

    ui->textEdit->setPalette(pal);//设置为textEdit的palette,改变textEdit的底色
}
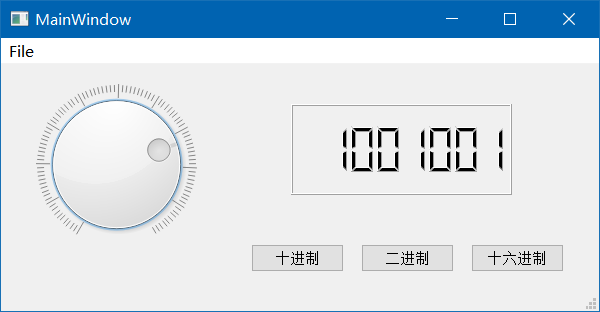
仪表盘配置:
#include "mainwindow.h"
#include "ui_mainwindow.h"
#include <iostream>

MainWindow::MainWindow(QWidget *parent): QMainWindow(parent), ui(new Ui::MainWindow)
{
    ui->setupUi(this);
    ui->lcdNumber->display(0);
}

MainWindow::~MainWindow()
{
    delete ui;
}

void MainWindow::on_dial_valueChanged(int value)
{
    // 设置LCD屏幕显示
    ui->lcdNumber->display(value);
}

void MainWindow::on_pushButton_clicked(bool checked)
{
    // 设置LCD显示十进制数
    ui->lcdNumber->setDigitCount(3);  // 设置位数
    ui->lcdNumber->setDecMode();      // 十进制
}

void MainWindow::on_pushButton_2_clicked(bool checked)
{
    // 设置显示二进制
    ui->lcdNumber->setDigitCount(8);
    ui->lcdNumber->setBinMode();
}

void MainWindow::on_pushButton_3_clicked(bool checked)
{
    // 设置显示十六进制
    ui->lcdNumber->setDigitCount(3);
    ui->lcdNumber->setHexMode();
}
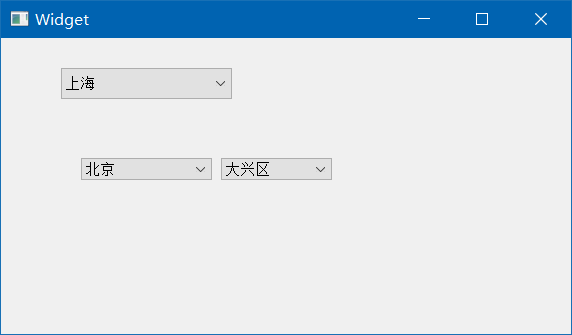
combox
#include <QString>
#include <iostream>
#include <QMap>
#include <QList>

Widget::Widget(QWidget *parent): QWidget(parent), ui(new Ui::Widget)
{
    ui->setupUi(this);

    // 给QComBox添加图标
    QIcon icon;
    icon.addFile(":/image/n1.ico");
    ui->comboBox->clear();
    for(int x=0;x<10;x++)
    {
        ui->comboBox->addItem(icon,QString::asprintf("item %d",x));
    }

    // 使用Items一次性追加标签
    ui->comboBox->clear();
    QStringList str_list;
    str_list << "北京" << "上海" << "天津" << "山东";
    ui->comboBox->addItems(str_list);

    // 使用Map映射实现,添加<城市,区号>城市显示,区号隐藏.
    QMap<QString,int> City_Zone;

    City_Zone.insert("北京",10);
    City_Zone.insert("上海",22);
    City_Zone.insert("天津",21);

    ui->comboBox->clear();
    foreach(const QString &str,City_Zone.keys())
    {
        ui->comboBox->addItem(str,City_Zone.value(str));
        std::cout << str.toUtf8().data() << " : " << City_Zone.value(str) << std::endl;
    }

    QMap<QString,QList <QString>> map;

    QList<QString> tmp;
    tmp.append("大兴区");
    tmp.append("昌平区");
    tmp.append("东城区");

    map["北京"] = tmp;

    foreach(const QString &x,map.keys())
    {
        std::cout << x.toStdString().data() << std::endl;
        ui->comboBox_2->addItem(x);
        if(x == "北京")
        {
            QList<QString> tmp;

            tmp = map.value(x);
            for(int y=0;y<tmp.count();y++)
            {
                std::cout << tmp[y].toStdString().data() << std::endl;
                ui->comboBox_3->addItem(tmp[y]);
            }
        }
    }
}
