介绍:
普通的队列是一种先进先出的数据结构,元素在队列尾追加,而从队列头删除。
在优先队列中,元素被赋予优先级。当访问元素时,具有最高优先级的元素最先删除。优先队列具有最高级先出 (first in, largest out)的行为特征。
首先要包含头文件#include<queue>, 他和queue不同的就在于我们可以自定义其中数据的优先级, 让优先级高的排在队列前面,优先出队。
优先队列具有队列的所有特性,包括队列的基本操作,只是在这基础上添加了内部的一个排序,它本质是一个堆实现的。
和队列相同的基本操作:
top 访问队头元素
empty 队列是否为空
size 返回队列内元素个数
push 插入元素到队尾 (并排序)
emplace 原地构造一个元素并插入队列
pop 弹出队头元素
swap 交换内容
定义:
priority_queue<Type, Container, Functional>
Type 就是数据类型,Container 就是容器类型(Container必须是用数组实现的容器,比如vector,deque等等,但不能用 list。STL里面默认用的是vector),Functional 就是比较的方式。
当需要用自定义的数据类型时才需要传入三个参数(因为此时需要重写自己数据的Functional,也就是为自己的数据重载<(大顶堆)或>(小顶堆) ),使用基本数据类型时,只需要传入数据类型,默认是大顶堆。
一般是:
//升序队列,小顶堆
priority_queue <int,vector<int>,greater<int> > q;
//降序队列,大顶堆
priority_queue <int,vector<int>,less<int> >q;

//greater和less是std实现的两个仿函数(就是使一个类的使用看上去像一个函数。其实现就是类中实现一个operator(),这个类就有了类似函数的行为,就是一个仿函数类了)
1>基本类型优先队列的例子:
#include<iostream>
#include <queue>
using namespace std;
int main()
{
    //对于基础类型 默认是大顶堆
    priority_queue<int> a;
    //等同于 priority_queue<int, vector<int>, less<int> > a;

    //      这里一定要有空格,不然成了右移运算符↓↓
    priority_queue<int, vector<int>, greater<int> > c;  //这样就是小顶堆
    priority_queue<string> b;

    for (int i = 0; i < 5; i++)
    {
        a.push(i);
        c.push(i);
    }
    while (!a.empty())
    {
        cout << a.top() << ' ';
        a.pop();
    }
    cout << endl;

    while (!c.empty())
    {
        cout << c.top() << ' ';
        c.pop();
    }
    cout << endl;

    b.push("abc");
    b.push("abcd");
    b.push("cbd");
    while (!b.empty())
    {
        cout << b.top() << ' ';
        b.pop();
    }
    cout << endl;
    return 0;
}
运行结果:
4 3 2 1 0
0 1 2 3 4
cbd abcd abc
请按任意键继续. . .
2>用pair做优先队列元素的例子:
规则:pair的比较,先比较第一个元素,第一个相等比较第二个。
#include <iostream>
#include <queue>
#include <vector>
using namespace std;
int main()
{
    priority_queue<pair<int, int> > a;
    pair<int, int> b(1, 2);
    pair<int, int> c(1, 3);
    pair<int, int> d(2, 5);
    a.push(d);
    a.push(c);
    a.push(b);
    while (!a.empty())
    {
        cout << a.top().first << ' ' << a.top().second << '
';
        a.pop();
    }
}
运行结果:
2 5
1 3
1 2
请按任意键继续. . .
3>用自定义类型做优先队列元素的例子
#include <iostream>
#include <queue>
using namespace std;

//方法1
struct tmp1 //运算符重载<
{
    int x;
    tmp1(int a) {x = a;}
    bool operator<(const tmp1& a) const
    {
        return x < a.x; //大顶堆
    }
};

//方法2
struct tmp2 //重写仿函数
{
    bool operator() (tmp1 a, tmp1 b)
    {
        return a.x < b.x; //大顶堆
    }
};

int main()
{
    tmp1 a(1);
    tmp1 b(2);
    tmp1 c(3);
    priority_queue<tmp1> d;
    d.push(b);
    d.push(c);
    d.push(a);
    while (!d.empty())
    {
        cout << d.top().x << '
';
        d.pop();
    }
    cout << endl;

    priority_queue<tmp1, vector<tmp1>, tmp2> f;
    f.push(b);
    f.push(c);
    f.push(a);
    while (!f.empty())
    {
        cout << f.top().x << '
';
        f.pop();
    }
}
运行结果:
3
2
1

3
2
1
请按任意键继续. . .
3>emplace方法
VS2017中的emplace源码
1 template<class... _Valty>
2         void emplace(_Valty&&... _Val)
3         {    // insert element at beginning
4         c.emplace_back(_STD forward<_Valty>(_Val)...);
5         _STD push_heap(c.begin(), c.end(), comp);
6         }
VS2017中的push源码
1 void push(value_type&& _Val)
2         {    // insert element at beginning
3         c.push_back(_STD move(_Val));
4         _STD push_heap(c.begin(), c.end(), comp);
5         }
两个方法的主要区别:在将新添加的元素堆中之前一个调用的是emplace_back()方法,一个调用的是push_back()方法。
下面主要分析emplace_back()方法和push_back()方法的区别:
c++开发中我们会经常用到插入操作对stl的各种容器进行操作,比如vector,map,set等。在引入右值引用,转移构造函数,转移复制运算符之前,通常使用push_back()向容器中加入一个右值元素(临时对象)时,首先会调用构造函数构造这个临时对象,然后需要调用拷贝构造函数将这个临时对象放入容器中。原来的临时变量释放。这样造成的问题就是临时变量申请资源的浪费。
引入了右值引用,转移构造函数后,push_back()右值时就会调用构造函数和转移构造函数,如果可以在插入的时候直接构造,就只需要构造一次即可。这就是c++11 新加的emplace_back。
详细区别请看:https://www.cnblogs.com/MrLiuZF/p/14071320.html
因此,优先队的push方法和emplace方法在功能上并没有很大的区别,只有实现上的细微区别。
现在测试一下:
由于STL优先队列实际上就是有heap的方法实现的所以先测试heap中的push_back()和emplace_back(),这值得容器用vector实现。
使用push_heap将新元素入堆之前调用emplace_back():
1 #include <iostream>
2 #include <vector>
3 #include <algorithm>
4 #include <queue>
5
6 using namespace std;
7
8 void printHeap(vector<int> &v) {
9 for (vector<int>::iterator it = v.begin(); it != v.end(); ++it) {
10 cout << *it << " ";
11 }
12 cout << "
" << endl;
13 }
14
15 int main()
16 {
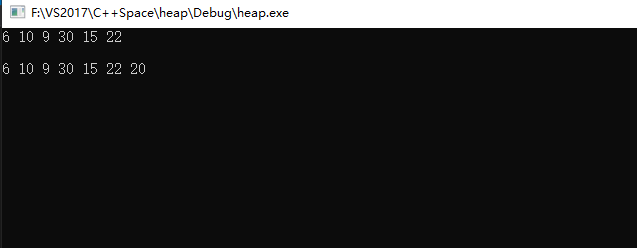
17 vector<int> min = { 10,30,22,6,15,9 };
18
19 //建立小顶堆
20 make_heap(min.begin(), min.end(), greater<int>());
21 printHeap(min);//6 10 9 30 15 22
22
23 //插入元素
24 min.emplace_back(20);
25 push_heap(min.begin(), min.end(), greater<int>());//该算法前提:必须在堆的条件下
26 printHeap(min);
27
28 return 0;
29 }
输出:

使用push_heap将新元素入堆之前调用push_back():
 1 #include <iostream>
 2 #include <vector>
 3 #include <algorithm>
 4 #include <queue>
 5
 6 using namespace std;
 7
 8 void printHeap(vector<int> &v) {
 9     for (vector<int>::iterator it = v.begin(); it != v.end(); ++it) {
10         cout << *it << " ";
11     }
12     cout << "
" << endl;
13 }
14
15 int main()
16 {
17     vector<int> min = { 10,30,22,6,15,9 };
18
19     //建立小顶堆
20     make_heap(min.begin(), min.end(), greater<int>());
21     printHeap(min);//6 10 9 30 15 22
22
23     //插入元素
24     min.push_back(20);
25     push_heap(min.begin(), min.end(), greater<int>());//该算法前提:必须在堆的条件下
26     printHeap(min);
27
28     return 0;
29 }
输出:

现在直接使用priority_queue来测试emplace和push:
 1 #include <iostream>
 2 #include <vector>
 3 #include <algorithm>
 4 #include <queue>
 5
 6 using namespace std;
 7
 8 void printHeap(vector<int> &v) {
 9     for (vector<int>::iterator it = v.begin(); it != v.end(); ++it) {
10         cout << *it << " ";
11     }
12     cout << "
" << endl;
13 }
14
15 int main()
16 {
17
18     priority_queue<int, vector<int>, less<int> > pq;
19     pq.push(6);
20     pq.push(15);
21     pq.push(9);
22     pq.push(10);
23     pq.push(30);
24     pq.push(22);
25
26     auto tpd = pq;
27     while (!tpd.empty()) {
28         cout << tpd.top() << " ";
29         tpd.pop();
30     }
31     cout << endl;
32
33     auto tpd1 = pq;
34     tpd1.push(16);
35     while (!tpd1.empty()) {
36         cout << tpd1.top() << " ";
37         tpd1.pop();
38     }
39     cout << endl;
40
41
42     auto tpd2 = pq;
43     tpd2.emplace(16);
44     while (!tpd2.empty()) {
45         cout << tpd2.top() << " ";
46         tpd2.pop();
47     }
48     cout << endl;
49
50     return 0;
51 }
输出:
