本文链接:https://blog.csdn.net/u011961856/article/details/77984667
函数解析
github 代码:https://github.com/adonistio/inception-face-shape-classifier
CLASSIFY_FACE.py
1
用于运行训练好的Inception model,对输入图像进行分类.
CLASSIFY_FACE_CONFUSION.py
1
与CLASSIFY_FACE.PY类似,但是讲述如结果和一个困惑度矩阵保存在文本文件中.
EXTRACT_FEATURES.py
1
这个脚本用于检测图像中的人脸,即bounding box,检测特征点,并提取人脸特征用于训练.
PROCESS_IMAGE.py
1
包含几个图像预处理和增强函数,例如图像平方,滤波,模糊,旋转,翻转等.
RETRAIN_CMDGEN.py
1
得到CMD窗口命令,以重新训练Inception V3 model.
RETRAIN_v2.py
1
将测试图片设置为包含所有的图像,解决了验证时的double counting 等问题.
TRAIN_CLASSIFIERS.py
1
用于训练LDA, SVM-LIN, SVM-RBF, MLP, KNN分类模型.
bottlenecks.rar
1
包含所有500张图像的bottleneck files, bottleneck files为图像的向量表示,向量为Inception model的最后一层的输出.
features.txt
1
包含LDA,SVM,KNN,MLP分类中使用的特征向量.
原理
inceptionV2网络结构:
采用inceptionV2,对图像,提取一个2048维的特征向量.由于我们需要将输入图像分为5个类别,因此需要添加网络层,网络层的输入为2048维的向量,输出为5维的特征向量.
具体为将特征向量输入一个全连接层,得到5维的特征向量,之后加一个softmax激活函数,得到输出概率:
# Add the new layer that we'll be training.
(train_step, cross_entropy, bottleneck_input, ground_truth_input,
final_tensor) = add_final_training_ops(len(image_lists.keys()),
FLAGS.final_tensor_name,
bottleneck_tensor)
1
2
3
4
5
def add_final_training_ops(class_count, final_tensor_name, bottleneck_tensor):
with tf.name_scope('input'):
bottleneck_input = tf.placeholder_with_default(
bottleneck_tensor, shape=[None, BOTTLENECK_TENSOR_SIZE],
name='BottleneckInputPlaceholder')#[batch_size,2048]
ground_truth_input = tf.placeholder(tf.float32,
[None, class_count],
name='GroundTruthInput')
# Organizing the following ops as `final_training_ops` so they're easier
# to see in TensorBoard
layer_name = 'final_training_ops'
with tf.name_scope(layer_name):
with tf.name_scope('weights'):
layer_weights = tf.Variable(tf.truncated_normal([BOTTLENECK_TENSOR_SIZE, class_count], stddev=0.001), name='final_weights')
variable_summaries(layer_weights)
with tf.name_scope('biases'):
layer_biases = tf.Variable(tf.zeros([class_count]), name='final_biases')
variable_summaries(layer_biases)
with tf.name_scope('Wx_plus_b'):
logits = tf.matmul(bottleneck_input, layer_weights) + layer_biases
tf.summary.histogram('pre_activations', logits)
final_tensor = tf.nn.softmax(logits, name=final_tensor_name)
tf.summary.histogram('activations', final_tensor)
with tf.name_scope('cross_entropy'):
cross_entropy = tf.nn.softmax_cross_entropy_with_logits(
labels=ground_truth_input, logits=logits)
with tf.name_scope('total'):
cross_entropy_mean = tf.reduce_mean(cross_entropy)
tf.summary.scalar('cross_entropy', cross_entropy_mean)
with tf.name_scope('train'):
train_step = tf.train.GradientDescentOptimizer(FLAGS.learning_rate).minimize(
cross_entropy_mean)
return (train_step, cross_entropy_mean, bottleneck_input, ground_truth_input,
final_tensor)
1
2
3
4
5
6
7
8
9
10
11
12
13
14
15
16
17
18
19
20
21
22
23
24
25
26
27
28
29
30
31
32
33
34
35
36
37
38
39
40
41
模型训练
inception模型训练函数为retrain_v2.py,训练命令为:
python retrain_v2.py –image_dir /home/qinghua/data/face_classify/celebs3_squared/
训练输入数据为,人脸图像(长度为2048的特征向量),根据inceptionv2网络计算所有的训练,验证,测试数据的特征向量(bottleneck),并将其保存在bootlneck文件假下,每个图像的特征向量对应一个文本文件,文件名为filename.txt.
label为长度为5的向量,需要训练的为添加的全连接层的权重矩阵w([2048,5]),b([5,]).
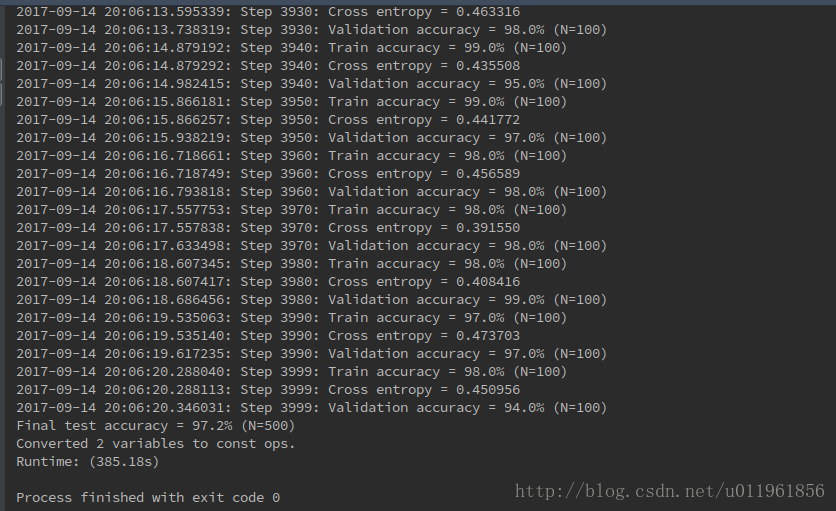
迭代4000次的结果: