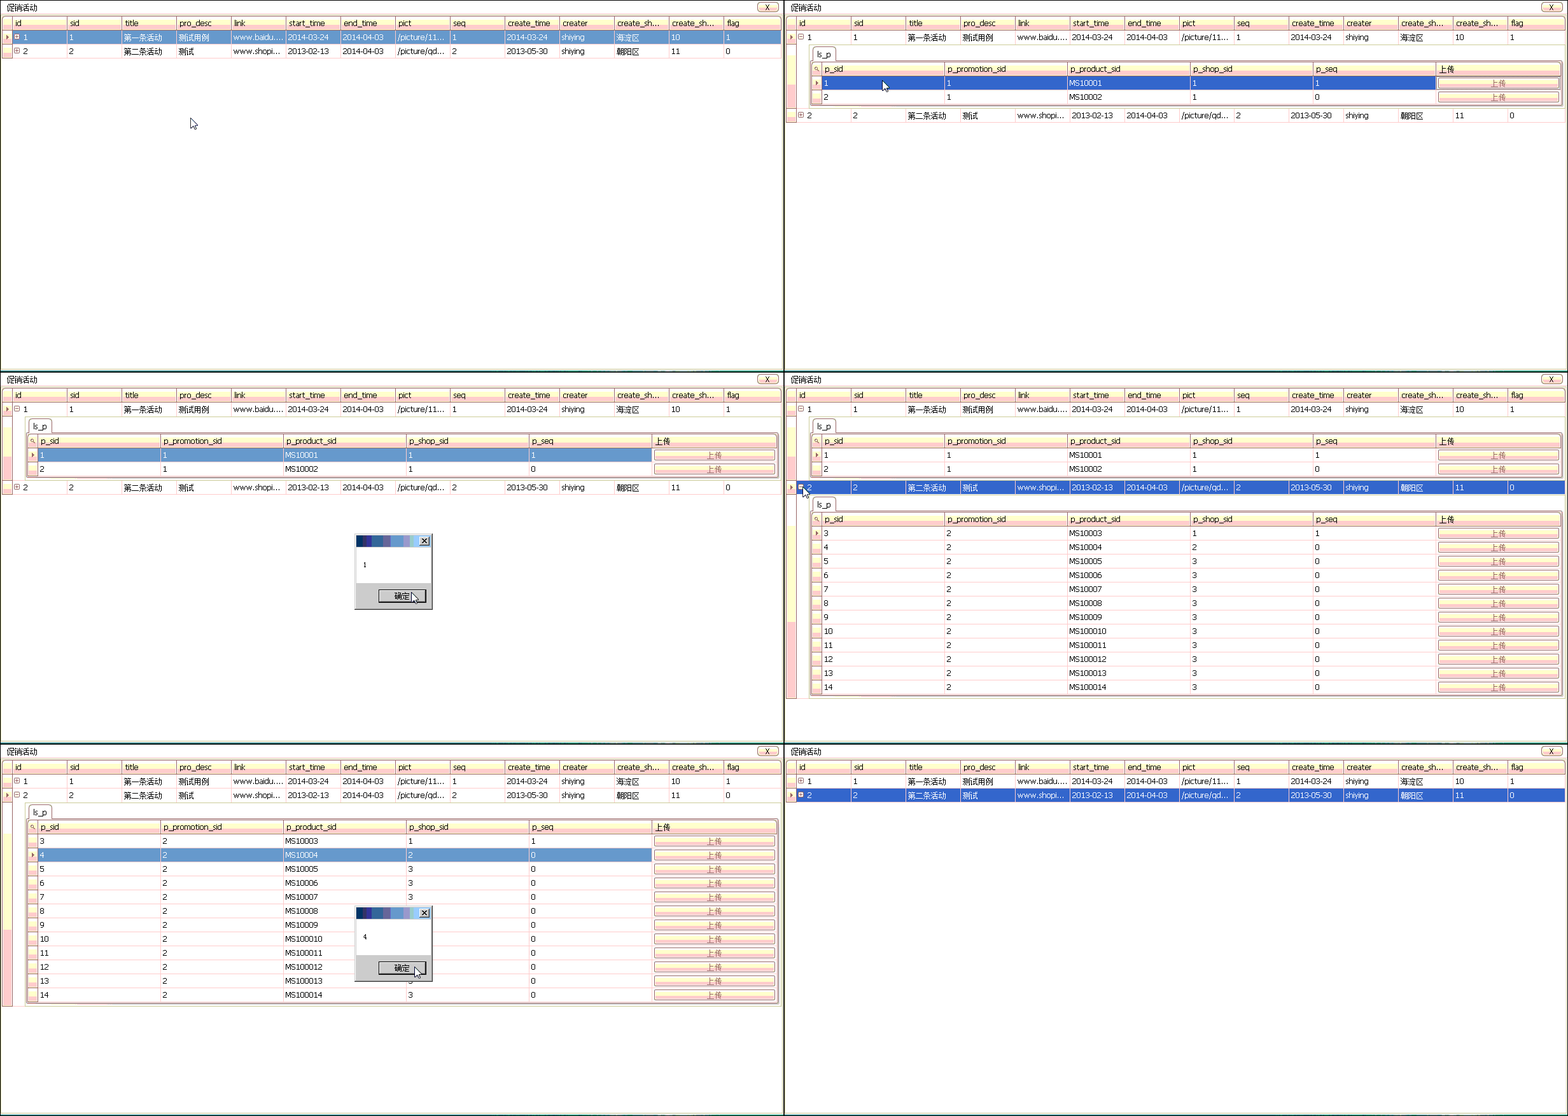
先附上效果图,不是想要这个效果的朋友就不用可以继续寻找了。

DEV—GridControl制作主从表:
(注:此例没有用到数据库,只是单纯的在内存中操作数据。)
写这一笔,是为了能更好的理解主从表,的搭建关系。
1.环境:
主表(这里用类代替):

 1      /// <summary>
 2      /// 主表
 3     /// </summary>
 4     public class mobile_flash_promotions
 5     {
 6
 7         /// <summary>
 8         /// ID
 9         /// </summary>
10         public string id { get; set; }
11
12         public string sid { get; set; }
13
14         /// <summary>
15         /// 活动标题
16         /// </summary>
17         public string title { get; set; }
18
19         public string pro_desc { get; set; }
20
21         /// <summary>
22         /// 活动链接
23         /// </summary>
24         public string link { get; set; }
25
26         /// <summary>
27         /// 活动开始时间
28         /// </summary>
29         public string start_time { get; set; }
30

31         /// <summary>
32         /// 活动结束时间
33         /// </summary>
34         public string end_time { get; set; }
35
36         /// <summary>
37         /// 活动图片
38         /// </summary>
39         public string pict { get; set; }
40
41         public string seq { get; set; }
42
43         /// <summary>
44         ///活动 创建时间
45         /// </summary>
46         public string create_time { get; set; }
47
48         /// <summary>
49         /// 活动创建人
50         /// </summary>
51         public string creater { get; set; }
52
53         /// <summary>
54         /// 活动创建分店名称
55         /// </summary>
56         public string create_shop_name { get; set; }
57
58         /// <summary>
59         /// 活动创建分店sid
60         /// </summary>
61         public string create_shop_sid { get; set; }
62
63         /// <summary>
64         /// 是否是旗舰店
65         /// </summary>
66         public string flag { get; set; }
67
68         /// <summary>
69         /// 活动店铺集合
70         /// </summary>
71         public List<mobile_promotion_product> ls_p { get; set; }
72     }
从表(仍然是类):

 1     /// <summary>
 2     /// 从表
 3    /// </summary>
 4     public class mobile_promotion_product
 5     {
 6         public string sid { get; set; }
 7
 8         public string promotion_sid { get; set; }
 9
10         public string product_sid { get; set; }
11
12         public string shop_sid { get; set; }
13
14         public string seq { get; set; }
15     }
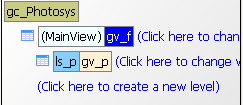
GridControl中在MainView中显示主表的GridView,随后添加一个Level在其中添加从表的GridView,如图:

来具体说明一下,主表与从表的关系式通过主表类中的List<从表>来确立的。
如果在主从表功能实现后,从表的列名和自己写好的从表的GridView的列名不相符,那就是在GridControl中添加Level时,Level的name与主表类中代表从表集合的字段名不一样所导致的。(也就是说,如果不需要定制从表的GridView,完全可以不添加Level和从表的GridView)。
2.模拟数据库环境:
首先说要实现的效果,【点击主表Row时,刷新从表信息】
刚才提到过本例子的数据都是在内存中操作,所以首先写一个加载数据的方法:

 1         /// <summary>
 2         /// 主表数据源
 3       /// </summary>
 4         List<mobile_flash_promotions> ls_f = new List<mobile_flash_promotions>();
 5
 6         /// <summary>
 7         /// 从表数据源
 8       /// </summary>
 9         List<mobile_promotion_product> ls_p = new List<mobile_promotion_product>();
10
11         /// <summary>
12         /// 向数据源加载数据
13       /// </summary>
14         public void LoadBaseData()
15         {
16
17             mobile_promotion_product mpp1 = new mobile_promotion_product() { sid = "1", product_sid = "MS10001", promotion_sid = "1", shop_sid = "1", seq = "1" };
18             mobile_promotion_product mpp2 = new mobile_promotion_product() { sid = "2", product_sid = "MS10002", promotion_sid = "1", shop_sid = "1", seq = "0" };
19             mobile_promotion_product mpp3 = new mobile_promotion_product() { sid = "3", product_sid = "MS10003", promotion_sid = "2", shop_sid = "1", seq = "1" };
20             mobile_promotion_product mpp4 = new mobile_promotion_product() { sid = "4", product_sid = "MS10004", promotion_sid = "2", shop_sid = "2", seq = "0" };
21
22             ls_p.Add(mpp1);
23             ls_p.Add(mpp2);
24             ls_p.Add(mpp3);
25             ls_p.Add(mpp4);
26
27             mobile_flash_promotions mfp1 = new mobile_flash_promotions() { id = "1", sid = "1", title = "第一条活动", pro_desc = "测试用例", link = "www.baidu.com", start_time = "2014-03-24", end_time = "2014-04-03", pict = "/picture/111000.jpg", seq = "1", create_time = "2014-03-24", creater = "shiying", create_shop_name = "海淀区", create_shop_sid = "10", flag = "1" };
28             mobile_flash_promotions mfp2 = new mobile_flash_promotions() { id = "2", sid = "2", title = "第二条活动", pro_desc = "测试", link = "www.shopin.net", start_time = "2013-02-13", end_time = "2014-04-03", pict = "/picture/qdq.jpg", seq = "2", create_time = "2013-05-30", creater = "shiying", create_shop_name = "朝阳区", create_shop_sid = "11", flag = "0" };
29
30             ls_f.Add(mfp1);
31             ls_f.Add(mfp2);
32         }
然后我们添加一个Timer进来,设置每5秒添加一条数据,Enable=True。

 1         /// <summary>
 2         /// 标记从ID=5开始添加
 3       /// </summary>
 4         int i = 4;
 5
 6         /// <summary>
 7         /// 每5秒添加一次数据
 8       /// </summary>
 9         /// <param name="sender"></param>
10         /// <param name="e"></param>
11         private void timer1_Tick(object sender, EventArgs e)
12         {
13             i = i + 1;
14
15             mobile_promotion_product mpp5 = new mobile_promotion_product() { sid = (i).ToString(), product_sid = "MS1000" + (i).ToString(), promotion_sid = "2", shop_sid = "3", seq = "0" };
16
17             ls_p.Add(mpp5);
18         }
数据添加完了,下一步是查询:

 1         /// <summary>
 2         /// 查询
 3       /// </summary>
 4         public void Query()
 5         {
 6
 7             List<mobile_promotion_product> ls_p_f1 = ls_p.Where(p => p.promotion_sid == ls_f[0].sid).ToList();
 8             List<mobile_promotion_product> ls_p_f2 = ls_p.Where(p => p.promotion_sid == ls_f[1].sid).ToList();
 9
10             ls_f[0].ls_p = ls_p_f1;
11             ls_f[1].ls_p = ls_p_f2;
12
13             gc_Photosys.DataSource = ls_f;
14         }
基本代码都oK了,剩下的是何时调用查询,本例的查询时发生在点击主表的Row的第一个Cell时发生,即向主表的GridView添加RowCellClick事件:

 1         /// <summary>
 2         /// 主表选中行发生改变时折叠上一个展开的从表+点击主表Row查询从表
 3       /// </summary>
 4         /// <param name="sender"></param>
 5         /// <param name="e"></param>
 6         private void gv_f_RowCellClick(object sender, DevExpress.XtraGrid.Views.Grid.RowCellClickEventArgs e)
 7         {
 8             if (gv_f_rowhandle != e.RowHandle)
 9             {
10                 //折叠从表
11                 gv_f.SetMasterRowExpanded(gv_f_rowhandle, false);
12
13                 gv_f_rowhandle = e.RowHandle;
14             }
15
16             if (e.Column.ColumnHandle == 0)
17             {
18                 Query();
19             }
20         }
将主表类的集合绑定到主表的GridView中(MainView的GridView) 后,主从表就实现了!
总结:主从表的实现相对于DEV来说很简单,只需要在主表的每个对象中添加一个从表对象的集合即可。
