【备注(转载请说明出处,"http://www.cnblogs.com/RedSky/p/6679443.html","如果本文对你有帮助,请给个赞")】
本文将教你如何在Xamarin中使用极光JPush对IOS进行推送。
要开发iOS应用程序,你需要一台mac,Xamarin并不能支持在Windows上单独开发iOS;要进行推送测试,这只能在真机上进行测试,所以你还需要一部iPhone手机。
简要步骤
- 配置开发环境及工具
- 申请苹果开发者证书,App IDs,推送开发版证书,以及配置文件
- 配置极光环境
- 使用Xcode建立静态类库配置极光sdk
- 将静态类库生成.a文件库
- 将静态类库生成ApiDefinition.cs和StructsAndEnums.cs
- 在Xcode建立应用项目
- 建立Xamarin.iOS项目
- 建立Native Library
- 引用Native Library
- 测试
1.配置开发环境及工具
这我们的开发环境及工具:
-
- Visual Studio 2013 Update 5
- Xamarin for Visual Studio 4.3.0.784
- Xcode 8.3
- 手机iPhone 4 A1332
- JPush iOS sdk 3.0.2
- Objective Sharpie(下载链接:https://xamarin.azureedge.net/objective-sharpie/ObjectiveSharpie.pkg)
- Windows 10
- macOS 10.12.3
这里内容过长不作详细讲解,可到网上参考其他资料进行。
2.申请苹果开发者证书,App IDs,推送开发版证书,以及配置文件
这里内容过长不作详细教学,可到网上参考其他资料进行。这步骤完成后下载配置文件到mac本机。
3.配置极光环境
注册极光开发者账号,新建应用,将推送开发版证书上传到应用,下载客户端iOS sdk。具体步骤可在极光官网查看。
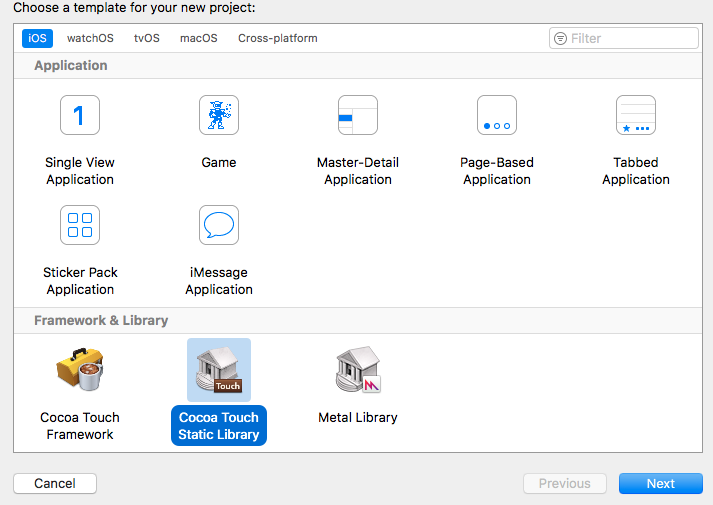
4.使用Xcode建立静态类库配置极光sdk
在mac里打开Xcode新建项目,这里我们选择Static Library,点击Next。
项目名称我们随便填一个,这里我们使用PushLibrary,然后完成,完成后会进入到项目界面。
接下来我们给项目引入极光官网的iOS sdk,引入后项目结构如下,注意,这里我们要将sdk的Lib文件夹复制到项目目录下后在添加到项目中,再将JPUSHService.h复制到PushLibrary.h同一目录下,引用jcore-ios-1.1.1.a, jpush-ios-3.0.2.a, JPUSHService.h要引用复制到项目目录里的文件。
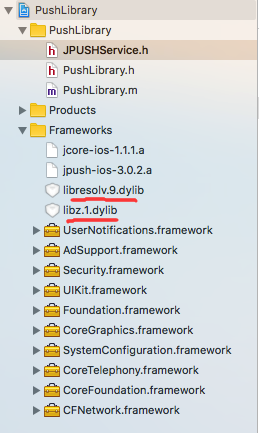
这里有两个文件注意一下(libresolv.9.dylib, libz.1.dylib),官方是libz.tbd和libresolv.tbd,如果你添加这两个文件后尝试编译未通过,请按下面方法。
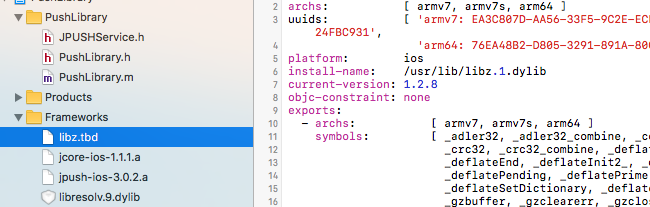
引用libz.tbd与引用libresolv.tbd方法相同,这里我们以libz.tbd为例。点击你的libz.tbd文件,在右侧文档里看见install-name:
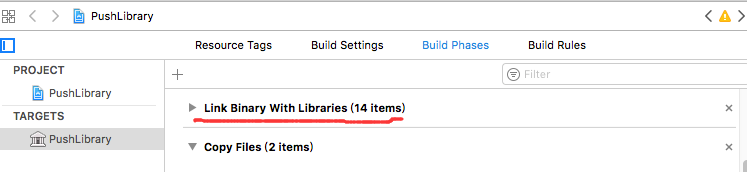
这里我们要添加libz.1.dylib,如果你的跟图片上不一样,请使用你自己的。在linking Binary中添加
在弹出窗口中选择左下角And Other...

在新弹出窗口内右侧搜索框里我们填上libz.1.dylib
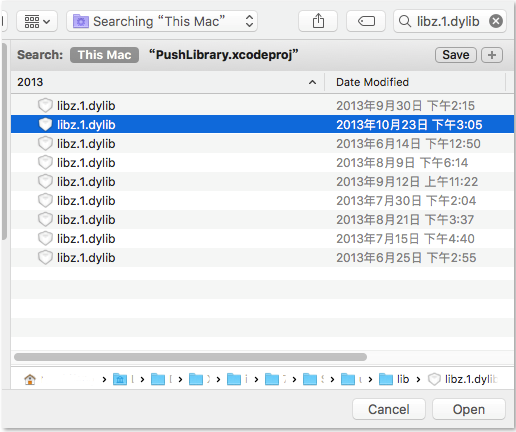
这里我们选择其中一个,Open。
这就完成了,libresolv.tbd的处理方法一样。
我们进行编译,编译通过。
5.将静态类库生成.a文件库
这里我们可以参考Xamarin官方文档,参考链接:https://developer.xamarin.com/guides/ios/advanced_topics/native_interop/。
我们需要生成arm64, armv7, armv7s三个版本的.a文件库,然后再将它们合并成一个文件库。
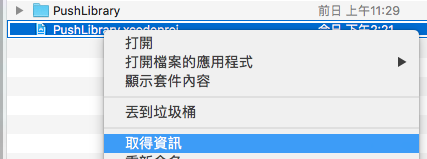
首先找到我们静态类库项目目录,通过右键项目>Show in Finder;右键项目文件>取得资讯(繁体版系统会显示取得资讯,如果你的是简体版可能不一样,就是查看文件信息的意思)。
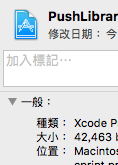
我们选择“位置“复制路径,在mac命令器里输入项目目录
cd /mydir/mydir
回车进入项目目录;接着输入命令生成arm64的.a文件:
/Applications/Xcode.app/Contents/Developer/usr/bin/xcodebuild -project PushLibrary.xcodeproj -target PushLibrary -sdk iphoneos -arch arm64 -configuration Release clean build
成功后进入build目录iphoneos目录里找到libPushLibrary.a文件,重命名为libPushLibrary-arm64.a。
生成armv7命令:
/Applications/Xcode.app/Contents/Developer/usr/bin/xcodebuild -project PushLibrary.xcodeproj -target PushLibrary -sdk iphoneos -arch armv7 -configuration Release clean build
成功后进入build目录iphoneos目录里找到libPushLibrary.a文件,重命名为libPushLibrary-armv7.a。
生成armv7s命令:
/Applications/Xcode.app/Contents/Developer/usr/bin/xcodebuild -project PushLibrary.xcodeproj -target PushLibrary -sdk iphoneos -arch armv7s -configuration Release clean build
成功后进入build目录iphoneos目录里找到libPushLibrary.a文件,重命名为libPushLibrary-armv7s.a。
好,到这里我们通过”cd“命令进入到这三个文件所在目录,输入如下命令:
lipo -create -output libPushLibrary.a libPushLibrary-arm64.a libPushLibrary-armv7.a libPushLibrary-armv7s.a
回车后就会生成我们需要的libPushLibrary.a文件。
6.将静态类库生成ApiDefinition.cs和StructsAndEnums.cs
这里我们需要用到Objective Sharpie,下载链接在上文已经提供,下载后安装在mac中。
现在我们在mac命令器中使用sharpie生成ApiDefinition.cs和StructsAndEnums.cs。
sharpie bind -sdk=iphoneos10.2 [项目目录]/PushLibrary/*.h
-sdk是iphoneos版本号,这里你可以通过命令
sharpie bind -sdks
获取自己已安装的sdk版本号,在这里我们使用已安装的iphoneos10.2。
如果没有错误的话,你会得到ApiDefinition.cs和StructsAndEnums.cs。
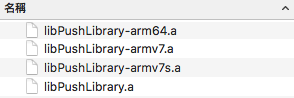
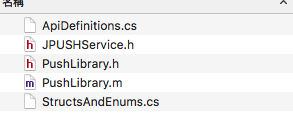
现在你得到三个文件libPushLibrary.a, ApiDefinition.cs和StructsAndEnums.cs。
7.在Xcode建立应用项目
这里我们选择Single View Application就可以。

点击Next>
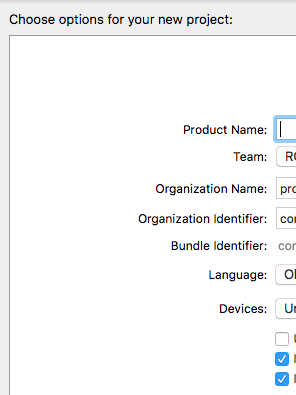
上面图片里注意命名规则,如果注册App IDs时Bundle Identifier是com.XXX.xxx,那么Product Name就是对应的xxx。填写完成点击Next。
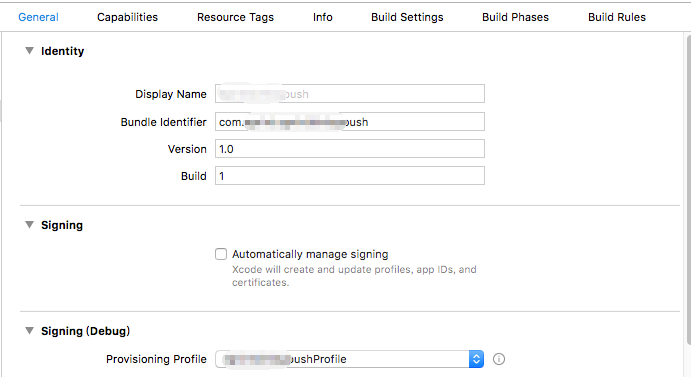
在项目配置里添加之前申请开发者证书时下载的配置文件:
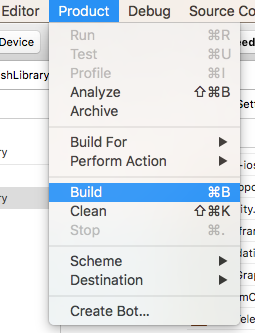
编译项目
在mac机上的操作到这里算结束。
8.建立Xamarin.iOS项目
在Visual Studio里新建一个项目,项目名称随意,生成后我们打开项目属性。
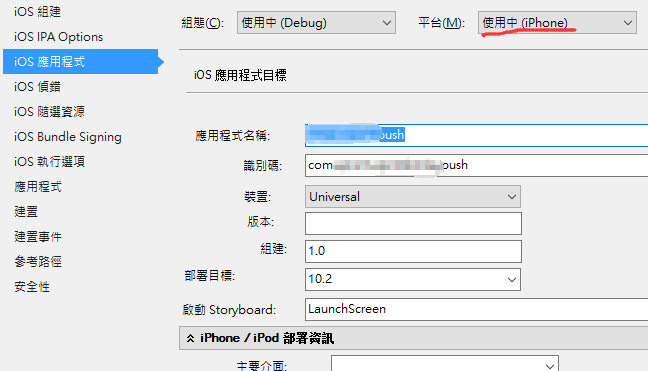
平台选择iPhone,应用名称和识别码填写对应Bundle Identifier;滚动条往下拖。
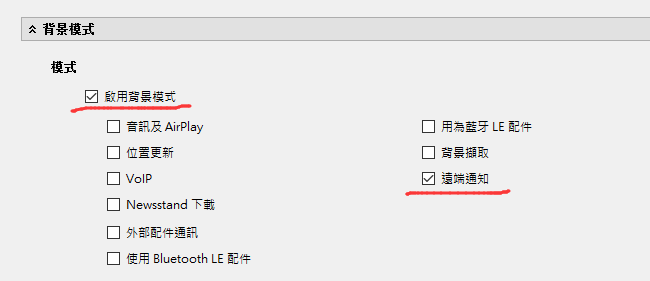
勾选中启用背景模式,远端通知。勾选后才能获得通知权限。
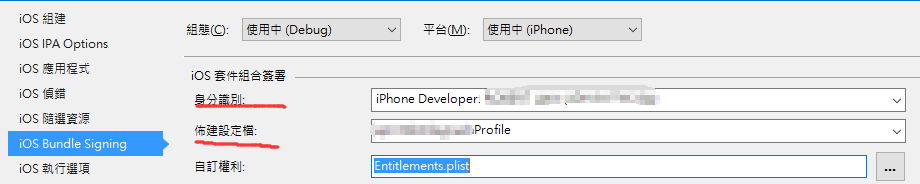
在iOS Bundle Signing选择身份和配置文件:
编译项目。
9.建立Native Library
右键解决方案新建项目,选择
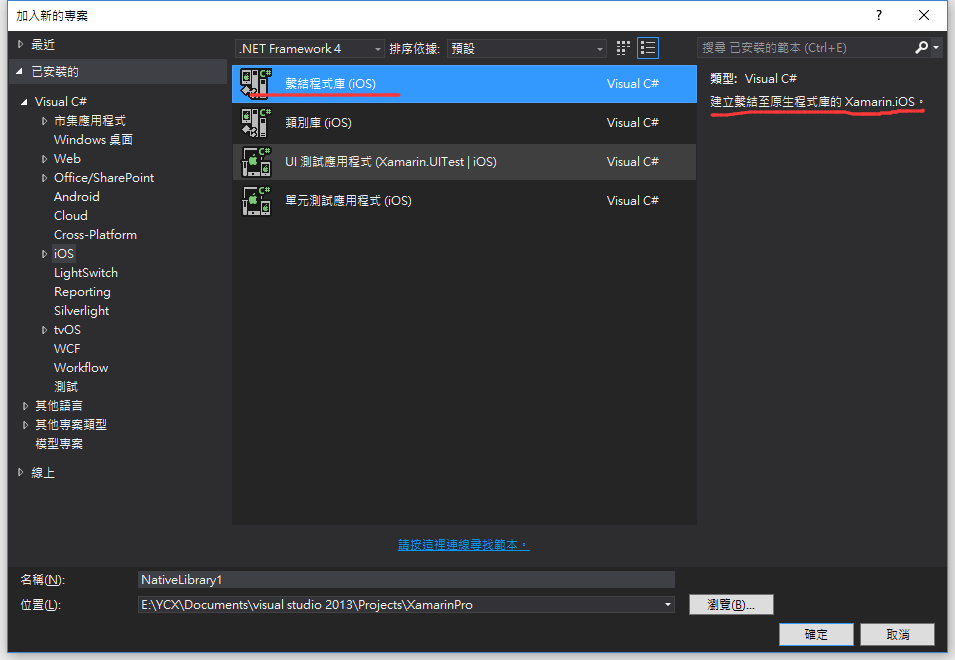
项目名称随意命名,新建Native Library后将之前生成的libPushLibrary.a文件添加到项目中。

添加后会在.a文件下自动生成个libPushLibrary.linkwith.cs文件,我们打开这个文件,"[assembly: ..."一行替换为:
[assembly: LinkWith("libPushLibrary.a", Frameworks="AdSupport CFNetwork CoreFoundation CoreGraphics CoreTelephony UIKit Foundation Security SystemConfiguration UserNotifications", LinkerFlags="-ObjC -lz.1 -lresolv.9", LinkTarget = LinkTarget.Arm64 | LinkTarget.ArmV7 | LinkTarget.ArmV7s, ForceLoad = true, SmartLink = true)]
注意这里-lz.1 -lresolv.9要对应之前你添加的libz和libresolv,libz写作lz,前有'-'。
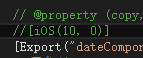
完成后再将ApiDefinition.cs和StructsAndEnums.cs里的代码复制到对应cs文件里,注意命名空间引用。在ApiDefinition.cs里找到有Verify标签([Verify(...)])的行,将这些行删掉,将[IOS(...)]标签注释掉
注释或删除函数SetTags(NSSet tags, string alias, Selector cbSelector, NSObject theTarget);这个方法重复了,注释掉过期的函数。

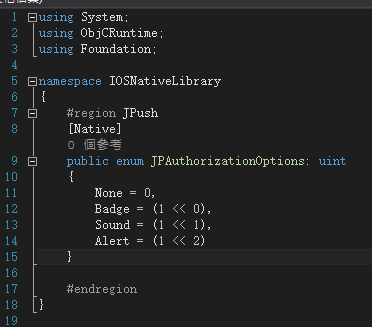
StructsAndEnums.cs里nuint替换成uint。
编译项目,到这里就完成了Native Library的创建,完成了极光sdk的引用。
10.引用Native Library
现在在我们的Xamarin.iOS应用项目里引用Native Library项目。
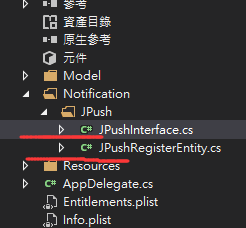
我们创建两个类文件用来注册极光推送id和接收推送消息的类:
代码如下:
JPushInterface.cs:


using Foundation;
using IOSNativeLibrary;
using System;
using System.Collections.Generic;
using System.Text;
using UserNotifications;

namespace App1.iOS.Notification.JPush
{
    public class JPushInterface : IOSNativeLibrary.JPUSHRegisterDelegate
    {
        internal static string JPushAppKey = "我的极光AppKey";
        internal static string Channel = "";
        JPushRegisterEntity entity { get; set; }
        public void Register(AppDelegate app, NSDictionary options)
        {
            //注册apns远程推送
            string advertisingId = AdSupport.ASIdentifierManager.SharedManager.AdvertisingIdentifier.AsString();
            this.entity = new JPushRegisterEntity();
            this.entity.Types = 1 | 2 | 3;//entity.Types = (nint)(JPAuthorizationOptions.Alert) | JPAuthorizationOptions.Badge | JPAuthorizationOptions.Sound;
            JPUSHService.RegisterForRemoteNotificationConfig(entity, this);
            JPUSHService.SetupWithOption(options, JPushAppKey, Channel, true, advertisingId);
            JPUSHService.RegistrationIDCompletionHandler(app.GetRegistrationID);
        }

        /// <summary>
        /// 前台收到通知,IOS10 support
        /// </summary>
        /// <param name="center"></param>
        /// <param name="notification"></param>
        /// <param name="completionHandler"></param>
        public override void WillPresentNotification(UserNotifications.UNUserNotificationCenter center, UserNotifications.UNNotification notification, Action<nint> completionHandler)
        {
            Console.WriteLine("WillPresentNotification:");
            var content = notification.Request.Content;
            var userInfo = notification.Request.Content.UserInfo;
            if (typeof(UserNotifications.UNPushNotificationTrigger) == notification.Request.Trigger.GetType())
            {//远程通知
                System.Console.WriteLine(" 收到远程通知,Title:{0} -SubTitle:{1}, -Body:{2}", content.Title, content.Subtitle, content.Body);
                this.AddNotificationToView(content);

                JPUSHService.HandleRemoteNotification(userInfo);
            }
            else
            {//本地通知

            }

            if (completionHandler != null)
            {
                completionHandler(2);//UNNotificationPresentationOptions: None = 0,Badge = 1,Sound = 2,Alert = 4,
            }
        }

        /// <summary>
        /// 后台收到通知
        /// </summary>
        /// <param name="center"></param>
        /// <param name="response"></param>
        /// <param name="completionHandler"></param>
        public override void DidReceiveNotificationResponse(UNUserNotificationCenter center, UNNotificationResponse response, Action completionHandler)
        {
            Console.WriteLine("DidReceiveNotificationResponse:");
            var content = response.Notification.Request.Content;
            var userInfo = response.Notification.Request.Content.UserInfo;
            if (typeof(UserNotifications.UNPushNotificationTrigger) == response.Notification.Request.Trigger.GetType())
            {//远程通知
                System.Console.WriteLine(" 收到远程通知,Title:{0} -SubTitle:{1}, -Body:{2}", content.Title, content.Subtitle, content.Body);
                this.AddNotificationToView(content);
                JPUSHService.HandleRemoteNotification(userInfo);
            }
            else
            {//本地通知

            }

            if (completionHandler != null)
            {
                completionHandler();
            }
        }

        /// <summary>
        /// 通知添加到视图
        /// </summary>
        /// <param name="content"></param>
        public void AddNotificationToView(UNNotificationContent content)
        {
            App1.ViewModel.PushsPageViewModel.Item item = new ViewModel.PushsPageViewModel.Item()
            {
                Id = content.CategoryIdentifier,
                Text = content.Title,
                Detail = content.Body,
            };
            App1.ViewModel.PushsPageViewModel.Instance.AddItem(item);
        }
    }
}
JPushRegisterEntity.cs:
using Foundation;
using IOSNativeLibrary;
using System;
using System.Collections.Generic;
using System.Text;

namespace App1.iOS.Notification.JPush
{
    public class JPushRegisterEntity : JPUSHRegisterEntity
    {
        public override NSSet Categories
        {
            get
            {
                return base.Categories;
            }
            set
            {
                base.Categories = value;
            }
        }

        public override nint Types
        {
            get
            {
                return base.Types;
            }
            set
            {
                base.Types = value;
            }
        }
    }
}
你发现这两个类都是继承自Native Library。
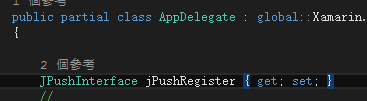
现在转到AppDelegate.cs中,我们先创建个字段jPushRegister,用来实例化极光注册和推送接收:
在FinishedLaunching方法里我们这么写:
public override bool FinishedLaunching(UIApplication app, NSDictionary options)
        {
            global::Xamarin.Forms.Forms.Init();

            LoadApplication(new App(Model.BasePlatform.Instance));


            //注册apns远程推送
            if (options == null) options = new NSDictionary();
            jPushRegister = new JPushInterface();
            jPushRegister.Register(this, options);
            this.RegistLogin(options);

            return base.FinishedLaunching(app, options);
        }
这里我们使用的是Xamarin.Forms框架,如果你的项目不是,那可能看起来会不太一样。
目前极光推送是通过APNS向iOS推送通知的,那么我们要想推送成功就得还需要注册APNS获取APNS的推送设备id。
我们在AppDelegate类下添加如下代码实现注册:
        /// <summary>
        /// 注册apns远程推送
        /// </summary>
        /// <param name="launchOptions"></param>
        protected void RegistLogin(NSDictionary launchOptions)
        {
            string systemVersion = UIDevice.CurrentDevice.SystemVersion.Split('.')[0];
            Console.WriteLine("System Version: " + UIDevice.CurrentDevice.SystemVersion);

            //iOS10以上的注册方式
            if (float.Parse(systemVersion) >= 10.0)
            {
                UNUserNotificationCenter center = UNUserNotificationCenter.Current;
                center.RequestAuthorization((UNAuthorizationOptions.CarPlay | UNAuthorizationOptions.Alert | UNAuthorizationOptions.Sound | UNAuthorizationOptions.Badge), (bool arg1, NSError arg2) =>
                {
                    if (arg1)
                        Console.WriteLine("ios 10 request notification success");
                    else
                        Console.WriteLine("IOS 10 request notification failed");
                });
            }
            //iOS8以上的注册方式
            else if (float.Parse(systemVersion) >= 8.0)
            {
                UIUserNotificationSettings notiSettings = UIUserNotificationSettings.GetSettingsForTypes(UIUserNotificationType.Badge | UIUserNotificationType.Sound | UIUserNotificationType.Alert, null);
                UIApplication.SharedApplication.RegisterUserNotificationSettings(notiSettings);
            }
            //iOS8以下的注册方式,这里我们最低版本是7.0以上
            else
            {
                UIRemoteNotificationType myTypes = UIRemoteNotificationType.Alert | UIRemoteNotificationType.Sound | UIRemoteNotificationType.Badge;
                UIApplication.SharedApplication.RegisterForRemoteNotificationTypes(myTypes);
            }
            UIApplication.SharedApplication.RegisterForRemoteNotifications();
            if (launchOptions != null)
            {
                NSDictionary remoteNotification = (NSDictionary)(launchOptions.ObjectForKey(UIApplication.LaunchOptionsRemoteNotificationKey));
                if (remoteNotification != null)
                {
                    Console.WriteLine(remoteNotification);
                    //这里是跳转页面用的
                    //this.goToMessageViewControllerWith(remoteNotification);
                }
            }
        }


        public override void DidRegisterUserNotificationSettings(UIApplication application, UIUserNotificationSettings notificationSettings)
        {
            application.RegisterForRemoteNotifications();
        }

        /// <summary>
        /// 注册成功获得token
        /// </summary>
        /// <param name="application"></param>
        /// <param name="deviceToken"></param>
        public override void RegisteredForRemoteNotifications(UIApplication application, NSData deviceToken)
        {
            JPUSHService.RegisterDeviceToken(deviceToken);

            // Get current device token
            var DeviceToken = deviceToken.Description;
            if (!string.IsNullOrWhiteSpace(DeviceToken))
            {
                DeviceToken = DeviceToken.Trim('<').Trim('>');
            }

            // Get previous device token
            var oldDeviceToken = NSUserDefaults.StandardUserDefaults.StringForKey("PushDeviceToken");

            // Has the token changed?
            if (string.IsNullOrEmpty(oldDeviceToken) || !oldDeviceToken.Equals(DeviceToken))
            {
                //TODO: Put your own logic here to notify your server that the device token has changed/been created!
            }

            // Save new device token
            NSUserDefaults.StandardUserDefaults.SetString(DeviceToken, "PushDeviceToken");

            System.Console.WriteLine(DeviceToken);

        }

        /// <summary>
        /// 注册token失败
        /// </summary>
        /// <param name="application"></param>
        /// <param name="error"></param>
        public override void FailedToRegisterForRemoteNotifications(UIApplication application, NSError error)
        {
            new UIAlertView("注册通知失败", error.LocalizedDescription, null, "OK", null).Show();
        }

        public void GetRegistrationID(int resCode, NSString registrationID)
        {
            if (resCode == 0)
            {
                Console.WriteLine("RegistrationID Successed: {0}", registrationID);

                App1.ViewModel.UserCenterPageViewModel.Instance.RegistId = registrationID;
            }
            else
                Console.WriteLine("RegistrationID Failed. ResultCode:{0}", resCode);
        }
到了这里你就可以在手机上进行测试了。
【备注(转载请说明出处,"http://www.cnblogs.com/RedSky/p/6679443.html","如果本文对你有帮助,请给个赞")】