关于“memset()”,网上也是有很多前辈作了总结,摘一个:http://blog.csdn.net/my_business/article/details/40537653
在你看来,写这篇文章可以有些多余吧。其实,我只是想留个纪念,或许,也能帮得上他人。
以前没有用过这个函数,在一个示例中看到,查了一下。
关于“memset()”,参考:https://msdn.microsoft.com/en-us/library/aa246471(VS.60).aspx
函数原型:void *memset( void *dest, int c, size_t count );
作用:将缓冲区的内容设为指定的字符。
参数:dest - 指向目标地址(内存)的指针;
c - 用来覆盖缓冲区(内存)的内容的字符;
count - 指定需要覆盖的长度,从目标地址的第一个字节开始,以字节为单位。
IDE: Code::Blocks
操作系统:Windows 7 x64
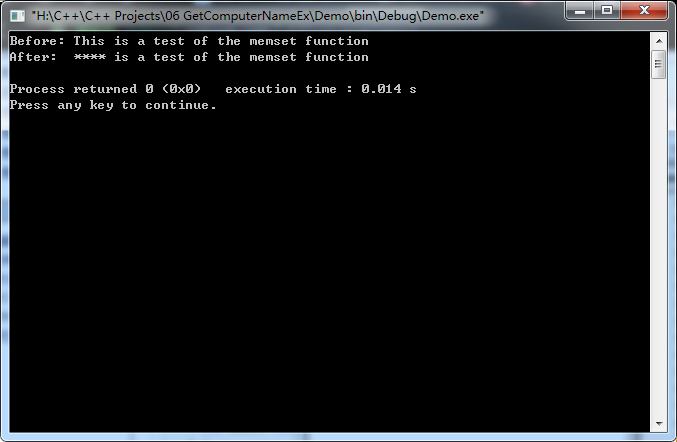
 1 /* This program uses memset to
 2  * set the first four bytes of buffer to "*".
 3  */
 4
 5 #include <memory.h>
 6 #include <stdio.h>
 7
 8 int main( void )
 9 {
10    char buffer[] = "This is a test of the memset function";
11
12    printf( "Before: %s
", buffer );
13    memset( buffer, '*', 4 );
14    printf( "After:  %s
", buffer );
15
16    return 0;
17 }
运行结果:
看看另外一个例子:
 1 #include <memory.h>
 2 #include <stdio.h>
 3 #include <windef.h>
 4
 5 int main( void )
 6 {
 7     int iBuffer[5] = {0, 0, 0, 0, 0};
 8     BYTE i;
 9
10     printf("The size of the array iBuffer: %d bytes

", sizeof(iBuffer));
11
12     memset(iBuffer, 0x12345678, 5);
13     for(i = 0; i < 5; i++) {
14         printf("iBuffer[%d] = %d
", i, iBuffer[i]);
15         printf("iBuffer[%d] = 0x%08x

", i, iBuffer[i]);
16     }
17
18    return 0;
19 }
假设:你的本意可能是想将数组iBuffer的每个元素的值都设为0x12345678。
但实际的运行结果是(以下运行结果和平台有关):
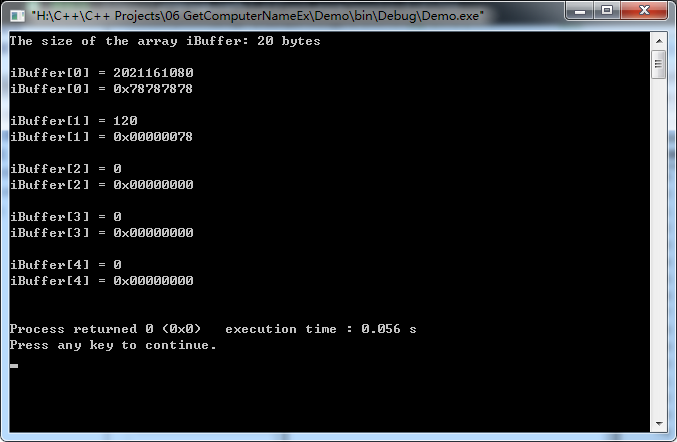
从上面的例子和运行结果可以看出,尽管“memset()”的第二个参数的值为0x12345678,但实际上只截取(使用)了最低8位(0x78),来覆盖iBuffer的前5个字节。
其实,在MSDN给出的参考(https://msdn.microsoft.com/en-us/library/aa246471(VS.60).aspx)中,明确地指出:
Remarks
The memset function sets the first count bytes of dest to the character c.
值得注意的是,尽管“memset()”的第二个参数的类型为int,但实际上只是使用该参数的值的最低8位;另外,第三个参数是指定缓冲区的前count个字节。