写得很棒的:http://blog.csdn.net/u010201484/article/details/51723455
log4j2【2.3】入门学习与总结
大纲:
- log4j2 配置文件加载
- log4j2 配置文件结构图
- log4j2 配置文件说明
- log4j2 Appenders.child.Filter.ThresholdFilter 的使用
- log4j2 实战示例
- log4j2 logger 加载规则
目录
一、log4j2 配置文件加载
log4j2 的配置文件只用 xml、json、jsn 三种格式,默认情况下由系统自动加载,系统加载 classpath 目录如下的配置文件:
- log4j-test.json 或者 log4j-test.jsn 文件
- log4j2-test.xml
- log4j-test.json 或者 log4j-test.jsn 文件
- log4j2.xml
加载优先级由上向下,且只加载其一。
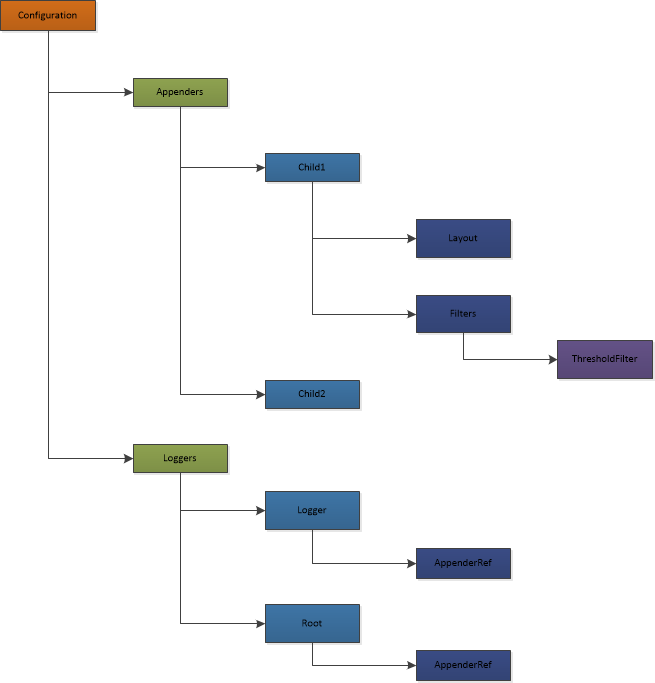
二、log4j2 配置文件结构图
三、log4j2 配置文件说明
1、configration
| 字段 | 描述 |
|---|---|
| status | 日志级别 默认值为最高级别 OFF |
| monitorInterval | 监控间隔,例如:monitorInterval=”600” 指log4j2每隔600秒(10分钟),自动监控该配置文件是否有变化,如果变化,则自动根据文件内容重新配置 |
2、Appenders 定义输出类型
1) Child
| 字段 | 描述 |
|---|---|
| Layout | 输出类型的模板、布局 |
| Filters | 过滤器,过滤掉不需要的日志 |
2)Filters.ThresholdFilter
| 字段 | 描述 |
|---|---|
| level | 输出级别,例:level=”info”,日志级别为info或者以上(匹配的界别) |
| onMatch | DENY/ACCEPT 禁止或者接受(是否接受匹配) |
| onMismatch | DENY/NEUTRAL (是否接受其他高于level的级别) |
一般的组合为:
- onMatch=”DENY” onMismatch=”NEUTRAL “
- onMatch=”ACCEPT ” onMismatch=”DENY”
3、Loggers 注册日志输出对象
1) Logger 日志输出对象
| 字段 | 解释 |
|---|---|
| name | 输出对象名称 |
| level | 日志级别 |
| additivity | 是否冒泡,既在本层输出日志后是否需要在父对象上输出该日志,默认为 true |
代码说明
<!-- 始祖日志输出对象 -->
<Root level="info">
    <AppenderRef ref="Appender3" />
</Root>
<!-- 父日志输出对象 -->
<logger level="warn" name="com.person" additivity="false">
   <AppenderRef ref="Appender1" />
</logger>
<!-- 继承了com.person 的子日志输出对象 -->
<logger level="info" name="com.person.man" additivity="true">
    <AppenderRef ref="Appender2" />
</logger>- 1
- 2
- 3
- 4
- 5
- 6
- 7
- 8
- 9
- 10
- 11
- 12
- 1
- 2
- 3
- 4
- 5
- 6
- 7
- 8
- 9
- 10
- 11
- 12
在 com.person.man 包下面或者类下面执行以下代码
logger.info("man info");    // Appender1、Appender2 有输出
logger.error("man error");  // Appender1、Appender2 有输出
logger.warn("man warn"); // Appender1、Appender2 有输出- 1
- 2
- 3
- 1
- 2
- 3
四、log4j2 Appenders.child.Filter.ThresholdFilter 的使用
<?xml version="1.0" encoding="UTF-8"?>
<!-- configure.status 为设置日志输出级别,级别如下:OFF 、FATAL 、ERROR、WARN、INFO、DEBUG、TRACE 、ALL  -->
<!-- configure.monitorInterval 监控间隔
         指log4j2每隔600秒(10分钟),自动监控该配置文件是否有变化,如果变化,则自动根据文件内容重新配置 -->
<configuration status="off" monitorInterval="600">
  <properties>
    <property name="LOG_HOME">logs</property>
    <property name="ERROR_FILE_NAME">myError</property>
    <property name="WARN_FILE_NAME">myWarn</property>
    <property name="INFO_FILE_NAME">myInfo</property>
    <property name="DEBUG_FILE_NAME">myDebug</property>
  </properties>
  <Appenders>
    <Console name="Console" target="SYSTEM_OUT">
      <PatternLayout pattern="%d{HH:mm:ss.SSS} {%t} %-5level %logger{36} - %msg%n"/>
    </Console>
    <File name="infoLog" fileName="E:/info.log" append="true" >
      <PatternLayout pattern="%d %5p [%c:%l] - %m%n"/>
      <Filters>
      <!-- 输出日志级别为 info 的日志 -->
        <ThresholdFilter level="warn" onMatch="DENY" onMismatch="NEUTRAL"/>
        <ThresholdFilter level="info" onMatch="ACCEPT" onMismatch="DENY"/>
      </Filters>
    </File>
    <File name="warnLog" fileName="E:/warn.log" append="true" >
      <PatternLayout pattern="%d %5p [%c:%l] - %m%n"/>
      <Filters>
      <!-- 输出日志级别为 warn 的日志 -->
        <ThresholdFilter level="error" onMatch="DENY" onMismatch="NEUTRAL"/>
        <ThresholdFilter level="warn" onMatch="ACCEPT" onMismatch="DENY"/>
      </Filters>
    </File>
    <File name="errorLog" fileName="E:/error.log" append="true" >
      <PatternLayout pattern="%d %5p [%c:%l] - %m%n"/>
      <Filters>
      <!-- 输出日志级别为 error 的日志 -->
        <ThresholdFilter level="error" onMatch="ACCEPT" onMismatch="DENY"/>
      </Filters>
    </File>
  </Appenders>
  <Loggers>
    <Root level="info">
        <AppenderRef ref="infoLog" />
        <AppenderRef ref="warnLog" />
        <AppenderRef ref="errorLog" />
    </Root>
  </Loggers>
</configuration>- 1
- 2
- 3
- 4
- 5
- 6
- 7
- 8
- 9
- 10
- 11
- 12
- 13
- 14
- 15
- 16
- 17
- 18
- 19
- 20
- 21
- 22
- 23
- 24
- 25
- 26
- 27
- 28
- 29
- 30
- 31
- 32
- 33
- 34
- 35
- 36
- 37
- 38
- 39
- 40
- 41
- 42
- 43
- 44
- 45
- 46
- 47
- 48
- 1
- 2
- 3
- 4
- 5
- 6
- 7
- 8
- 9
- 10
- 11
- 12
- 13
- 14
- 15
- 16
- 17
- 18
- 19
- 20
- 21
- 22
- 23
- 24
- 25
- 26
- 27
- 28
- 29
- 30
- 31
- 32
- 33
- 34
- 35
- 36
- 37
- 38
- 39
- 40
- 41
- 42
- 43
- 44
- 45
- 46
- 47
- 48
五、log4j2 实战示例
1、根据日志级别输出到不同文件,按日期进行封存日志
<?xml version="1.0" encoding="UTF-8"?>
<!-- configure.status 为设置日志输出级别,级别如下:OFF 、FATAL 、ERROR、WARN、INFO、DEBUG、TRACE 、ALL  -->
<!-- configure.monitorInterval 监控间隔
         指log4j2每隔600秒(10分钟),自动监控该配置文件是否有变化,如果变化,则自动根据文件内容重新配置 -->
<configuration status="off" monitorInterval="600">
  <properties>
    <property name="LOG_HOME">E:/webbase/logs</property>
    <property name="LOG_BACK_HOME">${LOG_HOME}/backup</property>
    <property name="ERROR_FILE_NAME">error</property>
    <property name="WARN_FILE_NAME">warn</property>
    <property name="INFO_FILE_NAME">info</property>
    <property name="DEBUG_FILE_NAME">debug</property>
  </properties>
  <Appenders>
    <Console name="Console" target="SYSTEM_OUT">
      <PatternLayout pattern="%d{HH:mm:ss.SSS} {%t} %-5level %logger{36} - %msg%n"/>
    </Console>
    <!-- 配置日志输出文件名字     追加读写 -->
    <!-- Error console log -->
    <RollingFile name="ErrLog" fileName="${LOG_HOME}/${ERROR_FILE_NAME}.log" filePattern="${LOG_BACK_HOME}/$${date:yyyy-MM}/${ERROR_FILE_NAME}.%d{yyyy-MM-dd}.log" append="true">
        <!-- 输出格式 -->
        <PatternLayout pattern="%date{yyyy-MM-dd HH:mm:ss.SSS} %level [%thread][%file:%line] - %msg%n"/>
        <!-- 设置策略 -->
        <Policies>
            <!-- 基于时间的触发策略。该策略主要是完成周期性的log文件封存工作。有两个参数:
                interval,integer型,指定两次封存动作之间的时间间隔。单位:以日志的命名精度来确定单位,
                    比如yyyy-MM-dd-HH 单位为小时,yyyy-MM-dd-HH-mm 单位为分钟
                modulate,boolean型,说明是否对封存时间进行调制。若modulate=true,
                    则封存时间将以0点为边界进行偏移计算。比如,modulate=true,interval=4hours,
                    那么假设上次封存日志的时间为03:00,则下次封存日志的时间为04:00,
                    之后的封存时间依次为08:00,12:00,16:00
             -->
            <TimeBasedTriggeringPolicy interval="1" modulate="true" />
        </Policies>
        <Filters>
         <ThresholdFilter level="error" onMatch="ACCEPT" onMismatch="DENY"/>
        </Filters>
    </RollingFile>

    <!-- Warn console log -->
    <RollingFile name="WarnLog" fileName="${LOG_HOME}/${WARN_FILE_NAME}.log" filePattern="${LOG_BACK_HOME}/$${date:yyyy-MM}/${WARN_FILE_NAME}.%d{yyyy-MM-dd}.log" append="true">
        <!-- 输出格式 -->
        <PatternLayout pattern="%date{yyyy-MM-dd HH:mm:ss.SSS} %level [%thread][%file:%line] - %msg%n"/>
        <!-- 设置策略 -->
        <Policies>
            <TimeBasedTriggeringPolicy interval="1" modulate="true" />
        </Policies>
        <Filters>
          <ThresholdFilter level="error" onMatch="DENY" onMismatch="NEUTRAL"/>
          <ThresholdFilter level="warn" onMatch="ACCEPT" onMismatch="DENY"/>
        </Filters>
    </RollingFile>
    <!-- Info console log -->
    <RollingFile name="InfoLog" fileName="${LOG_HOME}/${INFO_FILE_NAME}.log" filePattern="${LOG_BACK_HOME}/$${date:yyyy-MM}/${INFO_FILE_NAME}.%d{yyyy-MM-dd}.log" append="true">
        <!-- 输出格式 -->
        <PatternLayout pattern="%date{yyyy-MM-dd HH:mm:ss.SSS} %level [%thread][%file:%line] - %msg%n"/>
        <!-- 设置策略 -->
        <Policies>
            <TimeBasedTriggeringPolicy interval="1" modulate="true" />
        </Policies>
        <Filters>
          <ThresholdFilter level="warn" onMatch="DENY" onMismatch="NEUTRAL"/>
          <ThresholdFilter level="info" onMatch="ACCEPT" onMismatch="DENY"/>
        </Filters>
    </RollingFile>
    <!-- Debug console log -->
    <RollingFile name="DebugLog" fileName="${LOG_HOME}/${DEBUG_FILE_NAME}.log" filePattern="${LOG_BACK_HOME}/$${date:yyyy-MM}/${DEBUG_FILE_NAME}.%d{yyyy-MM-dd}.log" append="true">
        <!-- 输出格式 -->
        <PatternLayout pattern="%date{yyyy-MM-dd HH:mm:ss.SSS} %level [%thread][%file:%line] - %msg%n"/>
        <!-- 设置策略 -->
        <Policies>
            <TimeBasedTriggeringPolicy interval="1" modulate="true" />
        </Policies>
        <Filters>
          <ThresholdFilter level="info" onMatch="DENY" onMismatch="NEUTRAL"/>
          <ThresholdFilter level="debug" onMatch="ACCEPT" onMismatch="DENY"/>
        </Filters>
    </RollingFile>
  </Appenders>
  <Loggers>
    <Logger name="org.webbase" level="debug" additivity="true">
        <AppenderRef ref="DebugLog" />
        <AppenderRef ref="InfoLog" />
    </Logger>
    <Root level="warn">
        <AppenderRef ref="WarnLog" />
        <AppenderRef ref="ErrLog" />
        <AppenderRef ref="Console"/>
    </Root>
  </Loggers>
</configuration>- 1
- 2
- 3
- 4
- 5
- 6
- 7
- 8
- 9
- 10
- 11
- 12
- 13
- 14
- 15
- 16
- 17
- 18
- 19
- 20
- 21
- 22
- 23
- 24
- 25
- 26
- 27
- 28
- 29
- 30
- 31
- 32
- 33
- 34
- 35
- 36
- 37
- 38
- 39
- 40
- 41
- 42
- 43
- 44
- 45
- 46
- 47
- 48
- 49
- 50
- 51
- 52
- 53
- 54
- 55
- 56
- 57
- 58
- 59
- 60
- 61
- 62
- 63
- 64
- 65
- 66
- 67
- 68
- 69
- 70
- 71
- 72
- 73
- 74
- 75
- 76
- 77
- 78
- 79
- 80
- 81
- 82
- 83
- 84
- 85
- 86
- 87
- 88
- 89
- 90
- 91
- 1
- 2
- 3
- 4
- 5
- 6
- 7
- 8
- 9
- 10
- 11
- 12
- 13
- 14
- 15
- 16
- 17
- 18
- 19
- 20
- 21
- 22
- 23
- 24
- 25
- 26
- 27
- 28
- 29
- 30
- 31
- 32
- 33
- 34
- 35
- 36
- 37
- 38
- 39
- 40
- 41
- 42
- 43
- 44
- 45
- 46
- 47
- 48
- 49
- 50
- 51
- 52
- 53
- 54
- 55
- 56
- 57
- 58
- 59
- 60
- 61
- 62
- 63
- 64
- 65
- 66
- 67
- 68
- 69
- 70
- 71
- 72
- 73
- 74
- 75
- 76
- 77
- 78
- 79
- 80
- 81
- 82
- 83
- 84
- 85
- 86
- 87
- 88
- 89
- 90
- 91
TimeBasedTriggeringPolicy
| 属性 | 解释 |
|---|---|
| interval |
(integer)该属性是相对 RollingFile.filePattern 中的 %d{yyyy-MM-dd}值,例: filePattern=”xxx%d{yyyy-MM-dd}xx” interval=”2” 表示将2天一个日志文件; filePattern=”xxx%d{yyyy-MM-dd-HH}xx” interval=”1”表示一个小时一个日志文件 |
| modulate | (boolean)以0点为边界进行偏移计算 |
六、log4j2 logger 加载规则
- logger name 相同时,以 level 级别高的为准
- logger name = “org” 会被 name=”org.xxx” 继承
- logger 中的 additivity=”true” 表示子日志所获得的日志也会在父日志中出现,即使 父日志的 level 远高于子日志的 level
- 当子日志 level 大于 父日志时,父日志只能接收到子日志过滤后的日志