4.在 App 设计工具中创建多窗口 App
多窗口 App 由两个或多个共享数据的 App 构成。App 之间共享数据的方式取决于设计。
一种常见的设计包含两个 App:一个主 App 和一个对话框。通常,主 App 中有一个按钮用于打开该对话框。当用户关闭对话框时,对话框将用户的选择发送给主窗口,主窗口执行计算并更新 UI。

这两个 App 在不同的时间通过不同的方式共享信息:
-
当对话框打开时,主 App 将使用输入参数调用对话框 App,将信息传递给对话框。
-
当用户点击对话框中的
要创建多窗口的 App,必须创建两个单独的 App(主 App 和对话框 App)。然后执行以下高级任务,每个任务都包含多个步骤。
-
将信息发送给对话框 - 在接受输入参数的对话框 App 中编写一个
StartupFcn回调。必须有一个输入参数是主 App 对象。然后在主 App 中使用输入参数调用对话框 App。 -
将信息返回给主 App - 在主 App 中编写一个公共函数,以根据用户在对话框中的选择来更新 UI。由于它是公共函数,因此对话框可以调用它并将值传递给它。
-
关闭窗口时的管理任务 - 在两个 App 中各编写一个
CloseRequest回调,在窗口关闭时执行维护任务。
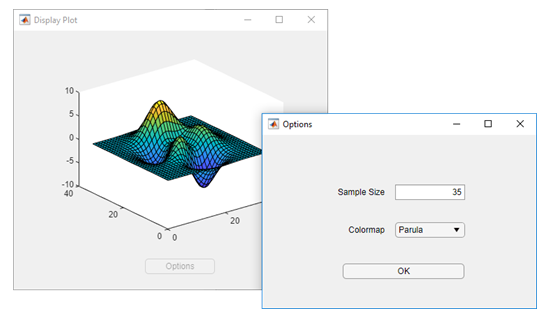
4.2 实例先行
此 App 由一个主绘图 App 构成,主绘图 App 中有一个按钮,用于在对话框中选择选项。选项按钮使用输入参数调用对话框 App。在对话框中,确定按钮的回调通过调用主 App 中的公共函数,将用户的选择发送回主 App。
将信息发送给对话框
执行以下步骤,将值从主 App 传递给对话框 App。
设计内容:
新建一个主app,按照下图安放控件

代码:
classdef MainAppExample < matlab.apps.AppBase

    % Properties that correspond to app components
    properties (Access = public)
        UIFigure       matlab.ui.Figure
        UIAxes         matlab.ui.control.UIAxes
        OptionsButton  matlab.ui.control.Button
    end


    properties (Access = private)
        DialogApp                   % Dialog box app
        CurrentSize = 35;           % Surface sample size
        CurrentColormap = 'Parula'; % Colormap
    end

    methods (Access = public)

        function updateplot(app, sz, c)
            % Store inputs as properties
            app.CurrentSize = sz;
            app.CurrentColormap = c;

            % Update plot
            Z = peaks(sz);
            surf(app.UIAxes,Z);
            colormap(app.UIAxes,c);

            % Re-enable the Plot Options button
            app.OptionsButton.Enable = 'on';
        end

    end


    % Callbacks that handle component events
    methods (Access = private)

        % Code that executes after component creation
        function startupFcn(app)
            % Call updateplot to display an initial plot
            updateplot(app, app.CurrentSize, app.CurrentColormap)
        end

        % Button pushed function: OptionsButton
        function OptionsButtonPushed(app, event)
            % Disable Plot Options button while dialog is open
            app.OptionsButton.Enable = 'off';

            % Open the options dialog and pass inputs
            app.DialogApp = DialogAppExample(app, app.CurrentSize, app.CurrentColormap);
        end

        % Close request function: UIFigure
        function MainAppCloseRequest(app, event)
            % Delete both apps
            delete(app.DialogApp)
            delete(app)
        end
    end

    % Component initialization
    methods (Access = private)

        % Create UIFigure and components
        function createComponents(app)

            % Create UIFigure and hide until all components are created
            app.UIFigure = uifigure('Visible', 'off');
            app.UIFigure.Position = [100 100 449 370];
            app.UIFigure.Name = 'Display Plot';
            app.UIFigure.CloseRequestFcn = createCallbackFcn(app, @MainAppCloseRequest, true);

            % Create UIAxes
            app.UIAxes = uiaxes(app.UIFigure);
            app.UIAxes.Position = [68 68 341 267];

            % Create OptionsButton
            app.OptionsButton = uibutton(app.UIFigure, 'push');
            app.OptionsButton.ButtonPushedFcn = createCallbackFcn(app, @OptionsButtonPushed, true);
            app.OptionsButton.Position = [189 23 100 22];
            app.OptionsButton.Text = 'Options';

            % Show the figure after all components are created
            app.UIFigure.Visible = 'on';
        end
    end

    % App creation and deletion
    methods (Access = public)

        % Construct app
        function app = MainAppExample

            % Create UIFigure and components
            createComponents(app)

            % Register the app with App Designer
            registerApp(app, app.UIFigure)

            % Execute the startup function
            runStartupFcn(app, @startupFcn)

            if nargout == 0
                clear app
            end
        end

        % Code that executes before app deletion
        function delete(app)

            % Delete UIFigure when app is deleted
            delete(app.UIFigure)
        end
    end
end
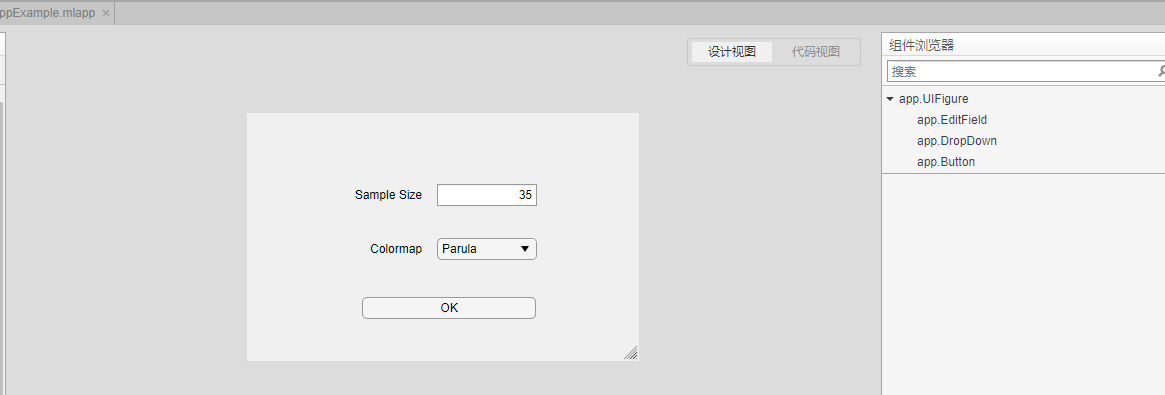
再建第二个对话框app,控件安放如下图
代码:
classdef DialogAppExample < matlab.apps.AppBase

    % Properties that correspond to app components
    properties (Access = public)
        UIFigure                  matlab.ui.Figure
        SampleSizeEditFieldLabel  matlab.ui.control.Label
        EditField                 matlab.ui.control.NumericEditField
        ColormapDropDownLabel     matlab.ui.control.Label
        DropDown                  matlab.ui.control.DropDown
        Button                    matlab.ui.control.Button
    end


    properties (Access = private)
        CallingApp   % Main app object
    end


    % Callbacks that handle component events
    methods (Access = private)

        % Code that executes after component creation
        function StartupFcn(app, mainapp, sz, c)
            % Store main app in property for CloseRequestFcn to use
            app.CallingApp = mainapp;

            % Update UI with input values
            app.EditField.Value = sz;
            app.DropDown.Value = c;
        end

        % Button pushed function: Button
        function ButtonPushed(app, event)
            % Call main app's public function
            updateplot(app.CallingApp, app.EditField.Value, app.DropDown.Value);

            % Delete the dialog box
            delete(app)
        end

        % Close request function: UIFigure
        function DialogAppCloseRequest(app, event)
            % Enable the Plot Opions button in main app
            app.CallingApp.OptionsButton.Enable = 'on';

            % Delete the dialog box
            delete(app)

        end
    end

    % Component initialization
    methods (Access = private)

        % Create UIFigure and components
        function createComponents(app)

            % Create UIFigure and hide until all components are created
            app.UIFigure = uifigure('Visible', 'off');
            app.UIFigure.Position = [600 100 392 248];
            app.UIFigure.Name = 'Options';
            app.UIFigure.CloseRequestFcn = createCallbackFcn(app, @DialogAppCloseRequest, true);

            % Create SampleSizeEditFieldLabel
            app.SampleSizeEditFieldLabel = uilabel(app.UIFigure);
            app.SampleSizeEditFieldLabel.HorizontalAlignment = 'right';
            app.SampleSizeEditFieldLabel.VerticalAlignment = 'top';
            app.SampleSizeEditFieldLabel.Position = [102 160 74 15];
            app.SampleSizeEditFieldLabel.Text = 'Sample Size';

            % Create EditField
            app.EditField = uieditfield(app.UIFigure, 'numeric');
            app.EditField.Limits = [2 1000];
            app.EditField.Position = [191 156 100 22];
            app.EditField.Value = 35;

            % Create ColormapDropDownLabel
            app.ColormapDropDownLabel = uilabel(app.UIFigure);
            app.ColormapDropDownLabel.HorizontalAlignment = 'right';
            app.ColormapDropDownLabel.VerticalAlignment = 'top';
            app.ColormapDropDownLabel.Position = [117 106 59 15];
            app.ColormapDropDownLabel.Text = 'Colormap';

            % Create DropDown
            app.DropDown = uidropdown(app.UIFigure);
            app.DropDown.Items = {'Parula', 'Jet', 'Winter', 'Cool'};
            app.DropDown.Position = [191 102 100 22];
            app.DropDown.Value = 'Parula';

            % Create Button
            app.Button = uibutton(app.UIFigure, 'push');
            app.Button.ButtonPushedFcn = createCallbackFcn(app, @ButtonPushed, true);
            app.Button.Position = [116 43 174 22];
            app.Button.Text = 'OK';

            % Show the figure after all components are created
            app.UIFigure.Visible = 'on';
        end
    end

    % App creation and deletion
    methods (Access = public)

        % Construct app
        function app = DialogAppExample(varargin)

            % Create UIFigure and components
            createComponents(app)

            % Register the app with App Designer
            registerApp(app, app.UIFigure)

            % Execute the startup function
            runStartupFcn(app, @(app)StartupFcn(app, varargin{:}))

            if nargout == 0
                clear app
            end
        end

        % Code that executes before app deletion
        function delete(app)

            % Delete UIFigure when app is deleted
            delete(app.UIFigure)
        end
    end
end
4.3 重点内容
4.3.1 将信息发送给对话框
执行以下步骤,将值从主 App 传递给对话框 App
(1)在对话框 App 中,为 StartupFcn 回调定义输入参数,然后将代码添加到回调中。
打开对话框 App 的
将代码添加到 StartupFcn 回调中,以存储 mainapp 的值。

function StartupFcn(app,mainapp,sz,c)
    % Store main app object
    app.CallingApp = mainapp;

    % Process sz and c inputs
    ...
end
2.从主 App 的回调中调用对话框 App。打开主 App 的代码视图,然后为
function OptionsButtonPushed(app,event)
    % Disable Plot Options button while dialog is open
    app.OptionsButton.Enable = 'off';

    % Get szvalue and cvalue
    % ....

    % Call dialog box with input values
    app.DialogApp = DialogAppExample(app,szvalue,cvalue);
end
3.在主 App 中定义一个属性,以存储对话框 App。在主 App 保持打开的情况下,创建一个名为 DialogApp 的私有属性。在编辑器选项卡上选择
properties (Access = private)
       DialogApp % Dialog box app
end
4.3.2 将信息返回给主App
执行以下步骤,将用户的选择返回给主 App
1.在主 App 中创建一个公共函数,以更新 UI。打开主 App 的代码视图,然后在编辑器选项卡上选择
将默认函数名称更改为所需的名称,即你所希望从对话框传递给主 App 的每个选项添加输入参数。app 参数必须是第一个,因此请在此参数后指定其他参数。然后将代码添加到处理输入并更新主 App 的函数中。
function updateplot(app,sz,c)
    % Process sz and c
    ...
end
2.在对话框 App 中创建一个属性,以存储主 App。打开对话框 App 的
properties (Access = private)
        CallingApp % Main app object
end
3.从对话框 App 的回调中调用公共函数。在对话框 App 保持打开的情况下,为
在此回调中,将 CallingApp 属性和用户的选择传递给公共函数。然后调用 delete 函数以关闭对话框。
function ButtonPushed(app,event)
   % Call main app's public function
   updateplot(app.CallingApp,app.EditField.Value,app.DropDown.Value);

   % Delete the dialog box
   delete(app)
end
4.3.3 关闭窗口时的管理任务
两个 App 都必须在用户关闭它们时执行某些任务。在对话框关闭之前,它必须重新启用主 App 中的
1.打开对话框 App 的代码视图,右键点击组件浏览器中的 app.UIFigure 对象,然后选择
function DialogAppCloseRequest(app,event)
   % Enable the Plot Options button in main app
   app.CallingApp.OptionsButton.Enable = 'on';

   % Delete the dialog box
   delete(app)
end
2.打开主 App 的代码视图,右键点击组件浏览器中的 app.UIFigure 对象,然后选择
function MainAppCloseRequest(app,event)
   % Delete both apps
   delete(app.DialogApp)
   delete(app)
end
Dialog