编译工具:STS
代码下载链接:https://github.com/theIndoorTrain/SpringBoot_Mybatis01/commit/b757cd9bfa4e2de551b2e9e5c095ded585c90566
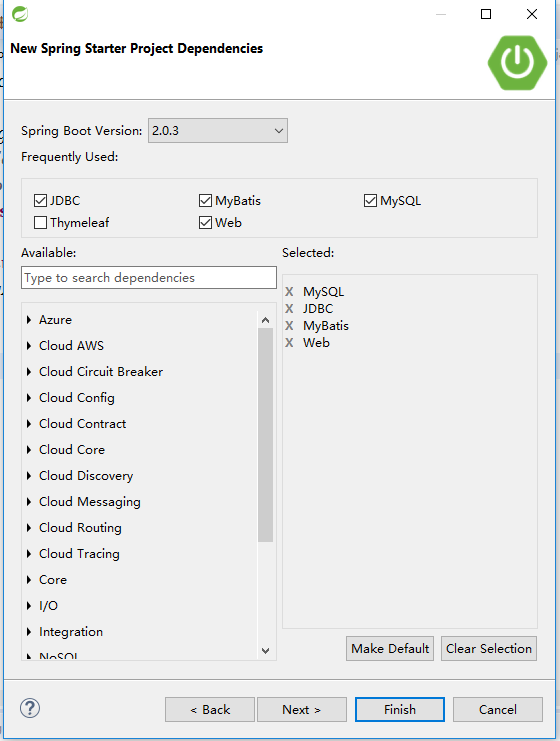
一、项目的建立
选择依赖:Mybatis,Web,MySql,JDBC
SpringBoot版本:2.0.3
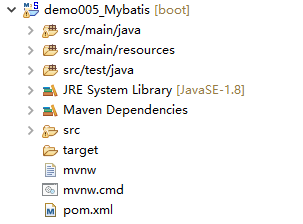
项目生成结构:
pom依赖:


 1 <?xml version="1.0" encoding="UTF-8"?>
 2 <project xmlns="http://maven.apache.org/POM/4.0.0" xmlns:xsi="http://www.w3.org/2001/XMLSchema-instance"
 3     xsi:schemaLocation="http://maven.apache.org/POM/4.0.0 http://maven.apache.org/xsd/maven-4.0.0.xsd">
 4     <modelVersion>4.0.0</modelVersion>
 5
 6     <groupId>com.xm</groupId>
 7     <artifactId>demo005_Mybatis</artifactId>
 8     <version>0.0.1-SNAPSHOT</version>
 9     <packaging>jar</packaging>
10
11     <name>demo005_Mybatis</name>
12     <description>Demo project for Spring Boot</description>
13
14     <parent>
15         <groupId>org.springframework.boot</groupId>
16         <artifactId>spring-boot-starter-parent</artifactId>
17         <version>2.0.2.RELEASE</version>
18         <relativePath/> <!-- lookup parent from repository -->
19     </parent>
20
21     <properties>
22         <project.build.sourceEncoding>UTF-8</project.build.sourceEncoding>
23         <project.reporting.outputEncoding>UTF-8</project.reporting.outputEncoding>
24         <java.version>1.8</java.version>
25     </properties>
26
27     <dependencies>
28         <dependency>
29             <groupId>org.springframework.boot</groupId>
30             <artifactId>spring-boot-starter-jdbc</artifactId>
31         </dependency>
32         <dependency>
33             <groupId>org.springframework.boot</groupId>
34             <artifactId>spring-boot-starter-web</artifactId>
35         </dependency>
36         <dependency>
37             <groupId>org.mybatis.spring.boot</groupId>
38             <artifactId>mybatis-spring-boot-starter</artifactId>
39             <version>1.3.2</version>
40         </dependency>
41
42         <dependency>
43             <groupId>mysql</groupId>
44             <artifactId>mysql-connector-java</artifactId>
45             <scope>runtime</scope>
46         </dependency>
47         <dependency>
48             <groupId>org.springframework.boot</groupId>
49             <artifactId>spring-boot-starter-test</artifactId>
50             <scope>test</scope>
51         </dependency>
52     </dependencies>
53
54     <build>
55         <plugins>
56             <plugin>
57                 <groupId>org.springframework.boot</groupId>
58                 <artifactId>spring-boot-maven-plugin</artifactId>
59             </plugin>
60         </plugins>
61     </build>
62
63
64 </project>
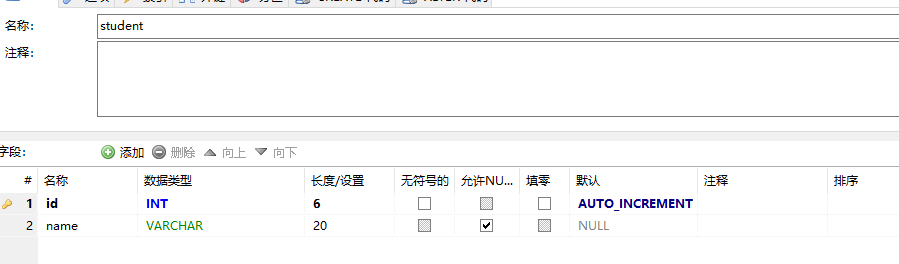
二、创建数据库
三、项目配置
1.添加yml配置文件:application.yml
 1 #配置mybatis
 2 mybatis:
 3   #配置xml映射路径
 4   mapper-locations: classpath:mapper/*.xml
 5    #配置实体类的别名
 6   type-aliases-package: com.xm.pojo
 7   configuration:
 8     #开启驼峰命名法
 9     map-underscore-to-camel-case: true
10
11
12 #配置mysql连接
13 spring:
14   datasource:
15     url: jdbc:mysql://10.1.51.31:3306/xm
16     username: root
17     password: cube1501
18     driver-class-name: com.mysql.jdbc.Driver
2.在source文件夹下建立mapper文件夹

3.在Springboot启动类添加@MapperScan注解
 1 package com.xm;
 2
 3 import org.mybatis.spring.annotation.MapperScan;
 4 import org.springframework.boot.SpringApplication;
 5 import org.springframework.boot.autoconfigure.SpringBootApplication;
 6 @MapperScan(value="com.xm.mapper")
 7 @SpringBootApplication
 8 public class Demo005MybatisApplication {
 9
10     public static void main(String[] args) {
11         SpringApplication.run(Demo005MybatisApplication.class, args);
12     }
13 }
注意:添加@MapperScan注解后,每个mapper都会自动扫描成为Bean。否则,需要在每个mapper接口上添加@Mapper接口
四、代码实现
1.实体类Student
 1 package com.xm.pojo;
 2
 3 /**
 4  * name:学生实体
 5  * @author xxm
 6  *
 7  */
 8 public class Student {
 9     /**
10      * content:主键id
11      */
12     private int id;
13     /**
14      * content:姓名
15      */
16     private String name;
17
18     public int getId() {
19         return id;
20     }
21     public void setId(int id) {
22         this.id = id;
23     }
24     public String getName() {
25         return name;
26     }
27     public void setName(String name) {
28         this.name = name;
29     }
30
31
32
33 }
2.数据操作层StudentMapper
 1 package com.xm.mapper;
 2
 3 import java.util.List;
 4
 5 import com.xm.pojo.Student;
 6
 7 public interface StudentMapper {
 8
 9     /**
10      * 根据id查询
11      * @param id
12      * @return
13      */
14     public Student getById(Integer id);
15
16     /**
17      * 查询全部
18      * @return
19      */
20     public List<Student> list();
21
22     /**
23      * 插入
24      * @param student
25      */
26     public void insert(Student student);
27
28     /**
29      * 根据student的id修改
30      * @param student
31      */
32     public void update(Student student);
33
34     /**
35      * 根据id删除
36      * @param id
37      */
38     public void delete(Integer id);
39
40 }
3.mapper映射Studentmapper
 1 <?xml version="1.0" encoding="UTF-8" ?>
 2 <!DOCTYPE mapper PUBLIC "-//mybatis.org//DTD Mapper 3.0//EN" "http://mybatis.org/dtd/mybatis-3-mapper.dtd" >
 3 <mapper namespace="com.xm.mapper.StudentMapper">
 4
 5     <!-- 根据id查询 -->
 6     <select id="getById" parameterType="int" resultType="student">
 7     select * from student where id=#{id}
 8     </select>
 9
10     <!-- 查询所有 -->
11     <select id="list" parameterType="int" resultType="student">
12     select * from student
13     </select>
14
15     <!-- 插入一个学生 -->
16     <insert id="insert" parameterType="student">
17     insert into student(name) values(#{name})
18     </insert>
19
20     <!-- 根据id修改学生信息 -->
21     <update id="update" parameterType="student">
22     update student set name=#{name} where id=#{id}
23     </update>
24
25     <!-- 根据id删除学生 -->
26     <delete id="delete" parameterType="int">
27     delete  from student where id=#{id}
28     </delete>
29 </mapper>
4.控制层StudentController
 1 package com.xm.controller;
 2
 3 import java.util.List;
 4
 5 import javax.websocket.server.PathParam;
 6
 7 import org.springframework.beans.factory.annotation.Autowired;
 8 import org.springframework.web.bind.annotation.DeleteMapping;
 9 import org.springframework.web.bind.annotation.GetMapping;
10 import org.springframework.web.bind.annotation.PathVariable;
11 import org.springframework.web.bind.annotation.PostMapping;
12 import org.springframework.web.bind.annotation.PutMapping;
13 import org.springframework.web.bind.annotation.RestController;
14
15 import com.xm.mapper.StudentMapper;
16 import com.xm.pojo.Student;
17
18 @RestController
19 public class StudentController {
20     @Autowired
21     private StudentMapper studentMapper;
22
23     /**
24      * 根据id查询学生
25      * @param id
26      * @return
27      */
28     @GetMapping("/student/{id}")
29     public Student getById(@PathVariable("id") Integer id) {
30
31         Student student = studentMapper.getById(id);
32         return student;
33
34     }
35
36     /**
37      * 查询全部
38      * @return
39      */
40     @GetMapping("/students")
41     public List<Student> list(){
42         List<Student> students = studentMapper.list();
43         return students;
44     }
45
46     /**
47      * 插入
48      * @param student
49      */
50     @PostMapping("/student")
51     public void insert( Student student) {
52         studentMapper.insert(student);
53     }
54
55     /**
56      * 修改
57      * @param student
58      */
59     @PutMapping("/student/{id}")
60     public void update(Student student,@PathVariable("id")Integer id) {
61         studentMapper.update(student);
62     }
63
64     /**
65      * 根据id删除
66      * @param id
67      */
68     @DeleteMapping("/student/{id}")
69     public void delete(@PathVariable("id") Integer id) {
70         studentMapper.delete(id);
71     }
72
73 }
2018-06-1517:31:14