1.下载vsftp:http://rpmfind.net/linux/rpm2html/search.php?query=vsftpd(x86-64)

2.检查是否已经安装了vsftp
 rpm -qa | grep vsftpd
 如果没有提示则说明没有安装
 如果提示版本号则说明已经安装
3.安装vsftpd-3.0.2-22.el7.x86_64.rpm
离线安装
rpm -ivh vsftpd-3.0.2-22.el7.x86_64.rpm
在线安装
yum install -y vsftp
安装过程可能会报错:
[root@yjy-pt01 vsftpd]# rpm -ivh vsftpd-3.0.2-22.el7.x86_64.rpm
warning: vsftpd-3.0.2-22.el7.x86_64.rpm: Header V3 RSA/SHA256 Signature, key ID f4a80eb5: NOKEY
error: Failed dependencies:
libc.so.6(GLIBC_2.14)(64bit) is needed by vsftpd-3.0.2-22.el7.x86_64
libc.so.6(GLIBC_2.15)(64bit) is needed by vsftpd-3.0.2-22.el7.x86_64
解决:安装相关依赖
rpm -ivh libcap-2.16-5.5.el6.x86_64.rpm
rpm -ivh libcap-devel-2.16-5.5.el6.x86_64.rpm
4.检查是否安装成功
[root@yjy-pt03 local]# rpm -qa | grep vsftpd
vsftpd-2.2.2-24.el6.x86_64                            //出现版本号,说明安装成功
5.配置,这里只说能让你的ftp跑起来的配置,详细原理可以点击查看这里
5.0 开启vsftpd的两个端口 20,21
开启
# iptables -I INPUT -i eth0 -p tcp --dport 20 -j ACCEPT
# iptables  -I OUTPUT -o eth0 -p tcp --sport 20 -j ACCEPT
保存
# /etc/rc.d/init.d/iptables save
重启防火墙
# service iptables restart
5.1 创建两个系统用户
1.因为vsftpd默认的宿主用户是root,不符合安全性要求,所以将新建立的vsftpd服务的宿主用户的shell改为“ /sbin/nologin意思是禁止登录系统 ”:
useradd vsftpd -s /sbin/nologin //系统用户 vsftpd 主要是提供一个默认宿主
2.建立vsftpd虚拟宿主用户:
useradd virtusers -s /sbin/nologin //系统用户 virtusers 本文主要讲虚拟用户登录,这相当于我们的虚拟用户组
此次主要介绍虚拟用户,顾名思义虚拟用户在系统中是不纯在的,它们集体寄托于方才创建的“virtusers”用户,那么这个用户就相当于一个虚拟用户组了,因为这个用户的权限将影响到后续讲到的虚拟用户。
5.2 配置vsftpd的主要配置文件vsftpd.conf
1.养成备份的好习惯
cp /etc/vsftpd/vsftpd.conf /etc/vsftpd/vsftpd.backup.conf
2.vim /etc/vsftpd/vsftpd.conf
#默认的根目录为
#local_root=/var/ftp
#设置为NO代表不允许匿名
anonymous_enable=NO

#设定本地用户可以访问,主要是虚拟宿主用户,如果设为NO那么所欲虚拟用户将无法访问。
local_enable=YES

#可以进行写的操作
write_enable=YES

#设定上传文件的权限掩码
local_umask=022

#禁止匿名用户上传
anon_upload_enable=NO

#禁止匿名用户建立目录
anon_mkdir_write_enable=NO

# 设定开启目录标语功能
dirmessage_enable=YES

# 设定开启日志记录功能
xferlog_enable=YES

#设定端口20进行数据连接
connect_from_port_20=YES

#设定禁止上传文件更改宿主
chown_uploads=NO

#设定vsftpd服务日志保存路劲。注意:改文件默认不纯在,需手动touch,且由于这里更改了vsftpd服务的宿主用户为手动建立的vsftpd,则必
须注意给予该用户对日志的读取权限否则服务启动失败。
xferlog_file=/var/log/vsftpd.log      //这个文件在后面步骤中会提及

#设定日志使用标准的记录格式
xferlog_std_format=YES

#设定空闲链接超时时间,这里使用默认/秒。
#idle_session_timeout=600

#设定最大连接传输时间,这里使用默认,将具体数值留给每个用户具体制定,默认120/秒
data_connection_timeout=3600

#设定支撑vsftpd服务的宿主用户为手动建立的vsftpd用户。注意:一旦更改宿主用户,需一起与该服务相关的读写文件的读写赋权问题.
nopriv_user=vsftpd

#设定支持异步传输的功能
#async_abor_enable=YES

#设置vsftpd的登陆标语
ftpd_banner=hello 欢迎登陆

#是否将所有用户限制在主目录,YES为启用 NO禁用.(该项默认值是NO,即在安装vsftpd后不做配置的话,ftp用户是可以向上切换到要目录之外的)
chroot_local_user=NO //如果设置成YE会导致你用java代码创建文件夹时失败,因为他被限制在了宿主目录


#禁止用户登出自己的ftp主目录
chroot_list_enable=NO

#禁止用户登陆ftp后使用ls -R 命令。该命令会对服务器性能造成巨大开销,如果该项运行当多个用户使用该命令会对服务器造成威胁。
ls_recurse_enable=NO

#设定vsftpd服务工作在standalone模式下。所谓standalone模式就是该服务拥有自己的守护进程,在ps -A可以看出vsftpd的守护进程名。如果
不想工作在standalone模式下,可以选择SuperDaemon模式,注释掉即可,在该模式下vsftpd将没有自己的守护进程,而是由超级守护进程Xinetd全权代理,>与此同时,vsftpd服务的许多功能,将得不到实现。
listen=YES

#设定userlist_file中的用户将不能使用ftp
userlist_enable=YES


#设定pam服务下的vsftpd验证配置文件名。因此,PAM验证将参考/etc/pam.d/下的vsftpd文件配置。
pam_service_name=vsftpd

#设定支持TCPwrappers
tcp_wrappers=YES

#################################################以下是关于虚拟用户支持的重要配置项目,默认.conf配置文件中是不包含这些项目的,需手动添加。
#启用虚拟用户功能
guest_enable=YES

#指定虚拟的宿主用户
guest_username=virtusers    //virtusers就是我们上面创建的系统用户,作为我们的虚拟用户组使用
#设定虚拟用户的权限符合他们的宿主用户
virtual_use_local_privs=YES

#设定虚拟用户个人vsftp的配置文件存放路劲。这个被指定的目录里,将被存放每个虚拟用户个性的配置文件,注意的地方是:配置文件名必须 和虚拟用户名相同。
user_config_dir=/etc/vsftpd/vconf           //这是个目录,是为每一个虚拟用户配置单独的权限使用,这里我们主要配置每个用户的单独根目录

#开启每个虚拟用户有独立的根目录
chroot_local_user=YES

#禁止反向域名解析,若是没有添加这个参数可能会出现用户登陆较慢,或则客户链接不上ftp的现象
reverse_lookup_enable=NO
5.3.建立vsftpd的日志文件,并更改属主为vsftpd的服务宿主用户
//上线配置文件中配置的日志目录
touch /var/log/vsftpd.log

chown vsftpd.vsftpd /var/log/vsftpd.log
5.4 配置虚拟用户
1.建立虚拟用户配置文件的存放路径 【这个路径就是上面配置文件末尾配置的路径】
mkdir /etc/vsftpd/vconf/
2.)建立一个虚拟用户名单文件,用来记录虚拟用户的账号和密码,格式为:一行用户名,一行密码。不要有空格
vim /opt/vsftp/passwd
test
123456
test1
654321
3.生成虚拟用户数据文件
db_load -T -t hash -f /opt/vsftp/passwd /opt/vsftp/passwd.db
需要注意的是,以后对虚拟用户的增删操作完之后需要再次执行上述命令,使其生成新的数据文件。
5.5设置PAM验证文件,并制定虚拟用户数据库文件进行读取
1.操作前记得备份的好习惯
cp /etc/pam.d/vsftpd /etc/pam.d/vsftpd.backup
2.查看我已经配置的文件:cat /etc/pam.d/vsftpd 红色部分为新增,可以看到目录就是我们配置的用户名密码
#%PAM-1.0
#####32位系统配置
#auth    sufficient      /lib/security/pam_userdb.so     db=/etc/vsftpd/xnpasswd
#account sufficient      /lib/security/pam_userdb.so     db=/etc/vsftpd/xnpasswd
#####64位系统配置
auth    sufficient      /lib64/security/pam_userdb.so     db=/opt/vsftp/passwd
account sufficient      /lib64/security/pam_userdb.so     db=/opt/vsftp/passwd

#以上两条是手动添加的,内容是对虚拟用户的安全和帐户权限进行验证。
#这里的auth是指对用户的用户名口令进行验证。
#这里的accout是指对用户的帐户有哪些权限哪些限制进行验证。
auth       required     pam_listfile.so item=user sense=deny file=/etc/vsftpd/ftpusers onerr=succeed
auth       required     pam_shells.so
auth       include      system-auth
account    include      system-auth
session    include      system-auth
session    required     pam_loginuid.so
5.6 为每一个虚拟账户配置专属配置文件
1.我是直接copy的主配置文件然后改的,内容如下
vim /etc/vsftpd/vconf/test //注意文件名 test与passwd中用户名要保持一致
# Example config file /etc/vsftpd/vsftpd.conf
#
# The default compiled in settings are fairly paranoid. This sample file
# loosens things up a bit, to make the ftp daemon more usable.
# Please see vsftpd.conf.5 for all compiled in defaults.
#
# READ THIS: This example file is NOT an exhaustive list of vsftpd options.
# Please read the vsftpd.conf.5 manual page to get a full idea of vsftpd's
# capabilities.
#
# Allow anonymous FTP? (Beware - allowed by default if you comment this out).
local_root=/opt/vsftpd/file  //这里是我配置的test用户的根目录
anonymous_enable=NO
#
# Uncomment this to allow local users to log in.
local_enable=YES
#
# Uncomment this to enable any form of FTP write command.
write_enable=YES
#
# Default umask for local users is 077. You may wish to change this to 022,
# if your users expect that (022 is used by most other ftpd's)
local_umask=022
#
# Uncomment this to allow the anonymous FTP user to upload files. This only
# has an effect if the above global write enable is activated. Also, you will
# obviously need to create a directory writable by the FTP user.
anon_upload_enable=NO
#
# Uncomment this if you want the anonymous FTP user to be able to create
# new directories.
anon_mkdir_write_enable=NO
#anno_other_writer_enable=YES
#
# Activate directory messages - messages given to remote users when they
# go into a certain directory.
#dirmessage_enable=YES
#
# The target log file can be vsftpd_log_file or xferlog_file.
# This depends on setting xferlog_std_format parameter
#xferlog_enable=YES
#
# Make sure PORT transfer connections originate from port 20 (ftp-data).
#connect_from_port_20=YES
#
# If you want, you can arrange for uploaded anonymous files to be owned by
# a different user. Note! Using "root" for uploaded files is not
# recommended!
#chown_uploads=NO
#chown_username=whoever
#
# The name of log file when xferlog_enable=YES and xferlog_std_format=YES
# WARNING - changing this filename affects /etc/logrotate.d/vsftpd.log
#xferlog_file=/var/log/vsftpd.log
#
# Switches between logging into vsftpd_log_file and xferlog_file files.
# NO writes to vsftpd_log_file, YES to xferlog_file
#xferlog_std_format=YES
#
# You may change the default value for timing out an idle session.
#idle_session_timeout=600
#
# You may change the default value for timing out a data connection.
#data_connection_timeout=120
#
# It is recommended that you define on your system a unique user which the
# ftp server can use as a totally isolated and unprivileged user.
#nopriv_user=vsftpd
#
# Enable this and the server will recognise asynchronous ABOR requests. Not
# recommended for security (the code is non-trivial). Not enabling it,
# however, may confuse older FTP clients.
async_abor_enable=YES
#
# By default the server will pretend to allow ASCII mode but in fact ignore
# the request. Turn on the below options to have the server actually do ASCII
# mangling on files when in ASCII mode.
# Beware that on some FTP servers, ASCII support allows a denial of service
# attack (DoS) via the command "SIZE /big/file" in ASCII mode. vsftpd
# predicted this attack and has always been safe, reporting the size of the
# raw file.
# ASCII mangling is a horrible feature of the protocol.
#ascii_upload_enable=YES
#ascii_download_enable=YES
#
# You may fully customise the login banner string:
#ftpd_banner=Welcome to blah FTP service.
#
# You may specify a file of disallowed anonymous e-mail addresses. Apparently
# useful for combatting certain DoS attacks.
#deny_email_enable=YES
# (default follows)
#banned_email_file=/etc/vsftpd/banned_emails
#
# You may specify an explicit list of local users to chroot() to their home
# directory. If chroot_local_user is YES, then this list becomes a list of
# users to NOT chroot().
#chroot_local_user=NO
#chroot_list_enable=NO
# (default follows)
#chroot_list_file=/etc/vsftpd/chroot_list
#
# You may activate the "-R" option to the builtin ls. This is disabled by
# default to avoid remote users being able to cause excessive I/O on large
# sites. However, some broken FTP clients such as "ncftp" and "mirror" assume
# the presence of the "-R" option, so there is a strong case for enabling it.
#ls_recurse_enable=YES
#
# When "listen" directive is enabled, vsftpd runs in standalone mode and
# listens on IPv4 sockets. This directive cannot be used in conjunction
# with the listen_ipv6 directive.
#listen=YES
#
# This directive enables listening on IPv6 sockets. To listen on IPv4 and IPv6
# sockets, you must run two copies of vsftpd with two configuration files.
# Make sure, that one of the listen options is commented !!
#listen_ipv6=YES

#pam_service_name=vsftpd
#userlist_enable=YES
#tcp_wrappers=YES


#guest_enable=YES
#guest_username=virtusers
#virtual_use_local_privs=YES
#reverse_lookup_enable=NO
2.建立虚拟用户的仓库目录并更改相应属主/组且赋予相应权限
mkdir -p /opt/vsftpd/file //这就是5.6中local_root=/opt/vsftpd/file 配置的根目录
chown virtusers:virtusers /opt/vsftpd/file

chmod 755 /opt/vsftpd/file
3.随便建立个文件方便后续检测是否安装成功:
touch /opt/vsftpd/file/abc
5.7重启
service vsftpd restart
其他命令
#开启
service vsftpd start
#停止
service vsftpd stop
#重启
service vsftpd restart
6.测试
打开文件夹输入地址

会提示你登录,或则右击登录

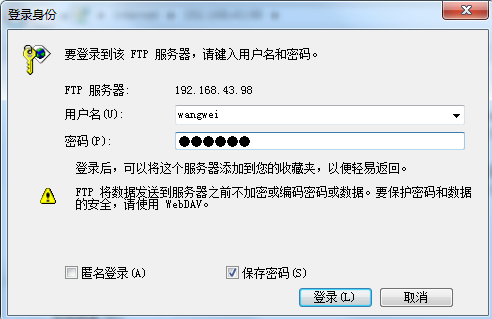
就可以看到你的文件夹了
7.附送:
gitHub源码:https://github.com/UncleWW/Shop