屏幕适配问题共有四种解决方案:(1)根据屏幕宽高写控件frame(下策);(2)Autoresizing的使用(中策);(3)AutoLayout的使用(上策);(4)sizeClasses+AutoLayout的使用(上上策)。下面将会分别来进行叙述。
(1)根据屏幕宽高写控件frame
利用宽高比,在不同的屏幕中来进行对控件的位置与控件的宽高进行等比例缩放.选定一个型号的屏幕的宽高为基准,进行等比例缩放.例如以iPhone6或者iPhone6s为基准.
其宽高分别是375与667.Iphone6ScaleWidth = [UIScreen mainScreen].bounds.size.width/375; Iphone6ScaleHeight = [UIScreen mainScreen].bounds.size.height/667;
如果是iPhone6或者iPhone6s则Iphone6ScaleWidth与Iphone6ScaleHeight的值都为1.但是此方法对于iPhone5之后的型号可以适用.因为我们知道iPhone4或者iPhone4s尺寸是320x480.iPhone5是320x568.所以对于4或者4s来说计算得到的宽高比不相同.可能会造成一个方形控件,在iPhone5之后的机型上显示的都是正方形.但是在4或者4s上显示的是长方形.需要进行自己的判断(目前来说4或者4s市场上已经不多见了).
同时也可以在代理增加两个属性,宽高比例属性,例如:
 1 @interface AppDelegate : UIResponder <UIApplicationDelegate>
 2 @property float autoSizeScaleX;
 3 @property float autoSizeScaleY;
 4
 5 - (BOOL)application:(UIApplication *)application didFinishLaunchingWithOptions:(NSDictionary *)launchOptions {
 6     if(CurrentScreenHeight > 480){
 7         nowAppDelegate().autoSizeScaleX = CurrentScreenWidth/320.0;
 8         nowAppDelegate().autoSizeScaleY = CurrentScreenHeight/568.0;
 9     }else{
10         nowAppDelegate().autoSizeScaleX = 1.0;其中nowAppDelegate() = (AppDelegate *)[[UIApplication sharedApplication] delegate];
11         nowAppDelegate().autoSizeScaleY = 1.0;
12     }
13
14 }
在项目对于控件的位置和尺寸乘以这两个缩放比例.
(2)Autoresizing的使用
在Autolayout以前,有Autoresizing可以做屏幕适配,但局限性较大,只能针对父子关系进行有限调整,如边距固定,尺寸可变,对于兄弟关系的调整无法实现。对于UI比较固定的app,这种方式基本满足。相比之下,Autolayout比Autoresizing强大很多。
(3)AutoLayout的使用
在以前的iOS程序是怎样布局UI的?
经常编写大量的坐标计算代码;
为了保证在各种屏幕上都能有完美的UI界面效果,有时还需要分别为几种屏幕编写不同的坐标计算代码(即传说中的“屏幕适配”)
什么是Autolayout?
Autolayout是一种“自动布局”技术,专门用来布局UI界面的。
Autolayout自iOS6开始引入,由于Xcode4的不给力,当时并没有得到很大的推广。
自iOS7(Xcode5)开始,Autolayout的开发效率得到很大的提升。
苹果官方也推荐开发者使用Autolayout来布局UI界面。
Autolayout能够很轻松的解决屏幕适配的问题。
代码如下:
 1 UIView *headView = [[UIView alloc] init];
 2 headView.translatesAutoresizingMaskIntoConstraints = NO;
 3 [self.view addSubview:headView];
 4 headView.backgroundColor = [UIColor redColor];
 5 NSLayoutConstraint *headViewLeft = [NSLayoutConstraint constraintWithItem:headView attribute:NSLayoutAttributeLeft relatedBy:NSLayoutRelationEqual toItem:self.view attribute:NSLayoutAttributeLeft multiplier:1.0 constant:0];
 6 NSLayoutConstraint *headViewTop = [NSLayoutConstraint constraintWithItem:headView attribute:NSLayoutAttributeTop relatedBy:NSLayoutRelationEqual toItem:self.view attribute:NSLayoutAttributeTop multiplier:1.0 constant:0];
 7 NSLayoutConstraint *headViewRight = [NSLayoutConstraint constraintWithItem:headView attribute:NSLayoutAttributeRight relatedBy:NSLayoutRelationEqual toItem:self.view attribute:NSLayoutAttributeRight multiplier:1.0 constant:0];
 8 NSLayoutConstraint *headViewHeight = [NSLayoutConstraint constraintWithItem:headView attribute:NSLayoutAttributeHeight relatedBy:NSLayoutRelationEqual toItem:nil attribute:0 multiplier:0 constant:200];
 9 self.headHeightCons = headViewHeight;
10 [self.view addConstraints:@[headViewTop,headViewLeft,headViewRight]];
11 [headView addConstraint:headViewHeight];
12
13
14 UIImage *imageLol = [UIImage imageNamed:@"lol"];
15 UIImageView *imageViewLol = [[UIImageView alloc] initWithImage:imageLol];
16 [headView addSubview:imageViewLol];
17 imageViewLol.translatesAutoresizingMaskIntoConstraints = NO;
18 [imageViewLol setContentMode:UIViewContentModeScaleAspectFill];
19
20
21 NSLayoutConstraint *imageLolViewLeft = [NSLayoutConstraint constraintWithItem:imageViewLol attribute:NSLayoutAttributeLeft relatedBy:NSLayoutRelationEqual toItem:headView attribute:NSLayoutAttributeLeft multiplier:1.0 constant:0];
22 NSLayoutConstraint *imageViewLolViewTop = [NSLayoutConstraint constraintWithItem:imageViewLol attribute:NSLayoutAttributeTop relatedBy:NSLayoutRelationEqual toItem:headView attribute:NSLayoutAttributeTop multiplier:1.0 constant:0];
23 NSLayoutConstraint *imageViewLolViewRight = [NSLayoutConstraint constraintWithItem:imageViewLol attribute:NSLayoutAttributeRight relatedBy:NSLayoutRelationEqual toItem:headView attribute:NSLayoutAttributeRight multiplier:1.0 constant:0];
24 NSLayoutConstraint *imageViewLolViewBottom = [NSLayoutConstraint constraintWithItem:imageViewLol attribute:NSLayoutAttributeBottom relatedBy:NSLayoutRelationEqual toItem:headView attribute:NSLayoutAttributeBottom multiplier:1.0 constant:0];
25 [headView addConstraints:@[imageLolViewLeft,imageViewLolViewTop,imageViewLolViewRight,imageViewLolViewBottom]];
(4)sizeClasses+AutoLayout的使用
iOS8中新增了Size Classes特性,他是对当前所有iOS设备尺寸的一个抽象。
用法:
屏幕的宽和高分别分成三种情况:(Compact,Regular,Any).也就是紧凑,正常和任意。这样宽和高三三整合,一共九种情况。针对每一种情况,如果需要的话,我们可以单独在storyboard或xib中设置UIView的自动布局约束,甚至某一个button是否显示都是能轻松实现的。
当然,还有一种就是使用Masonry框架进行屏幕适配
Masonry是一个轻量级的布局框架,拥有自己的描述语法,采用更优雅的链式语法封装自动布局,简洁明了并具有高可读性,而且同时支持 iOS 和 Max OS X。Masonry是一个用代码写iOS或OS界面的库,可以代替Auto layout。Masonry的github地址:https://github.com/SnapKit/Masonry
Masonry配置
- 推荐使用pods方式引入类库,pod 'Masonry',若不知道pod如何使用,情况我的另一篇文章: 提高ios开发效率的工具
- 引入头文件 #import "Masonry.h"
Masonry使用讲解
mas_makeConstraints 是给view添加约束,约束有几种,分别是边距,宽,高,左上右下距离,基准线。添加过约束后可以有修正,修正有offset(位移)修正和multipliedBy(倍率)修正。
语法一般是 make.equalTo or make.greaterThanOrEqualTo or make.lessThanOrEqualTo + 倍数和位移修正。
注意点1: 使用 mas_makeConstraints方法的元素必须事先添加到父元素的中,例如[self.view addSubview:view];
注意点2: masequalTo 和 equalTo 区别:masequalTo 比equalTo多了类型转换操作,一般来说,大多数时候两个方法都是 通用的,但是对于数值元素使用mas_equalTo。对于对象或是多个属性的处理,使用equalTo。特别是多个属性时,必须使用equalTo,例如 make.left.and.right.equalTo(self.view);
注意点3: 注意到方法with和and,这连个方法其实没有做任何操作,方法只是返回对象本身,这这个方法的左右完全是为了方法写的时候的可读性 。make.left.and.right.equalTo(self.view);和make.left.right.equalTo(self.view);是完全一样的,但是明显的加了and方法的语句可读性 更好点。
Masonry初级使用例子
 1 // exp1: 中心点与self.view相同,宽度为400*400
 2 -(void)exp1{
 3     UIView *view = [UIView new];
 4     [view setBackgroundColor:[UIColor redColor]];
 5     [self.view addSubview:view];
 6     [view mas_makeConstraints:^(MASConstraintMaker *make) {
 7          make.center.equalTo(self.view);
 8          make.size.mas_equalTo(CGSizeMake(400,400));
 9     }];
10 }
11 //exp2: 上下左右边距都为10
12 -(void)exp2{
13     UIView *view = [UIView new];
14     [view setBackgroundColor:[UIColor redColor]];
15     [self.view addSubview:view];
16     [view mas_makeConstraints:^(MASConstraintMaker *make) {
17         make.edges.equalTo(self.view).with.insets(UIEdgeInsetsMake(10, 10, 10, 10));
18         //  make.left.equalTo(self.view).with.offset(10);
19         //  make.right.equalTo(self.view).with.offset(-10);
20         //  make.top.equalTo(self.view).with.offset(10);
21         //  make.bottom.equalTo(self.view).with.offset(-10);
22     }];
23 }
24 //exp3 让两个高度为150的view垂直居中且等宽且等间隔排列 间隔为10
25 -(void)exp3{
26     UIView *view1 = [UIView new];
27     [view1 setBackgroundColor:[UIColor redColor]];
28     [self.view addSubview:view1];
29     UIView *view2 = [UIView new];
30     [view2 setBackgroundColor:[UIColor redColor]];
31     [self.view addSubview:view2];
32     [view1 mas_makeConstraints:^(MASConstraintMaker *make) {
33         make.centerY.mas_equalTo(self.view.mas_centerY);
34         make.height.mas_equalTo(150);
35         make.width.mas_equalTo(view2.mas_width);
36         make.left.mas_equalTo(self.view.mas_left).with.offset(10);
37         make.right.mas_equalTo(view2.mas_left).offset(-10);
38     }];
39     [view2 mas_makeConstraints:^(MASConstraintMaker *make) {
40         make.centerY.mas_equalTo(self.view.mas_centerY);
41         make.height.mas_equalTo(150);
42         make.width.mas_equalTo(view1.mas_width);
43         make.left.mas_equalTo(view1.mas_right).with.offset(10);
44         make.right.equalTo(self.view.mas_right).offset(-10);
45     }];
46 }
Masonry高级使用例子1
iOS计算器使用Masorny布局:
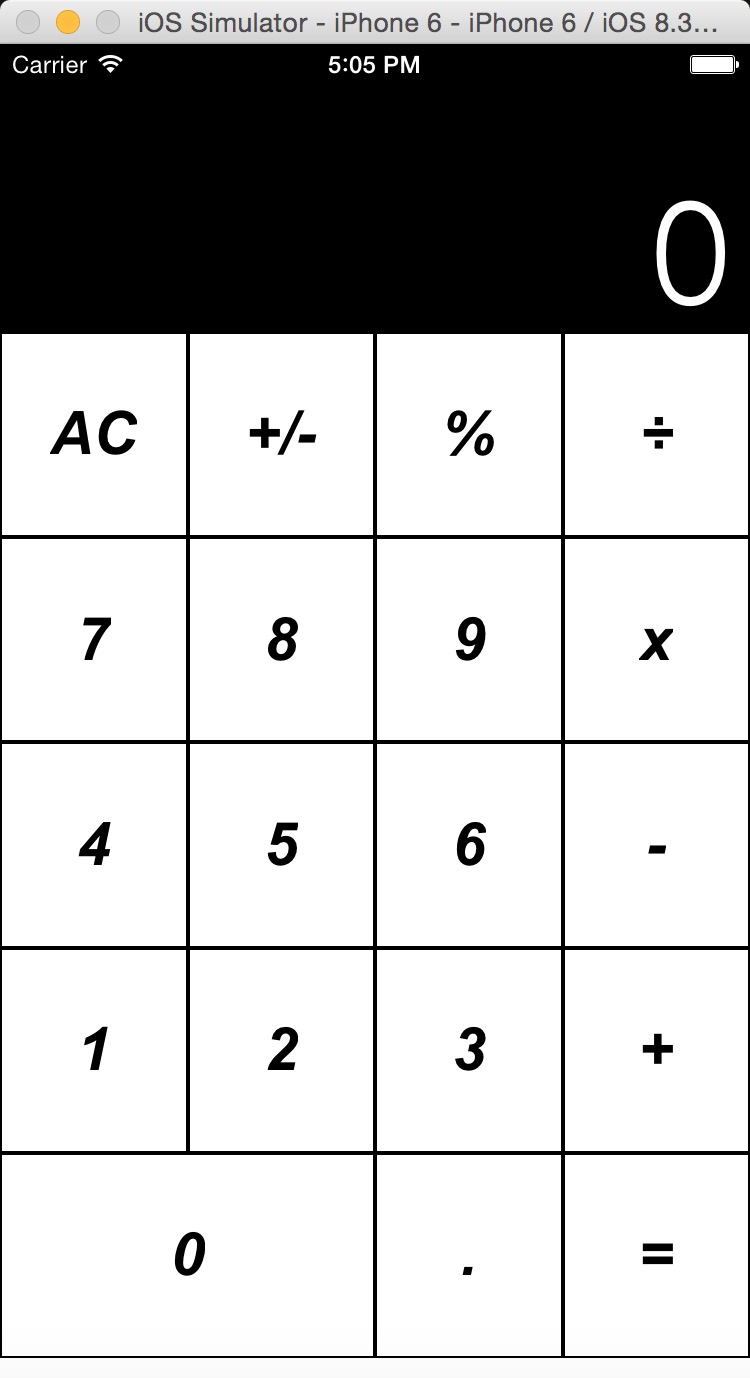
  1 //高级布局练习 ios自带计算器布局
  2 -(void)exp4{
  3     //申明区域,displayView是显示区域,keyboardView是键盘区域
  4     UIView *displayView = [UIView new];
  5     [displayView setBackgroundColor:[UIColor blackColor]];
  6     [self.view addSubview:displayView];
  7     UIView *keyboardView = [UIView new];
  8     [self.view addSubview:keyboardView];
  9     //先按1:3分割 displView(显示结果区域)和 keyboardView(键盘区域)
 10     [displayView mas_makeConstraints:^(MASConstraintMaker *make) {
 11         make.top.equalTo(self.view.mas_top);
 12         make.left.and.right.equalTo(self.view);
 13         make.height.equalTo(keyboardView).multipliedBy(0.3f);
 14     }];
 15     [keyboardView mas_makeConstraints:^(MASConstraintMaker *make) {
 16         make.top.equalTo(displayView.mas_bottom);
 17         make.bottom.equalTo(self.view.mas_bottom);
 18         make.left.and.right.equalTo(self.view);
 19     }];
 20     //设置显示位置的数字为0
 21     UILabel *displayNum = [[UILabel alloc]init];
 22     [displayView addSubview:displayNum];
 23     displayNum.text = @"0";
 24     displayNum.font = [UIFont fontWithName:@"HeiTi SC" size:70];
 25     displayNum.textColor = [UIColor whiteColor];
 26     displayNum.textAlignment = NSTextAlignmentRight;
 27     [displayNum mas_makeConstraints:^(MASConstraintMaker *make) {
 28         make.left.and.right.equalTo(displayView).with.offset(-10);
 29         make.bottom.equalTo(displayView).with.offset(-10);
 30     }];
 31     //定义键盘键名称,?号代表合并的单元格
 32     NSArray *keys = @[@"AC",@"+/-",@"%",@"÷"
 33                      ,@"7",@"8",@"9",@"x"
 34                      ,@"4",@"5",@"6",@"-"
 35                      ,@"1",@"2",@"3",@"+"
 36                      ,@"0",@"?",@".",@"="];
 37     int indexOfKeys = 0;
 38     for (NSString *key in keys){
 39         //循环所有键
 40         indexOfKeys++;
 41         int rowNum = indexOfKeys %4 ==0? indexOfKeys/4:indexOfKeys/4 +1;
 42         int colNum = indexOfKeys %4 ==0? 4 :indexOfKeys %4;
 43         NSLog(@"index is:%d and row:%d,col:%d",indexOfKeys,rowNum,colNum);
 44         //键样式
 45         UIButton *keyView = [UIButton buttonWithType:UIButtonTypeCustom];
 46         [keyboardView addSubview:keyView];
 47         [keyView setTitleColor:[UIColor blackColor] forState:UIControlStateNormal];
 48         [keyView setTitle:key forState:UIControlStateNormal];
 49         [keyView.layer setBorderWidth:1];
 50         [keyView.layer setBorderColor:[[UIColor blackColor]CGColor]];
 51         [keyView.titleLabel setFont:[UIFont fontWithName:@"Arial-BoldItalicMT" size:30]];
 52         //键约束
 53         [keyView mas_makeConstraints:^(MASConstraintMaker *make) {
 54             //处理 0 合并单元格
 55             if([key isEqualToString:@"0"] || [key isEqualToString:@"?"] ){
 56                 if([key isEqualToString:@"0"]){
 57                     [keyView mas_makeConstraints:^(MASConstraintMaker *make) {
 58                         make.height.equalTo(keyboardView.mas_height).with.multipliedBy(.2f);
 59                         make.width.equalTo(keyboardView.mas_width).multipliedBy(.5);
 60                         make.left.equalTo(keyboardView.mas_left);
 61                         make.baseline.equalTo(keyboardView.mas_baseline).with.multipliedBy(.9f);
 62                     }];
 63                 }if([key isEqualToString:@"?"]){
 64                     [keyView removeFromSuperview];
 65                 }
 66             }
 67             //正常的单元格
 68             else{
 69                 make.width.equalTo(keyboardView.mas_width).with.multipliedBy(.25f);
 70                 make.height.equalTo(keyboardView.mas_height).with.multipliedBy(.2f);
 71                 //按照行和列添加约束,这里添加行约束
 72                 switch (rowNum) {
 73                     case 1:
 74                     {
 75                         make.baseline.equalTo(keyboardView.mas_baseline).with.multipliedBy(.1f);
 76                         keyView.backgroundColor = [UIColor colorWithRed:205 green:205 blue:205 alpha:1];
 77                     }
 78                         break;
 79                     case 2:
 80                     {
 81                         make.baseline.equalTo(keyboardView.mas_baseline).with.multipliedBy(.3f);
 82                     }
 83                         break;
 84                     case 3:
 85                     {
 86                         make.baseline.equalTo(keyboardView.mas_baseline).with.multipliedBy(.5f);
 87                     }
 88                         break;
 89                     case 4:
 90                     {
 91                         make.baseline.equalTo(keyboardView.mas_baseline).with.multipliedBy(.7f);
 92                     }
 93                         break;
 94                     case 5:
 95                     {
 96                         make.baseline.equalTo(keyboardView.mas_baseline).with.multipliedBy(.9f);
 97                     }
 98                         break;
 99                     default:
100                         break;
101                 }
102                 //按照行和列添加约束,这里添加列约束
103                 switch (colNum) {
104                     case 1:
105                     {
106                         make.left.equalTo(keyboardView.mas_left);
107                     }
108                         break;
109                     case 2:
110                     {
111                         make.right.equalTo(keyboardView.mas_centerX);
112                     }
113                         break;
114                     case 3:
115                     {
116                         make.left.equalTo(keyboardView.mas_centerX);
117                     }
118                         break;
119                     case 4:
120                     {
121                         make.right.equalTo(keyboardView.mas_right);
122                         [keyView setBackgroundColor:[UIColor colorWithRed:243 green:127 blue:38 alpha:1]];
123                     }
124                         break;
125                     default:
126                         break;
127                 }
128             }
129         }];
130     }
131 }
本例子使用的baseline去控制高度位置,这似乎不是太准,如果想要精准控制高度位置,可以使用一行一行添加的方法,每次当前行的top去equelTo上一行的bottom。 给个提示:
for(遍历所有行)
    for(遍历所以列)
    //当前行约束根据上一行去设置
    ......