今天弄了半天才弄好mac上的openmp,一方面智商下限,另一方面竟然发现网上也没有什么详细过程,特意把我的配置过程贴上来
多核编程可以认为是对多线程编程做了一定程度的抽象,提供一些简单的API,使得用户不必花费太多精力来了解多线程的底层知识,从而提高编程效率。这两天关注的多核编程的工具包括openMP和TBB。按照目前网上的讨论,TBB风头要盖过openMP,比如openCV过去是使用openMP的,但从2.3版本开始抛弃openMP,转向TBB。但我试下来,TBB还是比较复杂的,相比之下,openMP则非常容易上手。因为精力和时间有限,没办法花费太多时间去学习TBB,就在这里分享下这两天学到的openMP的一点知识,和大家共同讨论。
openMP支持的编程语言包括C语言、C++和Fortran,支持OpenMP的编译器包括Sun Studio,Intel Compiler,Microsoft Visual Studio,GCC。
Microsoft Visual Studio上OpenMP的配置
总共分2步:
- 新建一个工程。这个不再多讲。
- 建立工程后,点击 菜单栏->Project->Properties,弹出菜单里,点击 Configuration Properties->C/C++->Language->OpenMP Support,在下拉菜单里选择Yes。 至此配置结束。
Using clang-omp with Xcode
- Website for this extension: http://clang-omp.github.io/
- Install clang-omp using homebrew:
-
brew install clang-omp
- Create a new Xcode project.
- Under click 'the name of the project' —> Build Settings
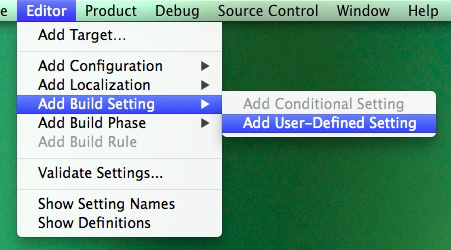
- Editor --> Add Build Setting --> Add User-Defined Setting (Press ‘delete’ on the keyboard to delete the user-defined setting when you do not want it)

- set the setting name as CC
- set its value as /usr/local/bin/clang-omp

- Add -fopenmp to Other C Flags
- Add /usr/local/include to Header Search Paths
- Set Enable Modules (C and Objective-C) to No.
- Under Build Phases
- Add /usr/local/lib/libiomp5.dylib to Link Binary With Libraries
- Done. You can now #include <libiomp/omp.h> and start using #pragma omp ... in your source code.
测试编译器和环境配置是否成功的代码如下:
#include <omp.h>
#include <stdio.h>
int main() {
  #pragma omp parallel
  printf("Hello from thread %d, nthreads %d
", omp_get_thread_num(), omp_get_num_threads());
}
/* OUTPUT:
Hello from thread 0, nthreads 4
Hello from thread 3, nthreads 4
Hello from thread 2, nthreads 4
Hello from thread 1, nthreads 4
Program ended with exit code: 0
*/
You should see more than one "Hello" line with different thread numbers. Note that the lines may be mixed together. If you see only one, try setting the environment variable OMP_NUM_THREADS to some number (say 4) and try again.