1、准备2台服务器
10.0.0.12 10.0.0.13
2、关闭服务器的防火墙
systemctl stop firewalld
3、配置nginx的yum源,俩台服务器做相同的操作
[root@ localhost network-scripts]# vim /etc/yum.repos.d/nginx.repo

[nginx]
name=nginx repo
baseurl=http://nginx.org/packages/centos/7/$basearch/
gpgcheck=0
enabled=1
4、这个时候下载所需要的安装的nginx、keepalived
yum -y install nginx keepalived
5、在10.0.0.12服务器上配置keepalived
[root@ localhost network-scripts]# vim /etc/keepalived/keepalived.conf

! Configuration File for keepalived

global_defs {
   notification_email {
     acassen@firewall.loc
     failover@firewall.loc
     sysadmin@firewall.loc
   }
   notification_email_from Alexandre.Cassen@firewall.loc
   smtp_server 192.168.200.1
   smtp_connect_timeout 30
   router_id LVS_DEVEL
   vrrp_skip_check_adv_addr
   vrrp_garp_interval 0
   vrrp_gna_interval 0
}

vrrp_instance VI_1 {
    state MASTER
    interface ens33
    virtual_router_id 51
    priority 100
    advert_int 1
    authentication {
        auth_type PASS
        auth_pass 1111
    }
    virtual_ipaddress {
        10.0.0.100
    }
}

virtual_server 10.0.0.100 80 {
    delay_loop 6
    lb_algo rr
    lb_kind DR         #因为这里要做LVS的DR模式
    protocol TCP
    nat_mask 255.255.255.0

    real_server 10.0.0.12 80 {
        weight 1
        TCP_CHECK {
            connect_timeout 3
            connect_timeout 80
            nb_get_retry 3
            delay_before_retry 3
        }
    }

    real_server 10.0.0.13 80 {
        weight 1
        TCP_CHECK {
            connect_timeout 3
            connect_timeout 80
            nb_get_retry 3
            delay_before_retry 3
        }
    }
}
vrrp_strict   #centos7里的keepalived有一个广播  这个需要删除  切记
6、在10.0.0.13服务器上配置keepalived 这里的配置文件和上一台服务器的配置文件有不同的地方 上一台是主 这台是从服务器
[root@ localhost network-scripts]# vim /etc/keepalived/keepalived.conf

! Configuration File for keepalived

global_defs {
   notification_email {
     acassen@firewall.loc
     failover@firewall.loc
     sysadmin@firewall.loc
   }
   notification_email_from Alexandre.Cassen@firewall.loc
   smtp_server 192.168.200.1
   smtp_connect_timeout 30
   router_id LVS_DEVEL
   vrrp_skip_check_adv_addr
   vrrp_garp_interval 0
   vrrp_gna_interval 0
}

vrrp_instance VI_1 {
    state BACKUP           #这里要改成backup,因为这台服务器是从的
    interface ens33       #这个网卡名字要和自己服务器网卡名字一样,否则也是不会出效果的
    virtual_router_id 51
    priority 90         #这里有一个优先级,要改成比上一台服务器的优先级低
    advert_int 1
    authentication {
        auth_type PASS
        auth_pass 1111
    }
    virtual_ipaddress {
        10.0.0.100
    }
}

virtual_server 10.0.0.100 80 {
    delay_loop 6
    lb_algo rr
    lb_kind DR         #因为这里要做LVS的DR模式
    protocol TCP
    nat_mask 255.255.255.0

    real_server 10.0.0.12 80 {
        weight 1
        TCP_CHECK {
            connect_timeout 3
            connect_timeout 80
            nb_get_retry 3
            delay_before_retry 3
        }
    }

    real_server 10.0.0.13 80 {
        weight 1
        TCP_CHECK {
            connect_timeout 3
            connect_timeout 80
            nb_get_retry 3
            delay_before_retry 3
        }
    }
}
vrrp_strict   #centos7里的keepalived有一个广播  这个需要删除  切记
7、启动keepalived,俩台服务器执行同样的操作
systemctl start keepalived
8、测试keepalived是否有vip漂移,先关掉主的keepalived,用ip a查看,如果有漂移则证明成功
10.0.0.12 执行代码
systemctl stop keepalived
10.0.0.13 查看ip a
[root@ localhost network-scripts]# ip a
1: lo: <LOOPBACK,UP,LOWER_UP> mtu 65536 qdisc noqueue state UNKNOWN qlen 1
    link/loopback 00:00:00:00:00:00 brd 00:00:00:00:00:00
    inet 127.0.0.1/8 scope host lo
       valid_lft forever preferred_lft forever
    inet 10.0.0.100/32 brd 10.0.0.100 scope global lo:0
       valid_lft forever preferred_lft forever
    inet6 ::1/128 scope host
       valid_lft forever preferred_lft forever
2: ens33: <BROADCAST,MULTICAST,UP,LOWER_UP> mtu 1500 qdisc pfifo_fast state UP qlen 1000
    link/ether 00:0c:29:27:e6:58 brd ff:ff:ff:ff:ff:ff
    inet 10.0.0.13/24 brd 10.0.0.255 scope global ens33
       valid_lft forever preferred_lft forever
    inet 10.0.0.100/32 scope global ens33
       valid_lft forever preferred_lft forever
    inet6 fe80::20c:29ff:fe27:e658/64 scope link
       valid_lft forever preferred_lft forever
3: ens37: <BROADCAST,MULTICAST,UP,LOWER_UP> mtu 1500 qdisc pfifo_fast state UP qlen 1000
    link/ether 00:0c:29:27:e6:62 brd ff:ff:ff:ff:ff:ff
    inet6 fe80::20c:29ff:fe27:e662/64 scope link
       valid_lft forever preferred_lft forever
这个就是keepalived的vip漂移成功
9、配置俩台服务器的网卡,执行相同的操作
[root@ localhost ~]# cd /etc/sysconfig/network-scripts/
[root@ localhost network-scripts]# ls
ifcfg-ens33  ifdown-eth   ifdown-ppp       ifup          ifup-ipv6   ifup-routes    init.ipv6-global
ifcfg-ens37  ifdown-ib    ifdown-routes    ifup-aliases  ifup-isdn   ifup-sit       network-functions
ifcfg-lo     ifdown-ippp  ifdown-sit       ifup-bnep     ifup-plip   ifup-Team      network-functions-ipv6
ifcfg-lo:0   ifdown-ipv6  ifdown-Team      ifup-eth      ifup-plusb  ifup-TeamPort
ifdown       ifdown-isdn  ifdown-TeamPort  ifup-ib       ifup-post   ifup-tunnel
ifdown-bnep  ifdown-post  ifdown-tunnel    ifup-ippp     ifup-ppp    ifup-wireless
[root@ localhost network-scripts]# cp ifcfg-lo ifcfg-lo:0
[root@ localhost network-scripts]# vim ifcfg-lo:0

DEVICE=lo:0
IPADDR=10.0.0.100
NETMASK=255.255.255.255
ONBOOT=yes
10、重启网卡
systemctl restart network 或者 ifup ifcfg-lo:0
11、配置lvs,俩台服务器执行相同的操作
ipvsadm -A -t 10.0.0.100:80 -s rr
ipvsadm -a -t 10.0.0.100:80 -r 10.0.0.12:80 -g
ipvsadm -a -t 10.0.0.100:80 -r 10.0.0.13:80 -g
echo "1" >/proc/sys/net/ipv4/conf/lo/arp_ignore
echo "2" >/proc/sys/net/ipv4/conf/lo/arp_announce
echo "1" >/proc/sys/net/ipv4/conf/all/arp_ignore
echo "2" >/proc/sys/net/ipv4/conf/all/arp_announce
route add -host 10.0.0.100 dev lo:0
12、查看是否配置成功,俩台服务器执行相同的操作
[root@ localhost network-scripts]# ipvsadm -Ln
IP Virtual Server version 1.2.1 (size=4096)
Prot LocalAddress:Port Scheduler Flags
  -> RemoteAddress:Port           Forward Weight ActiveConn InActConn
TCP  10.0.0.100:80 rr
  -> 10.0.0.12:80                 Route   1      0          0
  -> 10.0.0.13:80                 Route   1      0          0
TCP  127.0.0.1:80 rr
[root@ localhost network-scripts]# route -n
Kernel IP routing table
Destination     Gateway         Genmask         Flags Metric Ref    Use Iface
0.0.0.0         10.0.0.2        0.0.0.0         UG    0      0        0 ens33
10.0.0.0        0.0.0.0         255.255.255.0   U     0      0        0 ens33
10.0.0.100      0.0.0.0         255.255.255.255 UH    0      0        0 lo
169.254.0.0     0.0.0.0         255.255.0.0     U     1002   0        0 ens33
169.254.0.0     0.0.0.0         255.255.0.0     U     1003   0        0 ens37
172.16.0.0      0.0.0.0         255.255.0.0     U     0      0        0 ens37
13、更改nginx配置文件,并启动,俩台服务器执行相同的操作
[root@ localhost ~]# vim /etc/nginx/nginx.conf

worker_processes  1;

error_log  /var/log/nginx/error.log warn;
pid        /var/run/nginx.pid;


events {
    worker_connections  1024;
}


http {
    include       /etc/nginx/mime.types;
    default_type  application/octet-stream;

    log_format  main  '$remote_addr - $remote_user [$time_local] "$request" '
                      '$status $body_bytes_sent "$http_referer" '
                      '"$http_user_agent" "$http_x_forwarded_for"';

    access_log  /var/log/nginx/access.log  main;

    sendfile        on;
    #tcp_nopush     on;

    keepalive_timeout  0;       #这里的keepalived长连接一定要改成0

    #gzip  on;

    include /etc/nginx/conf.d/*.conf;
}
然后启动nginx
systemctl start nginx
14、更改nginx的index文件
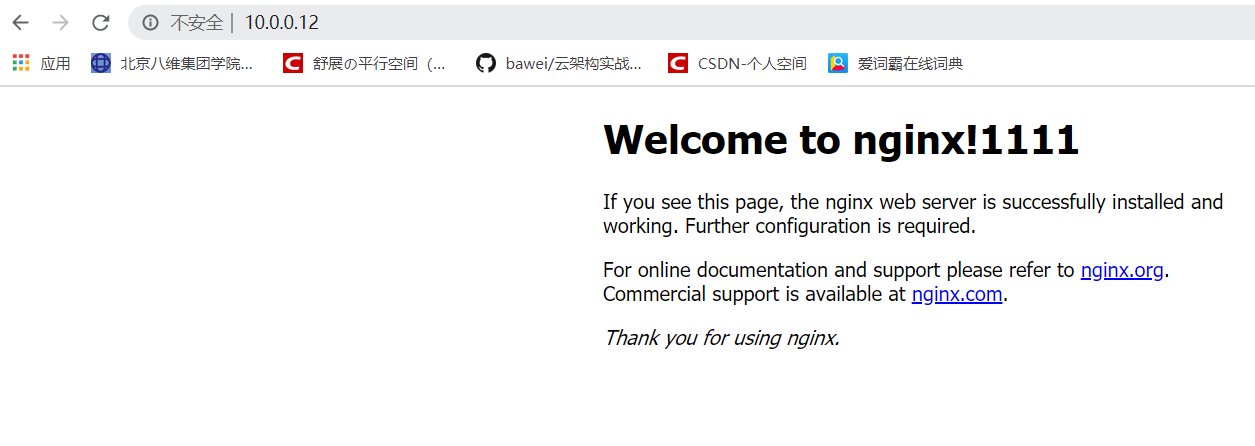
10.0.0.12服务器 加上1111便于区分
[root@ localhost ~]# vim /usr/share/nginx/html/index.html

<!DOCTYPE html>
<html>
<head>
<title>Welcome to nginx!</title>
<style>
    body {
         35em;
        margin: 0 auto;
        font-family: Tahoma, Verdana, Arial, sans-serif;
    }
</style>
</head>
<body>
<h1>Welcome to nginx!1111</h1>              #这里加上1111便于区分
<p>If you see this page, the nginx web server is successfully installed and
working. Further configuration is required.</p>

<p>For online documentation and support please refer to
<a href="http://nginx.org/">nginx.org</a>.<br/>
Commercial support is available at
<a href="http://nginx.com/">nginx.com</a>.</p>

<p><em>Thank you for using nginx.</em></p>
</body>
</html>
10.0.0.13服务器 加上2222便于区分
[root@ localhost ~]# vim /usr/share/nginx/html/index.html

<!DOCTYPE html>
<html>
<head>
<title>Welcome to nginx!</title>
<style>
    body {
         35em;
        margin: 0 auto;
        font-family: Tahoma, Verdana, Arial, sans-serif;
    }
</style>
</head>
<body>
<h1>Welcome to nginx!2222</h1>
<p>If you see this page, the nginx web server is successfully installed and
working. Further configuration is required.</p>

<p>For online documentation and support please refer to
<a href="http://nginx.org/">nginx.org</a>.<br/>
Commercial support is available at
<a href="http://nginx.com/">nginx.com</a>.</p>

<p><em>Thank you for using nginx.</em></p>
</body>
</html>
15、访问IP地址,查看是否成功

单个访问成功,访问vip
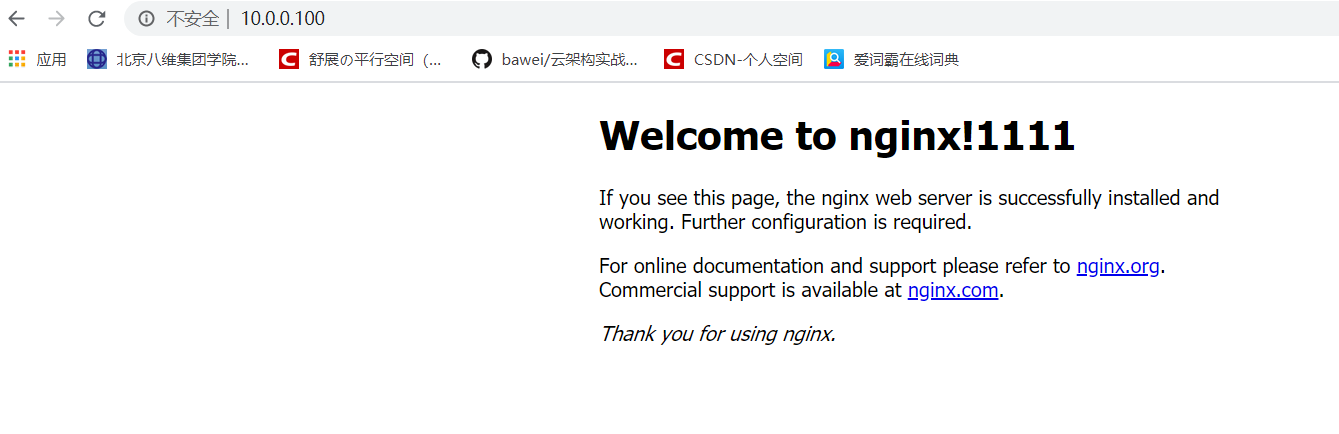

成功!