接着上一篇,在上一篇完成了有关IOC的注解实现,这一篇用XML的方式实现IOC,并且完成AOP。
简易的IOC框图
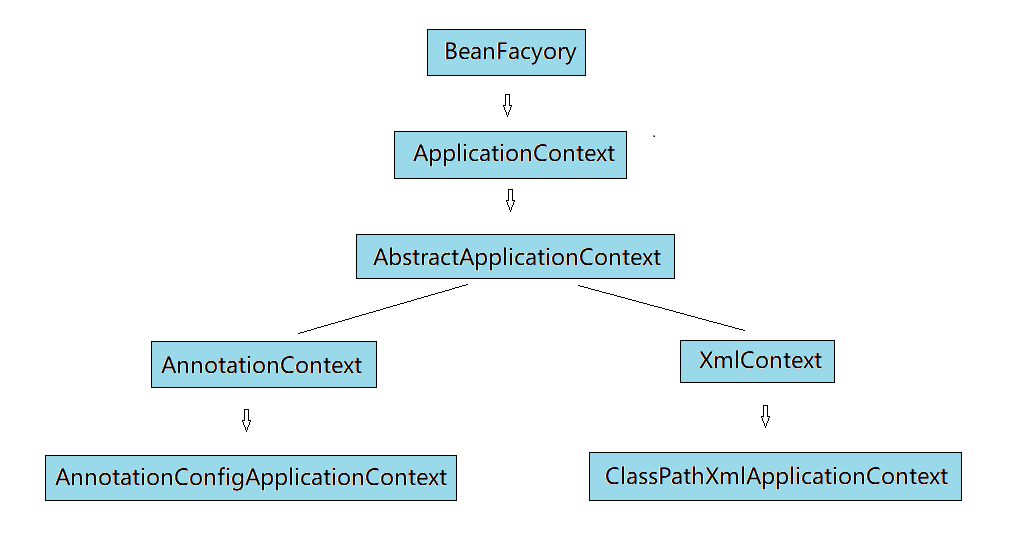
注解的方式实现了左边的分支,那么就剩下右边的XML分支:
XmlContext:
这个类是也是AbstractApplicationContext的子类,和AnnotationContext相似,只不过这里是要解析XML文件而不是注解:
(关于XML文件的解析之前给过一篇博客:【Java】XML文件的解析
对于XML文件的处理,是不太容易的,会产生很多问题,后面只是实现核心步骤,很多属性就不考虑了!
首先给出XmlBean,和AnnotationBean一样,都是继承自BeanElement
 1 public class XmlBean implements BeanElement {
 2     private boolean DI;
 3     private Object object;
 4     private Object proxy;
 5     private Map<Field, String> wiredMap;
 6     // key:object的为注入成员  value:依赖的className
 7     // 将不能注入的成员先保存起来
 8
 9     protected XmlBean() {
10         this(true, null, null);
11     }
12
13     protected XmlBean(Object object, Object proxy) {
14         this(true, object, proxy);
15     }
16
17     protected XmlBean(boolean dI, Object object, Object proxy) {
18         DI = dI;
19         this.object = object;
20         this.proxy = proxy;
21     }
22
23     protected void addWiredElement(Field field, String ref) throws RepeatProperty {
24         if (wiredMap == null) {
25             wiredMap = new HashMap<>();
26         }
27         if (wiredMap.containsKey(field)) {
28             throw new RepeatProperty(object.getClass() + "成员:" + field.getName() + "已定义!");
29         }
30         wiredMap.put(field, ref);
31     }
32
33     protected void setDI(boolean DI) {
34         this.DI = DI;
35     }
36
37     protected Map<Field, String> getWiredMap() {
38         return wiredMap;
39     }
40
41     @Override
42     @SuppressWarnings("unchecked")
43     public <E> E getProxy() {
44         return (E) proxy;
45     }
46
47     @Override
48     public Object getObject() {
49         return object;
50     }
51
52     @Override
53     public boolean isDI() {
54         return DI;
55     }
56
57 }
XmlContext
  1 public class XmlContext extends AbstractApplicationContext {
  2     protected XmlContext() {
  3     }
  4
  5     protected XmlContext(String xmlPath) {
  6         innerParseXml(xmlPath);
  7     }
  8
  9     // 和注解方式中的做法一样,只不过产生的是XML方式的BeanElement
 10     private XmlBean addXmlBean(Class<?> klass, Object object, String classId, String className) throws BeansException {
 11         Object proxy = aopFactory.creatCGLibProxy(klass, object);
 12         XmlBean bean = new XmlBean(object, proxy);
 13         add(classId, className, bean);
 14         return bean;
 15     }
 16
 17     protected void innerParseXml(String xmlPath) {
 18         // 找到根标签
 19         new XMLReader() {
 20             @Override
 21             public void dealElment(Element element, int index) {
 22                 // 处理bean标签
 23                 new XMLReader() {
 24                     @Override
 25                     public void dealElment(Element element, int index) {
 26                         // 得到id属性和class属性的值
 27                         String classId = element.getAttribute("id");
 28                         String className = element.getAttribute("class");
 29                         try {
 30                             // 由class得到类
 31                             Class<?> klass = Class.forName(className);
 32                             // 处理constructor标签
 33                             new XMLReader() {
 34                                 @Override
 35                                 public void dealElment(Element element, int index) {
 36                                 // TODO 处理有参数的构造方法,这里就会遇到许多问题,在这里我就不处理了,后面会给出解决思路
 37                                 }
 38                             }.parse(element, "constructor-arg");
 39                             // 由于上面没有处理带参数的构造方法,这里直接通过反射机制调用无参构造产生对象
 40                             // 并且利用产生的对象生成代理对象,最后得到Bean放入beanMap中
 41                             Object object = klass.newInstance();
 42                             XmlBean bean = addXmlBean(klass, object, classId, className);
 43
 44                             // 处理property标签
 45                             new XMLReader() {
 46                                 @Override
 47                                 public void dealElment(Element element, int index) {
 48                                     try {
 49                                         dealProperty(element, klass, bean);
 50                                     } catch (XmlPropertyMustNeedNameException e) {
 51                                         e.printStackTrace();
 52                                     } catch (Exception e) {
 53                                         e.printStackTrace();
 54                                     }
 55                                 }
 56                             }.parse(element, "property");
 57                         } catch (Exception e1) {
 58                             e1.printStackTrace();
 59                         }
 60                     }
 61                 }.parse(element, "bean");
 62             }
 63         }.parse(XMLReader.openDocument(xmlPath), "SimpleSpring");
 64     }
 65
 66     private void dealProperty(Element element, Class<?> klass, XmlBean bean)
 67             throws XmlPropertyMustNeedNameException, Exception {
 68         // 得到property标签name属性的值
 69         String fieldName = element.getAttribute("name");
 70         if (fieldName.length() <= 0) {
 71             throw new XmlPropertyMustNeedNameException("Bean" + klass.getName() + "的Property标签必须声明name属性!");
 72         }
 73         // 通过反射机制得到成员
 74         Field field = klass.getDeclaredField(fieldName);
 75         // 得到该成员的类型
 76         Class<?> fieldType = field.getType();
 77         // 得到value属性
 78         String value = element.getAttribute("value");
 79         // 得到ref属性
 80         String ref = element.getAttribute("ref");
 81
 82         // 判断ref和value是否同时存在
 83         if (value.length() > 0 && ref.length() > 0) {
 84             throw new CanNotJudgeParameterException("value:" + value + " ref:" + ref + "只能存在一个!");
 85         }
 86         Object arg = null;
 87         // value存在,则直接通过类型转换给成员赋值
 88         if (value.length() > 0) {
 89             if (!fieldType.isPrimitive() && !fieldType.equals(String.class)) {
 90                 throw new ValueOnlyPrimitiveType("Value只能用于八大基本类型!");
 91             }
 92             // TypeConversion是我自己写的,将字符串转换为基本类型的工具
 93             arg = TypeConversion.getValue(value, fieldType.getSimpleName());
 94             field.setAccessible(true);
 95             field.set(bean.getObject(), arg);
 96         }
 97         if (ref.length() > 0) {
 98             // ref属性存在,由于存在相互依赖关系,所以现在不做处理,只是将其保存起来
 99             // 设置该bean的状态为尚未注入
100             bean.setDI(false);
101             bean.addWiredElement(field, ref);
102         }
103     }
104
105 }
XmlContext能做的工作也十分有限,只能完成简单的注入,剩下的注入工作留给下一级处理!
在这里之所以没有处理constructor标签,是因为对与构造方法的处理存在许多因素:
比如:
1 public class Test {
2     public Test(String one, int two) {
3         ......
4     }
5     public Test(int two, String one) {
6         ......
7     }
8 }
通过XML文件读取出来的都是字符串,如何区分它是字符串“123”,而不是int类型123?这两个构造方法到底执行哪个?
再比如说:
 1     public Test(int one, int two, Student student) {
 2         ......
 3     }
 4
 5     public Test(String one, int two, Student student) {
 6         ......
 7     }
 8
 9     public Test(int two, String one, Student student) {
10         ......
11     }
通过反射机制,我们就需要得到构造方法的集合getConstructors();然后筛选出参数个数符合要求的子集,再遍历这个子集的每一个构造方法,然后遍历当前构造方法的所有参数,一个一个比对参数类型是否符合要求,直到找到符合要求的那一个为止,但是,如果说我们是想执行第三个构造方法,它却找到的是第一个,完全就出问题了!
所以Spring的解决办法是给出一个type属性
1 <bean id="xxx" class="xxx.xxx.Test">
2     <constructor-arg idnex="0" value="1" type="int.class">
3     <constructor-arg idnex="1" value="2" type="java.lang.String">
4     <constructor-arg idnex="2" ref="student">
5 </bean>
只有这样做才能真真区分,所以以后在使用Spring的constructor标签时,当构造方法有歧义时,一定要给出type属性,避免出错,也减少了查找时的遍历!
接下来就是最后一个类,xml分支的最高容器:
ClassPathXmlApplicationContext
上面的XmlContext只是完成了基本的注入问题,还有后续有关于注入之间的依赖关系,甚至是依赖循环(关于依赖循环在我的上一篇中有专门介绍,这里就不再介绍了)
 1 public class ClassPathXmlApplicationContext extends XmlContext {
 2     public ClassPathXmlApplicationContext() {
 3     }
 4
 5     public ClassPathXmlApplicationContext(String xmlPath) {
 6         super(xmlPath);
 7     }
 8
 9     public ClassPathXmlApplicationContext parseXml(String xmlPath) {
10         innerParseXml(xmlPath);
11         return this;
12     }
13
14     @Override
15     public <T> T getBean(Class<T> klass) throws BeansException {
16         String className = klass.getName();
17         BeanElement bean =  beanMap.get(className);
18
19         if (bean == null) {
20             throw new BeansException("Bean :" + klass + "不存在!");
21         }
22         // 在这里还是只考虑XmlBean的注入,不考虑AnnotationBlean注解的完成情况
23         if (!bean.isDI() && bean instanceof XmlBean) {
24             autowired(className, (XmlBean)bean);
25         }
26
27         return bean.getProxy();
28     }
29
30     private void autowired(String klassName, XmlBean bean) throws BeansException {
31         // 和AnnotationBean的解决思路一样,先设置状态为已注入,防止循环依赖的无限递归
32         bean.setDI(true);
33         // 得到尚未注入的成员map
34         Map<Field, String> wiredMap = bean.getWiredMap();
35         if (wiredMap == null || wiredMap.isEmpty()) return;
36         // 遍历map
37         for (Field field : wiredMap.keySet()) {
38             String ref = wiredMap.get(field);
39             String tagClassName = beanNameMap.get(ref);
40             // ref如果是id则在beanNameMap中找,如果是className就在beanMap中找
41             BeanElement wiredBean = tagClassName == null ? beanMap.get(ref) : beanMap.get(tagClassName);
42             if (bean == null) {
43                 return;
44             }
45             if (!wiredBean.isDI() && wiredBean instanceof XmlBean) {
46                 autowired(ref, (XmlBean)wiredBean);
47             }
48             field.setAccessible(true);
49             try {
50                 field.set(bean.getObject(), wiredBean.getObject());
51             } catch (Exception e) {
52                 throw new BeansException(klassName + "依赖关系不正确!");
53             }
54         }
55         wiredMap.clear();
56     }
57
58 }
看过注解方式的话再看XML就会发现两者其实是一回事,都是通过两者提供的映射关系,利用反射机制完成注入!
只不过两者提供的映射关系在解析起来时各有各的特点!
Xml方式的实现这里就简单实现了,来看看使用情况:
 1 public class StudentA {
 2     String name;
 3     private StudentB B;
 4
 5     public StudentA() {
 6     }
 7
 8     @Override
 9     public String toString() {
10         return "A:" + name + "->" +  B;
11     }
12
13 }
14
15 @Component
16 public class StudentB {
17     private String name;
18     private StudentC C;
19
20     public StudentB() {
21     }
22
23     @Override
24     public String toString() {
25         return "B:" + name + "->" + C;
26     }
27
28 }
29
30 @Component
31 public class StudentC {
32     private String name;
33     private StudentA A;
34
35     public StudentC() {
36     }
37
38     @Override
39     public String toString() {
40         return "C:" + name;
41     }
42
43 }
xml的配置:
 1 <SimpleSpring>
 2     <bean id="haha" class="com.zc.ioc.demo.StudentA">
 3         <property name="name" value="我是A"></property>
 4         <property name="B" ref="com.zc.ioc.demo.StudentB"></property>
 5     </bean>
 6     <bean class="com.zc.ioc.demo.StudentB">
 7         <property name="name" value="我是B"></property>
 8         <property name="C" ref="com.zc.ioc.demo.StudentC"></property>
 9     </bean>
10     <bean class="com.zc.ioc.demo.StudentC">
11         <property name="name" value="我是C"></property>
12         <property name="A" ref="haha"></property>
13     </bean>
14 </SimpleSpring>
主函数:
1 public static void main(String[] args) throws BeansException {
2         // 或者是使用BeanFactory beanFactory = new ClassPathXmlApplicationContext("/test_simple_spring.xml");
3         ApplicationContext applicationContext = new ClassPathXmlApplicationContext("/test_simple_spring.xml");
4         StudentA bean = applicationContext.getBean(StudentA.class);
5         System.out.println(bean);
6 }
输出:

那么试一试注解和Xml方式的混合使用:
 1 @Component
 2 public class StudentA {
 3     @Value(value="我是A")
 4     String name;
 5     @Autowired
 6     private StudentB B;
 7
 8     public StudentA() {
 9     }
10
11     @Override
12     public String toString() {
13         return "A:" + name + "->" +  B;
14     }
15
16 }
17
18 @Component
19 public class StudentB {
20     @Value(value="我是B")
21     private String name;
22     @Autowired
23     private StudentC C;
24
25     public StudentB() {
26     }
27
28     @Override
29     public String toString() {
30         return "B:" + name + "->" + C;
31     }
32
33 }
34 @Component
35 public class StudentC {
36     @Value(value="我是C")
37     private String name;
38     @Autowired
39     private StudentD D;
40
41     @Autowired
42     private StudentA A;
43
44     public StudentC() {
45     }
46
47     @Override
48     public String toString() {
49         return "C:" + name + "->" + D;
50     }
51
52 }
53
54 public class StudentD {
55     private String name;
56
57     public StudentD() {
58     }
59
60     @Override
61     public String toString() {
62         return "D:" + name;
63     }
64
65 }
Xml配置:
1 <SimpleSpring>
2     <bean class="com.zc.ioc.demo.StudentD">
3         <property name="name" value="我是D"></property>
4     </bean>
5 </SimpleSpring>
主函数:
1 public static void main(String[] args) throws BeansException {
2         ApplicationContext applicationContext = new ClassPathXmlApplicationContext("/test_simple_spring.xml");
3         StudentD studentD = applicationContext.getBean(StudentD.class);
4         System.out.println(studentD);
5
6         applicationContext= new AnnotationConfigApplicationContext("com.zc.moedl");
7         StudentA studentA = applicationContext.getBean(StudentA.class);
8         System.out.println(studentA);
9}
输出结果:

看起来是没有问题了,但是如果Xml和注解之间的出现顺序不同,结果也会不一样,还得仔细考虑,而且我做的这个是延迟注入,只有在getBean的时候才会完成最后的注入,并且若是注解中需要一个Xml的bean注入,而xml的这个bean又依赖于注解中的一个bean,那么这套方法是不可行的!
AOP
前面多次谈到AOP,以及我们的Bean是通过原始对象+代理对象,这里来看看AOP部分的实现:
AOP说到底主要目的不是产生代理对象,而是要通过代理对象执行方法,并对方法进行有效的拦截!
简单起见,将拦截分为置前,置后,以及出现异常时的拦截。
而拦截又是何时产生的?
还是为了简单实现,后面都只使用CGLibProxy,有关CGLib的代理我在上一篇有介绍,这里也就不累赘了。
关于拦截器的产生,我之前的实现方式是给要拦截的方法添加注解,给出拦截Id,然后提供一套方法,给指定Id号的方法创建拦截器,但是,在知道Spring的处理后,这种方式很快被否定了!在工程中,往往很多需要拦截的方法是不允许侵入式修改的,又或者是被打成了jar包,那么就更不可能对其添加注解,所以给出新的解决思路:
由用户自己写一个方法,然后给这个方法添加注解,使其和要拦截的方法产生对映射关系,这样我们实际执行的拦截器方法完全是由用户提供,并不会干预源代码!
前面说过只是处理置前,置后,以及出现异常时的拦截,所以会给出三种不同的注解,用于区分!
由于是要使用注解,那么就要用到包扫描【Java】包、jar包的扫描
包扫描就需要对类进行区分,只处理带有标识的类,所以还缺少一个对类的注解:
@Aspect
1 @Retention(RetentionPolicy.RUNTIME)
2 @Target(ElementType.TYPE)
3 public @interface Aspect {
4 }
这个注解只是为了表明这个类存放着用户编写的拦截器方法!
主要的是下面三个注解:
@Before
1 @Retention(RetentionPolicy.RUNTIME)
2 @Target(ElementType.METHOD)
3 public @interface Before {
4     Class<?> klass();
5      String method();
6 }
置前拦截方法的注解,klass表明对哪个类进行置前拦截,method表明对哪个方法进行拦截,但发现仅仅通过这好像不能找到具体的方法,但仔细想一想,置前拦截是对要拦截的方法参数进行判断,用户在编写拦截时必然知道拦截的方法是什么,参数个数和类型当然也知道,那我们只要让用户写的方法的参数和要拦截的方法参数保持一致就行了,如果不一致,就异常处理!这样就能通过用户编写的方法,知道被拦截的方法参数,进而定位到具体要拦截的方法!
@After
1 @Retention(RetentionPolicy.RUNTIME)
2 @Target(ElementType.METHOD)
3 public @interface After {
4     Class<?> klass();
5     String method();
6     Class<?>[] parameterTypes() default {};
7 }
置后拦截方法的注解,同置前拦截一样,klass表明对哪个类进行置前拦截,method表明对哪个方法进行拦截。由于之后拦截是对方法执行结果的操作,用户写的方法的参数有且只有一个,且参数类型要与原方法的返回值类型匹配,这样,我们就不能像处理@Before时一样,必须申明被拦截的方法的参数类型,只有这样才能定位到具体的被拦截方法!
@Throwable
1 @Retention(RetentionPolicy.RUNTIME)
2 @Target(ElementType.TYPE)
3 public @interface Throwable {
4     Class<?> klass();
5     String method();
6     Class<?>[] parameterTypes();
7 }
出现异常时拦截的注解,和@After一样,它只是处理异常,那么用户所提供的方法的参数有且只有一个,类型是执行被拦截方法产生的异常类型,它也必须传递被拦截方法的参数,使其定位到具体的被拦截方法!
其实在Spring里面使用了更为犀利的手段,它并没有使用Class<?> 只是使用了一个字符串就解决了类、方法、参数的定位,只不过它就需要对字符串解析,利用了正则表达式,虽然比我的方法繁琐,但面向用户的使用是十分友好的!
AOP框图

看起来我把它做的很复杂,事实上这里用到的全是接口,是非常灵活的,如果说不想使用这套方式,那么可以自己实现Advice接口;如果说拦截器链用的时list存储,以后想更换为链表也是可以的;拦截器的产生不想使用上面说的注解方式,那么自己去实现IntercepterFactory接口!
AopFactory
 1 public class AopFactory {
 2     private Advice advice;
 3
 4     public AopFactory() {
 5     }
 6
 7     public AopFactory setAdvice(Advice advice) {
 8         this.advice = advice;
 9         return this;
10     }
11
12     public <E> E creatCGLibProxy(Class<?> klass) throws Exception {
13         return creatCGLibProxy(klass, klass.newInstance());
14     }
15
16     public <E> E creatCGLibProxy(Object object) {
17         return creatCGLibProxy(object.getClass(), object);
18     }
19
20     @SuppressWarnings("unchecked")
21     public <E> E creatCGLibProxy(Class<?> klass, Object object) {
22         Enhancer enhancer = new Enhancer();
23         enhancer.setSuperclass(klass);
24         enhancer.setCallback(new MethodInterceptor() {
25             @Override
26             public Object intercept(Object proxyObject, Method method,
27                     Object[] args, MethodProxy methodProxy) throws Throwable {
28                 return doInvoke(object, method, args);
29             }
30         });
31
32         return (E) enhancer.create();
33     }
34
35     private Object doInvoke(Object object, Method method,
36             Object[] args)
37              throws Throwable{
38         Object result = null;
39         // AdviceAdapter是Advice的适配,什么都不做
40         advice = advice == null ? new AdviceAdapter() : advice;
41         if (!advice.dealBefore(method, args)) {
42             return result;
43         }
44         try {
45             result = method.invoke(object, args);
46             result = advice.dealAfter(method, result);
47         } catch (Throwable e) {
48             advice.delaThrowable(method, e);
49             throw e;
50         }
51
52         return result;
53     }
54
55 }
AopFactory只负责产生代理对象,而代理的拦截就下发给Advice
Advice
1 public interface Advice {
2     boolean dealBefore(Method method, Object[] args);
3     Object dealAfter(Method method, Object result);
4     void delaThrowable(Method method, Throwable e);
5 }
暂时只处理置前、置后、以及异常,以后需要再添加,而不是修改!这就是使用接口的好处!
IntercepterLink
1 public interface IntercepterLink {
2     boolean add(IntercepterMethod tagMethod);
3     public boolean doBefore(Object[] args);
4     Object doAfter(Object result);
5     void doThrowable(Throwable e);
6 }
拦截器链,一个方法可以由多个拦截器,拦截器链是拦截器方法的真正执行者!提供了添加拦截器,处理置前、置后、异常,也可以给个remove,这里就不写了。
IntercepterFactory
1 public interface IntercepterFactory {
2     void addBeforeIntercepter(Method tagMethod, IntercepterMethod imd);
3     void addAfterIntercepter(Method tagMethod, IntercepterMethod imd);
4     void addThrowableIntercepter(Method tagMethod, IntercepterMethod imd);
5
6     IntercepterLink getBeforeIntercepterLink(Method tagMethod);
7     IntercepterLink getAfterIntercepterLink(Method tagMethod);
8     IntercepterLink getThrowableIntercepterLink(Method tagMethod);
9 }
拦截器链的创建者和拥有着,其中的IntercepterMethod就是拦截器接口:
IntercepterMethod
1 public interface IntercepterMethod {
2     Object getIntercepterObject();
3     Method getIntercepterMethod();
4 }
我们的拦截器的执行是通过反射机制,那么就必须知道方法和对象,至于参实是通过CGLib代理机制传递过来的,就不用考虑!
准备工作完成,接下来就是真真的处理部分:
IntercepterFactory在上面说是拦截器的创建者和持有者,所以我把它的是实现类进行了分级:
IntercepterLoader
 1 public class IntercepterLoader implements IntercepterFactory {
 2     // 可以看到每个方法都有自己的置前、置后、异常拦截器链
 3     private static  final Map<Method, IntercepterLink> beforeMap;
 4     private static  final Map<Method, IntercepterLink> afterMap;
 5     private static  final Map<Method, IntercepterLink> exceptionMap;
 6
 7     static {
 8         beforeMap = new HashMap<>();
 9         afterMap = new HashMap<>();
10         exceptionMap = new HashMap<>();
11     }
12
13     public IntercepterLoader() {
14     }
15
16     @Override
17     public IntercepterLink getBeforeIntercepterLink(Method tagMethod) {
18         return beforeMap.get(tagMethod);
19     }
20
21     @Override
22     public IntercepterLink getAfterIntercepterLink(Method tagMethod) {
23         return afterMap.get(tagMethod);
24     }
25
26     @Override
27     public IntercepterLink getThrowableIntercepterLink(Method tagMethod) {
28         return exceptionMap.get(tagMethod);
29     }
30
31     private void add(Map<Method, IntercepterLink> map,
32             Method tagMethod, IntercepterMethod imd) {
33         IntercepterLink link = map.get(tagMethod);
34         // 防止多线程的访问而创建不同的拦截器链
35         if (link == null) {
36             synchronized (map) {
37                 if (link == null) {
38                     // IntercepterNodeList是我这套机制默认的IntercepterLink实现类
39                     link = new IntercepterNodeList(imd);
40                 }
41             }
42             // 该方法还未创建拦截器链
43             map.put(tagMethod, link);
44         } else {
45             // 方法相同,则在拦截器链上追加
46             link.add(imd);
47         }
48     }
49
50     @Override
51     public void addBeforeIntercepter(Method tagMethod, IntercepterMethod imd) {
52         add(beforeMap, tagMethod, imd);
53     }
54
55     @Override
56     public void addAfterIntercepter(Method tagMethod, IntercepterMethod imd) {
57         add(afterMap, tagMethod, imd);
58     }
59
60     @Override
61     public void addThrowableIntercepter(Method tagMethod, IntercepterMethod imd) {
62         add(exceptionMap, tagMethod, imd);
63     }
64
65 }
真正意义上的拦截器持有者,它要完成的功能非常简单!
我们是要通过注解的方式产生拦截器,所以就有更高级来处理:
IntercepterLoaderFactory
  1 /**
  2 *  使用包扫描,找到带有@Before、@After、@Throwable的方法,将其添加至拦截器map中
  3 */
  4 public class IntercepterLoaderFactory extends IntercepterLoader {
  5     public IntercepterLoaderFactory() {
  6     }
  7
  8     public IntercepterLoaderFactory parseMethodForPackage(String packageName) {
  9         new PackageScanner() {
 10             @Override
 11             public void dealClass(Class<?> klass) {
 12                 // 判断类是否满足我们定义的@Aspect
 13                 if (!klass.isAnnotationPresent(Aspect.class)) return;
 14                 try {
 15                     // 产生方法执行的对象
 16                     Object object = klass.newInstance();
 17                     Method[] methods = klass.getDeclaredMethods();
 18                     // 遍历所有方法,处理带有注解的方法
 19                     for (Method method : methods) {
 20                         if (method.isAnnotationPresent(Before.class)) {
 21                             parseBeforeIntercepter(klass, object, method, method.getAnnotation(Before.class));
 22                         } else if (method.isAnnotationPresent(After.class)) {
 23                             parseAfterIntercepter(klass, object, method, method.getAnnotation(After.class));
 24                         } else if (method.isAnnotationPresent(Throwable.class)) {
 25                             parseExceptionIntercepter(klass, object, method, method.getAnnotation(Throwable.class));
 26                         }
 27                     }
 28                 } catch (InstantiationException e) {
 29                     e.printStackTrace();
 30                 } catch (IllegalAccessException e) {
 31                     e.printStackTrace();
 32                 }
 33             }
 34         }.scanPackage(packageName);
 35         return this;
 36     }
 37
 38     /**
 39     *    处理带@Before注解的方法
 40     */
 41     private void parseBeforeIntercepter(Class<?> klass, Object object, Method method, Before before) {
 42         if (!method.getReturnType().equals(boolean.class)) {
 43             try {
 44                 throw new ReturnTypeNotMatch(method + "返回值类型必须是boolean!");
 45             } catch (ReturnTypeNotMatch e) {
 46                 e.printStackTrace();
 47             }
 48         }
 49         // 从@Before注解中获取被拦截方法的信息
 50         Class<?> targetClass = before.klass();
 51         String targetMethodName = before.method();
 52         Class<?>[] methodTypes = method.getParameterTypes();
 53
 54         try {
 55             Method targetMethod = targetClass.getDeclaredMethod(targetMethodName, methodTypes);
 56             // 父类的方法调用,其中的IntercepterMethodDefination是IntercepterMethod的实现类
 57             addBeforeIntercepter(targetMethod, new IntercepterMethodDefination(object, method));
 58         } catch (NoSuchMethodException e) {
 59             try {
 60                 throw new IntercepterMethodParaNotMatch(method + "参数不匹配!");
 61             } catch (IntercepterMethodParaNotMatch e1) {
 62                 e1.printStackTrace();
 63             }
 64         }
 65     }
 66
 67     /**
 68     *    处理带@After注解的方法
 69     */
 70     private void parseAfterIntercepter(Class<?> klass, Object object, Method method, After after) {
 71         //    从@After注解中获取被拦截方法的信息
 72         Class<?> targetClass = after.klass();
 73         String targetMethodName = after.method();
 74         Class<?>[] targetMethodPara = after.parameterTypes();
 75         try {
 76             // 通过上述参数得到被拦截方法,如果得不到,异常处理
 77             Method targetMethod = targetClass.getDeclaredMethod(targetMethodName, targetMethodPara);
 78             Class<?> targetMethodReturnType = targetMethod.getReturnType();
 79             Class<?> methodReturnType = method.getReturnType();
 80             Class<?>[] methodParameters = method.getParameterTypes();
 81             //    判断是否满足置后拦截方法的条件:
 82             //    置后拦截的方法返回值类型必须和被拦截方法相同
 83             //    置后拦截的方法的参数有且只有一个,且是被拦截的方法返回值类型
 84             if (methodParameters.length != 1
 85                     || !targetMethodReturnType.equals(methodReturnType)
 86                     || !methodReturnType.equals(methodParameters[0])) {
 87                 try {
 88                     throw new IntercepterMethodParaNotMatch("拦截器方法:" + method +
 89                             " 与被拦截方法" + targetMethod + "不匹配!");
 90                 } catch (IntercepterMethodParaNotMatch e) {
 91                     e.printStackTrace();
 92                 }
 93             }
 94
 95             addAfterIntercepter(targetMethod, new IntercepterMethodDefination(object, method));
 96         } catch (NoSuchMethodException | SecurityException e) {
 97             try {
 98                 throw new IntercepterMethodParaNotMatch("被拦截方法[" + targetMethodName + "]不存在!");
 99             } catch (IntercepterMethodParaNotMatch e1) {
100                 e1.printStackTrace();
101             }
102         }
103     }
104
105     private void parseExceptionIntercepter(Class<?> klass, Object object, Method method, Throwable throwable) {
106             //    从@Throwable 注解中获取被拦截方法的信息
107             Class<?> targetClass = throwable.klass();
108             String targetMethodName = throwable.method();
109             Class<?>[] targetMethodPara = throwable.parameterTypes();
110             try {
111                 // 通过上述参数得到被拦截方法,如果得不到,异常处理
112                 Method targetMethod = targetClass.getDeclaredMethod(targetMethodName, targetMethodPara);
113                 Class<?>[] methodParameters = method.getParameterTypes();
114                 //    判断是否满足异常拦截方法的条件:
115                 //    异常拦截的方法的参数有且只有一个,且是java.lang.Throwable
116                 if (methodParameters.length != 1
117                         || methodParameters[0].equals(java.lang.Throwable.class)) {
118                     try {
119                         throw new IntercepterMethodParaNotMatch("拦截器方法:" + method +
120                                 " 与被拦截方法" + targetMethod + "不匹配!");
121                     } catch (IntercepterMethodParaNotMatch e) {
122                         e.printStackTrace();
123                     }
124                 }
125                 addAfterIntercepter(targetMethod, new IntercepterMethodDefination(object, method));
126             } catch (NoSuchMethodException | SecurityException e) {
127                 try {
128                     throw new IntercepterMethodParaNotMatch("被拦截方法[" + targetMethodName + "]不存在!");
129                 } catch (IntercepterMethodParaNotMatch e1) {
130                     e1.printStackTrace();
131                 }
132             }
133     }
134
135 }
通过这套机制,我们就能通过注解+包扫描,十分方便地给指定方法添加拦截了!
IntercepterMethodDefination
 1 public class IntercepterMethodDefination implements IntercepterMethod {
 2     private Object intercepterObject;
 3     private Method intercepterMethod;
 4
 5     protected IntercepterMethodDefination() {
 6     }
 7
 8     protected IntercepterMethodDefination(Object intercepterObject, Method intercepterMethod) {
 9         this.intercepterObject = intercepterObject;
10         this.intercepterMethod = intercepterMethod;
11     }
12
13     @Override
14     public Object getIntercepterObject() {
15         return intercepterObject;
16     }
17
18     @Override
19     public Method getIntercepterMethod() {
20         return intercepterMethod;
21     }
22
23 }
拦截器方法执行所需的封装
拦截器我们也有了,就剩下拦截器链了:
我的拦截器链使用了链表,为了能够方法地链式调用,也就是设计模式之一的职责链模式,当然也可以使用List,只不过使用链表相比于List,在处理时都需要遍历,没有什么差别,但是链表比List占的空间小,List在内部是数组,且数组大小是大于有效元素个数的!
IntercepterNodeList
 1 public class IntercepterNodeList implements IntercepterLink {
 2     private IntercepterMethod imd; // 拦截器
 3     private IntercepterNodeList next; // 下一结点
 4     private IntercepterNodeList last; // 尾结点
 5
 6     protected IntercepterNodeList() {
 7         this(null);
 8     }
 9
10     protected IntercepterNodeList(IntercepterMethod imd) {
11         this.imd = imd;
12         this.next = null;
13         this.last = this;
14     }
15
16     /**
17     *    尾插法追加结点
18     */
19     @Override
20     public boolean add(IntercepterMethod imd) {
21         if (next == null) {
22             next = new IntercepterNodeList(imd);
23             last = next;
24         } else {
25             last = last.next = new IntercepterNodeList(imd);
26             last.next = null;
27         }
28         return true;
29     }
30     /**
31     *    链式调用处理置前拦截
32     */
33     @Override
34     public boolean doBefore(Object[] args) {
35         boolean isContinue = this.innerInvoke(imd.getIntercepterObject(), imd.getIntercepterMethod(), args);
36         if (this.next != null && isContinue) {
37             isContinue = this.next.doBefore(args);
38         }
39         return true;
40     }
41
42     @SuppressWarnings("unchecked")
43     private <T> T innerInvoke(Object object, Method method, Object[] args) {
44         T result = null;
45         try {
46             result = (T) method.invoke(object, args);
47         } catch (Exception e) {
48             e.printStackTrace();
49         }
50         return result;
51     }
52
53     /**
54     *    链式调用处理置后拦截
55     */
56     @Override
57     public Object doAfter(Object result) {
58         result = innerInvoke(imd.getIntercepterObject(), imd.getIntercepterMethod(), new Object[] {result});
59         if (this.next != null) {
60             result = this.next.doAfter(result);
61         }
62         return result;
63     }
64
65     /**
66     *    链式调用处理异常拦截
67     */
68     @Override
69     public void doThrowable(Throwable e) {
70         innerInvoke(imd.getIntercepterObject(), imd.getIntercepterMethod(), new Object[] {e});
71         if (this.next != null) {
72             this.next.doThrowable(e);
73         }
74     }
75
76 }
AOP到这里就已经结束了,来看看它的使用吧:
被拦截类及其方法:
1 public class Test {
2     public Test() {
3     }
4
5     public String fun(int arg) {
6         System.out.println("Test的fun方法执行 arg = " + arg);
7         return "fun";
8     }
9 }
拦截器所在类:
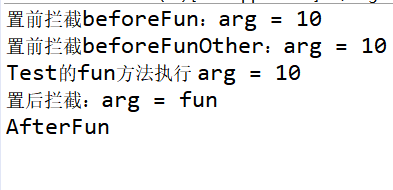
 1 @Aspect
 2 public class Action {
 3     public Action() {
 4     }
 5
 6     @Before(klass=Test.class, method="fun")
 7     public boolean beforeFun(int arg) {
 8         System.out.println("置前拦截beforeFun:arg = " + arg);
 9         return true;
10     }
11
12     @Before(klass=Test.class, method="fun")
13     public boolean beforeFunOther(int arg) {
14         System.out.println("置前拦截beforeFunOther:arg = " + arg);
15         return true;
16     }
17
18     @After(klass=Test.class, method="fun", parameterTypes= {int.class})
19     public String AfterFun(String arg) {
20         System.out.println("置后拦截:arg = " + arg);
21
22         return "AfterFun";
23     }
24 }
主函数:
 1 public static void main(String[] args) throws Exception {
 2         IntercepterLoaderFactory intercepterLoaderFactory =
 3                 new IntercepterLoaderFactory().parseMethodForPackage("com.zc.action");
 4
 5         AopFactory aopFactory = new AopFactory();
 6         aopFactory.setAdvice(new AdviceHander()
 7                 .setIntercepterFactory(intercepterLoaderFactory));
 8
 9         Test testProxy = aopFactory.creatCGLibProxy(Test.class);
10         System.out.println(testProxy.fun(10));
11 }
执行结果:
这样的用法是有些恶心了,但是,别忘了,AOP配合IOC才是使用的精华:
注解方式的注入:
 1 @Component
 2 public class StudentA {
 3     @Value(value="我是A")
 4     String name;
 5     @Autowired
 6     private StudentB B;
 7
 8     public String fun(int arg) {
 9         System.out.println("StudentA的fun方法执行 arg = " + arg);
10         return "fun";
11     }
12
13     @Override
14     public String toString() {
15         return "A:" + name + "->" +  B;
16     }
17
18 }
19
20 @Component
21 public class StudentB {
22     @Value(value="我是B")
23     private String name;
24     @Autowired
25     private StudentC C;
26
27     public StudentB() {
28     }
29
30     @Override
31     public String toString() {
32         return "B:" + name + "->" + C;
33     }
34
35 }
36
37 @Component
38 public class StudentC {
39     @Value(value="我是C")
40     private String name;
41     @Autowired
42     private StudentD D;
43
44     @Autowired
45     private StudentA A;
46
47     public StudentC() {
48     }
49
50     @Override
51     public String toString() {
52         return "C:" + name + "->" + D;
53     }
54
55 }
Xml方式的注入:
1 <SimpleSpring>
2     <bean class="com.zc.ioc.demo.StudentD">
3         <property name="name" value="我是D"></property>
4     </bean>
5 </SimpleSpring>
拦截器:
 1 @Aspect
 2 public class Action {
 3     public Action() {
 4     }
 5
 6     @Before(klass=StudentA.class, method="fun")
 7     public boolean beforeFun(int arg) {
 8         System.out.println("置前拦截beforeFun:arg = " + arg);
 9         return true;
10     }
11
12     @Before(klass=StudentA.class, method="fun")
13     public boolean beforeFunOther(int arg) {
14         System.out.println("置前拦截beforeFunOther:arg = " + arg);
15         return true;
16     }
17
18     @After(klass=StudentA.class, method="fun", parameterTypes= {int.class})
19     public String AfterFun(String arg) {
20         System.out.println("置后拦截:arg = " + arg);
21         return "AfterFun";
22     }
23
24 }
主函数:
 1 public static void main(String[] args) throws Exception {
 2         new IntercepterLoaderFactory().parseMethodForPackage("com.zc.action");
 3         ApplicationContext applicationContext = new ClassPathXmlApplicationContext("/test_simple_spring.xml");
 4         StudentD studentD = applicationContext.getBean(StudentD.class);
 5         System.out.println(studentD);
 6
 7         applicationContext = new AnnotationConfigApplicationContext("com.zc.model");
 8         StudentA studentA = applicationContext.getBean(StudentA.class);
 9         studentA.fun(10);
10         System.out.println(studentA);
11 }
执行结果:

Spring的IOC和AOP就是先到这里了,有兴趣的可以交流一下
感谢您的阅读(*^_^*)