MyBatis与Spring的整合
1、整合环境搭建
1)、要实现MyBatis与Spring的整合,很明显需要这两个框架的JAR包,但是只使用这两个框架中所提供的JAR包是不够的,还需要其他的JAR包来配合使用,整合时所需准备的JAR包具体如下。Spring框架所需的JAR包:
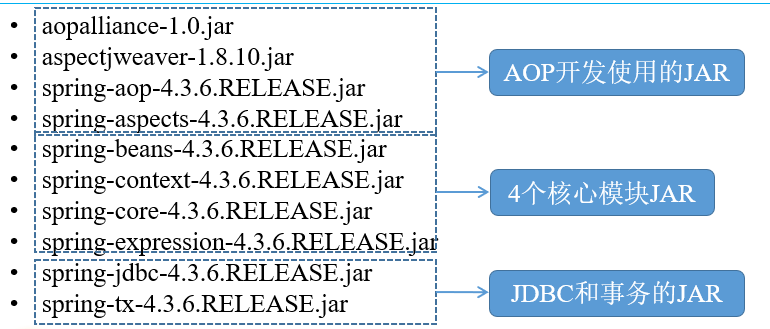
注意:核心容器依赖的commons-logging的JAR在MyBatis框架的lib包中已经包含!
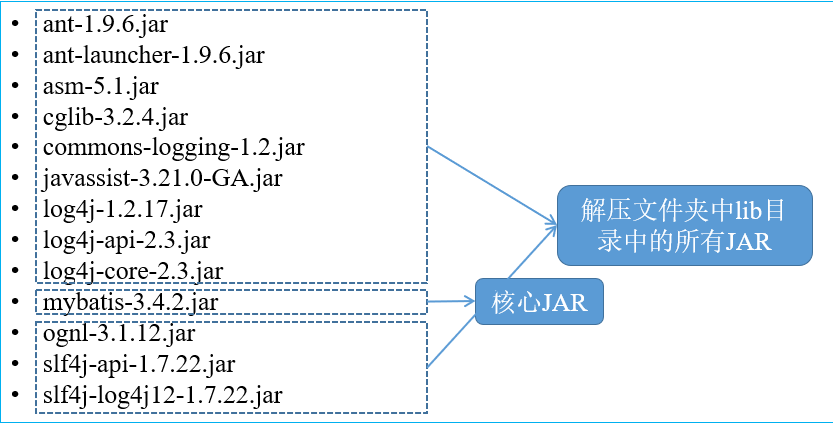
2)、MyBatis框架所需的JAR包:(共13个)
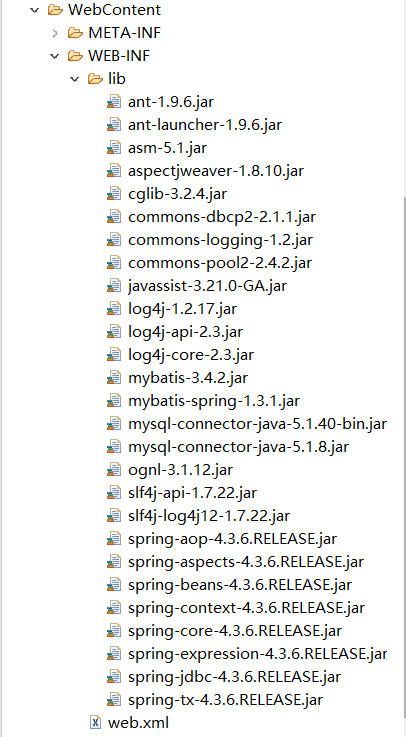
3)、MyBatis与Spring整合的中间JAR:mybatis-spring-1.3.1.jar
4)、数据库驱动JAR(MySQL):mysql-connector-java-5.1.40-bin.jar
5)、数据源所需JAR(DBCP数据库连接池):commons-dbcp2-2.1.1.jar、commons-pool2-2.4.2.jar
6)、编写配置文件:
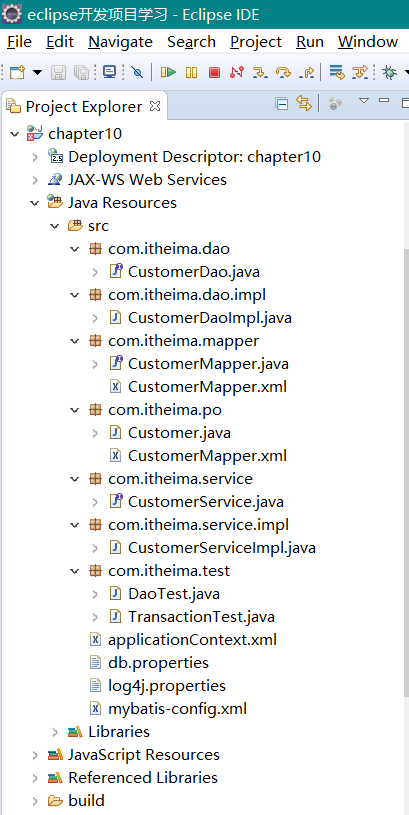
①创建项目,引入JAR包;
②编写db.properties ;
jdbc.driver=com.mysql.jdbc.Driver
jdbc.url=jdbc:mysql://localhost:3306/mybatis
jdbc.username=root
jdbc.password=******
jdbc.maxTotal=30
jdbc.maxIdle=10
jdbc.initialSize=5#密码自己设置
③编写Spring配置文件applicationContext.xml;
 1 <?xml version="1.0" encoding="UTF-8"?>
 2 <beans xmlns="http://www.springframework.org/schema/beans"
 3     xmlns:xsi="http://www.w3.org/2001/XMLSchema-instance"
 4     xmlns:aop="http://www.springframework.org/schema/aop"
 5     xmlns:tx="http://www.springframework.org/schema/tx"
 6     xmlns:context="http://www.springframework.org/schema/context"
 7     xsi:schemaLocation="http://www.springframework.org/schema/beans
 8     http://www.springframework.org/schema/beans/spring-beans-4.3.xsd
 9     http://www.springframework.org/schema/tx
10     http://www.springframework.org/schema/tx/spring-tx-4.3.xsd
11     http://www.springframework.org/schema/context
12     http://www.springframework.org/schema/context/spring-context-4.3.xsd
13     http://www.springframework.org/schema/aop
14     http://www.springframework.org/schema/aop/spring-aop-4.3.xsd">
15
16     <!--1、读取db.properties文件的位置 -->
17     <context:property-placeholder location="classpath:db.properties"/>
18
19     <!-- 2、配置数据源 -->
20     <bean id="dataSourceID" class="org.apache.commons.dbcp2.BasicDataSource">
21
22         <!--2.1、数据库驱动 -->
23         <property name="driverClassName" value="${jdbc.driver}" />
24
25         <!--2.2、连接数据库的url -->
26         <property name="url" value="${jdbc.url}" />
27
28         <!--2.3、连接数据库的用户名 -->
29         <property name="username" value="${jdbc.username}" />
30
31         <!--2.4、连接数据库的密码 -->
32         <property name="password" value="${jdbc.password}" />
33
34         <!--2.5、最大连接数 -->
35         <property name="maxTotal" value="${jdbc.maxTotal}" />
36
37         <!--2.6、最大空闲连接  -->
38         <property name="maxIdle" value="${jdbc.maxIdle}" />
39
40         <!--2.7、初始化连接数  -->
41         <property name="initialSize" value="${jdbc.initialSize}" />
42
43     </bean>
44
45     <!-- 3、事务管理器,依赖于数据源 -->
46     <bean id="transactionManagerID" class="org.springframework.jdbc.datasource.DataSourceTransactionManager">
47         <property name="dataSource" ref="dataSourceID" />
48     </bean>
49
50     <!--4、开启事务注解 -->
51     <tx:annotation-driven transaction-manager="transactionManagerID"/>
52
53     <!--5、配置MyBatis工厂来于Spring整合,
54         构建sqlSessionFactory是通过mybatis.spring包中提供的org.mybatis.spring.SqlSessionFactoryBean类配置的;
55         配置时通常需要2个参数:①数据源;②MyBatis的配置文件路径
56      -->
57     <bean id="sqlSessionFactoryID" class="org.mybatis.spring.SqlSessionFactoryBean">
58
59          <!--5.1、注入数据源 -->
60          <property name="dataSource" ref="dataSourceID" />
61
62          <!--5.2、指定核心配置文件位置 :mybatis-config.xml-->
63            <property name="configLocation" value="classpath:mybatis-config.xml"/>
64
65    </bean>
66
67    <!--6、实例化Dao -->
68     <bean id="customerDaoID" class="com.itheima.dao.impl.CustomerDaoImpl">
69     <!-- 6.1、注入SqlSessionFactory对象实例-->
70          <property name="sqlSessionFactory" ref="sqlSessionFactoryID" />
71     </bean>
72
73     <!-- 7、Mapper代理开发(基于MapperFactoryBean) -->
74     <!-- <bean id="customerMapperID" class="org.mybatis.spring.mapper.MapperFactoryBean">
75
76         指定了接口mapperInterface和工厂sqlSessionFactory
77         <property name="mapperInterface" value="com.itheima.mapper.CustomerMapper" />
78         <property name="sqlSessionFactory" ref="sqlSessionFactoryID" />
79
80     </bean> -->
81
82     <!-- 8、Mapper代理开发(基于MapperScannerConfigurer)
83         配置类路径:org.mybatis.spring.mapper.MapperScannerConfigurer
84         指定映射文件所在的包路径:com.itheima.mapper
85      -->
86     <bean class="org.mybatis.spring.mapper.MapperScannerConfigurer">
87          <property name="basePackage" value="com.itheima.mapper" />
88     </bean>
89
90     <!-- 9、使用注解,开启扫描
91         Spring注解提供了另外一种高效的注解配置方式,(对包路径下的所有Bean文件进行扫描)
92         使用 context 命名空间 ,通知Spring扫描指定包下所有Bean类,进行注解解析
93      -->
94     <context:component-scan base-package="com.itheima.service" />
95
96 </beans>
④编写MyBatis配置文件mybatis-config.xml;
 1 <?xml version="1.0" encoding="UTF-8" ?>
 2 <!DOCTYPE configuration PUBLIC "-//mybatis.org//DTD Config 3.0//EN"
 3                         "http://mybatis.org/dtd/mybatis-3-config.dtd">
 4 <configuration>
 5
 6     <!--1、配置别名:POJO类过多时,使用自动扫描包的形式定义别名
 7         目的:在于减少全限定类名的冗余。
 8     -->
 9     <typeAliases>
10         <package name="com.itheima.po" />
11     </typeAliases>
12
13     <!--2、配置Mapper的位置 -->
14     <mappers>
15
16        <mapper resource="com/itheima/po/CustomerMapper.xml" />
17
18        <!-- Mapper接口开发方式 -->
19        <mapper resource="com/itheima/mapper/CustomerMapper.xml" />
20
21     </mappers>
22 </configuration>
⑤引入log4j.properties。
# Global logging configuration
log4j.rootLogger=ERROR, stdout# MyBatis logging configuration...
log4j.logger.com.itheima=DEBUG# Console output...
log4j.appender.stdout=org.apache.log4j.ConsoleAppender
log4j.appender.stdout.layout=org.apache.log4j.PatternLayout
log4j.appender.stdout.layout.ConversionPattern=%5p [%t] - %m%n
2、传统DAO方式的开发整合
1)、采用传统DAO开发方式进行MyBatis与Spring框架的整合时,可以使用mybatis-spring包中所提供的SqlSessionTemplate类或SqlSessionDaoSupport类来实现。
2)、SqlSessionTemplate:是mybatis-spring的核心类,它负责管理MyBatis的SqlSession(会话对象),调用MyBatis的SQL方法。当调用SQL方法时,SqlSessionTemplate将会保证使用的SqlSession和当前Spring的事务是相关的。它还管理SqlSession的生命周期,包含必要的关闭、提交和回滚操作。
3)、SqlSessionDaoSupport:是一个抽象支持类,它继承了DaoSupport类,主要是作为DAO的基类来使用。可以通过SqlSessionDaoSupport类的getSqlSession()方法来获取所需的SqlSession。
4)、实现持久层:
①客户持久化类:src/com/itheima/po/Customer.java
 1 package com.itheima.po;
 2 /**
 3  * 客户持久化类
 4  */
 5 public class Customer {
 6     private Integer id;       // 主键id
 7     private String username; // 客户名称
 8     private String jobs;      // 职业
 9     private String phone;     // 电话
10
11     public Integer getId() {
12         return id;
13     }
14
15     public void setId(Integer id) {
16         this.id = id;
17     }
18
19     public String getUsername() {
20         return username;
21     }
22
23     public void setUsername(String username) {
24         this.username = username;
25     }
26
27     public String getJobs() {
28         return jobs;
29     }
30
31     public void setJobs(String jobs) {
32         this.jobs = jobs;
33     }
34
35     public String getPhone() {
36         return phone;
37     }
38
39     public void setPhone(String phone) {
40         this.phone = phone;
41     }
42
43     @Override
44     public String toString() {
45         return "Customer [id=" + id + ", username=" + username + ", jobs=" + jobs + ", phone=" + phone + "]";
46     }
47 }
②创建客户映射(映射数据库表)文件:src/com/itheima/po/CustomerMapper.xml
 1 <?xml version="1.0" encoding="UTF-8"?>
 2 <!DOCTYPE mapper PUBLIC "-//mybatis.org//DTD Mapper 3.0//EN"
 3                     "http://mybatis.org/dtd/mybatis-3-mapper.dtd">
 4
 5 <mapper namespace="com.itheima.po.CustomerMapper">
 6
 7     <!--根据id查询客户信息 -->
 8     <select id="findCustomerById" parameterType="Integer"
 9              resultType="customer">
10         <!-- 属性resultType:用于指定返回结果的类型,这里表示返回的数据是customer对象类型,
11             可见,其直接使用了别名,减少全限定名称的冗余。
12             相当于把 com.itheima.po.Customer 换成了customer
13          -->
14         select * from t_customer where id = #{id}
15     </select>
16 </mapper>
③在MyBatis的配置文件mybatis-config.xml中,配置映射文件src/com/itheima/po/CustomerMapper.xml
<mapper resource="com/itheima/po/CustomerMapper.xml" />
5)、实现DAO层
①创建Dao的接口:CustomerDao
package com.itheima.dao;
import com.itheima.po.Customer;

public interface CustomerDao {
    // 通过id查询客户
    public Customer findCustomerById(Integer id);
}
②创建接口CustomerDao的实现类:src/com/itheima/dao/impl/CustomerDaoImpl.java
 1 package com.itheima.dao.impl;
 2 import org.mybatis.spring.support.SqlSessionDaoSupport;
 3 import com.itheima.dao.CustomerDao;
 4 import com.itheima.po.Customer;
 5
 6
 7 /* CustomerDaoImpl类继承了SqlSessionDaoSupport类,并实现了CustomerDao接口。
 8  * 其中SqlSessionDaoSupport类在使用时需要一个SqlSessionFactory或一个SqlSessionTemplate对象
 9  * 所以需要Spring给SqlSessionDaoSupport类的子类对象注入一个SqlSessionFactory或SqlSessionTemplate。
10  * 这样子类中就能通过调用SqlSessionDaoSupport类的getSqlSession()方法来获取SqlSession对象,并使用SqlSession对象中的方法。
11  *
12  */
13
14 public class CustomerDaoImpl extends SqlSessionDaoSupport implements CustomerDao {
15     // 通过id查询客户
16     public Customer findCustomerById(Integer id) {
17          return this.getSqlSession().selectOne("com.itheima.po.CustomerMapper.findCustomerById", id);
18     }
19 }
③整合测试:src/com/itheima/test/DaoTest.java
 1 package com.itheima.test;
 2 import org.junit.Test;
 3 import org.springframework.context.ApplicationContext;
 4 import
 5      org.springframework.context.support.ClassPathXmlApplicationContext;
 6 import com.itheima.dao.CustomerDao;
 7 import com.itheima.mapper.CustomerMapper;
 8 import com.itheima.po.Customer;
 9 /**
10  * DAO测试类
11  */
12 public class DaoTest {
13     @Test
14     public void findCustomerByIdDaoTest(){
15         ApplicationContext act = new ClassPathXmlApplicationContext("applicationContext.xml");
16           // 根据容器中Bean的id来获取指定的Bean
17 //         CustomerDao customerDao = (CustomerDao) act.getBean("customerDaoID");
18
19          //Spring获取Bean的另一种方式,这种方式不再需要进行强制类型转换了
20          CustomerDao customerDao = act.getBean(CustomerDao.class);
21          Customer customer = customerDao.findCustomerById(1);
22          System.out.println(customer);
23     }
24 }
④测试结果:

3、Mapper接口方式的开发整合
1)、在MyBatis+Spring的项目中,虽然使用传统的DAO开发方式可以实现所需功能,但是采用这种方式在实现类中会出现大量的重复代码,在方法中也需要指定映射文件中执行语句的id,并且不能保证编写时id的正确性(运行时才能知道)。为此,我们可以使用MyBatis提供的另外一种编程方式,即使用Mapper接口编程。
2)、基于MapperFactoryBean的整合
a)、MapperFactoryBean是MyBatis-Spring团队提供的一个用于根据Mapper接口生成Mapper对象的类,该类在Spring配置文件中使用时可以配置以下参数:
mapperInterface:用于指定接口;
SqlSessionFactory:用于指定SqlSessionFactory;
SqlSessionTemplate:用于指定SqlSessionTemplate。如果与SqlSessionFactory同时设定,则只会启用SqlSessionTemplate。
b)、实操MapperFactoryBean是如何来实现MyBatis与Spring的整合:
①创建CustomerMapper接口即对应的映射文件:(注意此处就与上面的操作不同了)src/com/itheima/mapper--->CustomerMapper.java
 1 package com.itheima.mapper;
 2
 3 import java.lang.Integer;
 4 import com.itheima.po.Customer;
 5 public interface CustomerMapper { // 创建CustomerMapper接口
 6
 7     // 通过id查询客户
 8     public Customer findCustomerById(Integer id);
 9
10     // 添加客户
11     public void addCustomer(Customer customer);
12
13 }
②src/com/itheima/mapper--->CustomerMapper.xml
 1 <?xml version="1.0" encoding="UTF-8"?>
 2 <!DOCTYPE mapper PUBLIC "-//mybatis.org//DTD Mapper 3.0//EN"
 3                 "http://mybatis.org/dtd/mybatis-3-mapper.dtd">
 4
 5 <mapper namespace="com.itheima.mapper.CustomerMapper">
 6
 7     <!--1、根据id查询客户信息,返回类型是customer类型
 8         Mapper接口中的方法名和Mapper.xml中定义的每个执行语句的id相同!!!
 9      -->
10     <select id="findCustomerById" parameterType="Integer"
11              resultType="customer">
12         select * from t_customer where id = #{id}
13     </select>
14
15     <!--2、添加客户信息,参数类型是 customer类型-->
16     <insert id="addCustomer" parameterType="customer">
17         insert into t_customer(username,jobs,phone)
18         values(#{username},#{jobs},#{phone})
19     </insert>
20
21 </mapper>
③在MyBatis的配置文件mybatis-config.xml中,配置新的映射文件src/com/itheima/mapper/CustomerMapper.xml
<mapper resource="com/itheima/mapper/CustomerMapper.xml" />
④在Spring的配置文件中,创建CustomerMapper的Bean实例id
   <!-- 7、Mapper代理开发(基于MapperFactoryBean) -->
    <bean id="customerMapperID" class="org.mybatis.spring.mapper.MapperFactoryBean">

        <!-- 指定了接口mapperInterface和工厂sqlSessionFactory -->
        <property name="mapperInterface" value="com.itheima.mapper.CustomerMapper" />
        <property name="sqlSessionFactory" ref="sqlSessionFactoryID" />

    </bean>
⑤单元测试:
    @Test
    public void findCustomerByIdMapperTest(){
        ApplicationContext act = new ClassPathXmlApplicationContext("applicationContext.xml");
        CustomerMapper customerMapper = act.getBean(CustomerMapper.class);
        Customer customer = customerMapper.findCustomerById(1);
        System.out.println(customer);
    }
⑥测试结果:

c)、Mapper接口编程方式只需要编写Mapper接口(相当于DAO接口),然后由MyBatis框架根据接口的定义创建接口的动态代理对象,等同于DAO接口的实现类。
3)、虽然使用Mapper接口编程的方式很简单,但是在具体使用时还是需要遵循一些规范。
a)、Mapper接口的名称和对应的Mapper.xml映射文件的名称必须一致。
b)、Mapper.xml文件中的namespace与Mapper接口的类路径相同。(即接口文件和映射文件需要放在同一个包中)
c)、注意:Mapper接口中的方法名和Mapper.xml中定义的每个执行语句的id相同。
d)、Mapper接口中方法的输入参数类型要和Mapper.xml中定义的每个sql的parameterType的类型相同。
e)、Mapper接口方法的输出参数类型要和Mapper.xml中定义的每个sql的resultType的类型相同。
4)、基于MapperScannerConfigurer的整合
a)、在实际的项目中,DAO层会包含很多接口,如果每一个接口都在Spring配置文件中配置,不但会增加工作量,还会使得Spring配置文件非常臃肿。为此,可以采用自动扫描的形式来配置MyBatis中的映射器——采用MapperScannerConfigurer类。
b)、MapperScannerConfigurer类在Spring配置文件中可以配置以下属性:
basePackage:指定映射接口文件所在的包路径,当需要扫描多个包时可以使用分号或逗号作为分隔符。指定包路径后,会扫描该包及其子包中的所有文件。
annotationClass:指定了要扫描的注解名称,只有被注解标识的类才会被配置为映射器。
sqlSessionFactoryBeanName:指定在Spring中定义的SqlSessionFactory的Bean名称。
sqlSessionTemplateBeanName:指定在Spring中定义的SqlSessionTemplate的Bean名称。如果定义此属性,则sqlSessionFactoryBeanName将不起作用。
markerInterface:指定创建映射器的接口。
c)、MapperScannerConfigurer的使用非常简单,只需要在Spring的配置文件中编写如下代码:
<!-- Mapper代理开发(基于MapperScannerConfigurer) -->
<bean class="org.mybatis.spring.mapper.MapperScannerConfigurer">
     <property name="basePackage" value="com.itheima.mapper" />
</bean>
d)、通常情况下,MapperScannerConfigurer在使用时只需通过basePackage属性指定需要扫描的包即可,Spring会自动的通过包中的接口来生成映射器。这使得开发人员可以在编写很少代码的情况下,完成对映射器的配置,从而提高开发效率。对MapperScannerConfigurer进行测试可得与上面相同的结果。
4、 测试事务
1)、在项目中,Service层既是处理业务的地方,又是管理数据库事务的地方。对事务进行测试:
a)、创建Service层;
b)、在Service层编写添加客户操作的代码;
c)、有意地添加一段异常代码(如int i = 1/0;)来模拟现实中的意外情况;
d)、编写测试方法,调用业务层的添加方法。这样,程序在执行到错误代码时就会出现异常。
2)、在没有事务管理的情况下,即使出现了异常,数据也会被存储到数据表中;如果添加了事务管理,并且事务管理的配置正确,那么在执行上述操作时,所添加的数据将不能够插入到数据表中。
3)在CustomerMapper接口中,添加addCustomer()方法,然后在CustomerMapper映射文件中编写执行插入操作的SQL配置,具体看上面的代码。
①创建业务接口:src/com/itheima/service/CustomerService.java
package com.itheima.service;
import com.itheima.po.Customer;
public interface CustomerService { // 业务层:创建CustomerService接口
    public void addCustomer(Customer customer);
}
②创建业务接口的实现类:com/itheima/service/impl/CustomerServiceImpl.java
 1 package com.itheima.service.impl;
 2 import org.springframework.beans.factory.annotation.Autowired;
 3 import org.springframework.stereotype.Service;
 4 import org.springframework.transaction.annotation.Transactional;
 5 import com.itheima.mapper.CustomerMapper;
 6 import com.itheima.po.Customer;
 7 import com.itheima.service.CustomerService;
 8
 9 // 使用Spring的注解@Service来标识业务层的类
10 @Service
11
12 // 使用@Transactional注解来标识事务处理的类
13 @Transactional
14 public class CustomerServiceImpl implements CustomerService {
15
16     //通过@Autowired注解注入CustomerMapper
17     @Autowired
18     private CustomerMapper customerMapper;
19
20     //添加客户
21     public void addCustomer(Customer customer) {
22         // 调用接口中的addCustomer()方法
23         this.customerMapper.addCustomer(customer);
24
25         //模拟添加操作后系统突然出现的异常问题
26         int i = 1 / 0;
27     }
28 }
③在Spring的配置文件中,编写开启注解扫描的配置代码:
   <!-- 9、使用注解,开启扫描
        Spring注解提供了另外一种高效的注解配置方式,(对包路径下的所有Bean文件进行扫描)
        使用 context 命名空间 ,通知Spring扫描指定包下所有Bean类,进行注解解析
     -->
    <context:component-scan base-package="com.itheima.service" />
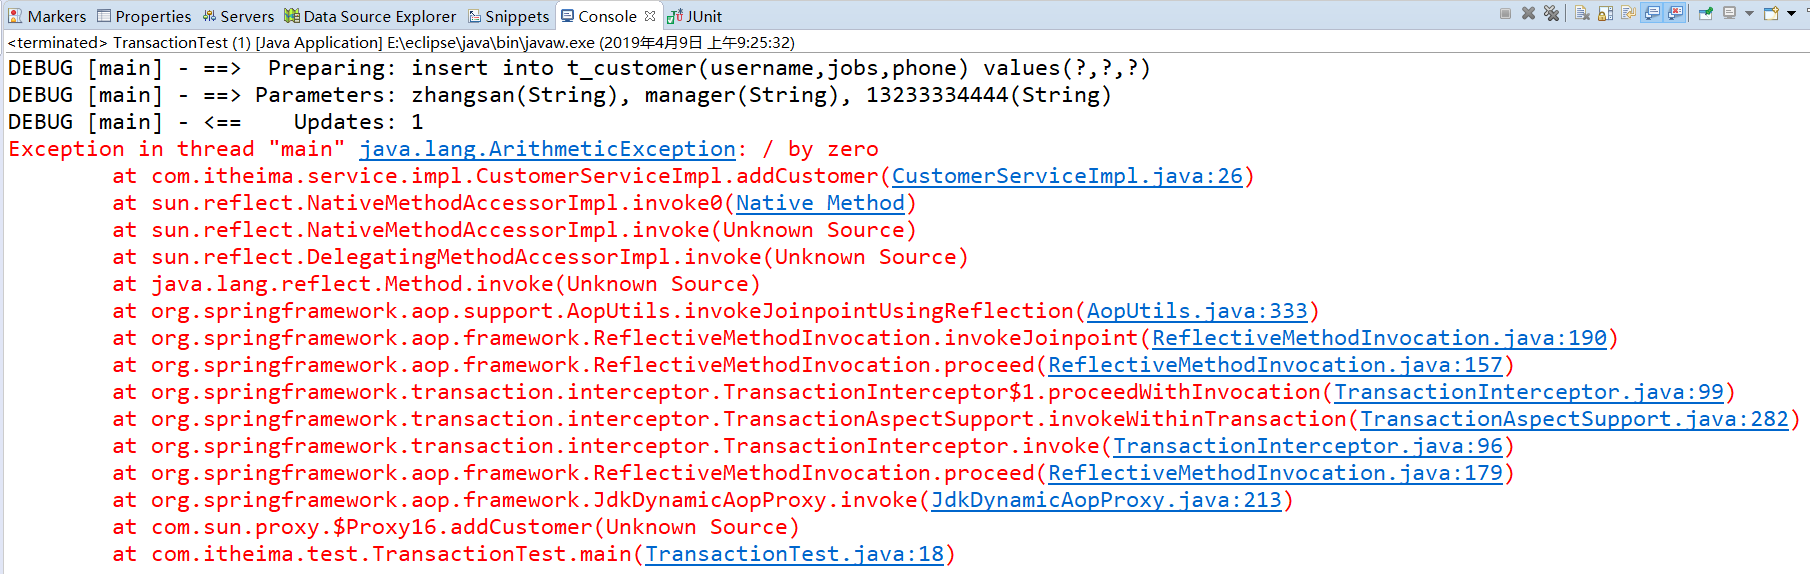
④测试类:com/itheima/test/TransactionTest.java
 1 package com.itheima.test;
 2 import org.springframework.context.ApplicationContext;
 3 import org.springframework.context.support.ClassPathXmlApplicationContext;
 4 import com.itheima.po.Customer;
 5 import com.itheima.service.CustomerService;
 6 /**
 7  * 测试事务
 8  */
 9 public class TransactionTest {
10     public static void main(String[] args) {
11         ApplicationContext act = new ClassPathXmlApplicationContext("applicationContext.xml");
12         CustomerService customerService = act.getBean(CustomerService.class);
13
14         Customer customer = new Customer();
15         customer.setUsername("zhangsan");
16         customer.setJobs("manager");
17         customer.setPhone("13233334444");
18         customerService.addCustomer(customer);
19     }
20 }
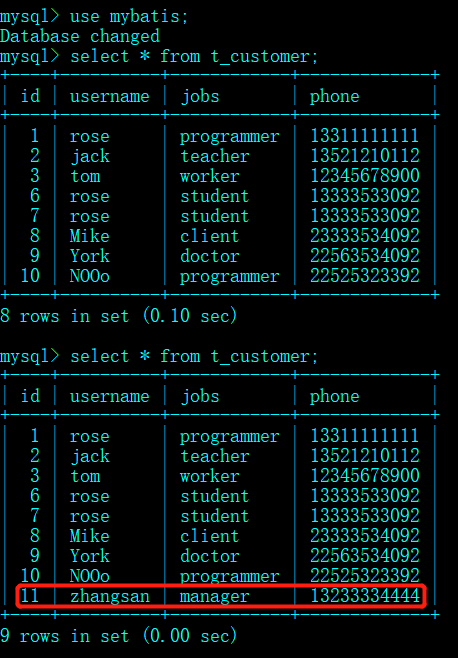
⑤先将@Transactional注释掉后运行测试类的结果如下:

4)、虽抛出异常,但查询数据库mybatis中的t_customer表可知,新添加的数据已经存储在该表中,这就验证了在没有事务管理的情况下,即使出现了异常,数据也会被存储到数据表中。
5)、将注释去掉,再次执行并查询表如图所示:
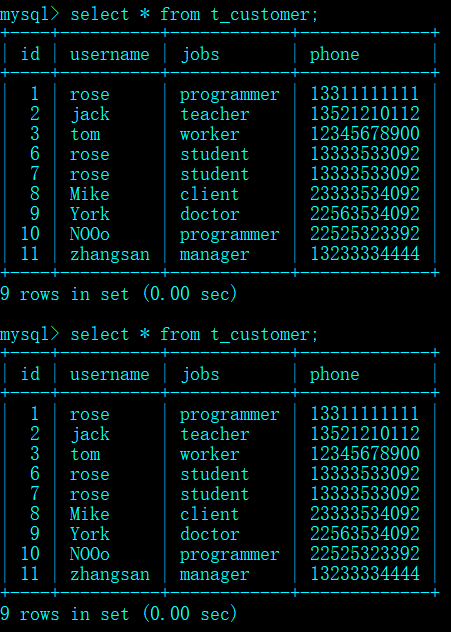
这就说明项目中配置的事务是正确的。
个人总结:
本章详细介绍了如何实现SM的整合步骤。个人认为基于Mapper的接口方式实现MyBatis与Spring的整合是相对比较方便和简单的,至少在编码方面能提高开发者的工作效率,但实现DAO层的整合也需充分理解,总之,实践是检验真知的标准!