Spring Boot中自带有Tomcat容器,因此Spring Boot项目只需要运行main函数,就可以运行,但是以往的web项目,我们习惯于使用自己安装的Tomcat运行或者使用Tomcat、Jetty插件来运行项目,方便简单,同时部署也是简单,只需要把生成的war包放在Tomcat的webapps下面,然后重启Tomcat,就可以访问项目了。那么Spring Boot想通过上面的方式部署和访问,应该如何操作呢?
其实主要的思路就是把Spring Boot自带的Tomcat屏蔽掉,然后引入新的Tomcat,这样就可以了,也就达到了使用Spring Boot轻松开发web项目,简单部署了。
本文的项目是基于Maven的多模块开发的,因此需要有一点这个基础,如果还不太了解看一下这篇博客http://www.cnblogs.com/advancing/category/1123469.html
具体的使用外部容器部署的实现方式如下:
1.在父级中设置以下配置
<!-- 这里指定打包的时候不再需要tomcat相关的包 更改打war包加入的配置-->
<dependency>
   <groupId>org.springframework.boot</groupId>
   <artifactId>spring-boot-starter-tomcat</artifactId>
   <scope>provided</scope>
</dependency>
父级pom中添加Tomcat、Jetty插件,子模块中才会继承,之后再根据子模块的特性去重新修改插件参数,如端口、编码....
<plugin>
   <groupId>org.apache.tomcat.maven</groupId>
   <artifactId>tomcat7-maven-plugin</artifactId>
   <version>2.2</version>
   <!--如果在这设置属性(port、path),模块的path就不起作用了-->
   <configuration>
      <uriEncoding>UTF-8</uriEncoding>
      <!--<port>9080</port>-->
      <!--<path>/</path>-->
   </configuration>
</plugin>

<plugin>
   <groupId>org.eclipse.jetty</groupId>
   <artifactId>jetty-maven-plugin</artifactId>
   <version>${jetty-version}</version>
   <configuration>
      <jvmArgs>-Dfile.encoding=UTF-8</jvmArgs>
   </configuration>
</plugin>

<!--surefire-->
<plugin>
   <groupId>org.apache.maven.plugins</groupId>
   <artifactId>maven-surefire-plugin</artifactId>
   <version>2.19.1</version>
   <configuration>
      <skipTests>true</skipTests>
   </configuration>
</plugin>
2.在子模块中新建一个和Spring Boot含有main方法的类同级的一个修改启动类的方法

/**
 * 修改启动类,继承 SpringBootServletInitializer 并重写 configure 方法
 * Created by kk on 2017/11/21.
 */
public class SpringBootStartApplication extends SpringBootServletInitializer {

    @Override
    public SpringApplicationBuilder configure(SpringApplicationBuilder builder){
        return builder.sources(含有Main方法的类名.class);
    }

}
3.子模块pom中添加打包所依赖的插件,以及Tomcat、Jetty插件。
<plugins>
   <!--spring-boot为了保护application.yml和application.properties,修改了默认的占位符${...}为@...@-->
   <!--为了spring boot的yml和properties文件能够使用maven变量替换,使用${}占位符-->
   <plugin>
      <artifactId>maven-resources-plugin</artifactId>
      <configuration>
         <encoding>utf-8</encoding>
         <useDefaultDelimiters>true</useDefaultDelimiters>
      </configuration>
   </plugin>

   <plugin>
      <groupId>org.springframework.boot</groupId>
      <artifactId>spring-boot-maven-plugin</artifactId>
      <configuration>
         <!--指定该Main Class为全局的唯一入口-->
         <mainClass>cn.XX.wechat.authorization.XXWechatAuthorizationCloudApplication</mainClass>
         <layout>ZIP</layout>
      </configuration>
      <executions>
         <execution>
            <goals>
               <!--可以把依赖的包都打包到生成的Jar包中-->
               <goal>repackage</goal>
            </goals>
         </execution>
      </executions>
   </plugin>

   <!--  这个配置是打包war包需要的   maven打包的时候告诉maven不需要web.xml,否刚会报找不到web.xml错误 -->
   <plugin>
      <groupId>org.apache.maven.plugins</groupId>
      <artifactId>maven-war-plugin</artifactId>
      <!--<version>2.4</version>-->
      <configuration>
         <failOnMissingWebXml>false</failOnMissingWebXml>
      </configuration>
   </plugin>

   <plugin>
      <groupId>org.apache.tomcat.maven</groupId>
      <artifactId>tomcat7-maven-plugin</artifactId>
      <version>2.2</version>
      <configuration>
         <!-- Tomcat启动 直接访问http://localhost:8080/ -->
         <!--<url>http://localhost:8080/</url>-->
         <!--<server>tomcat</server>-->
         <!--<username>manager</username>-->
         <!--<password>manager.123</password>-->
         <!--<path>/</path>-->
         <uriEncoding>UTF-8</uriEncoding>
         <path>/${project.module.name}</path>
         <port>8866</port>
      </configuration>
   </plugin>

   <plugin>
      <groupId>org.eclipse.jetty</groupId>
      <artifactId>jetty-maven-plugin</artifactId>
      <version>${jetty-version}</version>
      <configuration>
         <jvmArgs>-Dfile.encoding=UTF-8</jvmArgs>
         <systemProperties>
            <systemProperty>
               <name>jetty.port</name>
               <value>9083</value>
            </systemProperty>
            <systemProperty>
               <name>org.eclipse.jetty.server.Request.maxFormContentSize</name>
               <value>-1</value>
            </systemProperty>
         </systemProperties>
         <stopKey>stop</stopKey>
         <stopPort>5599</stopPort>
         <webAppConfig>
            <contextPath>/${project.module.name}</contextPath>
            <parentLoaderPriority>true</parentLoaderPriority>
         </webAppConfig>
         <scanIntervalSeconds>0</scanIntervalSeconds>
      </configuration>
   </plugin>
</plugins>
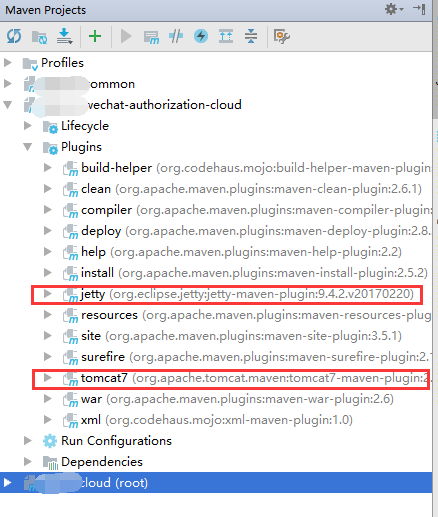
4.这样在本地就可以运用自己配置的容器运行了,成功之后子模块会有以下标志。
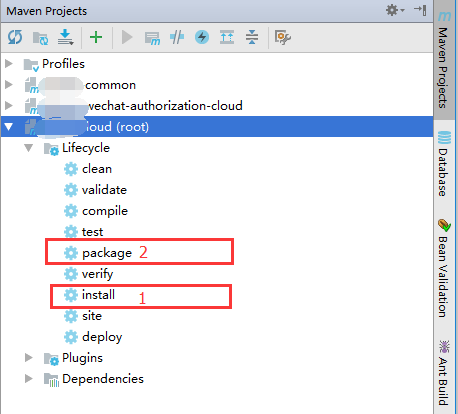
5.如果需要对子模块发布到生产上,需要子模块设置packaging为war,在父模块先mvn install(因为对其他模块有依赖),然后在mvn package,之后将生成的war包放在生产就OK了。

延伸一点:
使用Spring Boot自带的Tomcat开发,不做如上操作,该如何部署Spring Boot项目呢,有两种方式:
一:将Spring Boot项目生成一个jar包,然后通过。
1.cmd进入到Spring Boot项目打包成的jar文件目录
2.运行java -Xms128m -Xmx256m -jar 项目jar名.jar
nohup /opt/appstack/java/bin/java -Xms128m -Xmx256m -jar /opt/appstack/apps/test/release/eureka-center.jar &
3.访问项目中定义的路径
二:通过Docker来部署。