一、在Django中引用Bootstrap模版
1、首先下载bootsrtap代码(http://v3.bootcss.com/getting-started/#download),并将下载后的文件放在project下新创建的static目录下。下载dashboard.css放在static/bootstrap/css/目录下。下载jquery放在static/bootstrap/js/目录下。

2、下载合适的bootstrap模版样式(http://v3.bootcss.com/getting-started/),下载的文件包含一个html和一个目录。
3、将下载的模版放在templates中,修改名字为base.html。并在templates里创建与app同名的目录(stc_crm)用来存放该app使用的模版。
4、在stu_crm中创建dashboard.html,用来继承base.html模版。
{% extends 'base.html' %}
目录结构为:

5、修改全局setting文件,添加静态文件路径。
STATIC_URL = '/static/'                 #若存放静态文件的static目录在app目录下,则改局生效,无需定义下面的

STATICFILES_DIRS = [            #若存放静态文件的static目录在project目录下,则用该定义
    os.path.join(BASE_DIR, "static"),
]
6、设置url
在全局url中设置转发规则
from django.conf.urls import url,include

from stu_crm import views
import stu_crm

urlpatterns = [
    url(r'^stu_crm/',include('stu_crm.urls')),
]
在stu_crm中创建urls.py
from django.conf.urls import url,include

from stu_crm import views
import stu_crm

urlpatterns = [
    url(r'^$',views.dashboard),
]
7、定义视图函数 views.py
def dashboard(request):
    return render(request,'stu_crm/dashboard.html')
注意,返回html的路径为'stu_crm/dashboard.html'
8、修改bash.html中引用js的路径
由于下载的bootstrap样式中引用了一些线上的js文件,这里需要修改为本地的文件。
    <!-- Bootstrap core CSS -->
    <link href="/static/bootstrap/css/bootstrap.min.css" rel="stylesheet">

    <!-- Custom styles for this template -->
    <link href="/static/bootstrap/css/dashboard.css" rel="stylesheet">

...

    <script src="/static/bootstrap/js/jquery-2.2.3.js"></script>
    <script src="/static/bootstrap/js/bootstrap.min.js"></script>
    <!-- Just to make our placeholder images work. Don't actually copy the next line! -->
    <script src="/static/bootstrap/js/holder.min.js"></script>
然后页面就可以正常访问了。
二、修改模版样式
1、删除base.html 中关于页面标题及内容样式的定义,并允许子模版继承后重写该部分。({ % black page-header% }、{ % black page-content% })
        <div class="col-sm-9 col-sm-offset-3 col-md-10 col-md-offset-2 main">
          <h1 class="page-header">{% block page-header %}your page header{% endblock %}</h1>
            {% block page-content %}
                your page content
            {% endblock %}
        </div>
2、新建customers.html页面,用来展示客户信息列表。该页面继承父模版base.html,并自定义标题和主题内容。
{% extends 'base.html' %}

{% block page-header %}
客户信息表
{% endblock %}

{% block page-content %}
    <table class="table table-striped">     #使用bootsrtap定义好的样式,将客户信息展示在一个表里
        <thead>                 #表头
            <tr>
                <th>ID</th>          #每列标题
                <th>QQ</th>
                <th>姓名</th>
                <th>渠道</th>
                <th>咨询课程</th>
                <th>班级类型</th>
                <th>客户备注</th>
                <th>状态</th>
                <th>课程顾问</th>
                <th>日期</th>
            </tr>
        </thead>
        <tbody>                         #表的主题内容
            {% for customer in customers_list %}
                <tr>
                    <td>{{ customer.id }}</td>      #每列展示的美美容
                    <td>{{ customer.qq }}</td>
                    <td>{{ customer.name }}</td>
                    <td>{{ customer.source }}</td>
                    <td>{{ customer.course }}</td>
                    <td>{{ customer.get_class_type_display }}</td>    #get_class_type_display 显示中文
                    <td>{{ customer.customer_note|truncatechars:30}}</td>   #|truncatechars:30 默认在页面只显示30个字节
                    <td class="{{ customer.status }}">{{ customer.get_status_display }}</td>  #根据不同的状态,添加底色样式,css样式在customers.css中定义
                    <td>{{ customer.consultant}}</td>
                    <td>{{ customer.date }}</td>
                </tr>
            {% endfor %}
        </tbody>
    </table>
{% endblock %}
3、创建新的url规则
urlpatterns = [
    url(r'^customer/$',views.customer),
]
将对localhost:8000/stu_crm/customer的请求转给customer函数处理
4、数图函数
def customer(request):
    customers=models.Customer.objects.all()
    return render(request,'stu_crm/customers.html',{'customers_list':customers})
5、在static/bootstrap/css目录下创建用于显示不同状态底色的样式文件customers.css,每个类标签的名字即数据库中客户状态的字段
.signed{
    background-color:greenyellow;
}

.unregistered{
    background-color:silver;
}

.graduated{
    background-color:orange;
}
6、在base.html中添加对customers.css样式的引用
<link href="/static/bootstrap/css/dashboard.css" rel="stylesheet">
<link href="/static/bootstrap/css/customer.css" rel="stylesheet">
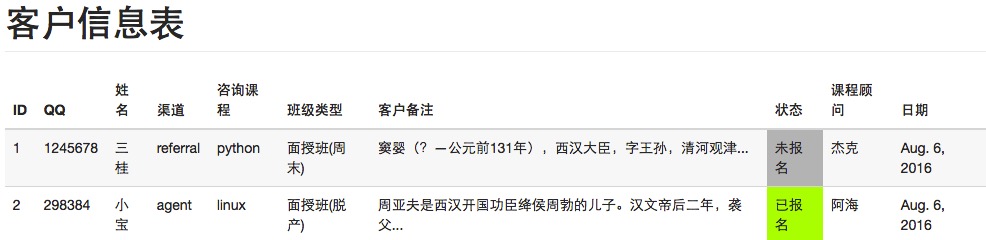
经过以上几步,前段显示效果为:
三、分页显示
1、修改views中customer函数
from django.core.paginator import Paginator,EmptyPage,PageNotAnInteger


def customer(request):
    customers=models.Customer.objects.all()
    paginator=Paginator(customers,2)    #每页显示2条
    page=request.GET.get('page')        #前段请求的页,比如点击'下一页',该页以变量'page'表示
    try:
      customer_obj=paginator.page(page) #获取前端请求的页数
    except PageNotAnInteger:
        customer_obj=paginator.page(1)   #如果前端输入的不是数字,就返回第一页
    except EmptyPage:
        customer_obj=paginator.page(paginator.num_pages)   #如果前端请求的页码超出范围,则显示最后一页.获取总页数,返回最后一页.比如共10页,则返回第10页.
    return render(request,'stu_crm/customers.html',{'customers_list':customer_obj})
2、修改前端显示页面
customers.html添加分页功能后如下
{% extends 'base.html' %}

{% block page-header %}
客户信息表
{% endblock %}

{% block page-content %}
    <table class="table table-striped">
        <thead>
            <tr>
                <th>ID</th>
                <th>QQ</th>
                <th>姓名</th>
                <th>渠道</th>
                <th>咨询课程</th>
                <th>班级类型</th>
                <th>客户备注</th>
                <th>状态</th>
                <th>日期</th>
                <th>课程顾问</th>
                <th>日期</th>
            </tr>
        </thead>
        <tbody>
            {% for customer in customers_list %}
                <tr>
                    <td>{{ customer.id }}</td>
                    <td>{{ customer.qq }}</td>
                    <td>{{ customer.name }}</td>
                    <td>{{ customer.source }}</td>
                    <td>{{ customer.course }}</td>
                    <td>{{ customer.get_class_type_display }}</td>
                    <td>{{ customer.customer_note|truncatechars:30}}</td>
                    <td class="{{ customer.status }}">{{ customer.get_status_display }}</td>
                    <td>{{ customer.consultant}}</td>
                    <td>{{ customer.date }}</td>
                </tr>
            {% endfor %}
        </tbody>
    </table>
    <div class="pagination">
        <span class="step-links">
            {% if customers_list.has_previous %}                                     <!--如果有上一页-->
                <a href="?page={{ customers_list.previous_page_number }}">上一页</a>  <!--点击时超链接到上一页-->
            {% endif %}

            <span class="current">
                 Page{{ customers_list.number }} of {{ customers_list.paginator.num_pages }}  <!--customers_list.number为当前页码,customers_list.paginator.num_pages为总页码数-->
            </span>

            {% if customers_list.has_next %}    <!--如果有下一页-->
                <a href="?page={{ customers_list.next_page_number }}">下一页</a>    <!--点击时超链接到下一页-->
            {% endif %}
        </span>
    </div>
{% endblock %}
效果额如下图:

3、使用bootstrap的分页样式

在bootstrap上找到相应源代码,粘贴至customers.html文件中并作相应修改
{% extends 'base.html' %}
{% block page-header %}
客户信息表
{% endblock %}
{% block page-content %}
<table class="table table-striped">
<thead>
<tr>
<th>ID</th>
<th>QQ</th>
<th>姓名</th>
<th>渠道</th>
<th>咨询课程</th>
<th>班级类型</th>
<th>客户备注</th>
<th>状态</th>
<th>课程顾问</th>
<th>日期</th>
</tr>
</thead>
<tbody>
{% for customer in customers_list %}
<tr>
<td>{{ customer.id }}</td>
<td>{{ customer.qq }}</td>
<td>{{ customer.name }}</td>
<td>{{ customer.source }}</td>
<td>{{ customer.course }}</td>
<td>{{ customer.get_class_type_display }}</td>
<td>{{ customer.customer_note|truncatechars:30}}</td>
<td class="{{ customer.status }}">{{ customer.get_status_display }}</td>
<td>{{ customer.consultant}}</td>
<td>{{ customer.date }}</td>
</tr>
{% endfor %}
</tbody>
</table>
<div class="pagination">
<nav>
<ul class="pagination">
{#左箭头部分#}
{% if customers_list.has_previous %} <!--如果有上一页,就显示左箭头,如果没有上一页(即当前为第一页),就不会显示-->
<li class="enabled"><a href="?page={{ customers_list.previous_page_number }}" aria-label="Previous"><span aria-hidden="true">«</span></a></li>
{% endif %}
{# 中间页码显示部分 #}
{% for page_num in customers_list.paginator.page_range %} <!--遍历所有分页-->
{% if page_num == customers_list.number %} <!--如果当前页是显示页,页码数字加底色-->
<li class="active"><a href="#">{{ page_num }}<span class="sr-only">(current)</span></a></li>
{% else %}
<li class=""><a href="?page={{ page_num }}">{{ page_num }}<span class="sr-only">(current)</span></a></li>
{% endif %}
{% endfor %}
{# 右箭头部分 #}
{% if customers_list.has_next %} <!--如果有下一页,就显示右箭头,如果没有下一页(即当前为最后一页),就不会显示-->
<li class="enabled"><a href="?page={{ customers_list.next_page_number }}" aria-label="Previous"><span aria-hidden="true">»</span></a></li>
{% endif %}
</ul>
</nav>
</div>
{% endblock %}
即可显示以上效果的分页。
4、分页中只显示一定数量的页码。
在分页中只显示于当前页最近的三页(前三页和后三页)
由于前端页面中不能进行相关算数运算,因此将该部分功能写在后端py文件中(模版),然后向前端传回html
在django中自定义模版
- 1、在app应用下创建templatetags目录,并在该目录中创建模版文件和__init__.py文件,模版文件为customer_tags.py,(必须手动创建__init__.py文件,否则注册模版不生效,django_version:1.9.8)目录结构图 :

- 2、在模版文件customer_tag.py中注册模版到django并定义分页标签样式
#!_*_ coding:utf-8 _*_
from django import template
from django.utils.html import format_html


register = template.Library()      # 将自定义的模版注册到django

@register.simple_tag
def guess_page(current_page,loop_num):
    offset = abs(current_page - loop_num)
    if offset < 3:                  #如果当前循环页数和当前显示的页数的绝对值小于3,就显示该页码
        if current_page == loop_num:
            #如果循环页为当前显示页,则加底色
            #第一个loop_num为调转的页码,第二个loop_num为分页标签中显示的,
            page_ele = '''<li class="active"><a href="?page= %s">%s<span class="sr-only">(current)</span></a></li>''' % (loop_num,loop_num)
        else:
            page_ele = '''<li class=""><a href="?page= %s">%s<span class="sr-only">(current)</span></a></li>''' % (loop_num,loop_num)

        return format_html(page_ele)   #以html返回前端
    else:
        return ''
- 3、前端页面customers.html
{% extends 'base.html' %}
{% load customer_tags %}
{% block page-header %}
客户信息表
{% endblock %}
{% block page-content %}
<table class="table table-striped">
<thead>
<tr>
<th>ID</th>
<th>QQ</th>
<th>姓名</th>
<th>渠道</th>
<th>咨询课程</th>
<th>班级类型</th>
<th>客户备注</th>
<th>状态</th>
<th>课程顾问</th>
<th>日期</th>
</tr>
</thead>
<tbody>
{% for customer in customers_list %}
<tr>
<td>{{ customer.id }}</td>
<td>{{ customer.qq }}</td>
<td>{{ customer.name }}</td>
<td>{{ customer.source }}</td>
<td>{{ customer.course }}</td>
<td>{{ customer.get_class_type_display }}</td>
<td>{{ customer.customer_note|truncatechars:30}}</td>
<td class="{{ customer.status }}">{{ customer.get_status_display }}</td>
<td>{{ customer.consultant}}</td>
<td>{{ customer.date }}</td>
</tr>
{% endfor %}
</tbody>
</table>
<div class="pagination">
<nav>
<ul class="pagination">
{#左箭头部分#}
{% if customers_list.has_previous %} <!--如果有上一页,就显示左箭头,如果没有上一页(即当前为第一页),就不会显示-->
<li class="enabled"><a href="?page={{ customers_list.previous_page_number }}" aria-label="Previous"><span aria-hidden="true">«</span></a></li>
{% endif %}
{# 中间页码显示部分 #}
{% for page_num in customers_list.paginator.page_range %}
{% guess_page customers_list.number page_num%} <!--将customers_list.number和page_num两个参数传递给guess_page函数-->
{% endfor %}
{#右箭头部分 #}
{% if customers_list.has_next %} <!--如果有下一页,就显示右箭头,如果没有下一页(即当前为最后一页),就不会显示-->
<li class="enabled"><a href="?page={{ customers_list.next_page_number }}" aria-label="Previous"><span aria-hidden="true">»</span></a></li>
{% endif %}
</ul>
</nav>
</div>
{% endblock %}
以上,分页显示样式为:
