卸载过程:
停止服务:systemctl stop mariadb
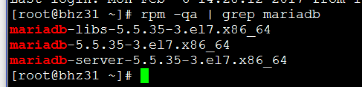
查询安装包:rpm -qa | grep mariadb
卸载:
rpm -e mariadb-server
rpm -e mariadb
rpm -e --nodeps mariadb-libs
1. 准备环境
1.1 查看磁盘挂载情况:df –h < 如果没有则挂载系统盘:mount /dev/cdrom /media >
PS: 在虚拟机设置里 对以下步骤进行操作:

(如果开机自动挂载到桌面上[带桌面的Linux系统],那么需要卸载,然后再进行重新挂载)
卸载:umonut /dev/cdrom
挂载:mount /dev/cdrom /media
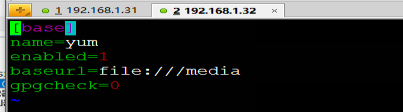
1.1 使用本地yum源:
配置本地yum:cd /etc/yum.repos.d/
创建一个文件(以repo结尾),如:yum.repo,文件内容如下:进行配置:
1. 开始安装
1.1 执行命令:yum -y install mariadb mariadb-server
1.2 拷贝文件:cp /usr/share/mysql/my-huge.cnf /etc/my.cnf
1.3 用root帐号登录后,在/etc/my.cnf 中的[mysqld]后添加添加lower_case_table_names=1,重启MYSQL服务,这时已设置成功:不区分表名的大小写。
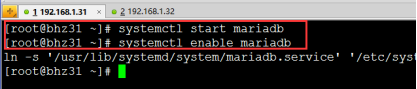
1.4 启动mariadb服务并开机自动运行。命令如下:
systemctl start mariadb
systemctl enable mariadb
1.1 查看防火墙状态:systemctl status firewalld
停止防火墙:systemctl stop firewalld
设置开机不启用防火墙:systemctl disable firewalld
1.2 开始设置Mariadb数据库, 执行脚本:/usr/bin/mysql_secure_installation
按照下面提示进行操作即可:
NOTE: RUNNING ALL PARTS OF THIS SCRIPT IS RECOMMENDED FOR ALL MariaDB
SERVERS IN PRODUCTION USE! PLEASE READ EACH STEP CAREFULLY!
In order to log into MariaDB to secure it, we'll need the current
password for the root user. If you've just installed MariaDB, and
you haven't set the root password yet, the password will be blank,
so you should just press enter here.
Enter current password for root (enter for none): 安装后默认没有root密码,直接回车
OK, successfully used password, moving on...
Setting the root password ensures that nobody can log into the MariaDB
root user without the proper authorisation.
Set root password? [Y/n] Y
New password: 输入root的新密码
Re-enter new password: 新密码确认
Password updated successfully!
Reloading privilege tables..
... Success!
By default, a MariaDB installation has an anonymous user, allowing anyone
to log into MariaDB without having to have a user account created for
them. This is intended only for testing, and to make the installation
go a bit smoother. You should remove them before moving into a
production environment.
Remove anonymous users? [Y/n] 删除匿名用户 Y
... Success!
Normally, root should only be allowed to connect from 'localhost'. This
ensures that someone cannot guess at the root password from the network.
Disallow root login remotely? [Y/n] 关闭root远程登录 Y
... Success!
By default, MariaDB comes with a database named 'test' that anyone can
access. This is also intended only for testing, and should be removed
before moving into a production environment.
Remove test database and access to it? [Y/n] 删除test数据库 Y
- Dropping test database...
... Success!
- Removing privileges on test database...
... Success!
Reloading the privilege tables will ensure that all changes made so far
will take effect immediately.
Reload privilege tables now? [Y/n] 确定以上所有操作 Y
... Success!
Cleaning up...
All done! If you've completed all of the above steps, your MariaDB
installation should now be secure.
Thanks for using MariaDB!
1. 配置MariaDB主从
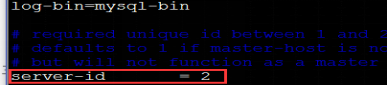
1.1 修改vim /etc/my.cnf配置文件:
主节点不需要进行修改
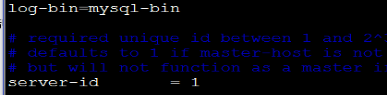
从节点进行修改 server-id=2
PS:进行重启从节点(slave):systemctl restart mariadb
1.1 在主节点上建立账户并且授权Slave
登录MariaDB数据库:mysql -uroot -proot
建立主从复制用户并授权:
语法:
GRANT REPLICATION SLAVE ON *.*{所有权限} TO 'slave'@'%'{用户名为slave,%为任意地址} identified by 'slave';
命令:
GRANT REPLICATION SLAVE ON *.* TO 'slave'@'%' identified by 'slave';
1.2 查询SQL(Master的状态) 命令:SHOW MASTER STATUS;

1.1 配置从节点SLAVE:(注意在从节点上执行)
登录从服务器:mysql -u root –proot进行配置:
语法:
CHANGE MASTER TO
MASTER_HOST='主节点的IP地址', MASTER_USER='主节点授权的用户', MASTER_PASSWORD='主节点授权的用户的密码',MASTER_LOG_FILE='mysql-bin.000007',MASTER_LOG_POS=2197;
命令:
CHANGE MASTER TO MASTER_HOST='192.168.1.31',MASTER_USER='slave',MASTER_PASSWORD='slave',MASTER_LOG_FILE='mysql-bin.000007',MASTER_LOG_POS=2197;
PS:注意语法逗号前后不要用空格。
1.2 查看主从状态验证:
命令:show slave statusG;

1.1 授权远程用户root登录:(主从都需要进行执行)
1.1.1 GRANT ALL PRIVILEGES ON *.* TO 'root'@'%' IDENTIFIED BY 'root' WITH GRANT OPTION;
1.1.2 FLUSH PRIVILEGES;
进入slave服务器,运行:
MySQL> show slave statusG
.......
Relay_Log_File: localhost-relay-bin.000535
Relay_Log_Pos: 21795072
Relay_Master_Log_File: localhost-bin.000094
Slave_IO_Running: Yes
Slave_SQL_Running: No
Replicate_Do_DB:
Replicate_Ignore_DB:
......
解决办法一、
Slave_SQL_Running: No
1.程序可能在slave上进行了写操作
2.也可能是slave机器重起后,事务回滚造成的.
一般是事务回滚造成的:
解决办法:
mysql> stop slave ;
mysql> set GLOBAL SQL_SLAVE_SKIP_COUNTER=1;
mysql> start slave ;
解决办法二、
首先停掉Slave服务:slave stop
到主服务器上查看主机状态:
记录File和Position对应的值
进入master
mysql> show master status;
+----------------------+----------+--------------+------------------+
| File | Position | Binlog_Do_DB | Binlog_Ignore_DB |
+----------------------+----------+--------------+------------------+
| localhost-bin.000094 | 33622483 | | |
+----------------------+----------+--------------+------------------+
1 row in set (0.00 sec)
然后到slave服务器上执行手动同步:
mysql> change master to
> master_host='master_ip',
> master_user='user',
> master_password='pwd',
> master_port=3306,
> master_log_file=localhost-bin.000094',
> master_log_pos=33622483 ;
1 row in set (0.00 sec)
mysql> start slave ;
1 row in set (0.00 sec)
mysql> show slave statusG
*************************** 1. row ***************************
........
Master_Log_File: localhost-bin.000094
Read_Master_Log_Pos: 33768775
Relay_Log_File: localhost-relay-bin.000537
Relay_Log_Pos: 1094034
Relay_Master_Log_File: localhost-bin.000094
Slave_IO_Running: Yes
Slave_SQL_Running: Yes
Replicate_Do_DB:
手动同步需要停止master的写操作!