一 元类介绍
什么是元类呢?一切源自于一句话:python中一切皆为对象。让我们先定义一个类,然后逐步分析
class StanfordTeacher(object):
    school='Stanford'

    def __init__(self,name,age):
        self.name=name
        self.age=age

    def say(self):
        print('%s says welcome to the Stanford to learn Python' %self.name)
所有的对象都是实例化或者说调用类而得到的(调用类的过程称为类的实例化),比如对象t1是调用类StanfordTeacher得到的
t1=StanfordTeacher('lili',18)
print(type(t1)) #查看对象t1的类是<class '__main__.StanfordTeacher'>
如果一切皆为对象,那么类StanfordTeacher本质也是一个对象,既然所有的对象都是调用类得到的,那么StanfordTeacher必然也是调用了一个类得到的,这个类称为元类
于是我们可以推导出===>产生StanfordTeacher的过程一定发生了:StanfordTeacher=元类(...)
print(type(StanfordTeacher)) # 结果为<class 'type'>,证明是调用了type这个元类而产生的StanfordTeacher,即默认的元类为type
二 class关键字创建类的流程分析
上文我们基于python中一切皆为对象的概念分析出:我们用class关键字定义的类本身也是一个对象,负责产生该对象的类称之为元类(元类可以简称为类的类),内置的元类为type
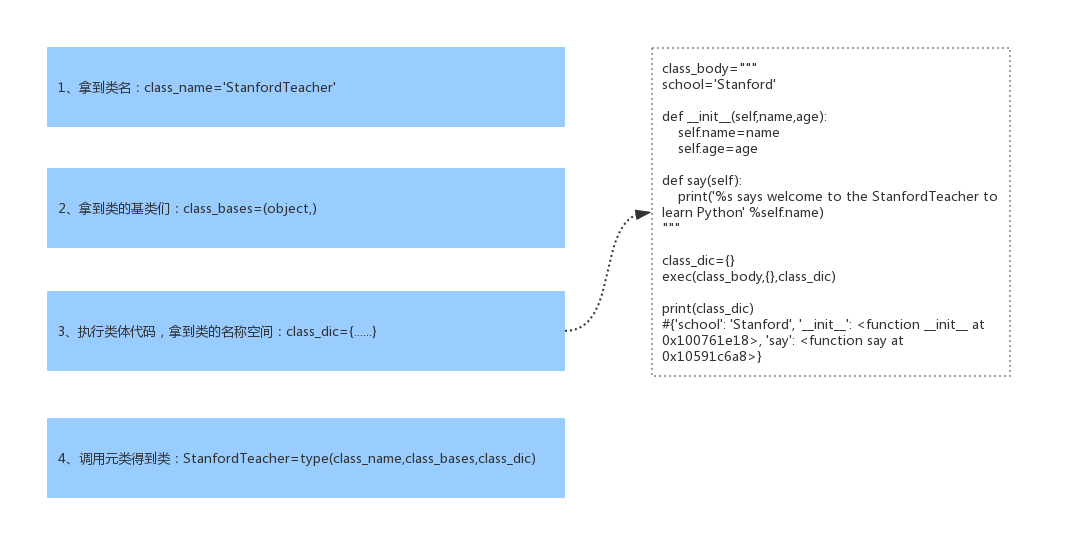
class关键字在帮我们创建类时,必然帮我们调用了元类StanfordTeacher=type(...),那调用type时传入的参数是什么呢?必然是类的关键组成部分,一个类有三大组成部分,分别是
1、类名class_name='StanfordTeacher'
2、基类们class_bases=(object,)
3、类的名称空间class_dic,类的名称空间是执行类体代码而得到的
调用type时会依次传入以上三个参数
综上,class关键字帮我们创建一个类应该细分为以下四个过程
补充:exec的用法
#exec:三个参数

#参数一:包含一系列python代码的字符串

#参数二:全局作用域(字典形式),如果不指定,默认为globals()

#参数三:局部作用域(字典形式),如果不指定,默认为locals()

#可以把exec命令的执行当成是一个函数的执行,会将执行期间产生的名字存放于局部名称空间中
g={
    'x':1,
    'y':2
}
l={}

exec('''
global x,z
x=100
z=200

m=300
''',g,l)

print(g) #{'x': 100, 'y': 2,'z':200,......}
print(l) #{'m': 300}
四 自定义元类控制类StanfordTeacher的创建
一个类没有声明自己的元类,默认他的元类就是type,除了使用内置元类type,我们也可以通过继承type来自定义元类,然后使用metaclass关键字参数为一个类指定元类
class Mymeta(type): #只有继承了type类才能称之为一个元类,否则就是一个普通的自定义类
    pass

# StanfordTeacher=Mymeta('StanfordTeacher',(object),{...})
class StanfordTeacher(object,metaclass=Mymeta):
    school='Stanford'

    def __init__(self,name,age):
        self.name=name
        self.age=age

    def say(self):
        print('%s says welcome to the Stanford to learn Python' %self.name)
自定义元类可以控制类的产生过程,类的产生过程其实就是元类的调用过程,即StanfordTeacher=Mymeta('StanfordTeacher',(object),{...}),调用Mymeta会先产生一个空对象StanfordTeacher,然后连同调用Mymeta括号内的参数一同传给Mymeta下的 __ init __ 方法,完成初始化,于是我们可以
class Mymeta(type): #只有继承了type类才能称之为一个元类,否则就是一个普通的自定义类
    def __init__(self,class_name,class_bases,class_dic):
        # print(self) #<class '__main__.StanfordTeacher'>
        # print(class_bases) #(<class 'object'>,)
        # print(class_dic) #{'__module__': '__main__', '__qualname__': 'StanfordTeacher', 'school': 'Stanford', '__init__': <function StanfordTeacher.__init__ at 0x102b95ae8>, 'say': <function StanfordTeacher.say at 0x10621c6a8>}
        super(Mymeta, self).__init__(class_name, class_bases, class_dic)  # 重用父类的功能

        if class_name.islower():
            raise TypeError('类名%s请修改为驼峰体' %class_name)

        if '__doc__' not in class_dic or len(class_dic['__doc__'].strip('
')) == 0:
            raise TypeError('类中必须有文档注释,并且文档注释不能为空')

# StanfordTeacher=Mymeta('StanfordTeacher',(object),{...})
class StanfordTeacher(object,metaclass=Mymeta):
    """
    类StanfordTeacher的文档注释
    """
    school='Stanford'

    def __init__(self,name,age):
        self.name=name
        self.age=age

    def say(self):
        print('%s says welcome to the Stanford to learn Python' %self.name)
五 自定义元类控制类StanfordTeacher的调用
储备知识: __ call __
class Foo:
    def __call__(self, *args, **kwargs):
        print(self)
        print(args)
        print(kwargs)

obj=Foo()
#1、要想让obj这个对象变成一个可调用的对象,需要在该对象的类中定义一个方法__call__方法,该方法会在调用对象时自动触发
#2、调用obj的返回值就是__call__方法的返回值
res=obj(1,2,3,x=1,y=2)
由上例得知,调用一个对象,就是触发对象所在类中的 __ call __ 方法的执行,如果把StanfordTeacher也当做一个对象,那么在StanfordTeacher这个对象的类中也必然存在一个 __ call __ 方法
class Mymeta(type): #只有继承了type类才能称之为一个元类,否则就是一个普通的自定义类
    def __call__(self, *args, **kwargs):
        print(self) #<class '__main__.StanfordTeacher'>
        print(args) #('lili', 18)
        print(kwargs) #{}
        return 123

class StanfordTeacher(object,metaclass=Mymeta):
    school='Stanford'

    def __init__(self,name,age):
        self.name=name
        self.age=age

    def say(self):
        print('%s says welcome to the Stanford to learn Python' %self.name)


# 调用StanfordTeacher就是在调用StanfordTeacher类中的__call__方法
# 然后将StanfordTeacher传给self,溢出的位置参数传给*,溢出的关键字参数传给**
# 调用StanfordTeacher的返回值就是调用__call__的返回值
t1=StanfordTeacher('lili',18)
print(t1) #123
默认地,调用t1=StanfordTeacher('lili',18)会做三件事
1、产生一个空对象obj
2、调用 __ init __ 方法初始化对象obj
3、返回初始化好的obj
对应着,StanfordTeacher类中的 __ call __ 方法也应该做这三件事
class Mymeta(type): #只有继承了type类才能称之为一个元类,否则就是一个普通的自定义类
    def __call__(self, *args, **kwargs): #self=<class '__main__.StanfordTeacher'>
        #1、调用__new__产生一个空对象obj
        obj=self.__new__(self) # 此处的self是类OldoyTeacher,必须传参,代表创建一个StanfordTeacher的对象obj

        #2、调用__init__初始化空对象obj
        self.__init__(obj,*args,**kwargs)

        #3、返回初始化好的对象obj
        return obj

class StanfordTeacher(object,metaclass=Mymeta):
    school='Stanford'

    def __init__(self,name,age):
        self.name=name
        self.age=age

    def say(self):
        print('%s says welcome to the Stanford to learn Python' %self.name)

t1=StanfordTeacher('lili',18)
print(t1.__dict__) #{'name': 'lili', 'age': 18}
上例的 __ call __ 相当于一个模板,我们可以在该基础上改写 __ call __ 的逻辑从而控制调用StanfordTeacher的过程,比如将StanfordTeacher的对象的所有属性都变成私有的
class Mymeta(type): #只有继承了type类才能称之为一个元类,否则就是一个普通的自定义类
    def __call__(self, *args, **kwargs): #self=<class '__main__.StanfordTeacher'>
        #1、调用__new__产生一个空对象obj
        obj=self.__new__(self) # 此处的self是类StanfordTeacher,必须传参,代表创建一个StanfordTeacher的对象obj

        #2、调用__init__初始化空对象obj
        self.__init__(obj,*args,**kwargs)

        # 在初始化之后,obj.__dict__里就有值了
        obj.__dict__={'_%s__%s' %(self.__name__,k):v for k,v in obj.__dict__.items()}
        #3、返回初始化好的对象obj
        return obj

class StanfordTeacher(object,metaclass=Mymeta):
    school='Stanford'

    def __init__(self,name,age):
        self.name=name
        self.age=age

    def say(self):
        print('%s says welcome to the Stanford to learn Python' %self.name)

t1=StanfordTeacher('lili',18)
print(t1.__dict__) #{'_StanfordTeacher__name': 'lili', '_StanfordTeacher__age': 18}
上例中涉及到查找属性的问题,比如self. __ new __ ,请看下一小节
五 再看属性查找
结合python继承的实现原理+元类重新看属性的查找应该是什么样子呢???
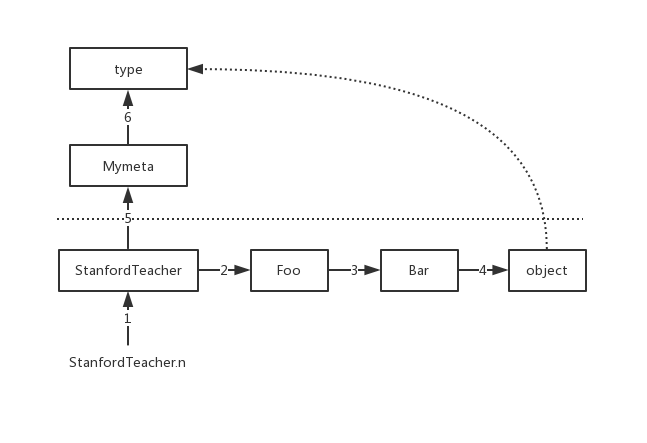
在学习完元类后,其实我们用class自定义的类也全都是对象(包括object类本身也是元类type的 一个实例,可以用type(object)查看),我们学习过继承的实现原理,如果把类当成对象去看,将下述继承应该说成是:对象StanfordTeacher继承对象Foo,对象Foo继承对象Bar,对象Bar继承对象object
class Mymeta(type): #只有继承了type类才能称之为一个元类,否则就是一个普通的自定义类
    n=444

    def __call__(self, *args, **kwargs): #self=<class '__main__.StanfordTeacher'>
        obj=self.__new__(self)
        self.__init__(obj,*args,**kwargs)
        return obj

class Bar(object):
    n=333

class Foo(Bar):
    n=222

class StanfordTeacher(Foo,metaclass=Mymeta):
    n=111

    school='Stanford'

    def __init__(self,name,age):
        self.name=name
        self.age=age

    def say(self):
        print('%s says welcome to the Stanford to learn Python' %self.name)


print(StanfordTeacher.n) #自下而上依次注释各个类中的n=xxx,然后重新运行程序,发现n的查找顺序为StanfordTeacher->Foo->Bar->object->Mymeta->type
于是属性查找应该分成两层,一层是对象层(基于c3算法的MRO)的查找,另外一个层则是类层(即元类层)的查找
插图:01元类-继承背景下的属性查找
#查找顺序:
#1、先对象层:StanfordTeacher->Foo->Bar->object
#2、然后元类层:Mymeta->type
依据上述总结,我们来分析下元类Mymeta中 __ call __ 里的self. __ new __ 的查找
class Mymeta(type):
    n=444

    def __call__(self, *args, **kwargs): #self=<class '__main__.StanfordTeacher'>
        obj=self.__new__(self)
        print(self.__new__ is object.__new__) #True


class Bar(object):
    n=333

    # def __new__(cls, *args, **kwargs):
    #     print('Bar.__new__')

class Foo(Bar):
    n=222

    # def __new__(cls, *args, **kwargs):
    #     print('Foo.__new__')

class StanfordTeacher(Foo,metaclass=Mymeta):
    n=111

    school='Stanford'

    def __init__(self,name,age):
        self.name=name
        self.age=age

    def say(self):
        print('%s says welcome to the Stanford to learn Python' %self.name)


    # def __new__(cls, *args, **kwargs):
    #     print('StanfordTeacher.__new__')


StanfordTeacher('lili',18) #触发StanfordTeacher的类中的__call__方法的执行,进而执行self.__new__开始查找
总结,Mymeta下的 __ call __ 里的self. __ new __ 在StanfordTeacher、Foo、Bar里都没有找到 __ new __ 的情况下,会去找object里的 __ new __ ,而object下默认就有一个 __ new __ ,所以即便是之前的类均未实现 __ new __ ,也一定会在object中找到一个,根本不会、也根本没必要再去找元类Mymeta -> type中查找 __ new __
我们在元类的 __ call __ 中也可以用object. __ new __ (self)去造对象
但我们还是推荐在 __ call __ 中使用self. __ new __ (self)去创造空对象,因为这种方式会检索三个类StanfordTeacher->Foo->Bar,而object. __ new __ 则是直接跨过了他们三个
最后说明一点
class Mymeta(type): #只有继承了type类才能称之为一个元类,否则就是一个普通的自定义类
    n=444

    def __new__(cls, *args, **kwargs):
        obj=type.__new__(cls,*args,**kwargs) # 必须按照这种传值方式
        print(obj.__dict__)
        # return obj # 只有在返回值是type的对象时,才会触发下面的__init__
        return 123

    def __init__(self,class_name,class_bases,class_dic):
        print('run。。。')


class StanfordTeacher(object,metaclass=Mymeta): #StanfordTeacher=Mymeta('StanfordTeacher',(object),{...})
    n=111

    school='Stanford'

    def __init__(self,name,age):
        self.name=name
        self.age=age

    def say(self):
        print('%s says welcome to the Stanford to learn Python' %self.name)


print(type(Mymeta)) #<class 'type'>
# 产生类StanfordTeacher的过程就是在调用Mymeta,而Mymeta也是type类的一个对象,那么Mymeta之所以可以调用,一定是在元类type中有一个__call__方法
# 该方法中同样需要做至少三件事:
# class type:
#     def __call__(self, *args, **kwargs): #self=<class '__main__.Mymeta'>
#         obj=self.__new__(self,*args,**kwargs) # 产生Mymeta的一个对象
#         self.__init__(obj,*args,**kwargs)
#         return obj
六 作业
1、在元类中控制把自定义类的数据属性都变成大写
class Mymetaclass(type):
    def __new__(cls,name,bases,attrs):
        update_attrs={}
        for k,v in attrs.items():
            if not callable(v) and not k.startswith('__'):
                update_attrs[k.upper()]=v
            else:
                update_attrs[k]=v
        return type.__new__(cls,name,bases,update_attrs)

class Chinese(metaclass=Mymetaclass):
    country='China'
    tag='Legend of the Dragon' #龙的传人
    def walk(self):
        print('%s is walking' %self.name)


print(Chinese.__dict__)
'''
{'__module__': '__main__',
 'COUNTRY': 'China',
 'TAG': 'Legend of the Dragon',
 'walk': <function Chinese.walk at 0x0000000001E7B950>,
 '__dict__': <attribute '__dict__' of 'Chinese' objects>,
 '__weakref__': <attribute '__weakref__' of 'Chinese' objects>,
 '__doc__': None}
'''
2、在元类中控制自定义的类无需 __ init __ 方法
1.元类帮其完成创建对象,以及初始化操作;
2.要求实例化时传参必须为关键字形式,否则抛出异常TypeError: must use keyword argument
3.key作为用户自定义类产生对象的属性,且所有属性变成大写
class Mymetaclass(type):
    # def __new__(cls,name,bases,attrs):
    #     update_attrs={}
    #     for k,v in attrs.items():
    #         if not callable(v) and not k.startswith('__'):
    #             update_attrs[k.upper()]=v
    #         else:
    #             update_attrs[k]=v
    #     return type.__new__(cls,name,bases,update_attrs)

    def __call__(self, *args, **kwargs):
        if args:
            raise TypeError('must use keyword argument for key function')
        obj = object.__new__(self) #创建对象,self为类Foo

        for k,v in kwargs.items():
            obj.__dict__[k.upper()]=v
        return obj

class Chinese(metaclass=Mymetaclass):
    country='China'
    tag='Legend of the Dragon' #龙的传人
    def walk(self):
        print('%s is walking' %self.name)


p=Chinese(name='lili',age=18,sex='male')
print(p.__dict__)
3、在元类中控制自定义的类产生的对象相关的属性全部为隐藏属性
class Mymeta(type):
    def __init__(self,class_name,class_bases,class_dic):
        #控制类Foo的创建
        super(Mymeta,self).__init__(class_name,class_bases,class_dic)

    def __call__(self, *args, **kwargs):
        #控制Foo的调用过程,即Foo对象的产生过程
        obj = self.__new__(self)
        self.__init__(obj, *args, **kwargs)
        obj.__dict__={'_%s__%s' %(self.__name__,k):v for k,v in obj.__dict__.items()}

        return obj

class Foo(object,metaclass=Mymeta):  # Foo=Mymeta(...)
    def __init__(self, name, age,sex):
        self.name=name
        self.age=age
        self.sex=sex


obj=Foo('lili',18,'male')
print(obj.__dict__)
4、基于元类实现单例模式
#步骤五:基于元类实现单例模式
# 单例:即单个实例,指的是同一个类实例化多次的结果指向同一个对象,用于节省内存空间
# 如果我们从配置文件中读取配置来进行实例化,在配置相同的情况下,就没必要重复产生对象浪费内存了
#settings.py文件内容如下
HOST='1.1.1.1'
PORT=3306

#方式一:定义一个类方法实现单例模式
import settings

class Mysql:
    __instance=None
    def __init__(self,host,port):
        self.host=host
        self.port=port

    @classmethod
    def singleton(cls):
        if not cls.__instance:
            cls.__instance=cls(settings.HOST,settings.PORT)
        return cls.__instance

obj1=Mysql('1.1.1.2',3306)
obj2=Mysql('1.1.1.3',3307)
print(obj1 is obj2) #False

obj3=Mysql.singleton()
obj4=Mysql.singleton()
print(obj3 is obj4) #True


#方式二:定制元类实现单例模式
import settings

class Mymeta(type):
    def __init__(self,name,bases,dic): #定义类Mysql时就触发
        # 事先先从配置文件中取配置来造一个Mysql的实例出来
        self.__instance = object.__new__(self)  # 产生对象
        self.__init__(self.__instance, settings.HOST, settings.PORT)  # 初始化对象
        # 上述两步可以合成下面一步
        # self.__instance=super().__call__(*args,**kwargs)
        super().__init__(name,bases,dic)

    def __call__(self, *args, **kwargs): #Mysql(...)时触发
        if args or kwargs: # args或kwargs内有值
            obj=object.__new__(self)
            self.__init__(obj,*args,**kwargs)
            return obj
        return self.__instance

class Mysql(metaclass=Mymeta):
    def __init__(self,host,port):
        self.host=host
        self.port=port

obj1=Mysql() # 没有传值则默认从配置文件中读配置来实例化,所有的实例应该指向一个内存地址
obj2=Mysql()
obj3=Mysql()
print(obj1 is obj2 is obj3)
obj4=Mysql('1.1.1.4',3307)


#方式三:定义一个装饰器实现单例模式
import settings

def singleton(cls): #cls=Mysql
    _instance=cls(settings.HOST,settings.PORT)

    def wrapper(*args,**kwargs):
        if args or kwargs:
            obj=cls(*args,**kwargs)
            return obj
        return _instance
    return wrapper


@singleton # Mysql=singleton(Mysql)
class Mysql:
    def __init__(self,host,port):
        self.host=host
        self.port=port

obj1=Mysql()
obj2=Mysql()
obj3=Mysql()
print(obj1 is obj2 is obj3) #True

obj4=Mysql('1.1.1.3',3307)
obj5=Mysql('1.1.1.4',3308)
print(obj3 is obj4) #False


