1、安装
yum install httpd httpd-devel subversion mod_dav_svn mod_auth_mysql -y
2、查看版本
svnserve --version
3、创建库并修改配置文件
 创建库:
        创建所有库的父目录
        mkdir /opt/svn
        创建库1和库2
        [root@localhost opt]# mkdir /opt/svn
        [root@localhost opt]# svnadmin create /opt/svn/repo1
        [root@localhost opt]# svnadmin create /opt/svn/repo2
        将repo1中生成的config文件夹中authz文件和passwd文件复制一份到/opt/svn/conf文件夹下,使用该目录下的配置文件为所有库提供认证的账号密码
        [root@localhost ~]# mkdir /opt/svn/conf
        [root@localhost ~]# cp /opt/svn/repo1/conf/authz /opt/svn/conf/
        [root@localhost ~]# cp /opt/svn/repo1/conf/passwd /opt/svn/conf/
        [root@localhost ~]# ls /opt/svn/conf/
        authz  passwd
        添加svn用户登录账号密码
        [root@localhost ~]# cat /opt/svn/conf/passwd
        ### This file is an example password file for svnserve.
        ### Its format is similar to that of svnserve.conf. As shown in the
        ### example below it contains one section labelled [users].
        ### The name and password for each user follow, one account per line.
        [users]
        # harry = harryssecret
        # sally = sallyssecret
        armo = passwd
        [root@localhost ~]#
        给新用户armo授权,定义用户armo和armo1都属于dev组,在repo的根“[/]”下,dev组有读写权限
        [root@localhost ~]# cat /opt/svn/conf/passwd
        [groups]
        # harry_and_sally = harry,sally
        # harry_sally_and_joe = harry,sally,&joe
        dev = armo,armo1
        [/]
        @dev = rw
        将所有库配置文件调用的账号文件和权限文件指向统一配置文件,该配置文件中所有配置必须在行首开始,否则无法识别
        [root@localhost ~]# vi /opt/svn/repo1/conf/svnserve.conf
        [root@localhost ~]# vi /opt/svn/repo2/conf/svnserve.conf
        [root@localhost ~]# more /opt/svn/repo1/conf/svnserve.conf | grep =
        #匿名账号权限
        anon-access = none
        #认证账号权限
        auth-access = write
        #指向全局密码文件
        password-db = /opt/svn/conf/passwd
        #指向全局授权文件
        authz-db = /opt/svn/conf/authz
4、启动svn
svnserve -d -r /opt/svn
-d以守护模式启动进程
-r /opt/svn 指向所有库的父目录
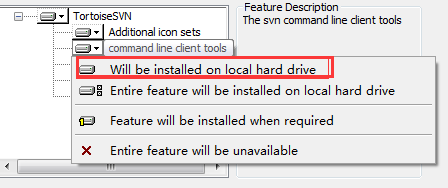
5、下载安装客户端
下载对应32位或64位客户端进行安装
安装过程中选择will be installed on local hard drive
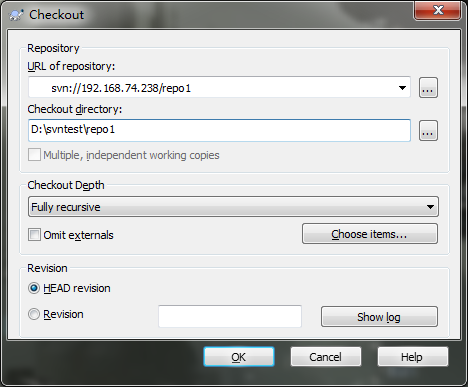
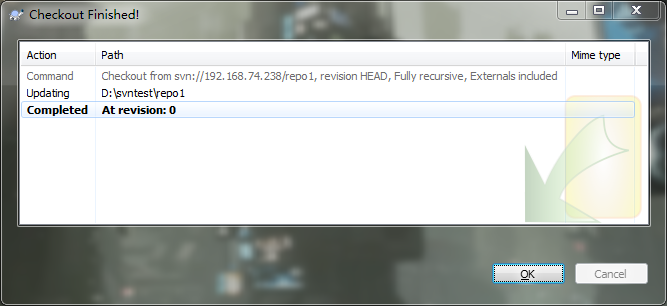
6、客户端连接SVN服务,开始第一个项目
在客户端桌面,右键,选择SVN checkout
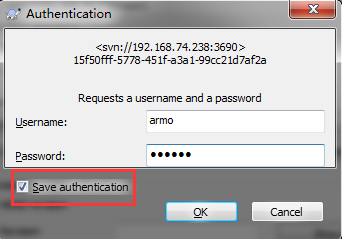
进行账号认证 armo 密码 passwd,第三步设置的账号密码
打开本地对应目录:D:svntest
epo1,开始项目,测试创建文件并提交。
新建文件后,在D:svntest
epo1文件夹中,右键,选择SVN commit进行提交代码。
SVN update从服务器上更新代码到本地
SVN commit将本地代码提交至服务器
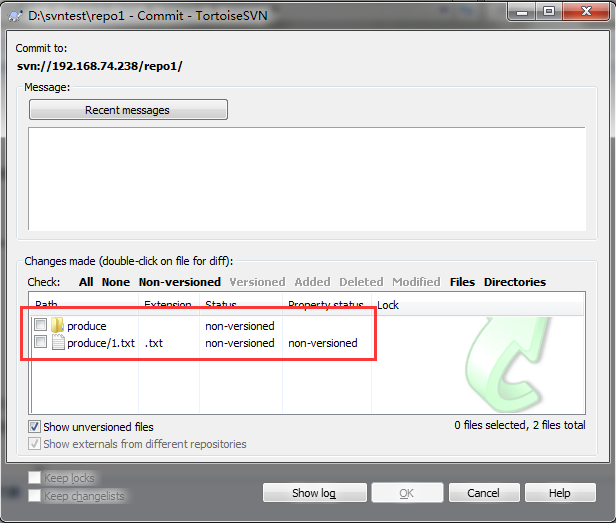
提交到服务器的代码已二进制格式保存在/opt/svn/repo1/db/revs/0中,此时如果有新客户端进行check out,则会从服务器上同步已经提交的product文件夹和1.txt到新客户端本地
7、设置HOOKS,实现提交到SVN服务器的代码同步到目标目录当中
在/opt/svn/repo1/hooks/中将post-commit.tmpl复制一份为post-commit,并且赋予执行权限,该hook在客户端执行commit之后会执行一次
  [root@localhost ~]# cp post-commit.tmpl post-commit
  [root@localhost ~]# vi /opt/svn/repo1/hooks/post-commit
    增加以下几行
    export LANG=en_US.UTF-8
    #将提交的文件在/tmp/svn_up文件夹中进行更新同步
    /usr/bin/svn update --username armo --password passwd /tmp/svn_up
    #使用rsync同步文件到目标文件夹,不包含.svn文件
    rsync -av --delete /tmp/svn_up/ /www/site/ --exclude=.svn
设置完该HOOKS之后,客户端提交的代码,会先使用svn update更新一份到/tmp/svn_up中,在使用rsync同步一份到需要的站点目录下,完成自动上线