http://blog.jobbole.com/63320/
A、30 Python Language Features and Tricks You May Not Know About
Posted on Mar 05, 2014 , last modified on May 19, 2014 - Permanent link
1 Introduction
Since I started learning Python, I decided to maintain an often visited list of "tricks". Any time I saw a piece of code (in an example, on Stack Overflow, in open source software, etc.) that made me think "Cool! I didn't know you could do that!" I experimented with it until I understood it and then added it to the list. This post is part of that list, after some cleaning up. If you are an experienced Python programmer, chances are you already know most of these, though you might still find a few that you didn't know about. If you are a C, C++ or Java programmer who is learning Python, or just brand new to programming, then you might find quite a few of them surprisingly useful, like I did.
Each trick or language feature is demonstrated only through examples, with no explanation. While I tried my best to make the examples clear, some of them might still appear cryptic depending on your familiarity level. So if something still doesn't make sense after looking at the examples, the title should be clear enough to allow you to use Google for more information on it.
The list is very roughly ordered by difficulty, with the easier and more commonly known language features and tricks appearing first.
A table of contents is given at the end.
- Update - April 9th, 2014
- As you can see the article has been growing with currently 38 items in it, mostly thanks to comments from readers. As such the number 30 in the title is no longer accurate. However, I chose to leave it as is since that's the original title the article was shared as, making it more recognizable and easier to find.
- Update - March 14th, 2014
- Roy Keyes made a great suggestion of turning this article into a GitHub repository to allow readers to make improvements or additions through pull requests. The repository is now at https://github.com/sahands/python-by-example. Feel free to fork, add improvements or additions and submit pull requests. I will update this page periodically with the new additions.
- Update - March 8th, 2014
-
This article generated a lot of good discussion on Reddit (http://redd.it/1zv3q3), Hacker News (https://news.ycombinator.com/item?id=7365410), and in the comments below, with many readers suggesting great alternatives and improvements. I have updated the list below to include many of the improvements suggested, and added a few new items based on suggestions that made me have one of those "Cool! I didn't know you could do that!" moments. In particular, I did not know about itertools.chain.from_iterable, and dictionary comprehensions.
There was also a very interesting discussion about the possibility of some of the techniques below leading to harder to debug code. My say on it is that as far as I can see, none of the items below are inherently harder to debug. But I can definitely see how they can be taken too far, resulting in hard to debug, maintain and understand code. Use your best judgment and if it feels like how short and smart your code is is outweighing how readable and maintainable it is, then break it down and simplify it. For example, I think list comprehensions can be very readable and rather easy to debug and maintain. But a list comprehension inside another list comprehension that is then passed to map and then toitertools.chain? Probably not the best idea!
1.1 Unpacking
>>> a, b, c = 1, 2, 3
>>> a, b, c
(1, 2, 3)
>>> a, b, c = [1, 2, 3]
>>> a, b, c
(1, 2, 3)
>>> a, b, c = (2 * i + 1 for i in range(3))
>>> a, b, c
(1, 3, 5)
>>> a, (b, c), d = [1, (2, 3), 4]
>>> a
1
>>> b
2
>>> c
3
>>> d
4
1.2 Unpacking for swapping variables
>>> a, b = 1, 2
>>> a, b = b, a
>>> a, b
(2, 1)
1.3 Extended unpacking (Python 3 only)
>>> a, *b, c = [1, 2, 3, 4, 5]
>>> a
1
>>> b
[2, 3, 4]
>>> c
5
1.4 Negative indexing
>>> a = [0, 1, 2, 3, 4, 5, 6, 7, 8, 9, 10]
>>> a[-1]
10
>>> a[-3]
8
1.5 List slices (a[start:end])
>>> a = [0, 1, 2, 3, 4, 5, 6, 7, 8, 9, 10]
>>> a[2:8]
[2, 3, 4, 5, 6, 7]
1.6 List slices with negative indexing
>>> a = [0, 1, 2, 3, 4, 5, 6, 7, 8, 9, 10]
>>> a[-4:-2]
[7, 8]
1.7 List slices with step (a[start:end:step])
>>> a = [0, 1, 2, 3, 4, 5, 6, 7, 8, 9, 10]
>>> a[::2]
[0, 2, 4, 6, 8, 10]
>>> a[::3]
[0, 3, 6, 9]
>>> a[2:8:2]
[2, 4, 6]
1.8 List slices with negative step
>>> a = [0, 1, 2, 3, 4, 5, 6, 7, 8, 9, 10]
>>> a[::-1]
[10, 9, 8, 7, 6, 5, 4, 3, 2, 1, 0]
>>> a[::-2]
[10, 8, 6, 4, 2, 0]
1.9 List slice assignment
>>> a = [1, 2, 3, 4, 5]
>>> a[2:3] = [0, 0]
>>> a
[1, 2, 0, 0, 4, 5]
>>> a[1:1] = [8, 9]
>>> a
[1, 8, 9, 2, 0, 0, 4, 5]
>>> a[1:-1] = []
>>> a
[1, 5]
1.10 Naming slices (slice(start, end, step))
>>> a = [0, 1, 2, 3, 4, 5]
>>> LASTTHREE = slice(-3, None)
>>> LASTTHREE
slice(-3, None, None)
>>> a[LASTTHREE]
[3, 4, 5]
1.11 Iterating over list index and value pairs (enumerate)
>>> a = ['Hello', 'world', '!']
>>> for i, x in enumerate(a):
...     print '{}: {}'.format(i, x)
...
0: Hello
1: world
2: !
1.12 Iterating over dictionary key and value pairs (dict.iteritems)
>>> m = {'a': 1, 'b': 2, 'c': 3, 'd': 4}
>>> for k, v in m.iteritems():
...     print '{}: {}'.format(k, v)
...
a: 1
c: 3
b: 2
d: 4
Note: use dict.items in Python 3.
1.13 Zipping and unzipping lists and iterables
>>> a = [1, 2, 3]
>>> b = ['a', 'b', 'c']
>>> z = zip(a, b)
>>> z
[(1, 'a'), (2, 'b'), (3, 'c')]
>>> zip(*z)
[(1, 2, 3), ('a', 'b', 'c')]
1.14 Grouping adjacent list items using zip
>>> a = [1, 2, 3, 4, 5, 6]

>>> # Using iterators
>>> group_adjacent = lambda a, k: zip(*([iter(a)] * k))
>>> group_adjacent(a, 3)
[(1, 2, 3), (4, 5, 6)]
>>> group_adjacent(a, 2)
[(1, 2), (3, 4), (5, 6)]
>>> group_adjacent(a, 1)
[(1,), (2,), (3,), (4,), (5,), (6,)]


>>> # Using slices
>>> from itertools import islice
>>> group_adjacent = lambda a, k: zip(*(islice(a, i, None, k) for i in range(k)))
>>> group_adjacent(a, 3)
[(1, 2, 3), (4, 5, 6)]
>>> group_adjacent(a, 2)
[(1, 2), (3, 4), (5, 6)]
>>> group_adjacent(a, 1)
[(1,), (2,), (3,), (4,), (5,), (6,)]
1.15 Sliding windows ((n)-grams) using zip and iterators
>>> from itertools import islice
>>> def n_grams(a, n):
...     z = (islice(a, i, None) for i in range(n))
...     return zip(*z)
...
>>> a = [1, 2, 3, 4, 5, 6]
>>> n_grams(a, 3)
[(1, 2, 3), (2, 3, 4), (3, 4, 5), (4, 5, 6)]
>>> n_grams(a, 2)
[(1, 2), (2, 3), (3, 4), (4, 5), (5, 6)]
>>> n_grams(a, 4)
[(1, 2, 3, 4), (2, 3, 4, 5), (3, 4, 5, 6)]
1.16 Inverting a dictionary using zip
>>> m = {'a': 1, 'b': 2, 'c': 3, 'd': 4}
>>> m.items()
[('a', 1), ('c', 3), ('b', 2), ('d', 4)]
>>> zip(m.values(), m.keys())
[(1, 'a'), (3, 'c'), (2, 'b'), (4, 'd')]
>>> mi = dict(zip(m.values(), m.keys()))
>>> mi
{1: 'a', 2: 'b', 3: 'c', 4: 'd'}
1.17 Flattening lists:
>>> a = [[1, 2], [3, 4], [5, 6]]
>>> list(itertools.chain.from_iterable(a))
[1, 2, 3, 4, 5, 6]

>>> sum(a, [])
[1, 2, 3, 4, 5, 6]

>>> [x for l in a for x in l]
[1, 2, 3, 4, 5, 6]

>>> a = [[[1, 2], [3, 4]], [[5, 6], [7, 8]]]
>>> [x for l1 in a for l2 in l1 for x in l2]
[1, 2, 3, 4, 5, 6, 7, 8]

>>> a = [1, 2, [3, 4], [[5, 6], [7, 8]]]
>>> flatten = lambda x: [y for l in x for y in flatten(l)] if type(x) is list else [x]
>>> flatten(a)
[1, 2, 3, 4, 5, 6, 7, 8]
Note: according to Python's documentation on sum, itertools.chain.from_iterable is the preferred method for this.
1.18 Generator expressions
>>> g = (x ** 2 for x in xrange(10))
>>> next(g)
0
>>> next(g)
1
>>> next(g)
4
>>> next(g)
9
>>> sum(x ** 3 for x in xrange(10))
2025
>>> sum(x ** 3 for x in xrange(10) if x % 3 == 1)
408
1.19 Dictionary comprehensions
>>> m = {x: x ** 2 for x in range(5)}
>>> m
{0: 0, 1: 1, 2: 4, 3: 9, 4: 16}

>>> m = {x: 'A' + str(x) for x in range(10)}
>>> m
{0: 'A0', 1: 'A1', 2: 'A2', 3: 'A3', 4: 'A4', 5: 'A5', 6: 'A6', 7: 'A7', 8: 'A8', 9: 'A9'}
1.20 Inverting a dictionary using a dictionary comprehension
>>> m = {'a': 1, 'b': 2, 'c': 3, 'd': 4}
>>> m
{'d': 4, 'a': 1, 'b': 2, 'c': 3}
>>> {v: k for k, v in m.items()}
{1: 'a', 2: 'b', 3: 'c', 4: 'd'}
1.21 Named tuples (collections.namedtuple)
>>> Point = collections.namedtuple('Point', ['x', 'y'])
>>> p = Point(x=1.0, y=2.0)
>>> p
Point(x=1.0, y=2.0)
>>> p.x
1.0
>>> p.y
2.0
1.22 Inheriting from named tuples:
>>> class Point(collections.namedtuple('PointBase', ['x', 'y'])):
...     __slots__ = ()
...     def __add__(self, other):
...             return Point(x=self.x + other.x, y=self.y + other.y)
...
>>> p = Point(x=1.0, y=2.0)
>>> q = Point(x=2.0, y=3.0)
>>> p + q
Point(x=3.0, y=5.0)
1.23 Sets and set operations
>>> A = {1, 2, 3, 3}
>>> A
set([1, 2, 3])
>>> B = {3, 4, 5, 6, 7}
>>> B
set([3, 4, 5, 6, 7])
>>> A | B
set([1, 2, 3, 4, 5, 6, 7])
>>> A & B
set([3])
>>> A - B
set([1, 2])
>>> B - A
set([4, 5, 6, 7])
>>> A ^ B
set([1, 2, 4, 5, 6, 7])
>>> (A ^ B) == ((A - B) | (B - A))
True
1.24 Multisets and multiset operations (collections.Counter)
>>> A = collections.Counter([1, 2, 2])
>>> B = collections.Counter([2, 2, 3])
>>> A
Counter({2: 2, 1: 1})
>>> B
Counter({2: 2, 3: 1})
>>> A | B
Counter({2: 2, 1: 1, 3: 1})
>>> A & B
Counter({2: 2})
>>> A + B
Counter({2: 4, 1: 1, 3: 1})
>>> A - B
Counter({1: 1})
>>> B - A
Counter({3: 1})
1.25 Most common elements in an iterable (collections.Counter)
>>> A = collections.Counter([1, 1, 2, 2, 3, 3, 3, 3, 4, 5, 6, 7])
>>> A
Counter({3: 4, 1: 2, 2: 2, 4: 1, 5: 1, 6: 1, 7: 1})
>>> A.most_common(1)
[(3, 4)]
>>> A.most_common(3)
[(3, 4), (1, 2), (2, 2)]
1.26 Double-ended queue (collections.deque)
>>> Q = collections.deque()
>>> Q.append(1)
>>> Q.appendleft(2)
>>> Q.extend([3, 4])
>>> Q.extendleft([5, 6])
>>> Q
deque([6, 5, 2, 1, 3, 4])
>>> Q.pop()
4
>>> Q.popleft()
6
>>> Q
deque([5, 2, 1, 3])
>>> Q.rotate(3)
>>> Q
deque([2, 1, 3, 5])
>>> Q.rotate(-3)
>>> Q
deque([5, 2, 1, 3])
1.27 Double-ended queue with maximum length (collections.deque)
>>> last_three = collections.deque(maxlen=3)
>>> for i in xrange(10):
...     last_three.append(i)
...     print ', '.join(str(x) for x in last_three)
...
0
0, 1
0, 1, 2
1, 2, 3
2, 3, 4
3, 4, 5
4, 5, 6
5, 6, 7
6, 7, 8
7, 8, 9
1.28 Ordered dictionaries (collections.OrderedDict)
>>> m = dict((str(x), x) for x in range(10))
>>> print ', '.join(m.keys())
1, 0, 3, 2, 5, 4, 7, 6, 9, 8
>>> m = collections.OrderedDict((str(x), x) for x in range(10))
>>> print ', '.join(m.keys())
0, 1, 2, 3, 4, 5, 6, 7, 8, 9
>>> m = collections.OrderedDict((str(x), x) for x in range(10, 0, -1))
>>> print ', '.join(m.keys())
10, 9, 8, 7, 6, 5, 4, 3, 2, 1
1.29 Default dictionaries (collections.defaultdict)
>>> m = dict()
>>> m['a']
Traceback (most recent call last):
  File "<stdin>", line 1, in <module>
KeyError: 'a'
>>>
>>> m = collections.defaultdict(int)
>>> m['a']
0
>>> m['b']
0
>>> m = collections.defaultdict(str)
>>> m['a']
''
>>> m['b'] += 'a'
>>> m['b']
'a'
>>> m = collections.defaultdict(lambda: '[default value]')
>>> m['a']
'[default value]'
>>> m['b']
'[default value]'
1.30 Using default dictionaries to represent simple trees
>>> import json
>>> tree = lambda: collections.defaultdict(tree)
>>> root = tree()
>>> root['menu']['id'] = 'file'
>>> root['menu']['value'] = 'File'
>>> root['menu']['menuitems']['new']['value'] = 'New'
>>> root['menu']['menuitems']['new']['onclick'] = 'new();'
>>> root['menu']['menuitems']['open']['value'] = 'Open'
>>> root['menu']['menuitems']['open']['onclick'] = 'open();'
>>> root['menu']['menuitems']['close']['value'] = 'Close'
>>> root['menu']['menuitems']['close']['onclick'] = 'close();'
>>> print json.dumps(root, sort_keys=True, indent=4, separators=(',', ': '))
{
    "menu": {
        "id": "file",
        "menuitems": {
            "close": {
                "onclick": "close();",
                "value": "Close"
            },
            "new": {
                "onclick": "new();",
                "value": "New"
            },
            "open": {
                "onclick": "open();",
                "value": "Open"
            }
        },
        "value": "File"
    }
}
(See https://gist.github.com/hrldcpr/2012250 for more on this.)
1.31 Mapping objects to unique counting numbers (collections.defaultdict)
>>> import itertools, collections
>>> value_to_numeric_map = collections.defaultdict(itertools.count().next)
>>> value_to_numeric_map['a']
0
>>> value_to_numeric_map['b']
1
>>> value_to_numeric_map['c']
2
>>> value_to_numeric_map['a']
0
>>> value_to_numeric_map['b']
1
1.32 Largest and smallest elements (heapq.nlargest andheapq.nsmallest)
>>> a = [random.randint(0, 100) for __ in xrange(100)]
>>> heapq.nsmallest(5, a)
[3, 3, 5, 6, 8]
>>> heapq.nlargest(5, a)
[100, 100, 99, 98, 98]
1.33 Cartesian products (itertools.product)
>>> for p in itertools.product([1, 2, 3], [4, 5]):
(1, 4)
(1, 5)
(2, 4)
(2, 5)
(3, 4)
(3, 5)
>>> for p in itertools.product([0, 1], repeat=4):
...     print ''.join(str(x) for x in p)
...
0000
0001
0010
0011
0100
0101
0110
0111
1000
1001
1010
1011
1100
1101
1110
1111
1.34 Combinations and combinations with replacement (itertools.combinations anditertools.combinations_with_replacement)
>>> for c in itertools.combinations([1, 2, 3, 4, 5], 3):
...     print ''.join(str(x) for x in c)
...
123
124
125
134
135
145
234
235
245
345
>>> for c in itertools.combinations_with_replacement([1, 2, 3], 2):
...     print ''.join(str(x) for x in c)
...
11
12
13
22
23
33
1.35 Permutations (itertools.permutations)
>>> for p in itertools.permutations([1, 2, 3, 4]):
...     print ''.join(str(x) for x in p)
...
1234
1243
1324
1342
1423
1432
2134
2143
2314
2341
2413
2431
3124
3142
3214
3241
3412
3421
4123
4132
4213
4231
4312
4321
1.36 Chaining iterables (itertools.chain)
>>> a = [1, 2, 3, 4]
>>> for p in itertools.chain(itertools.combinations(a, 2), itertools.combinations(a, 3)):
...     print p
...
(1, 2)
(1, 3)
(1, 4)
(2, 3)
(2, 4)
(3, 4)
(1, 2, 3)
(1, 2, 4)
(1, 3, 4)
(2, 3, 4)
>>> for subset in itertools.chain.from_iterable(itertools.combinations(a, n) for n in range(len(a) + 1))
...     print subset
...
()
(1,)
(2,)
(3,)
(4,)
(1, 2)
(1, 3)
(1, 4)
(2, 3)
(2, 4)
(3, 4)
(1, 2, 3)
(1, 2, 4)
(1, 3, 4)
(2, 3, 4)
(1, 2, 3, 4)
1.37 Grouping rows by a given key (itertools.groupby)
>>> from operator import itemgetter
>>> import itertools
>>> with open('contactlenses.csv', 'r') as infile:
...     data = [line.strip().split(',') for line in infile]
...
>>> data = data[1:]
>>> def print_data(rows):
...     print '
'.join('	'.join('{: <16}'.format(s) for s in row) for row in rows)
...

>>> print_data(data)
young               myope                   no                      reduced                 none
young               myope                   no                      normal                  soft
young               myope                   yes                     reduced                 none
young               myope                   yes                     normal                  hard
young               hypermetrope            no                      reduced                 none
young               hypermetrope            no                      normal                  soft
young               hypermetrope            yes                     reduced                 none
young               hypermetrope            yes                     normal                  hard
pre-presbyopic      myope                   no                      reduced                 none
pre-presbyopic      myope                   no                      normal                  soft
pre-presbyopic      myope                   yes                     reduced                 none
pre-presbyopic      myope                   yes                     normal                  hard
pre-presbyopic      hypermetrope            no                      reduced                 none
pre-presbyopic      hypermetrope            no                      normal                  soft
pre-presbyopic      hypermetrope            yes                     reduced                 none
pre-presbyopic      hypermetrope            yes                     normal                  none
presbyopic          myope                   no                      reduced                 none
presbyopic          myope                   no                      normal                  none
presbyopic          myope                   yes                     reduced                 none
presbyopic          myope                   yes                     normal                  hard
presbyopic          hypermetrope            no                      reduced                 none
presbyopic          hypermetrope            no                      normal                  soft
presbyopic          hypermetrope            yes                     reduced                 none
presbyopic          hypermetrope            yes                     normal                  none

>>> data.sort(key=itemgetter(-1))
>>> for value, group in itertools.groupby(data, lambda r: r[-1]):
...     print '-----------'
...     print 'Group: ' + value
...     print_data(group)
...
-----------
Group: hard
young               myope                   yes                     normal                  hard
young               hypermetrope            yes                     normal                  hard
pre-presbyopic      myope                   yes                     normal                  hard
presbyopic          myope                   yes                     normal                  hard
-----------
Group: none
young               myope                   no                      reduced                 none
young               myope                   yes                     reduced                 none
young               hypermetrope            no                      reduced                 none
young               hypermetrope            yes                     reduced                 none
pre-presbyopic      myope                   no                      reduced                 none
pre-presbyopic      myope                   yes                     reduced                 none
pre-presbyopic      hypermetrope            no                      reduced                 none
pre-presbyopic      hypermetrope            yes                     reduced                 none
pre-presbyopic      hypermetrope            yes                     normal                  none
presbyopic          myope                   no                      reduced                 none
presbyopic          myope                   no                      normal                  none
presbyopic          myope                   yes                     reduced                 none
presbyopic          hypermetrope            no                      reduced                 none
presbyopic          hypermetrope            yes                     reduced                 none
presbyopic          hypermetrope            yes                     normal                  none
-----------
Group: soft
young               myope                   no                      normal                  soft
young               hypermetrope            no                      normal                  soft
pre-presbyopic      myope                   no                      normal                  soft
pre-presbyopic      hypermetrope            no                      normal                  soft
presbyopic          hypermetrope            no                      normal                  soft
1.38 Start a static HTTP server in any directory
[10:26] $ python -m SimpleHTTPServer 5000
Serving HTTP on 0.0.0.0 port 5000 ...
1.39 Learn the Zen of Python
>>> import this
The Zen of Python, by Tim Peters

Beautiful is better than ugly.
Explicit is better than implicit.
Simple is better than complex.
Complex is better than complicated.
Flat is better than nested.
Sparse is better than dense.
Readability counts.
Special cases aren't special enough to break the rules.
Although practicality beats purity.
Errors should never pass silently.
Unless explicitly silenced.
In the face of ambiguity, refuse the temptation to guess.
There should be one-- and preferably only one --obvious way to do it.
Although that way may not be obvious at first unless you're Dutch.
Now is better than never.
Although never is often better than *right* now.
If the implementation is hard to explain, it's a bad idea.
If the implementation is easy to explain, it may be a good idea.
Namespaces are one honking great idea -- let's do more of those!
1.40 Use C-Style Braces Instead of Indentation to Denote Scopes
>>> from __future__ import braces
2 Table of contents
List of language features and tricks in this article:
- 1 Introduction
- 1.1 Unpacking
- 1.2 Unpacking for swapping variables
- 1.3 Extended unpacking (Python 3 only)
- 1.4 Negative indexing
- 1.5 List slices (a[start:end])
- 1.6 List slices with negative indexing
- 1.7 List slices with step (a[start:end:step])
- 1.8 List slices with negative step
- 1.9 List slice assignment
- 1.10 Naming slices (slice(start, end, step))
- 1.11 Iterating over list index and value pairs (enumerate)
- 1.12 Iterating over dictionary key and value pairs (dict.iteritems)
- 1.13 Zipping and unzipping lists and iterables
- 1.14 Grouping adjacent list items using zip
- 1.15 Sliding windows ((n)-grams) using zip and iterators
- 1.16 Inverting a dictionary using zip
- 1.17 Flattening lists:
- 1.18 Generator expressions
- 1.19 Dictionary comprehensions
- 1.20 Inverting a dictionary using a dictionary comprehension
- 1.21 Named tuples (collections.namedtuple)
- 1.22 Inheriting from named tuples:
- 1.23 Sets and set operations
- 1.24 Multisets and multiset operations (collections.Counter)
- 1.25 Most common elements in an iterable (collections.Counter)
- 1.26 Double-ended queue (collections.deque)
- 1.27 Double-ended queue with maximum length (collections.deque)
- 1.28 Ordered dictionaries (collections.OrderedDict)
- 1.29 Default dictionaries (collections.defaultdict)
- 1.30 Using default dictionaries to represent simple trees
- 1.31 Mapping objects to unique counting numbers (collections.defaultdict)
- 1.32 Largest and smallest elements (heapq.nlargest and heapq.nsmallest)
- 1.33 Cartesian products (itertools.product)
- 1.34 Combinations and combinations with replacement (itertools.combinations anditertools.combinations_with_replacement)
- 1.35 Permutations (itertools.permutations)
- 1.36 Chaining iterables (itertools.chain)
- 1.37 Grouping rows by a given key (itertools.groupby)
- 1.38 Start a static HTTP server in any directory
- 1.39 Learn the Zen of Python
- 1.40 Use C-Style Braces Instead of Indentation to Denote Scopes
B、http://ozkatz.github.io/improving-your-python-productivity.html
I've been programming in python for a few years now, and I'm still often amazed by how clear and DRY well written Python code can be. There are many small tips and tricks I've learned over time, mostly by reading the code of popular open source projects, such as Django, Flask, Requests and others.
Here are a few things I've picked up that are sometimes overlooked, but can really help with everyday work.
1. Dictionary and Set comprehensions
Most Python developers know and use list comprehensions. For those of you unfamiliar with the concept, a list comprehension is a shorter, more concise way of creating lists.
>>> some_list = [1, 2, 3, 4, 5]
>>> another_list = [ x + 1 for x in some_list ]
>>> another_list
[2, 3, 4, 5, 6]
Since python 3.1 (and also back-ported to Python 2.7), we can now use the same idiom to create sets and dictionaries:
>>> # Set Comprehensions
>>> some_list = [1, 2, 3, 4, 5, 2, 5, 1, 4, 8]
>>> even_set = { x for x in some_list if x % 2 == 0 }
>>> even_set
set([8, 2, 4])

>>> # Dict Comprehensions
>>> d = { x: x % 2 == 0 for x in range(1, 11) }
>>> d
{1: False, 2: True, 3: False, 4: True, 5: False, 6: True, 7: False, 8: True, 9: False, 10: True}
In the first example we create a set of unique items from some_list, but only ones that are even numbers. The Dictionary example shows the creation of a dictionary, where the keys are integers from 1 to 10 (inclusive), and the values are booleans, indicating whether or not the key is an even number.
Another feature worth mentioning here is the availability of set literals. We can create a set simply by doing:
>>> my_set = {1, 2, 1, 2, 3, 4}
>>> my_set
set([1, 2, 3, 4])
Instead of using the set() built-in function.
2. Using a Counter object for, well, counting.
This is a pretty obvious one, but it's often forgotten. Counting stuff is a pretty common task for most developers, and while it isn't a very challenging thing to do (In most cases) - there are ways to make it even easier.
Python's collections library includes a subclass of the built-in dict, created specifically for this task:
>>> from collections import Counter
>>> c = Counter('hello world')
>>> c
Counter({'l': 3, 'o': 2, ' ': 1, 'e': 1, 'd': 1, 'h': 1, 'r': 1, 'w': 1})
>>> c.most_common(2)
[('l', 3), ('o', 2)]
3. Pretty printing JSON
JSON is a great serialization format, heavily used today by APIs and web-services. While it's somewhat human-readable, when working with the built-in json module, It's very hard to make sense of larger data structures with the naked eye, as they appear as one long, continuous line.
To make things a bit easier we can use the indent argument to "pretty print" our JSON data. this is especially useful when working interactively from the REPL or for logging:
>>> import json
>>> print(json.dumps(data))  # No indention
{"status": "OK", "count": 2, "results": [{"age": 27, "name": "Oz", "lactose_intolerant": true}, {"age": 29, "name": "Joe", "lactose_intolerant": false}]}
>>> print(json.dumps(data, indent=2))  # With indention
{
  "status": "OK",
  "count": 2,
  "results": [
    {
      "age": 27,
      "name": "Oz",
      "lactose_intolerant": true
    },
    {
      "age": 29,
      "name": "Joe",
      "lactose_intolerant": false
    }
  ]
}
Also, be sure to checkout the built-in pprint module for pretty-printing anything else.
4. Create a one-off, quick and dirty web service
Sometimes we need a very basic and quick way of doing some sort of RPC between services or machines. All we want is a simple way to call a method of program A by program B, possibly on another machine - for internal use.
While I wouldn't advocate this technique for creating anything other than internal one-off hacks, we can use a protocol called XML-RPC (with its corresponding Python libraries) for this sort of work.
Here is an example of a quick and dirty file-reading server, using theSimpleXMLRPCServer module:
from SimpleXMLRPCServer import SimpleXMLRPCServer

def file_reader(file_name):
    with open(file_name, 'r') as f:
        return f.read()

server = SimpleXMLRPCServer(('localhost', 8000))
server.register_introspection_functions()

server.register_function(file_reader)

server.serve_forever()
With the corresponding client:
import xmlrpclib
proxy = xmlrpclib.ServerProxy('http://localhost:8000/')
proxy.file_reader('/tmp/secret.txt')
And we now have some sort of a remote file reader with no external dependencies and only a little code (And, of course, no security of any kind, so try this only at home).
5. Python's awesome open source community has you covered
Well, I've only covered things available in Python's standard library, which, if you have Python installed, is already included with your distribution. for most other tasks, there are a ton of community maintained 3rd party libraries at your disposal.
Here is my checklist for choosing a great reliable open source library:
A Great open source library must...
- Contain a clear license that suites your particular case.
- Be Actively developed and maintained (Or, your willingness to step in and maintain it).
- Be installable using
pipfor easy, repeatable deployment. - have a test suite with at least decent coverage.
If you do find a good library that fits your needs, don't be shy - most open source projects welcome contributions and assistance, even if you are not a Python veteran. Helping hands (and heads) are almost always welcome.
As always, I'd be happy to learn from your experience and of course discuss the tips I presented! Hit me up in the comments here below, or on Twitter at ozkatz100.
C、http://blog.jobbole.com/61171/
本文由 伯乐在线 - 熊崽Kevin 翻译。未经许可,禁止转载!
英文出处:pypix。欢迎加入翻译组。
译注:本文的英文题目是《Advanced Design Patterns in Python》,可直译为《Python中的高级设计模式》。不过本人在通读完全文之后发现文章的内容与我们通常理解的设计模式有很大出入,原文后的评论中也有其他读者提出了这一点。因此,根据文章内容我将题目译为“Python高级编程技巧”,如有不同意见请留言指出,非常感谢。
正文:
本文展示一些高级的Python设计结构和它们的使用方法。在日常工作中,你可以根据需要选择合适的数据结构,例如对快速查找性的要求、对数据一致性的要求或是对索引的要求等,同时也可以将各种数据结构合适地结合在一起,从而生成具有逻辑性并易于理解的数据模型。Python的数据结构从句法上来看非常直观,并且提供了大量的可选操作。这篇指南尝试将大部分常用的数据结构知识放到一起,并且提供对其最佳用法的探讨。
推导式(Comprehensions)
如果你已经使用了很长时间的Python,那么你至少应该听说过列表推导(list comprehensions)。这是一种将for循环、if表达式以及赋值语句放到单一语句中的一种方法。换句话说,你能够通过一个表达式对一个列表做映射或过滤操作。
一个列表推导式包含以下几个部分:
- 一个输入序列
- 一个表示输入序列成员的变量
- 一个可选的断言表达式
- 一个将输入序列中满足断言表达式的成员变换成输出列表成员的输出表达式
举个例子,我们需要从一个输入列表中将所有大于0的整数平方生成一个新的序列,你也许会这么写:
|
1
2
3
4
5
6
7
8
9
|
num = [1, 4, -5, 10, -7, 2, 3, -1]
filtered_and_squared = []
for number in num:
if number > 0:
filtered_and_squared.append(number ** 2)
print filtered_and_squared
# [1, 16, 100, 4, 9]
|
很简单是吧?但是这就会有4行代码,两层嵌套外加一个完全不必要的append操作。而如果使用filter、lambda和map函数,则能够将代码大大简化:
|
1
2
3
4
5
|
num = [1, 4, -5, 10, -7, 2, 3, -1]
filtered_and_squared = map(lambda x: x ** 2, filter(lambda x: x > 0, num))
print filtered_and_squared
# [1, 16, 100, 4, 9]
|
嗯,这么一来代码就会在水平方向上展开。那么是否能够继续简化代码呢?列表推导能够给我们答案:
|
1
2
3
4
5
|
num = [1, 4, -5, 10, -7, 2, 3, -1]
filtered_and_squared = [ x**2 for x in num if x > 0]
print filtered_and_squared
# [1, 16, 100, 4, 9]
|

- 迭代器(iterator)遍历输入序列num的每个成员x
- 断言式判断每个成员是否大于零
- 如果成员大于零,则被交给输出表达式,平方之后成为输出列表的成员。
列表推导式被封装在一个列表中,所以很明显它能够立即生成一个新列表。这里只有一个type函数调用而没有隐式调用lambda函数,列表推导式正是使用了一个常规的迭代器、一个表达式和一个if表达式来控制可选的参数。
另一方面,列表推导也可能会有一些负面效应,那就是整个列表必须一次性加载于内存之中,这对上面举的例子而言不是问题,甚至扩大若干倍之后也都不是问题。但是总会达到极限,内存总会被用完。
针对上面的问题,生成器(Generator)能够很好的解决。生成器表达式不会一次将整个列表加载到内存之中,而是生成一个生成器对象(Generator objector),所以一次只加载一个列表元素。
生成器表达式同列表推导式有着几乎相同的语法结构,区别在于生成器表达式是被圆括号包围,而不是方括号:
|
1
2
3
4
5
6
7
8
9
10
|
num = [1, 4, -5, 10, -7, 2, 3, -1]
filtered_and_squared = ( x**2 for x in num if x > 0 )
print filtered_and_squared
# <generator object <genexpr> at 0x00583E18>
for item in filtered_and_squared:
print item
# 1, 16, 100 4,9
|
这比列表推导效率稍微提高一些,让我们再一次改造一下代码:
|
1
2
3
4
5
6
7
8
9
10
11
12
13
14
15
16
17
|
num = [1, 4, -5, 10, -7, 2, 3, -1]
def square_generator(optional_parameter):
return (x ** 2 for x in num if x > optional_parameter)
print square_generator(0)
# <generator object <genexpr> at 0x004E6418>
# Option I
for k in square_generator(0):
print k
# 1, 16, 100, 4, 9
# Option II
g = list(square_generator(0))
print g
# [1, 16, 100, 4, 9]
|
除非特殊的原因,应该经常在代码中使用生成器表达式。但除非是面对非常大的列表,否则是不会看出明显区别的。
下例使用zip()函数一次处理两个或多个列表中的元素:
|
1
2
3
4
5
6
7
8
9
|
alist = ['a1', 'a2', 'a3']
blist = ['1', '2', '3']
for a, b in zip(alist, blist):
print a, b
# a1 1
# a2 2
# a3 3
|
再来看一个通过两阶列表推导式遍历目录的例子:
|
1
2
3
4
5
6
7
8
|
import os
def tree(top):
for path, names, fnames in os.walk(top):
for fname in fnames:
yield os.path.join(path, fname)
for name in tree('C:UsersXXXDownloadsTest'):
print name
|
装饰器(Decorators)
装饰器为我们提供了一个增加已有函数或类的功能的有效方法。听起来是不是很像Java中的面向切面编程(Aspect-Oriented Programming)概念?两者都很简单,并且装饰器有着更为强大的功能。举个例子,假定你希望在一个函数的入口和退出点做一些特别的操作(比如一些安全、追踪以及锁定等操作)就可以使用装饰器。
装饰器是一个包装了另一个函数的特殊函数:主函数被调用,并且其返回值将会被传给装饰器,接下来装饰器将返回一个包装了主函数的替代函数,程序的其他部分看到的将是这个包装函数。
|
1
2
3
4
5
6
7
8
9
10
|
def timethis(func):
'''
Decorator that reports the execution time.
'''
pass
@timethis
def countdown(n):
while n > 0:
n -= 1
|
语法糖@标识了装饰器。
好了,让我们回到刚才的例子。我们将用装饰器做一些更典型的操作:
|
1
2
3
4
5
6
7
8
9
10
11
12
13
14
15
16
17
18
19
20
21
22
23
24
|
import time
from functools import wraps
def timethis(func):
'''
Decorator that reports the execution time.
'''
@wraps(func)
def wrapper(*args, **kwargs):
start = time.time()
result = func(*args, **kwargs)
end = time.time()
print(func.__name__, end-start)
return result
return wrapper
@timethis
def countdown(n):
while n > 0:
n -= 1
countdown(100000)
# ('countdown', 0.006999969482421875)
|
当你写下如下代码时:
|
1
2
|
@timethis
def countdown(n):
|
意味着你分开执行了以下步骤:
|
1
2
3
|
def countdown(n):
...
countdown = timethis(countdown)
|
装饰器函数中的代码创建了一个新的函数(正如此例中的wrapper函数),它用 *args 和 **kwargs 接收任意的输入参数,并且在此函数内调用原函数并且返回其结果。你可以根据自己的需要放置任何额外的代码(例如本例中的计时操作),新创建的包装函数将作为结果返回并取代原函数。
|
1
2
3
|
@decorator
def function():
print("inside function")
|
当编译器查看以上代码时,function()函数将会被编译,并且函数返回对象将会被传给装饰器代码,装饰器将会在做完相关操作之后用一个新的函数对象代替原函数。
装饰器代码是什么样的?大部分的例子都是将装饰器定义为函数,而我发觉将装饰器定义成类更容易理解其功能,并且这样更能发挥装饰器机制的威力。
对装饰器的类实现唯一要求是它必须能如函数一般使用,也就是说它必须是可调用的。所以,如果想这么做这个类必须实现__call__方法。
这样的装饰器应该用来做些什么?它可以做任何事,但通常它用在当你想在一些特殊的地方使用原函数时,但这不是必须的,例如:
|
1
2
3
4
5
6
7
8
9
10
11
12
13
14
15
16
17
18
19
20
21
|
class decorator(object):
def __init__(self, f):
print("inside decorator.__init__()")
f() # Prove that function definition has completed
def __call__(self):
print("inside decorator.__call__()")
@decorator
def function():
print("inside function()")
print("Finished decorating function()")
function()
# inside decorator.__init__()
# inside function()
# Finished decorating function()
# inside decorator.__call__()
|
译者注:
1. 语法糖@decorator相当于function=decorator(function),在此调用decorator的__init__打印“inside decorator.__init__()”
2. 随后执行f()打印“inside function()”
3. 随后执行“print(“Finished decorating function()”)”
4. 最后在调用function函数时,由于使用装饰器包装,因此执行decorator的__call__打印 “inside decorator.__call__()”。
一个更实际的例子:
|
1
2
3
4
5
6
7
8
9
10
11
12
13
14
15
16
17
18
19
20
|
def decorator(func):
def modify(*args, **kwargs):
variable = kwargs.pop('variable', None)
print variable
x,y=func(*args, **kwargs)
return x,y
return modify
@decorator
def func(a,b):
print a**2,b**2
return a**2,b**2
func(a=4, b=5, variable="hi")
func(a=4, b=5)
# hi
# 16 25
# None
# 16 25
|
上下文管理库(ContextLib)
contextlib模块包含了与上下文管理器和with声明相关的工具。通常如果你想写一个上下文管理器,则你需要定义一个类包含__enter__方法以及__exit__方法,例如:
|
1
2
3
4
5
6
7
8
9
10
11
|
import time
class demo:
def __init__(self, label):
self.label = label
def __enter__(self):
self.start = time.time()
def __exit__(self, exc_ty, exc_val, exc_tb):
end = time.time()
print('{}: {}'.format(self.label, end - self.start))
|
完整的例子在此:
|
1
2
3
4
5
6
7
8
9
10
11
12
13
14
15
16
17
18
19
|
import time
class demo:
def __init__(self, label):
self.label = label
def __enter__(self):
self.start = time.time()
def __exit__(self, exc_ty, exc_val, exc_tb):
end = time.time()
print('{}: {}'.format(self.label, end - self.start))
with demo('counting'):
n = 10000000
while n > 0:
n -= 1
# counting: 1.36000013351
|
上下文管理器被with声明所激活,这个API涉及到两个方法。
1. __enter__方法,当执行流进入with代码块时,__enter__方法将执行。并且它将返回一个可供上下文使用的对象。
2. 当执行流离开with代码块时,__exit__方法被调用,它将清理被使用的资源。
利用@contextmanager装饰器改写上面那个例子:
|
1
2
3
4
5
6
7
8
9
10
11
12
13
14
15
16
17
18
|
from contextlib import contextmanager
import time
@contextmanager
def demo(label):
start = time.time()
try:
yield
finally:
end = time.time()
print('{}: {}'.format(label, end - start))
with demo('counting'):
n = 10000000
while n > 0:
n -= 1
# counting: 1.32399988174
|
看上面这个例子,函数中yield之前的所有代码都类似于上下文管理器中__enter__方法的内容。而yield之后的所有代码都如__exit__方法的内容。如果执行过程中发生了异常,则会在yield语句触发。
描述器(Descriptors)
描述器决定了对象属性是如何被访问的。描述器的作用是定制当你想引用一个属性时所发生的操作。
构建描述器的方法是至少定义以下三个方法中的一个。需要注意,下文中的instance是包含被访问属性的对象实例,而owner则是被描述器修辞的类。
- __get__(self, instance, owner) – 这个方法是当属性被通过(value = obj.attr)的方式获取时调用,这个方法的返回值将被赋给请求此属性值的代码部分。
- __set__(self, instance, value) – 这个方法是当希望设置属性的值(obj.attr = ‘value’)时被调用,该方法不会返回任何值。
- __delete__(self, instance) – 当从一个对象中删除一个属性时(del obj.attr),调用此方法。
译者注:对于instance和owner的理解,考虑以下代码:
|
1
2
3
4
5
6
7
8
9
10
11
12
13
|
class Celsius(object):
def __init__(self, value=0.0):
self.value = float(value)
def __get__(self, instance, owner):
return self.value
def __set__(self, instance, value):
self.value = float(value)
class Temperature(object):
celsius = Celsius()
temp=Temperature()
temp.celsius #calls Celsius.__get__
|
上例中,instance指的是temp,而owner则是Temperature。
LazyLoading Properties例子:
|
1
2
3
4
5
6
7
8
9
10
11
12
13
14
15
16
17
18
19
20
21
22
23
24
25
|
import weakref
class lazyattribute(object):
def __init__(self, f):
self.data = weakref.WeakKeyDictionary()
self.f = f
def __get__(self, obj, cls):
if obj not in self.data:
self.data[obj] = self.f(obj)
return self.data[obj]
class Foo(object):
@lazyattribute
def bar(self):
print "Being lazy"
return 42
f = Foo()
print f.bar
# Being lazy
# 42
print f.bar
# 42
|
描述器很好的总结了Python中的绑定方法(bound method)这个概念,绑定方法是经典类(classic classes)的实现核心。在经典类中,当在一个对象实例的字典中没有找到某个属性时,会继续到类的字典中查找,然后再到基类的字典中,就这么一直递归的查找下去。如果在类字典中找到这个属性,解释器会检查找到的对象是不是一个Python函数对象。如果是,则返回的并不是这个对象本身,而是返回一个柯里化(currying function)的包装器对象。当调用这个包装器时,它会首先在参数列表之前插入实例,然后再调用原函数。
译者注:
1. 柯里化 – http://zh.wikipedia.org/wiki/%E6%9F%AF%E9%87%8C%E5%8C%96
2. function,method,bound method及unbound method的区别。首先,函数(function)是由def或lambda创建的。当一个函数在class语句块中定义或是由type来创建时,它会转成一个非绑定方法(unbound method),而当通过类实例(instance)来访问此方法的时候,它将转成绑定方法(bound method),绑定方法会自动将实例作为第一个参数传入方法。综上所述,方法是出现在类中的函数,绑定方法是一个绑定了具体实例的方法,反之则是非绑定方法。
综上,描述器被赋值给类,而这些特殊的方法就在属性被访问的时候根据具体的访问类型自动地调用。
元类(MetaClasses)
元类提供了一个改变Python类行为的有效方式。
元类的定义是“一个类的类”。任何实例是它自己的类都是元类。
|
1
2
3
4
5
6
7
8
9
10
|
class demo(object):
pass
obj = demo()
print "Class of obj is {0}".format(obj.__class__)
print "Class of obj is {0}".format(demo.__class__)
# Class of obj is <class '__main__.demo'>
# Class of obj is <type 'type'>
|
在上例中,我们定义了一个类demo,并且生成了一个该类的对象obj。首先,可以看到obj的__class__是demo。有意思的来了,那么demo的class又是什么呢?可以看到demo的__class__是type。
所以说type是python类的类,换句话说,上例中的obj是一个demo的对象,而demo本身又是type的一个对象。
所以说type就是一个元类,而且是python中最常见的元类,因为它使python中所有类的默认元类。
因为元类是类的类,所以它被用来创建类(正如类是被用来创建对象的一样)。但是,难道我们不是通过一个标准的类定义来创建类的么?的确是这样,但是python内部的运作机制如下:
- 当看见一个类定义,python会收集所有属性到一个字典中。
- 当类定义结束,python将决定类的元类,我们就称它为Meta吧。
- 最后,python执行Meta(name, bases, dct),其中:
a. Meta是元类,所以这个调用是实例化它。
b. name是新建类的类名。
c. bases是新建类的基类元组
d. dct将属性名映射到对象,列出所有的类属性。
那么如何确定一个类(A)的元类呢?简单来说,如果一个类(A)自身或其基类(Base_A)之一有__metaclass__属性存在,则这个类(A/Base_A)就是类(A)的元类。否则type就将是类(A)的元类。
模式(Patterns)
“请求宽恕比请求许可更容易(EFAP)”
这个Python设计原则是这么说的“请求宽恕比请求许可更容易(EFAP)”。不提倡深思熟虑的设计思路,这个原则是说应该尽量去尝试,如果遇到错误,则给予妥善的处理。Python有着强大的异常处理机制可以支持这种尝试,这些机制帮助程序员开发出更为稳定,容错性更高的程序。
单例
单例是指只能同时存在一个的实例对象。Python提供了很多方法来实现单例。
Null对象
Null对象能够用来代替None类型以避免对None的测试。
观察者
观察者模式允许多个对象访问同一份数据。
构造函数
构造函数的参数经常被赋值给实例的变量。这种模式能够用一行代码替代多个手动赋值语句。
总结
谢谢阅读,如有疑问,请留言讨论。
D、http://www.cnblogs.com/vamei/archive/2012/11/06/2755503.html
Python补充02 Python小技巧
作者:Vamei 出处:http://www.cnblogs.com/vamei 欢迎转载,也请保留这段声明。谢谢!
在这里列举一些我使用Python时积累的小技巧。这些技巧是我在使用Python过程中经常使用的。之前很零碎的记在笔记本中,现在整理出来,和大家分享,也作为Python快速教程的一个补充。
import模块
在Python经常使用import声明,以使用其他模块(也就是其它.py文件)中定义的对象。
1) 使用__name__
当我们编写Python库模块的时候,我们往往运行一些测试语句。当这个程序作为库被import的时候,我们并不需要运行这些测试语句。一种解决方法是在import之前,将模块中的测试语句注释掉。Python有一种更优美的解决方法,就是使用__name__。
下面是一个简单的库程序TestLib.py。当直接运行TestLib.py时,__name__为"__main__"。如果被import的话,__name__为"TestLib"。

def lib_func(a):
    return a + 10
def lib_func_another(b):
    return b + 20

if __name__ == '__main__':
    test = 101
    print(lib_func(test))
我们在user.py中import上面的TestLib。
import TestLib
print(TestLib.lib_func(120))
你可以尝试不在TestLib.py中使用if __name__=='__main__', 并对比运行结果。
2) 更多import使用方式
import TestLib as test # 引用TestLib模块,并将它改名为t
比如:
import TestLib as t
print(t.lib_func(120))
from TestLib import lib_func # 只引用TestLib中的lib_func对象,并跳过TestLib引用字段
这样的好处是减小所引用模块的内存占用。
比如:
from TestLib import lib_func
print(lib_func(120))
from TestLib import * # 引用所有TestLib中的对象,并跳过TestLib引用字段
比如:
from TestLib import *
print(lib_func(120))
查询
1) 查询函数的参数
当我们想要知道某个函数会接收哪些参数的时候,可以使用下面方法查询。
import inspect
print(inspect.getargspec(func))
2) 查询对象的属性
除了使用dir()来查询对象的属性之外,我们可以使用下面内置(built-in)函数来确认一个对象是否具有某个属性:
hasattr(obj, attr_name) # attr_name是一个字符串
例如:
a = [1,2,3]
print(hasattr(a,'append'))
2) 查询对象所属的类和类名称
a = [1, 2, 3]
print a.__class__
print a.__class__.__name__
3) 查询父类
我们可以用__base__属性来查询某个类的父类:
cls.__base__
例如:
print(list.__base__)
使用中文(以及其它非ASCII编码)
在Python程序的第一行加入#coding=utf8,例如:
#coding=utf8
print("你好吗?")
也能用以下方式:
#-*- coding: UTF-8 -*-
print("你好吗?")
表示2进制,8进制和16进制数字
在2.6以上版本,以如下方式表示
print(0b1110)     # 二进制,以0b开头
print(0o10)       # 八进制,以0o开头
print(0x2A)       # 十六进制,以0x开头
如果是更早版本,可以用如下方式:
print(int("1110", 2))
print(int("10", 8))
print(int("2A", 16))
注释
一行内的注释可以以#开始
多行的注释可以以'''开始,以'''结束,比如
'''
This is demo
'''

def func():
    # print something
    print("Hello world!")  # use print() function

# main
func()
注释应该和所在的程序块对齐。
搜索路径
当我们import的时候,Python会在搜索路径中查找模块(module)。比如上面import TestLib,就要求TestLib.py在搜索路径中。
我们可以通过下面方法来查看搜索路径:
import sys
print(sys.path)
我们可以在Python运行的时候增加或者删除sys.path中的元素。另一方面,我们可以通过在shell中增加PYTHONPATH环境变量,来为Python增加搜索路径。
下面我们增加/home/vamei/mylib到搜索路径中:
$export PYTHONPATH=$PYTHONPATH:/home/vamei/mylib
你可以将正面的这行命令加入到~/.bashrc中。这样,我们就长期的改变了搜索路径。
脚本与命令行结合
可以使用下面方法运行一个Python脚本,在脚本运行结束后,直接进入Python命令行。这样做的好处是脚本的对象不会被清空,可以通过命令行直接调用。
$python -i script.py
安装非标准包
Python的标准库随着Python一起安装。当我们需要非标准包时,就要先安装。
1) 使用Linux repository (Linux环境)
这是安装Python附加包的一个好的起点。你可以在Linux repository中查找可能存在的Python包 (比如在Ubuntu Software Center中搜索matplot)。
2) 使用pip。pip是Python自带的包管理程序,它连接Python repository,并查找其中可能存在的包。
比如使用如下方法来安装、卸载或者升级web.py:
$pip install web.py
$pip uninstall web.py
$pip install --upgrade web.py
如果你的Python安装在一个非标准的路径(使用$which python来确认python可执行文件的路径)中,比如/home/vamei/util/python/bin中,你可以使用下面方法设置pip的安装包的路径:
$pip install --install-option="--prefix=/home/vamei/util/" web.py
3) 从源码编译
如果上面方法都没法找到你想要的库,你可能需要从源码开始编译。Google往往是最好的起点。
以后如果有新的收获,会补充到这篇博文中。
E、http://python.jobbole.com/32748/
本文由 伯乐在线 - 刘志军 翻译。未经许可,禁止转载!
英文出处:Max Burstein。欢迎加入翻译组。
以下是我近些年收集的一些Python实用技巧和工具,希望能对你有所帮助。
交换变量
|
1
2
3
4
5
6
7
8
9
|
x = 6
y = 5
x, y = y, x
print x
>>> 5
print y
>>> 6
|
if 语句在行内
|
1
2
|
print "Hello" if True else "World"
>>> Hello
|
连接
下面的最后一种方式在绑定两个不同类型的对象时显得很cool。
|
1
2
3
4
5
6
7
8
9
10
11
12
13
14
15
|
nfc = ["Packers", "49ers"]
afc = ["Ravens", "Patriots"]
print nfc + afc
>>> ['Packers', '49ers', 'Ravens', 'Patriots']
print str(1) + " world"
>>> 1 world
print `1` + " world"
>>> 1 world
print 1, "world"
>>> 1 world
print nfc, 1
>>> ['Packers', '49ers'] 1
|
数字技巧
|
1
2
3
4
5
6
|
#除后向下取整
print 5.0//2
>>> 2
# 2的5次方
print 2**5
>> 32
|
注意浮点数的除法
|
1
2
3
4
|
print .3/.1
>>> 2.9999999999999996
print .3//.1
>>> 2.0
|
数值比较
这是我见过诸多语言中很少有的如此棒的简便法
|
1
2
3
4
5
6
7
|
x = 2
if 3 > x > 1:
print x
>>> 2
if 1 < x > 0:
print x
>>> 2
|
同时迭代两个列表
|
1
2
3
4
5
6
|
nfc = ["Packers", "49ers"]
afc = ["Ravens", "Patriots"]
for teama, teamb in zip(nfc, afc):
print teama + " vs. " + teamb
>>> Packers vs. Ravens
>>> 49ers vs. Patriots
|
带索引的列表迭代
|
1
2
3
4
5
6
7
|
teams = ["Packers", "49ers", "Ravens", "Patriots"]
for index, team in enumerate(teams):
print index, team
>>> 0 Packers
>>> 1 49ers
>>> 2 Ravens
>>> 3 Patriots
|
列表推导式
已知一个列表,我们可以刷选出偶数列表方法:
|
1
2
3
4
5
|
numbers = [1,2,3,4,5,6]
even = []
for number in numbers:
if number%2 == 0:
even.append(number)
|
转变成如下:
|
1
2
|
numbers = [1,2,3,4,5,6]
even = [number for number in numbers if number%2 == 0]
|
是不是很牛呢,哈哈。
字典推导
和列表推导类似,字典可以做同样的工作:
|
1
2
3
|
teams = ["Packers", "49ers", "Ravens", "Patriots"]
print {key: value for value, key in enumerate(teams)}
>>> {'49ers': 1, 'Ravens': 2, 'Patriots': 3, 'Packers': 0}
|
初始化列表的值
|
1
2
3
|
items = [0]*3
print items
>>> [0,0,0]
|
列表转换为字符串
|
1
2
3
|
teams = ["Packers", "49ers", "Ravens", "Patriots"]
print ", ".join(teams)
>>> 'Packers, 49ers, Ravens, Patriots'
|
从字典中获取元素
我承认try/except代码并不雅致,不过这里有一种简单方法,尝试在字典中查找key,如果没有找到对应的alue将用第二个参数设为其变量值。
|
1
2
3
4
5
|
data = {'user': 1, 'name': 'Max', 'three': 4}
try:
is_admin = data['admin']
except KeyError:
is_admin = False
|
|
1
|
替换诚这样:
|
|
1
2
|
data = {'user': 1, 'name': 'Max', 'three': 4}
is_admin = data.get('admin', False)
|
获取列表的子集
有时,你只需要列表中的部分元素,这里是一些获取列表子集的方法。
|
1
2
3
4
5
6
7
8
9
10
11
12
13
14
15
16
|
x = [1,2,3,4,5,6]
#前3个
print x[:3]
>>> [1,2,3]
#中间4个
print x[1:5]
>>> [2,3,4,5]
#最后3个
print x[-3:]
>>> [4,5,6]
#奇数项
print x[::2]
>>> [1,3,5]
#偶数项
print x[1::2]
>>> [2,4,6]
|
60个字符解决FizzBuzz
前段时间Jeff Atwood 推广了一个简单的编程练习叫FizzBuzz,问题引用如下:
写一个程序,打印数字1到100,3的倍数打印“Fizz”来替换这个数,5的倍数打印“Buzz”,对于既是3的倍数又是5的倍数的数字打印“FizzBuzz”。
这里就是一个简短的,有意思的方法解决这个问题:
|
1
|
for x in range(101):print"fizz"[x%3*4::]+"buzz"[x%5*4::]or x
|
集合
除了python内置的数据类型外,在collection模块同样还包括一些特别的用例,在有些场合Counter非常实用。如果你参加过在这一年的Facebook HackerCup,你甚至也能找到他的实用之处。
|
1
2
3
|
from collections import Counter
print Counter("hello")
>>> Counter({'l': 2, 'h': 1, 'e': 1, 'o': 1})
|
迭代工具
和collections库一样,还有一个库叫itertools,对某些问题真能高效地解决。其中一个用例是查找所有组合,他能告诉你在一个组中元素的所有不能的组合方式
|
1
2
3
4
5
6
7
8
9
10
|
from itertools import combinations
teams = ["Packers", "49ers", "Ravens", "Patriots"]
for game in combinations(teams, 2):
print game
>>> ('Packers', '49ers')
>>> ('Packers', 'Ravens')
>>> ('Packers', 'Patriots')
>>> ('49ers', 'Ravens')
>>> ('49ers', 'Patriots')
>>> ('Ravens', 'Patriots')
|
False == True
比起实用技术来说这是一个很有趣的事,在python中,True和False是全局变量,因此:
|
1
2
3
4
5
6
|
False = True
if False:
print "Hello"
else:
print "World"
>>> Hello
|
如果你还有任何很酷的奇技淫巧,可以在下面留言,感谢阅读
F、http://www.cnblogs.com/JohnABC/p/4673649.html
0.推荐的扩展
requests urilib的替代品
BeautifulSoup4 解析HTML代码
rq 任务队列
selenium 自动化测试工具,模拟浏览器
1.sys.modules, 根据已加载的模块创建对象, 其中 page 为类名
if hasattr(sys.modules[__name__], page):
    setattr(self, page, getattr(sys.modules[__name__], page)(self))
2.hasattr, setattr, locals(), globals() 动态创建变量
3.绑定、未绑定
未绑定的类方法: 没有self
通过类来引用方法返回一个未绑定方法对象, 要调用它, 你必须显示地提供一个实例作为第一个参数
绑定的实例方法: 有self
通过实例访问方法返回一个绑定的方法对象, Python自动地给方法绑定一个实例, 所以我们调用它时不用再传一个实例参数
class Test:
    def func(self,message):
        print message

object1 = Test()
x = object1.func
x('绑定方法对象,实例是隐含的')

t=Test.func
t(object1,'未绑定的方法对象,需要传递一个实例')
#t('未绑定的方法对象,需要传递一个实例') #错误的调用
object1 = Test()生成一个实例, object1.func返回一个绑定的方法, 把实例object1和方法func绑定, 而Test.func是用类去引用方法, 我们得到一个未绑定的方法对象, 要调用它就得传一个实例参数, 如t(object1,'未绑定的方法对象,需要传递一个实例')
class A(object):
    def f(self):
        print "f"

def ff():
    print "ff"

a = A()
a.f()
xf = a.f  #xf为绑定的方法, 故不用传入第一个值
xf()
a.f = ff
a.f()
4.MRO(method resolution order, 多继承时判断调的属性的类)
MRO要先确定一个线性序列, 然后查找路径由由序列中类的顺序决定, 所以MRO的算法就是生成一个线性序列
Python先后有三种不同的MRO: 经典方式、Python2.2 新式算法、Python2.3 新式算法(C3), Python 3中只保留了最后一种, 即C3算法
经典方式: 非常简单, 深度优先, 按定义从左到右
新式算法: 还是经典方式, 但出现重复的, 只保留最后一个
C3算法: 最早被提出是用于Lisp的, 应用在Python中是为了解决原来基于深度优先搜索算法不满足本地优先级, 和单调性的问题:
本地优先级: 指声明时父类的顺序, 比如C(A, B), 如果访问C类对象属性时, 应该根据声明顺序, 优先查找A类, 然后再查找B类
单调性: 如果在C的解析顺序中, A排在B的前面, 那么在C的所有子类里, 也必须满足这个顺序
class B(A) 这时B的mro序列为[B,A]
class B(A1,A2,A3 ...) 这时B的mro序列 mro(B) = [B] + merge(mro(A1), mro(A2), mro(A3) ..., [A1,A2,A3])
merge操作就是C3算法的核心, 遍历执行merge操作的序列, 如果一个序列的第一个元素, 是其他序列中的第一个元素, 或不在其他序列出现, 则从所有执行merge操作序列中删除这个元素, 合并到当前的mro中, merge操作后的序列, 继续执行merge操作, 直到merge操作的序列为空, 如果merge操作的序列无法为空, 则说明不合法
class a:pass
class b(a):pass
class c(a):pass
class d(b, c):pass
比如此菱形继承结构
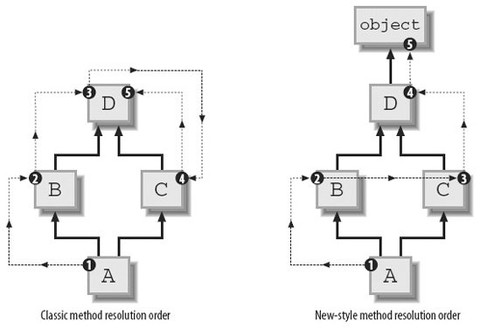
按经典方式, d类MRO为dbaca, 缺点是如果c类重写了a类中得方法, c类的方法将不会被调用到(即本地优先顺序问题)
按新式算法, d类MRO为dbca, 缺点是单调性, 比如d继承b、c, 且b在c的前面, 如果f继承d, 那么f的MRO中也应该和d的一样b在c的前面, 单调性即继承时要保持顺序, 现在e继承c、b, 且c在b的前面, f继承d, e时, bc的顺序就没法决定了, 无论怎样排都违反了单调性
class A(O):pass
class B(O):pass
class C(O):pass
class E(A,B):pass
class F(B,C):pass
class G(E,F):pass
按C3算法, A、B、C都继承至一个基类, 所以mro序列依次为[A,O]、[B,O]、[C,O]
mro(E) = [E] + merge(mro(A), mro(B), [A,B])
= [E] + merge([A,O], [B,O], [A,B])
此时需要执行merge操作的序列为[A,O]、[B,O]、[A,B]
A是序列[A,O]中的第一个元素, 在序列[B,O]中不出现, 在序列[A,B]中也是第一个元素, 所以从执行merge操作的序列([A,O]、[B,O]、[A,B])中删除A, 合并到当前mro, [E]中
mro(E) = [E,A] + merge([O], [B,O], [B])
再执行merge操作, O是序列[O]中的第一个元素, 但O在序列[B,O]中出现并且不是其中第一个元素, 继续查看[B,O]的第一个元素B, B满足条件, 所以从执行merge操作的序列中删除B, 合并到[E, A]中
mro(E) = [E,A,B] + merge([O], [O])
= [E,A,B,O]
实现C3算法的代码:
#-*- encoding:GBK -*-#
def mro_C3(*cls):
        if len(cls)==1:
            if not cls[0].__bases__:
                return  cls
            else:
                return cls+ mro_C3(*cls[0].__bases__)
        else:
            seqs = [list(mro_C3(C)) for C in cls ] +[list(cls)]
            res = []
            while True:
              non_empty = list(filter(None, seqs))
              if not non_empty:
                  return tuple(res)
              for seq in non_empty:
                  candidate = seq[0]
                  not_head = [s for s in non_empty if candidate in s[1:]]
                  if not_head:
                      candidate = None
                  else:
                      break
              if not candidate:
                  raise TypeError("inconsistent hierarchy, no C3 MRO is possible")
              res.append(candidate)
              for seq in non_empty:
                  if seq[0] == candidate:
                      del seq[0]
查看一个类的MRO列表, 可以使用 classname.__mro__
5.super 避免多次调用基类
# -*- coding:utf-8 -*-
class D(object):
    def foo(self):
        print "class D"

class B(D):
    pass

class C(D):
    def foo(self):
        print "class C"

class A(B, C):
    pass

f = A()
f.foo()
#A的实例对象f在调用foo函数的时候, 根据广度优先搜索原则, 调用的是C类里面的foo函数, 上面的代码输出class C; 如果定义D类的时候直接class D, 而不是class D(object), 那么上述代码就该输出class D了
1). super并不是一个函数, 是一个类名, 形如super(B, self)事实上调用了super类的初始化函数产生了一个super对象;
2). super类的初始化函数并没有做什么特殊的操作, 只是简单记录了类类型和具体实例;
3). super(B, self).func的调用并不是用于调用当前类的父类的func函数;
4). Python的多继承类是通过mro的方式来保证各个父类的函数被逐一调用, 而且保证每个父类函数只调用一次(如果每个类都使用super);
5). 混用super类和非绑定的函数是一个危险行为, 这可能导致应该调用的父类函数没有调用或者一个父类函数被调用多次
6).super并不是像我们想象中一样直接找到当前类的父类, 而是沿着mro顺藤摸瓜
参考:http://blog.csdn.net/johnsonguo/article/details/585193
6.模块即模块对象
7.利用 __new__ 实现单例
class Singleton(object):
    def __new__(cls, *args, **kwargs):
        # 关键在于这,每一次实例化的时候,我们都只会返回这同一个instance对象
        if not hasattr(cls, "instance"):
            cls.instance = super(Singleton, cls).__new__(cls, *args, **kwargs)
        return cls.instance
8.__new__ 执行顺序
class A(object):
    def __new__(cls):
        Object = super(A, cls).__new__(cls)
        print "in New"
        return Object #如果把此行注释掉, 则不会执行 __init__ 方法
    def __init__(self):
        print "in init"


class B(A):
    def __init__(self):
        print "in B's init"

B()
9.判断一个变量是否存在
1).
'var' in locals().keys()
2).
try:
     print var
except NameError:
     print 'var not defined'
3).
'var' in dir()
10.根据类名创建实例, 主要是获得类的 class 对象
1).类名cls为class类型, 直接 cls() 即可
2).类名cls为str类型
m = __import__(clsstr所在模块名)
cls = getattr(m, clsstr)
cls()
如果myclass并不在mymodule的自动导出列表中(__all__), 则必须显式地导入, __import__('mymodule', globals(), locals(), ['myclass'])
11.获取当前模块名
locals()/globals().get("__name__")
12.import, reload, __import__
del sys.modules[modulename] 即可实现 unimport
import 调用的 __import__, 比如 import sys => sys = __import__("sys")
reload 对已经加载的模块进行重新加载, 一般用于原模块有变化等特殊情况, reload前该模块必须已经import过, 但原来已经使用的实例还是会使用旧的模块, 新生产的实例会使用新的模块
import sys   #引用sys模块进来,并不是进行sys的第一次加载
reload(sys)  #重新加载sys
sys.setdefaultencoding('utf8')  ##调用setdefaultencoding函数
#如果去掉reload(sys), 会执行失败, 因为这里的import语句其实并不是sys的第一次导入语句, 也就是说这里其实可能是第二、三次进行sys模块的import, 这里只是一个对sys的引用, 只能reload才能进行重新加载; 那么为什么要重新加载, 而直接引用过来则不能调用该函数呢?因为setdefaultencoding函数在被系统调用后被删除了, 所以通过import引用进来时其实已经没有了, 所以必须reload一次sys模块, 这样setdefaultencoding才会为可用, 才能在代码里修改解释器当前的字符编码
__import__, 返回模块实例
__import__(module_name[, globals[, locals[, fromlist]]]) #可选参数默认为globals(),locals(),[]
__import__('os')
__import__('os',globals(),locals(),['path','pip'])  #等价于from os import path, pip
13.迭代器
基本原理:
实现了__iter__方法的对象是可迭代的, 实现了next()方法的对象是迭代器(迭代器就是一个有next()方法的对象), 所以iter(实现了__iter__方法的对象)会调用此对象的__iter__方法, 返回一个实现了next()方法的迭代器对象, 不断调用此迭代器对象的next()方法, 实现遍历, 直到遇到StopIteration异常, 使用迭代器一个显而易见的好处就是每次只从对象中读取一条数据, 不会造成内存的过大开销
序列、字典、文件中当使用for x in y的结构时, 其实质就是迭代器, 迭代器是和实际对象绑定在一起的, 所以在使用迭代器时或者上述3者时不能修改可变对象的值, 这会产生错误
迭代器不要求你事先准备好整个迭代过程中所有的元素, 迭代器仅仅在迭代至某个元素时才计算该元素, 而在这之前或之后, 元素可以不存在或者被销毁, 这个特点使得它特别适合用于遍历一些巨大的或是无限的集合, 比如几个G的文件, 或是斐波那契数列等等, 这个特点被称为延迟计算或惰性求值(Lazy evaluation)
创建迭代器的方法: iter(object)和iter(func, sentinel)两种, 一种使用的是序列, 另一种使用类来创建, 迭代器更大的功劳是提供了一个统一的访问集合的接口, 只要是实现了__iter__()方法的对象, 就可以使用迭代器进行访问, 返回一个对象, 这个对象拥有一个next()方法, 这个方法能在恰当的时候抛出StopIteration异常即可
for i in seq:
    do_something_to(i)
实际为:
fetch = iter(seq)
while True:
    try:
        i = fetch.next()
    except StopIteration:
        break
    do_something_to(i)
字典中, iterkeys(), itervalues(), iteritems() 比 keys(), values(), items() 更省内存
open("test.txt").readlines() 返回的是列表, open("test.txt") 返回的是迭代器
14.生成器
如果一个函数返回的列表非常大, 仅仅创建这个列表就会用完系统所有内存, 因为在我们的观念中函数只有一次返回结果的机会, 因而必须一次返回所有的结果, 此类问题可以用生成器解决
生成器是特定的函数, 允许你返回一个值, 然后“暂停”代码的执行, 稍后恢复, 生成器使用了“延迟计算”, 所以在内存上面更加有效, 生成器函数不能有返回值, 因为 yield 的值就是返回值, 生成器就是一类特殊的迭代器
1).调用生成器函数将返回一个生成器
>>> generator = get_0_1_2()
>>> generator
<generator object get_0_1_2 at 0x00B1C7D8>
2).第一次调用生成器的next方法时, 生成器才开始执行生成器函数(而不是构建生成器时), 直到遇到yield时暂停执行(挂起), 并且yield的参数将作为此次next方法的返回值
>>> generator.next()
0
3).之后每次调用生成器的next方法, 生成器将从上次暂停执行的位置恢复执行生成器函数, 直到再次遇到yield时暂停, 并且同样的, yield的参数将作为next方法的返回值
>>> generator.next()
1
>>> generator.next()
2
4).如果当调用next方法时生成器函数结束(遇到空的return语句或是到达函数体末尾), 则这次next方法的调用将抛出StopIteration异常(即for循环的终止条件)
>>> generator.next()
Traceback (most recent call last):
  File "<stdin>", line 1, in <module>
StopIteration
5).生成器函数在每次暂停执行时, 函数体内的所有变量都将被封存(freeze)在生成器中, 并将在恢复执行时还原, 并且类似于闭包, 即使是同一个生成器函数返回的生成器, 封存的变量也是互相独立的, 我们的小例子中并没有用到变量, 所以这里另外定义一个生成器来展示这个特点
>>> def fibonacci():
...   a = b = 1
...   yield a
...   yield b
...   while True:
...     a, b = b, a+b
...     yield b
...
>>> for num in fibonacci():
...   if num > 100: break
...   print num,
...
1 1 2 3 5 8 13 21 34 55 89
看到while True可别太吃惊, 因为生成器可以挂起, 所以是延迟计算的, 无限循环并没有关系, 这个例子中我们定义了一个生成器用于获取斐波那契数列
如果生成器函数调用了return, 或者执行到函数的末尾, 会出现一个StopIteration异常
有一篇好文章:点击进入
15.列表解析器
也可以直接生成 dict
{x: 1 for x in ["name", "sex"]} #返回 {"name": 1, "sex" 1}
列表解析一次生成一个列表, 所占内存较大
(x+1 for x in lst) #生成器表达式,返回迭代器。外部的括号可在用于参数时省略。
[x+1 for x in lst] #列表解析,返回list
由于返回迭代器时, 并不是在一开始就计算所有的元素, 这样能得到更多的灵活性并且可以避开很多不必要的计算, 所以除非你明确希望返回列表, 否则应该始终使用生成器表达式
可以在Python Shell中试一下一下两个语句的执行时间
(for x in range(1000000))    #返回生成器
[for x in range(1000000)]    #返回整个列表
或者提供多条for子句进行嵌套循环, 嵌套次序就是for子句的顺序:
((x, y) for x in range(3) for y in range(x))
同样外部也可以使用 if
(x for x in (y.doSomething() for y in lst) if x>0)
16.在Python里, 函数的默认值实在函数定义的时候实例化的, 而不是在调用的时候, 如果在调用函数的时候重写了默认值, 那么这个存储的值就不会被使用, 当你不重写默认值的时候, 那么Python就会让默认值引用存储的值(这个例子里的numbers)
def abc(numbers = []):
    numbers.append(9)
    print numbers
abc(): [9] #第一次执行
abc(): [9, 9] #第二次执行
abc([1, 2]): [1, 2, 9] #第三次执行
abc(): [9, 9, 9] #第四次执行
def print_now(now = time.time()):
    print now    #如果不加参数, 则每次都会返回相同的时间
默认参数最好指向不变对象!
17.当def这个声明执行的时候, Python会静态地从函数的局部作用域里获取信息, 当来到 xxx = yyy 这行的时候(不是执行到这行代码, 而是当Python解释器读到这行代码的时候), 它会把xxx这个变量加入到函数的局部变量列表里
18.__builtin__模块, 在Python启动后、且没有执行程序员所写的任何代码前, Python会首先加载该内建模块到内存, 另外, 该内建模块中的功能可以直接使用, 不用在其前添加内建模块前缀, 导入仅仅是让__builitin__标识符在该作用域内可见
19.from __future__ import xxx, 必须是模块或程序的第一个语句, 此外,'__ future__' 模块中存在的特性最终将成为Python语言标准的一部分, 到那时, 将不再需要使用 '__future__' 模块
20.序列解包
a, b, c = 1, 2, 3 #赋值
a, b = b, a #转换a, b的值
a = 1, #声明元组
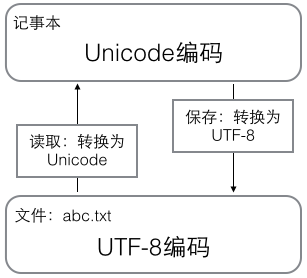
21.最好了解下二进制文件和文本文件的区别以及编码问题, ASCII(固定一个字节)->Unicode(固定两个字节)->UTF-8(变长), 在计算机内存中, 统一使用Unicode编码, 当需要保存到硬盘或者需要传输的时候, 就转换为UTF-8编码, 用记事本编辑的时候, 从文件读取的UTF-8字符被转换为Unicode字符到内存里, 编辑完成后, 保存的时候再把Unicode转换为UTF-8保存到文件, len()函数计算的是str(Unicode编码)的字符数, 如果换成bytes(UTF-8等编码), len()函数就计算字节数:
参考自:廖雪峰Python
22.dict的key必须是不可变对象
23.Python函数参数顺序
定义: (arg, kwarg = <value>, *args, **kwargs)
调用:
第一, 按顺序把"arg"这种形式的实参给对应的形参
第二, 把"arg=<value>"这种形式的实参赋值给形式kwarg
第三, 把多出来的"arg"这种形式的实参组成一个tuple给带一个星号的形参args
第四, 把多出来的"key=value"这种形式的实参转为一个dictionary给带两个星号的形参kwargs
def test(x, y = 5, *a, **b):
    print x, y, a, b
  test(1) ===> 1 5 () {}
  test(1,2) ===> 1 2 () {}
  test(1,2,3)  ===> 1 2 (3,) {}
  test(1,2,3,4) ===> 1 2 (3,4)
  test(x=1)   ===> 1 5 () {}
  test(x=1,y=1)  ===> 1 1 () {}
  test(x=1,y=1,a=1)   ===> 1 1 () {'a':1}
  test(x=1,y=1,a=1,b=1)   ===> 1 1 () {'a':1,'b':1}
  test(1,y=1) ===> 1 1 () {}
  test(1,2,y=1) ===> 出错, 说y给赋了多个值
  test(1, y = 2, 3, a = 4) ===> 出错, non-keyword arg after keyword arg
  test(1,2,3,4,a=1) ===> 1 2 (3,4) {'a':1}
24.限制 **kwargs 参数个数
#只接收city和job作为关键字参数
def person(name, age, *, city, job):
    print(name, age, city, job)
25.functools 模块
wraps: 用来装饰返回func的函数, 以同步func与被装饰的函数的属性, 比如__name__等 @functools.wraps(func)
partial: 变化函数的参数创建偏函数, 固定住原函数的部分参数, 比如 int2 = functools.partial(x, base = 2), 此时 int2 是一个把二进制字符串转为十进制数字的函数, int2('10010')
26.一个.py文件称为一个模块, 为了避免模块名冲突, Python按目录来组织模块的方法, 称为包(Package), 包内必须有__init__.py, 因为__init__.py本身就是一个模块, 它的模块名就是包名(目录名)
27.第三方库都会在 Python 官方的 pypi.python.org 网站注册, 要安装一个第三方库, 必须先知道该库的名称, 可以在官网或者 pypi 上搜索
28.各种包管理工具区别:
distribute是setuptools的取代, pip是easy_install的取代
distribute被创建是因为setuptools包不再维护了
29.Python的实例属性必须在__init__(self) 方法中定义, 直接跟在类名后边定义的属性都默认是类属性(类似于c++的static变量), 类的属性一改, 只要没有覆盖此属性的对象的此属性都会改
main.py
#-*- coding: utf-8 -*-

class Model():
    model_path = "online_model"
    model_dict = {}

    def __init__(self, path = None):
        self.reload(path)

    def reload(self, path = None):
        if not path:
            return

        self.model_dict.clear()
        fp = file(path, "r")
        for line in fp:
            cols = line.split()
            self.model_dict[cols[0]] = cols[1]

        self.model_path = path

def main():
    m1 = Model()
    m2 = Model()

    m1.reload("aa_model")
    m2.reload("bb_model")

    print m1.model_path
    print m2.model_path

    print m1.model_dict
    print m2.model_dict

    return 0

if __name__ == "__main__":
    main()
aa_model
1 a
2 b
bb_model
x 1
y 2
z 3
结果如图:
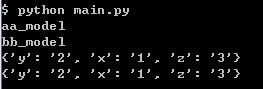
aa_model, bb_model: 由于reload方法中self.model_path = path, 实例重写了类的model_path属性(第一次赋值视为变量的定义), 故输出本实例的model_path
{‘y': 2, 'x': '1', 'z': '3'}, {‘y': 2, 'x': '1', 'z': '3'}: 由于self.model_dict.clear(), 第一次使用此变量非赋值而是直接使用(类似PHP), 类似函数中表示使用已有的值, 根据MRO, 搜索到Model.model_dict, 故两次会覆盖同一个变量
30.类的特殊属性
C.__name__: 类的名字
C.__doc__: 类的文档描述
C.__bases__: 类的基类组成的元组
C.__dict__: 类的属性
C.__module__: 类所在模块
C.__class__: 类的类名
__getattribute__: 不管属性是否存在都会调用
__getattr__: 如果属性不存在则调用, 如果__getattribute__被定义会先被调用, 然后调用此方法, 也可以返回函数
class A(object):
    def __getattr__(self, attr):
        if attr == "age":
            return lambda : 25

a = A()
a.age()
__setattr__
__delattr__
__slots__: 限制实例可以添加到属性
hasattr(), getattr(), setattr(), delattr()
31.实例的特殊属性
i.__class__: 实例的类名
i.__dict__: 实例的属性, __dict__分层存储属性, 每一层的__dict__只存储该层新增的属性, 子类不需要重复存储父类中的属性
32.property()可以即时生成属性
33.类中私有属性__xx, 实现为Python自动为__xx改变变量名
34.当我们定义一个class的时候, 我们实际上就定义了一种数据类型, 我们定义的数据类型和Python自带的数据类型, 比如str、list、dict没什么两样, type(instance), 返回instance对应的Class类型, 比如
class A(object):
    pass

a = A()
b = type(a)() #此时b为A的实例

print type(A) #<type 'type'>
print type(a) #<class '__main__.A'>
print isinstance(b, A) #True
type()函数可以查看一个类型或变量的类型, A是一个class(类对象), 它的类型就是type, 而h是一个实例, 它的类型就是class A
class的定义是运行时动态创建的, 而创建class的方法就是使用type()函数, type()函数既可以返回一个对象的类型, 又可以创建出新的类型, 比如, 我们可以通过type()函数创建出A类, 而无需通过class A(object)...的定义,
def fn(self, name = "John"):
    self.name = name

A = type('A', (object,), dict(hello=fn))
a = A()
print type(A) #<type 'type'>
print type(a) #<class '__main__.A'>
type() 创建类对象的参数如下:
class的名称
继承的父类集合, 注意Python支持多重继承, 如果只有一个父类, 别忘了tuple的单元素写法
class的方法名称与函数绑定, 这里我们把函数fn绑定到方法名hello上
通过type()函数创建的类和直接写class是完全一样的, 因为Python解释器遇到class定义时, 仅仅是扫描一下class定义的语法, 然后调用type()函数创建出class
除了使用type()动态创建类对象, 还可以使用元类, 即 metaclass, 流程为先定义metaclass, 就可以创建类, 最后创建实例
# metaclass是创建类,所以必须从`type`类型派生:
class ListMetaclass(type):
    def __new__(cls, name, bases, attrs):
        attrs['add'] = lambda self, value: self.append(value)
        return type.__new__(cls, name, bases, attrs)

class MyList(list):
    __metaclass__ = ListMetaclass # 指示使用ListMetaclass来定制类, 表示创建MyList时要通过ListMetaclass.__new__()来创建, 在此, 我们可以修改类的定义, 比如, 加上新的方法, 然后, 返回修改后的定义
__new__()方法接收到的参数依次是:当前准备创建的类的对象, 类的名字, 类继承的父类集合, 类的方法集合
35.types模块, 可以查看所有的type, type(abs) == types.BuiltinFunctionType
36.把方法变成属性 @property
class Student(object):

    #@property 会创建一个另外一个装饰器 @score.setter, 负责把一个方法编程属性赋值
    @property
    def score(self):
        return self._score

    @score.setter
    def score(self, value):
        if not isinstance(value, int):
            raise ValueError('score must be an integer!')
        if value < 0 or value > 100:
            raise ValueError('score must between 0 ~ 100!')
        self._score = value

s = Student()
s.score = 60
s.score = 101    #ValueError: Score must between 0 ~ 100!
37.Linux下用Python实现多进程(此处不是讲线程), Unix/Linux操作系统提供了一个fork()系统调用, 它返回两次, 因为操作系统自动把当前进程(称为父进程)复制了一份(称为子进程), 然后, 分别在父进程和子进程内返回, 子进程永远返回0, 而父进程返回子进程的ID, 这样做的理由是, 一个父进程可以fork出很多子进程, 所以, 父进程要记下每个子进程的ID, 而子进程只需要调用getppid()就可以拿到父进程的ID; Windows系统不支持fork()函数; 有了fork调用, 一个进程在接到新任务时就可以复制出一个子进程来处理新任务, 常见的Apache服务器就是由父进程监听端口, 每当有新的http请求时, 就fork出子进程来处理新的http请求
import os

print('Process (%s) start...' % os.getpid())
# Only works on Unix/Linux/Mac:
pid = os.fork()
if pid == 0:
    print('I am child process (%s) and my parent is %s.' % (os.getpid(), os.getppid()))
else:
    print('I (%s) just created a child process (%s).' % (os.getpid(), pid))
38.multiprocessing模块是跨平台的多进程模块
创建一个进程运行某个函数
from multiprocessing import Process
import os

# 子进程要执行的代码
def run_proc(name):
    print('Run child process %s (%s)...' % (name, os.getpid()))

if __name__=='__main__':
    print('Parent process %s.' % os.getpid())
    p = Process(target=run_proc, args=('test',))
    print('Child process will start.')
    p.start()
    p.join()
    print('Child process end.')
结果为:
Parent process 67416.
Child process will start.
Run child process test (70388)...
Child process end.
join()方法可以等待子进程结束后再继续往下运行, 通常用于进程间的同步
39.占位
40.timestamp与时区毫无关系, timestamp一旦确定, 其UTC时间就确定了, 转换到任意时区的时间也是完全确定的, 全球各地的计算机在任意时刻的timestamp都是完全相同的, datetime是有时区的, 会在timestamp与本地时间之间做转换
>>> from datetime import datetime
>>> t = 1429417200.0
>>> print(datetime.fromtimestamp(t)) # 本地时间
2015-04-19 12:20:00
>>> print(datetime.utcfromtimestamp(t)) # UTC时间
2015-04-19 04:20:00
41.struct模块, 了解c语言的人, 一定会知道struct结构体在c语言中的作用, 它定义了一种结构, 里面包含不同类型的数据(int, char, bool等等), 方便对某一结构对象进行处理, 而在网络通信当中, 大多传递的数据是以二进制流(binary data)存在的, 当传递字符串时, 不必担心太多的问题, 而当传递诸如int、char之类的基本数据的时候, 就需要有一种机制将某些特定的结构体类型打包成二进制流的字符串然后再网络传输, 而接收端也应该可以通过某种机制进行解包还原出原始的结构体数据, python中的struct模块就提供了这样的机制, 该模块的主要作用就是对python基本类型值与用python字符串格式表示的C struct类型间的转化.
>>>import struct
>>>ss = struct.pack("!H4s2I", 20, "abcd", 6, 7)
>>>ss
"x00x14abcdx00x00x00x06x00x00x00x07" #ss是一个字符串 类似c结构体的字节流(二进制)的字符串表示
>>>struct.unpack("!H4s2I", ss)
(20, 'abcd', 6, 7)
H表示 一个unsigned short的id, 4s表示4字节长的字符串, 2I表示有两个unsigned int类型的数据
struct中支持的格式如下表
| Format | C Type | Python | 字节数 |
|---|---|---|---|
| x | pad byte | no value | 1 |
| c | char | string of length 1 | 1 |
| b | signed char | integer | 1 |
| B | unsigned char | integer | 1 |
| ? | _Bool | bool | 1 |
| h | short | integer | 2 |
| H | unsigned short | integer | 2 |
| i | int | integer | 4 |
| I | unsigned int | integer or long | 4 |
| l | long | integer | 4 |
| L | unsigned long | long | 4 |
| q | long long | long | 8 |
| Q | unsigned long long | long | 8 |
| f | float | float | 4 |
| d | double | float | 8 |
| s | char[] | string | 1 |
| p | char[] | string | 1 |
| P | void * | long |
另一方面, 打包的后的字节顺序默认上是由操作系统的决定的, 当然struct模块也提供了自定义字节顺序的功能, 可以指定大端存储、小端存储等特定的字节顺序, 对于底层通信的字节顺序是十分重要的, 不同的字节顺序和存储方式也会导致字节大小的不同; 在format字符串前面加上特定的符号即可以表示不同的字节顺序存储方式, 例如采用小端存储 s = struct.Struct(‘<I3sf’)就可以了, 官方api library 也提供了相应的对照列表:
| Character | Byte order | Size and alignment |
|---|---|---|
| @ | native | native 凑够4个字节 |
| = | native | standard 按原字节数 |
| < | little-endian | standard 按原字节数 |
| > | big-endian | standard 按原字节数 |
| ! | network (= big-endian) |
standard 按原字节数 |
利用struct解析BMP文件头, 首先找一个bmp文件, 没有的话用“画图”画一个, 读入前30个字节来分析:
>>> s = b'x42x4dx38x8cx0ax00x00x00x00x00x36x00x00x00x28x00x00x00x80x02x00x00x68x01x00x00x01x00x18x00'
BMP格式采用小端方式存储数据,文件头的结构按顺序如下: 两个字节:'BM'表示Windows位图,'BA'表示OS/2位图; 一个4字节整数:表示位图大小; 一个4字节整数:保留位,始终为0; 一个4字节整数:实际图像的偏移量; 一个4字节整数:Header的字节数; 一个4字节整数:图像宽度; 一个4字节整数:图像高度; 一个2字节整数:始终为1; 一个2字节整数:颜色数。 所以,组合起来用unpack读取:
>>> struct.unpack('<ccIIIIIIHH', s)
(b'B', b'M', 691256, 0, 54, 40, 640, 360, 1, 24)
结果显示,b'B'、b'M'说明是Windows位图,位图大小为640x360,颜色数为24。
42.快速创建字典
{}.from_keys(list, defaultValue)
dict((key1, value1), (key2, value2), (key3, value3)...)
zip([key1, key2, key3...], [value1, value2, value3...])
dict(name = "John", "age" = 26)
43.判断字典中键名是否存在的两种方法
#第一种
d.has_key()

#第二种
"" in d.keys()
44.判断对象中属性/方法是否存在
hasattr(object, attr)
attr in dir(object)
45.动态调用方法
def _execute(self, sql, params, isMany):
    func = "executemany" if isMany else "execute"
    func = getattr(self._db["cur"], func)
    return func(sql, params)
46.False, 0, '', (), [], {}都可以视为假
47.列表内数据唯一(类似PHP中array_unique)
set([1, 2, 1]) -- set([1, 2])
48.根据一个对象创建另一个对象
obj.__class__(...)
49.collections模块
collections.namedtuple 创建可命名的tuple
import collections as cs
Point = cs.namedtuple("Point", ["x", "y", "z"])
p = Point(1, 2, 3)

print p.x, p.y, p.z
collections.deque 为了高效实现插入和删除操作的双向列表,增删效率高于 list,也可以使用 deque(maxlen = 10) 来限制列表长度,超出时添加会把头尾的元素挤出。
import collections as cs
q = cs.deque(['a', 'b', 'c'])
q.append('x')
q.appendleft('y')
print q

>>>deque(['y', 'a', 'b', 'c', 'x'])
collections.defaultdict 使用dict时,如果引用的Key不存在,就会抛出KeyError。如果希望key不存在时,返回一个默认值,就可以用defaultdict,也可以直接创建多维字典。
import collections as cs

tree = lambda: collections.defaultdict(tree)

d = tree()
d["names"]["John"] = "ABC"
collections.OrderedDict 创建按key值遍历时有序的dict(普通dict无序排列) 使用
50.禁止创建对象属性字典。每个类都有实例属性,默认用一个字典保存一个对象的实例属性,允许我们设置任意属性,但是可能会浪费很多内存。使用__slots__高速Python不要使用字典,而且只给一个固定集合的属性分配空间。
class MyClass(obj ect) :
__slots__ = [ ' name' , ' identifier' ]
def __init__(self, name, identifier) :
self. name = name
self. identifier = identifier
self. set_up()
51.文件遍历
with open("foo.txt", "r") as f:
    for line in f:
        # do_something(line)

for line in open("foo.txt", "r"):
    # do_something(line)
52.打印格式化的json
import json
print json.dumps({"name": "John"}, indent = 2)
53.格式化输出字典
print("I'm %(name)s. I'm %(age)d year old" % {'name':'Vamei', 'age':99})
54.字典和集合也有列表推导式,都使用{}包围,分别返回字典和集合
#快速兑换字典键—值
mca={"a":1, "b":2, "c":3, "d":4}
dicts={v:k for k,v in mca.items()}
#{1: 'a', 2: 'b', 3: 'c', 4: 'd'}
55.
G、http://python.jobbole.com/85668/
原文出处: 张 颖
使用 pdb 进行调试
pdb 是 python 自带的一个包,为 python 程序提供了一种交互的源代码调试功能,主要特性包括设置断点、单步调试、进入函数调试、查看当前代码、查看栈片段、动态改变变量的值等。pdb 提供了一些常用的调试命令,详情见表 1。
表 1. pdb 常用命令
| 命令 | 解释 |
|---|---|
| break 或 b 设置断点 | 设置断点 |
| continue 或 c | 继续执行程序 |
| list 或 l | 查看当前行的代码段 |
| step 或 s | 进入函数 |
| return 或 r | 执行代码直到从当前函数返回 |
| exit 或 q | 中止并退出 |
| next 或 n | 执行下一行 |
| pp | 打印变量的值 |
| help | 帮助 |
下面结合具体的实例讲述如何使用 pdb 进行调试。
清单 1. 测试代码示例
|
1
2
3
4
5
6
7
|
import pdb
a = "aaa"
pdb.set_trace()
b = "bbb"
c = "ccc"
final = a + b + c
print final
|
开始调试:直接运行脚本,会停留在 pdb.set_trace() 处,选择 n+enter 可以执行当前的 statement。在第一次按下了 n+enter 之后可以直接按 enter 表示重复执行上一条 debug 命令。
清单 2. 利用 pdb 调试
|
1
2
3
4
5
6
7
8
9
10
11
12
13
14
15
16
17
18
19
20
21
22
23
24
|
[root@rcc-pok-idg-2255 ~]# python epdb1.py
> /root/epdb1.py(4)?()
-> b = "bbb"
(Pdb) n
> /root/epdb1.py(5)?()
-> c = "ccc"
(Pdb)
> /root/epdb1.py(6)?()
-> final = a + b + c
(Pdb) list
1 import pdb
2 a = "aaa"
3 pdb.set_trace()
4 b = "bbb"
5 c = "ccc"
6 -> final = a + b + c
7 print final
[EOF]
(Pdb)
[EOF]
(Pdb) n
> /root/epdb1.py(7)?()
-> print final
(Pdb)
|
退出 debug:使用 quit 或者 q 可以退出当前的 debug,但是 quit 会以一种非常粗鲁的方式退出程序,其结果是直接 crash。
清单 3. 退出 debug
|
1
2
3
4
5
6
7
8
9
10
11
12
13
14
15
16
17
|
[root@rcc-pok-idg-2255 ~]# python epdb1.py
> /root/epdb1.py(4)?()
-> b = "bbb"
(Pdb) n
> /root/epdb1.py(5)?()
-> c = "ccc"
(Pdb) q
Traceback (most recent call last):
File "epdb1.py", line 5, in ?
c = "ccc"
File "epdb1.py", line 5, in ?
c = "ccc"
File "/usr/lib64/python2.4/bdb.py", line 48, in trace_dispatch
return self.dispatch_line(frame)
File "/usr/lib64/python2.4/bdb.py", line 67, in dispatch_line
if self.quitting: raise BdbQuit
bdb.BdbQuit
|
打印变量的值:如果需要在调试过程中打印变量的值,可以直接使用 p 加上变量名,但是需要注意的是打印仅仅在当前的 statement 已经被执行了之后才能看到具体的值,否则会报 NameError: 错误。
清单 4. debug 过程中打印变量
|
1
2
3
4
5
6
7
8
9
10
11
12
13
14
15
16
17
18
19
20
21
22
23
|
[root@rcc-pok-idg-2255 ~]# python epdb1.py
> /root/epdb1.py(4)?()
-> b = "bbb"
(Pdb) n
> /root/epdb1.py(5)?()
-> c = "ccc"
(Pdb) p b
'bbb'
(Pdb)
'bbb'
(Pdb) n
> /root/epdb1.py(6)?()
-> final = a + b + c
(Pdb) p c
'ccc'
(Pdb) p final
*** NameError:
(Pdb) n
> /root/epdb1.py(7)?()
-> print final
(Pdb) p final
'aaabbbccc'
(Pdb)
|
使用 c 可以停止当前的 debug 使程序继续执行。如果在下面的程序中继续有 set_statement() 的申明,则又会重新进入到 debug 的状态,读者可以在代码 print final 之前再加上 set_trace() 验证。
清单 5. 停止 debug 继续执行程序
|
1
2
3
4
5
6
7
8
|
[root@rcc-pok-idg-2255 ~]# python epdb1.py
> /root/epdb1.py(4)?()
-> b = "bbb"
(Pdb) n
> /root/epdb1.py(5)?()
-> c = "ccc"
(Pdb) c
aaabbbccc
|
显示代码:在 debug 的时候不一定能记住当前的代码块,如要要查看具体的代码块,则可以通过使用 list 或者 l 命令显示。list 会用箭头 -> 指向当前 debug 的语句。
清单 6. debug 过程中显示代码
|
1
2
3
4
5
6
7
8
9
10
11
12
13
14
15
16
17
18
19
20
21
22
23
24
25
|
[root@rcc-pok-idg-2255 ~]# python epdb1.py
> /root/epdb1.py(4)?()
-> b = "bbb"
(Pdb) list
1 import pdb
2 a = "aaa"
3 pdb.set_trace()
4 -> b = "bbb"
5 c = "ccc"
6 final = a + b + c
7 pdb.set_trace()
8 print final
[EOF]
(Pdb) c
> /root/epdb1.py(8)?()
-> print final
(Pdb) list
3 pdb.set_trace()
4 b = "bbb"
5 c = "ccc"
6 final = a + b + c
7 pdb.set_trace()
8 -> print final
[EOF]
(Pdb)
|
在使用函数的情况下进行 debug
清单 7. 使用函数的例子
|
1
2
3
4
5
6
7
8
9
10
11
|
import pdb
def combine(s1,s2): # define subroutine combine, which...
s3 = s1 + s2 + s1 # sandwiches s2 between copies of s1, ...
s3 = '"' + s3 +'"' # encloses it in double quotes,...
return s3 # and returns it.
a = "aaa"
pdb.set_trace()
b = "bbb"
c = "ccc"
final = combine(a,b)
print final
|
如果直接使用 n 进行 debug 则到 final=combine(a,b) 这句的时候会将其当做普通的赋值语句处理,进入到 print final。如果想要对函数进行 debug 如何处理呢 ? 可以直接使用 s 进入函数块。函数里面的单步调试与上面的介绍类似。如果不想在函数里单步调试可以在断点处直接按 r 退出到调用的地方。
清单 8. 对函数进行 debug
|
1
2
3
4
5
6
7
8
9
10
11
12
13
14
15
16
17
18
19
20
21
22
23
24
25
26
27
28
29
30
31
32
33
34
35
36
37
38
39
40
41
42
|
[root@rcc-pok-idg-2255 ~]# python epdb2.py
> /root/epdb2.py(10)?()
-> b = "bbb"
(Pdb) n
> /root/epdb2.py(11)?()
-> c = "ccc"
(Pdb) n
> /root/epdb2.py(12)?()
-> final = combine(a,b)
(Pdb) s
--Call--
> /root/epdb2.py(3)combine()
-> def combine(s1,s2): # define subroutine combine, which...
(Pdb) n
> /root/epdb2.py(4)combine()
-> s3 = s1 + s2 + s1 # sandwiches s2 between copies of s1, ...
(Pdb) list
1 import pdb
2
3 def combine(s1,s2): # define subroutine combine, which...
4 -> s3 = s1 + s2 + s1 # sandwiches s2 between copies of s1, ...
5 s3 = '"' + s3 +'"' # encloses it in double quotes,...
6 return s3 # and returns it.
7
8 a = "aaa"
9 pdb.set_trace()
10 b = "bbb"
11 c = "ccc"
(Pdb) n
> /root/epdb2.py(5)combine()
-> s3 = '"' + s3 +'"' # encloses it in double quotes,...
(Pdb) n
> /root/epdb2.py(6)combine()
-> return s3 # and returns it.
(Pdb) n
--Return--
> /root/epdb2.py(6)combine()->'"aaabbbaaa"'
-> return s3 # and returns it.
(Pdb) n
> /root/epdb2.py(13)?()
-> print final
(Pdb)
|
在调试的时候动态改变值 。在调试的时候可以动态改变变量的值,具体如下实例。需要注意的是下面有个错误,原因是 b 已经被赋值了,如果想重新改变 b 的赋值,则应该使用! B。
清单 9. 在调试的时候动态改变值
|
1
2
3
4
5
6
7
8
9
|
[root@rcc-pok-idg-2255 ~]# python epdb2.py
> /root/epdb2.py(10)?()
-> b = "bbb"
(Pdb) var = "1234"
(Pdb) b = "avfe"
*** The specified object '= "avfe"' is not a function
or was not found along sys.path.
(Pdb) !b="afdfd"
(Pdb)
|
pdb 调试有个明显的缺陷就是对于多线程,远程调试等支持得不够好,同时没有较为直观的界面显示,不太适合大型的 python 项目。而在较大的 python 项目中,这些调试需求比较常见,因此需要使用更为高级的调试工具。接下来将介绍 PyCharm IDE 的调试方法 .
使用 PyCharm 进行调试
PyCharm 是由 JetBrains 打造的一款 Python IDE,具有语法高亮、Project 管理、代码跳转、智能提示、自动完成、单元测试、版本控制等功能,同时提供了对 Django 开发以及 Google App Engine 的支持。分为个人独立版和商业版,需要 license 支持,也可以获取免费的 30 天试用。试用版本的 Pycharm 可以在官网上下载,下载地址为:http://www.jetbrains.com/pycharm/download/index.html。 PyCharm 同时提供了较为完善的调试功能,支持多线程,远程调试等,可以支持断点设置,单步模式,表达式求值,变量查看等一系列功能。PyCharm IDE 的调试窗口布局如图 1 所示。
图 1. PyCharm IDE 窗口布局

下面结合实例讲述如何利用 PyCharm 进行多线程调试。具体调试所用的代码实例见清单 10。
清单 10. PyCharm 调试代码实例
|
1
2
3
4
5
6
7
8
9
10
11
12
13
14
15
16
17
18
19
20
21
22
|
__author__ = 'zhangying'
#!/usr/bin/python
import thread
import time
# Define a function for the thread
def print_time( threadName, delay):
count = 0
while count 0 and valueB>0:
return valueA+valueB
def readFile(threadName, filename):
file = open(filename)
for line in file.xreadlines():
print line
try:
thread.start_new_thread( print_time, ("Thread-1", 2, ) )
thread.start_new_thread( check_sum, ("Thread-2", 4,5, ) )
thread.start_new_thread( readFile, ("Thread-3","test.txt",))
except:
print "Error: unable to start thread"
while 1:
# print "end"
pass
|
在调试之前通常需要设置断点,断点可以设置在循环或者条件判断的表达式处或者程序的关键点。设置断点的方法非常简单:在代码编辑框中将光标移动到需要设置断点的行,然后直接按 Ctrl+F8 或者选择菜单”Run”->”Toggle Line Break Point”,更为直接的方法是双击代码编辑处左侧边缘,可以看到出现红色的小圆点(如图 2)。当调试开始的时候,当前正在执行的代码会直接显示为蓝色。下图中设置了三个断点,蓝色高亮显示的为正在执行的代码。
图 2. 断点设置

表达式求值:在调试过程中有的时候需要追踪一些表达式的值来发现程序中的问题,Pycharm 支持表达式求值,可以通过选中该表达式,然后选择“Run”->”Evaluate Expression”,在出现的窗口中直接选择 Evaluate 便可以查看。
Pychar 同时提供了 Variables 和 Watches 窗口,其中调试步骤中所涉及的具体变量的值可以直接在 variable 一栏中查看。
图 3. 变量查看

如果要动态的监测某个变量可以直接选中该变量并选择菜单”Run”->”Add Watch”添加到 watches 栏中。当调试进行到该变量所在的语句时,在该窗口中可以直接看到该变量的具体值。
图 4. 监测变量

对于多线程程序来说,通常会有多个线程,当需要 debug 的断点分别设置在不同线程对应的线程体中的时候,通常需要 IDE 有良好的多线程调试功能的支持。 Pycharm 中在主线程启动子线程的时候会自动产生一个 Dummy 开头的名字的虚拟线程,每一个 frame 对应各自的调试帧。如图 5,本实例中一共有四个线程,其中主线程生成了三个线程,分别为 Dummy-4,Dummy-5,Dummy-6. 其中 Dummy-4 对应线程 1,其余分别对应线程 2 和线程 3。
图 5. 多线程窗口

当调试进入到各个线程的子程序时,Frame 会自动切换到其所对应的 frame,相应的变量栏中也会显示与该过程对应的相关变量,如图 6,直接控制调试按钮,如 setp in,step over 便可以方便的进行调试。
图 6. 子线程调试

查看大图。
使用 PyDev 进行调试
PyDev 是一个开源的的 plugin,它可以方便的和 Eclipse 集成,提供方便强大的调试功能。同时作为一个优秀的 Python IDE 还提供语法错误提示、源代码编辑助手、Quick Outline、Globals Browser、Hierarchy View、运行等强大功能。下面讲述如何将 PyDev 和 Eclipse 集成。在安装 PyDev 之前,需要先安装 Java 1.4 或更高版本、Eclipse 以及 Python。 第一步:启动 Eclipse,在 Eclipse 菜单栏中找到 Help 栏,选择 Help > Install New Software,并选择 Add button,添加 Ptdev 的下载站点 http://pydev.org/updates。选择 PyDev 之后完成余下的步骤便可以安装 PyDev。
图 7. 安装 PyDev

安装完成之后需要配置 Python 解释器,在 Eclipse 菜单栏中,选择 Window > Preferences > Pydev > Interpreter – Python。Python 安装在 C:Python27 路径下。单击 New,选择 Python 解释器 python.exe,打开后显示出一个包含很多复选框的窗口,选择需要加入系统 PYTHONPATH 的路径,单击 OK。
图 8. 配置 PyDev

在配置完 Pydev 之后,可以通过在 Eclipse 菜单栏中,选择 File > New > Project > Pydev >Pydev Project,单击 Next 创建 Python 项目,下面的内容假设 python 项目已经创建,并且有个需要调试的脚本 remote.py(具体内容如下),它是一个登陆到远程机器上去执行一些命令的脚本,在运行的时候需要传入一些参数,下面将详细讲述如何在调试过程中传入参数 .
清单 11. Pydev 调试示例代码
|
1
2
3
4
5
6
7
8
9
10
11
12
13
14
15
16
17
18
19
20
21
22
23
24
25
26
27
28
29
30
31
32
33
|
#!/usr/bin/env python
import os
def telnetdo(HOST=None, USER=None, PASS=None, COMMAND=None): #define a function
import telnetlib, sys
if not HOST:
try:
HOST = sys.argv[1]
USER = sys.argv[2]
PASS = sys.argv[3]
COMMAND = sys.argv[4]
except:
print "Usage: remote.py host user pass command"
return
tn = telnetlib.Telnet() #
try:
tn.open(HOST)
except:
print "Cannot open host"
return
tn.read_until("login:")
tn.write(USER + 'n')
if PASS:
tn.read_until("Password:")
tn.write(PASS + 'n')
tn.write(COMMAND + 'n')
tn.write("exitn")
tmp = tn.read_all()
tn.close()
del tn
return tmp
if __name__ == '__main__':
print telnetdo()
|
在调试的时候有些情况需要传入一些参数,在调试之前需要进行相应的配置以便接收所需要的参数,选择需要调试的程序(本例 remote.py),该脚本在 debug 的过程中需要输入四个参数:host,user,password 以及命令。在 eclipse 的工程目录下选择需要 debug 的程序,单击右键,选择“Debug As”->“Debug Configurations”,在 Arguments Tab 页中选择“Variables”。如下 图 9 所示 .
图 9. 配置变量

在窗口”Select Variable”之后选择“Edit Varuables” ,出现如下窗口,在下图中选择”New” 并在弹出的窗口中输入对应的变量名和值。特别需要注意的是在值的后面一定要有空格,不然所有的参数都会被当做第一个参数读入。
图 10. 添加具体变量

按照以上方式依次配置完所有参数,然后在”select variable“窗口中安装参数所需要的顺序依次选择对应的变量。配置完成之后状态如下图 11 所示。
图 11. 完成配置

选择 Debug 便可以开始程序的调试,调试方法与 eclipse 内置的调试功能的使用相似,并且支持多线程的 debug,这方面的文章已经有很多,读者可以自行搜索阅读,或者参考”使用 Eclipse 平台进行调试“一文。
使用日志功能达到调试的目的
日志信息是软件开发过程中进行调试的一种非常有用的方式,特别是在大型软件开发过程需要很多相关人员进行协作的情况下。开发人员通过在代码中加入一些特定的能够记录软件运行过程中的各种事件信息能够有利于甄别代码中存在的问题。这些信息可能包括时间,描述信息以及错误或者异常发生时候的特定上下文信息。 最原始的 debug 方法是通过在代码中嵌入 print 语句,通过输出一些相关的信息来定位程序的问题。但这种方法有一定的缺陷,正常的程序输出和 debug 信息混合在一起,给分析带来一定困难,当程序调试结束不再需要 debug 输出的时候,通常没有很简单的方法将 print 的信息屏蔽掉或者定位到文件。python 中自带的 logging 模块可以比较方便的解决这些问题,它提供日志功能,将 logger 的 level 分为五个级别,可以通过 Logger.setLevel(lvl) 来设置。默认的级别为 warning。
表 2. 日志的级别
| Level | 使用情形 |
|---|---|
| DEBUG | 详细的信息,在追踪问题的时候使用 |
| INFO | 正常的信息 |
| WARNING | 一些不可预见的问题发生,或者将要发生,如磁盘空间低等,但不影响程序的运行 |
| ERROR | 由于某些严重的问题,程序中的一些功能受到影响 |
| CRITICAL | 严重的错误,或者程序本身不能够继续运行 |
logging lib 包含 4 个主要对象
- logger:logger 是程序信息输出的接口。它分散在不同的代码中使得程序可以在运行的时候记录相应的信息,并根据设置的日志级别或 filter 来决定哪些信息需要输出并将这些信息分发到其关联的 handler。常用的方法有 Logger.setLevel(),Logger.addHandler() ,Logger.removeHandler() ,Logger.addFilter() ,Logger.debug(), Logger.info(), Logger.warning(), Logger.error(),getLogger() 等。logger 支持层次继承关系,子 logger 的名称通常是父 logger.name 的方式。如果不创建 logger 的实例,则使用默认的 root logger,通过 logging.getLogger() 或者 logging.getLogger(“”) 得到 root logger 实例。
- Handler:Handler 用来处理信息的输出,可以将信息输出到控制台,文件或者网络。可以通过 Logger.addHandler() 来给 logger 对象添加 handler,常用的 handler 有 StreamHandler 和 FileHandler 类。StreamHandler 发送错误信息到流,而 FileHandler 类用于向文件输出日志信息,这两个 handler 定义在 logging 的核心模块中。其他的 hander 定义在 logging.handles 模块中,如 HTTPHandler,SocketHandler。
- Formatter:Formatter 则决定了 log 信息的格式 , 格式使用类似于 %()s 的形式来定义,如’%(asctime)s – %(levelname)s – %(message)s’,支持的 key 可以在 python 自带的文档 LogRecord attributes 中查看。
- Filter:Filter 用来决定哪些信息需要输出。可以被 handler 和 logger 使用,支持层次关系,比如如果设置了 filter 为名称为 A.B 的 logger,则该 logger 和其子 logger 的信息会被输出,如 A.B,A.B.C.
清单 12. 日志使用示例
|
1
2
3
4
5
6
7
8
9
10
11
12
13
14
15
16
17
18
19
20
21
22
|
import logging
LOG1=logging.getLogger('b.c')
LOG2=logging.getLogger('d.e')
filehandler = logging.FileHandler('test.log','a')
formatter = logging.Formatter('%(name)s %(asctime)s %(levelname)s %(message)s')
filehandler.setFormatter(formatter)
filter=logging.Filter('b')
filehandler.addFilter(filter)
LOG1.addHandler(filehandler)
LOG2.addHandler(filehandler)
LOG1.setLevel(logging.INFO)
LOG2.setLevel(logging.DEBUG)
LOG1.debug('it is a debug info for log1')
LOG1.info('normal infor for log1')
LOG1.warning('warning info for log1:b.c')
LOG1.error('error info for log1:abcd')
LOG1.critical('critical info for log1:not worked')
LOG2.debug('debug info for log2')
LOG2.info('normal info for log2')
LOG2.warning('warning info for log2')
LOG2.error('error:b.c')
LOG2.critical('critical')
|
上例设置了 filter b,则 b.c 为 b 的子 logger,因此满足过滤条件该 logger 相关的日志信息会 被输出,而其他不满足条件的 logger(这里是 d.e)会被过滤掉。
清单 13. 输出结果
|
1
2
3
4
|
b.c 2011-11-25 11:07:29,733 INFO normal infor for log1
b.c 2011-11-25 11:07:29,733 WARNING warning info for log1:b.c
b.c 2011-11-25 11:07:29,733 ERROR error info for log1:abcd
b.c 2011-11-25 11:07:29,733 CRITICAL critical info for log1:not worked
|
logging 的使用非常简单,同时它是线程安全的,下面结合多线程的例子讲述如何使用 logging 进行 debug。
清单 14. 多线程使用 logging
|
1
2
3
4
5
6
7
8
9
10
11
12
13
14
15
16
17
18
19
20
21
22
23
24
25
26
27
28
29
30
31
32
33
34
35
36
37
38
39
40
41
42
43
44
|
logging.conf
[loggers]
keys=root,simpleExample
[handlers]
keys=consoleHandler
[formatters]
keys=simpleFormatter
[logger_root]
level=DEBUG
handlers=consoleHandler
[logger_simpleExample]
level=DEBUG
handlers=consoleHandler
qualname=simpleExample
propagate=0
[handler_consoleHandler]
class=StreamHandler
level=DEBUG
formatter=simpleFormatter
args=(sys.stdout,)
[formatter_simpleFormatter]
format=%(asctime)s - %(name)s - %(levelname)s - %(message)s
datefmt=
code example:
#!/usr/bin/python
import thread
import time
import logging
import logging.config
logging.config.fileConfig('logging.conf')
# create logger
logger = logging.getLogger('simpleExample')
# Define a function for the thread
def print_time( threadName, delay):
logger.debug('thread 1 call print_time function body')
count = 0
logger.debug('count:%s',count)
|
总结
全文介绍了 python 中 debug 的几种不同的方式,包括 pdb 模块、利用 PyDev 和 Eclipse 集成进行调试、PyCharm 以及 Debug 日志进行调试,希望能给相关 python 使用者一点参考。更多关于 python debugger 的资料可以参见参考资料。
参考资料
学习
- 参考 Tutorial Python查看 Python 的官方文档。
- 参考 Python Logging文档获取更多的 logging 使用信息