一、总体功能介绍
这是关于Linux-kernel-0.11中boot文件夹下bootsect.s源文件的说明,其中涉及到了一些基础知识可以参考这两篇文章。
bootsect.s 代码是磁盘引导块程序,存储在磁盘的第一个扇区中(0面0道1扇区),在计算机上电BIOS自检后,BIOS 会吧引导扇区代码bootsect加载到内存0x90000处开并运行。
bootsect代码主要完成以下几项工作:
-
加载从磁盘第二个扇区开始的4个扇区的内容(由setup.s编译而成)到内存紧接着bootsect后面的0x90200处。
-
利用BIOS中断 int 13h 获取磁盘参数表中当前启动引导盘的参数。
-
在屏幕上显示
"Loading system..."字符串。 -
把磁盘上setup模块后面的system模块加载到内存0x10000开始的地方。
-
确定根文件系统的设备号,若没有指定,则根据所保存的引导盘的每磁道扇区数判别出磁盘的类型和种类(1.2MB 或 1.44MB 软盘),并将其设备号保存在root_dev(引导扇区的508地址出,即第一个扇区的第509个字节处)。
-
长跳转到setup程序开始处(0x90200)执行setup程序。
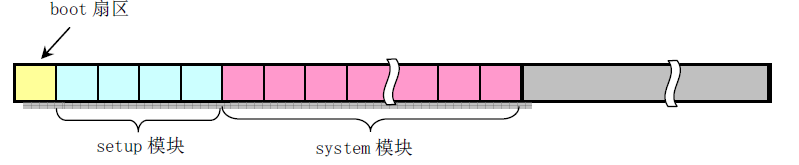
在磁盘上,引导块bootsect、setup模块和system模块的扇区位置和大小如下图所示:
二、代码注释
!
! SYS_SIZE is the number of clicks (16 bytes) to be loaded.
! 0x3000 is 0x30000 bytes = 196kB, more than enough for current
! versions of linux
! SYS_SIZE 是要加载的系统模块的长度,单位是节 1节 = 16字节, 0x3000 字节 = 196kB。
!这里定义了system模块长度,所以makefile中的规则就失效了
!
SYSSIZE = 0x3000
!
!	bootsect.s		(C) 1991 Linus Torvalds
!
! bootsect.s is loaded at 0x7c00 by the bios-startup routines, and moves
! iself out of the way to address 0x90000, and jumps there.
!
! It then loads 'setup' directly after itself (0x90200), and the system
! at 0x10000, using BIOS interrupts.
!
! NOTE! currently system is at most 8*65536 bytes long. This should be no
! problem, even in the future. I want to keep it simple. This 512 kB
! kernel size should be enough, especially as this doesn't contain the
! buffer cache as in minix
!
! The loader has been made as simple as possible, and continuos
! read errors will result in a unbreakable loop. Reboot by hand. It
! loads pretty fast by getting whole sectors at a time whenever possible.


! .globl 或 .global 用于定义随后的标识符是外部的或全局的,并且即使不使用也强制引入。
! .text  .data .bss 分别定义当前代码段、数据段和未初始化数据段。
.globl begtext, begdata, begbss, endtext, enddata, endbss   !定义了6个全局标识符
.text         !文本段
begtext:
.data         !数据段
begdata:
.bss          !未初始化数据段
begbss:
.text

SETUPLEN = 4				! nr of setup-sectors                  setup程序的扇区(setup-sectors)值
BOOTSEG  = 0x07c0			! original address of boot-sector      bootsect的原始值(是段地址)
INITSEG  = 0x9000			! we move boot here - out of the way   将bootsect移到这里
SETUPSEG = 0x9020			! setup starts here                    setup程序从这里开始
SYSSEG   = 0x1000			! system loaded at 0x10000 (65536).    system模块加载到0x10000(64KB)处
ENDSEG   = SYSSEG + SYSSIZE		! where to stop loading                停止加载的段地址

! ROOT_DEV:	0x000 - same type of floppy as boot. 根文件系统设备与引导使用同样的软驱设备
!		0x301 - first partition on first drive etc 根文件系统设备在第一个硬盘的第一个分区上。
ROOT_DEV = 0x306

entry start                     !告诉链接程序,程序从标号start开始执行
start:
	mov	ax,#BOOTSEG     !设置ds为0x07c0(段地址)
	mov	ds,ax
	mov	ax,#INITSEG     !设置es为0x9000(段地址)
	mov	es,ax
	mov	cx,#256         !移动计数值256个字
	sub	si,si           !源地址      ds:si = 0x07c0:0x0000
	sub	di,di           !目的地址 es:di = 0x9000:0x0000
	rep                     !重复执行并cx的值,直到cx = 0
	movw                    !串传送指令,从[si]移动cx个字到[di]处。从start开始到这里,这段程序将bootsect从0x07c0复制到0x9000处
	jmpi	go,INITSEG      !段间跳转,INITSEG 指跳转到的段地址, 标号go是段内偏移地址。
go:	mov	ax,cs        !设置ds,ss和es为复制代码后代码所在的段。
	mov	ds,ax
	mov	es,ax
! put stack at 0x9ff00.
	mov	ss,ax
	mov	sp,#0xFF00		! arbitrary value >>512  设置栈顶指针,远大于512个字节偏移。

! load the setup-sectors directly after the bootblock.
! Note that 'es' is already set up.

!加载 setup 模块代码数据,注意 es已经指向了 0x9000处,不用再设置。
!将setup从磁盘第二个扇区读到0x90200开始处,共读4个扇区。如果读出错,则复位驱动器并重读。
load_setup:
	mov	dx,#0x0000		! drive 0, head 0    对驱动器0进行操作
	mov	cx,#0x0002		! sector 2, track 0
	mov	bx,#0x0200		! address = 512, in INITSEG
	mov	ax,#0x0200+SETUPLEN	! service 2, nr of sectors
	int	0x13			! read it
	jnc	ok_load_setup		! ok - continue
	mov	dx,#0x0000
	mov	ax,#0x0000		! reset the diskette
	int	0x13
	j	load_setup       ! j 即jmp指令

ok_load_setup:

! Get disk drive parameters, specifically nr of sectors/track
! 获取磁盘参数,尤其是每道的扇区数量

	mov	dl,#0x00
	mov	ax,#0x0800		! AH=8 is get drive parameters
	int	0x13
	mov	ch,#0x00
	seg cs
	mov	sectors,cx
	mov	ax,#INITSEG
	mov	es,ax

! Print some inane message  在屏幕上显示msg1指向的字符串,"Loading system ..."

	mov	ah,#0x03		! read cursor pos
	xor	bh,bh
	int	0x10

	mov	cx,#24
	mov	bx,#0x0007		! page 0, attribute 7 (normal)
	mov	bp,#msg1
	mov	ax,#0x1301		! write string, move cursor
	int	0x10                    ! 写字符串并将光标移动到字符串结尾处。

! ok, we've written the message, now    现在开始将system模块加载到 0x10000处(64KB处)
! we want to load the system (at 0x10000)

	mov	ax,#SYSSEG
	mov	es,ax		! segment of 0x010000
	call	read_it         ! 读磁盘上的system模块,es为输入参数
	call	kill_motor      ! 关闭驱动马达,这样就可以知道驱动器的状态了。

! After that we check which root-device to use. If the device is
! defined (!= 0), nothing is done and the given device is used.
! Otherwise, either /dev/PS0 (2,28) or /dev/at0 (2,8), depending
! on the number of sectors that the BIOS reports currently.
! 确定选用哪个根文件系统
	seg cs
	mov	ax,root_dev
	cmp	ax,#0
	jne	root_defined
	seg cs
	mov	bx,sectors
	mov	ax,#0x0208		! /dev/ps0 - 1.2Mb
	cmp	bx,#15                  ! 判断每磁道扇区数是否为15
	je	root_defined
	mov	ax,#0x021c		! /dev/PS0 - 1.44Mb
	cmp	bx,#18                  ! 判断每磁道扇区数是否为18
	je	root_defined
undef_root:
	jmp undef_root      如果根文件系统设备都不对,则死循环。
root_defined:
	seg cs
	mov	root_dev,ax ! 将检查过的设备号保存到 root_dev 中

! after that (everyting loaded), we jump to
! the setup-routine loaded directly after
! the bootblock:

	jmpi	0,SETUPSEG ! 到这里所有的文件都已经加载完毕,程序跳转到setup文件中去执行。

!!!!!  bootsect.s 执行到这里就结束了。 下面是两个子程序。


! This routine loads the system at address 0x10000, making sure
! no 64kB boundaries are crossed. We try to load it as fast as
! possible, loading whole tracks whenever we can.
!
! in:	es - starting address segment (normally 0x1000)
!
sread:	.word 1+SETUPLEN	! sectors read of current track 当前磁道中已读扇区数
head:	.word 0			! current head  当前磁头号
track:	.word 0			! current track 当前磁道号

read_it:
	mov ax,es
	test ax,#0x0fff
die:	jne die			! es must be at 64kB boundary
	xor bx,bx		! bx is starting address within segment
rp_read:
	mov ax,es
	cmp ax,#ENDSEG		! have we loaded all yet?
	jb ok1_read
	ret
ok1_read:
	seg cs
	mov ax,sectors
	sub ax,sread
	mov cx,ax
	shl cx,#9
	add cx,bx
	jnc ok2_read
	je ok2_read
	xor ax,ax
	sub ax,bx
	shr ax,#9
ok2_read:
	call read_track
	mov cx,ax
	add ax,sread
	seg cs
	cmp ax,sectors
	jne ok3_read
	mov ax,#1
	sub ax,head
	jne ok4_read
	inc track
ok4_read:
	mov head,ax
	xor ax,ax
ok3_read:
	mov sread,ax
	shl cx,#9
	add bx,cx
	jnc rp_read
	mov ax,es
	add ax,#0x1000
	mov es,ax
	xor bx,bx
	jmp rp_read

read_track:
	push ax
	push bx
	push cx
	push dx
	mov dx,track
	mov cx,sread
	inc cx
	mov ch,dl
	mov dx,head
	mov dh,dl
	mov dl,#0
	and dx,#0x0100
	mov ah,#2
	int 0x13
	jc bad_rt
	pop dx
	pop cx
	pop bx
	pop ax
	ret
bad_rt:	mov ax,#0
	mov dx,#0
	int 0x13
	pop dx
	pop cx
	pop bx
	pop ax
	jmp read_track

/*
 * This procedure turns off the floppy drive motor, so
 * that we enter the kernel in a known state, and
 * don't have to worry about it later.
 */
kill_motor:
	push dx
	mov dx,#0x3f2  !软驱控制卡的数字输出寄存器(DOR)端口,只写
	mov al,#0      !A驱动器,关闭FDC,禁止DMA和中断请求,关闭马达。
	outb           !将al中的内容输出到dx指定的端口。
	pop dx
	ret

sectors:
	.word 0    !存放当前启动软盘每磁道的存储扇区数。

msg1:                                   !调用BIOS中断显示的信息
	.byte 13,10                     !回车,换行的ASCⅡ码
	.ascii "Loading system ..."
	.byte 13,10,13,10               !共24个ASCⅡ码字符

.org 508   !表示语句从地址508(0x01fc)开始,所以root_dev在启动扇区的第508开始的2个字节中。
root_dev:
	.word ROOT_DEV  !这里存放根文件系统所在设备号(init/main.c 中会用到)
boot_flag:
	.word 0xAA55  !启动盘具有有效引导扇区的标志,仅供BIOS中程序加载引导扇区时识别使用。
	              !它必须位于引导扇区的最后两个字节中。

.text
endtext:
.data
enddata:
.bss
endbss: