场景
前后端分离的项目,前端修改头像时,需要对头像进行裁剪并且能实时预览,然后上传到SpringBoot后台。
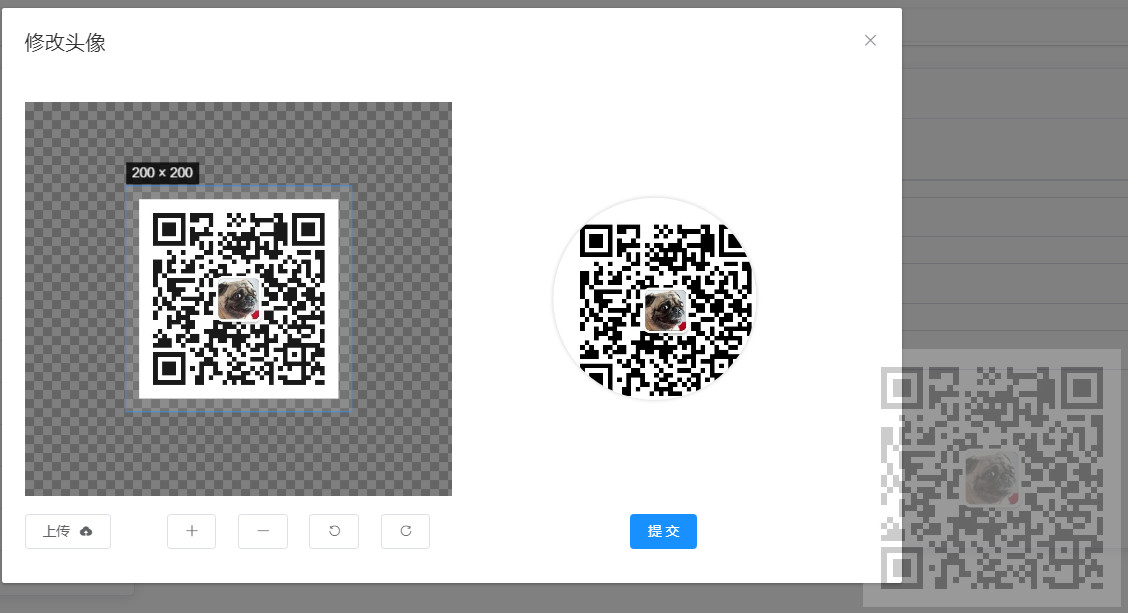
实现效果如下

注:
博客:
https://blog.csdn.net/badao_liumang_qizhi
关注公众号
霸道的程序猿
获取编程相关电子书、教程推送与免费下载。
实现
插件官网
https://github.com/xyxiao001/vue-cropper
安装插件
npm install vue-cropper
引用插件
组件内使用
import { VueCropper }  from 'vue-cropper'
components: {
  VueCropper,
},

main.js里面使用
import VueCropper from 'vue-cropper'

Vue.use(VueCropper)

cdn方式使用
<script src="//cdn.jsdelivr.net/npm/vue-cropper@0.4.9/dist/index.js"></script>
Vue.use(window['vue-cropper'].default)
nuxt 使用方式
if(process.browser) {
  vueCropper = require('vue-cropper')
  Vue.use(vueCropper.default)
}
这里只是在头像上传组件内使用,所以采用
import { VueCropper }  from 'vue-cropper'
components: {
  VueCropper,
},
的方式。
使用
把上传图片和裁剪图片和预览都放在一个dialog里面,只有在点击修改头像按钮时才显示此dialog
    <el-dialog :title="title" :visible.sync="open" width="800px" append-to-body @opened="modalOpened">
      <el-row>
        <el-col :xs="24" :md="12" :style="{height: '350px'}">
          <vue-cropper
            ref="cropper"
            :img="options.img"
            :info="true"
            :autoCrop="options.autoCrop"
            :autoCropWidth="options.autoCropWidth"
            :autoCropHeight="options.autoCropHeight"
            :fixedBox="options.fixedBox"
            @realTime="realTime"
            v-if="visible"
          />
        </el-col>
        <el-col :xs="24" :md="12" :style="{height: '350px'}">
          <div class="avatar-upload-preview">
            <img :src="previews.url" :style="previews.img" />
          </div>
        </el-col>
      </el-row>
      <br />
      <el-row>
        <el-col :lg="2" :md="2">
          <el-upload action="#" :http-request="requestUpload" :show-file-list="false" :before-upload="beforeUpload">
            <el-button size="small">
              上传
              <i class="el-icon-upload el-icon--right"></i>
            </el-button>
          </el-upload>
        </el-col>
        <el-col :lg="{span: 1, offset: 2}" :md="2">
          <el-button icon="el-icon-plus" size="small" @click="changeScale(1)"></el-button>
        </el-col>
        <el-col :lg="{span: 1, offset: 1}" :md="2">
          <el-button icon="el-icon-minus" size="small" @click="changeScale(-1)"></el-button>
        </el-col>
        <el-col :lg="{span: 1, offset: 1}" :md="2">
          <el-button icon="el-icon-refresh-left" size="small" @click="rotateLeft()"></el-button>
        </el-col>
        <el-col :lg="{span: 1, offset: 1}" :md="2">
          <el-button icon="el-icon-refresh-right" size="small" @click="rotateRight()"></el-button>
        </el-col>
        <el-col :lg="{span: 2, offset: 6}" :md="2">
          <el-button type="primary" size="small" @click="uploadImg()">提 交</el-button>
        </el-col>
      </el-row>
    </el-dialog>
这个dialog的布局的效果如下
通过:visible.sync="open" 绑定的是否显示的变量为open,需要声明
    data() {
      return {
        // 是否显示弹出层
        open: false,
然后在修改头像按钮的点击事件中
      // 编辑头像
      editCropper() {
        this.open = true;
      },
显示此dialog
然后图片裁剪控件的代码为
          <vue-cropper
            ref="cropper"
            :img="options.img"
            :info="true"
            :autoCrop="options.autoCrop"
            :autoCropWidth="options.autoCropWidth"
            :autoCropHeight="options.autoCropHeight"
            :fixedBox="options.fixedBox"
            @realTime="realTime"
            v-if="visible"
          />
此控件的属性
| 名称 | 功能 | 默认值 | 可选值 |
| img | 裁剪图片的地址 | 空 | url 地址 || base64 || blob |
| 裁剪生成图片的质量 | 1 | 0.1 - 1 | |
| outputType | 裁剪生成图片的格式 | jpg (jpg 需要传入jpeg) | jpeg || png || webp |
| 裁剪框的大小信息 | true | true || false | |
| canScale | 图片是否允许滚轮缩放 | true | true || false |
| 是否默认生成截图框 | false | true || false | |
| autoCropWidth | 默认生成截图框宽度 | 容器的80% | 0~max |
| 默认生成截图框高度 | 容器的80% | 0~max | |
| fixed | 是否开启截图框宽高固定比例 | true | true | false |
| 截图框的宽高比例 | [1, 1] | [宽度, 高度] | |
| full | 是否输出原图比例的截图 | false | true | false |
| 固定截图框大小 不允许改变 | false | true | false | |
| canMove | 上传图片是否可以移动 | true | true | false |
| 截图框能否拖动 | true | true | false | |
| original | 上传图片按照原始比例渲染 | false | true | false |
| 截图框是否被限制在图片里面 | false | true | false | |
| high | 是否按照设备的dpr 输出等比例图片 | true | true | false |
| true 为展示真实输出图片宽高 false 展示看到的截图框宽高 | false | true | false | |
| maxImgSize | 限制图片最大宽度和高度 | 2000 | 0-max |
| 图片根据截图框输出比例倍数 | 1 | 0-max(建议不要太大不然会卡死的呢) | |
| mode | 图片默认渲染方式 | contain | contain , cover, 100px, 100% auto |
这里设置此插件的一些属性与对象options的属性绑定。
声明对象options并设置一些属性
        options: {
          img: 'https://images.cnblogs.com/cnblogs_com/badaoliumangqizhi/1539113/o_qrcode_for_gh_f76a8d7271eb_258.jpg', //裁剪图片的地址
          autoCrop: true, // 是否默认生成截图框
          autoCropWidth: 200, // 默认生成截图框宽度
          autoCropHeight: 200, // 默认生成截图框高度
          fixedBox: true // 固定截图框大小 不允许改变
        },
这里给裁剪的图片设置了一张默认图片,在上传后会重新给该img属性赋值,img就是裁剪图片的地址。
实时预览是通过 @realTime="realTime"
绑定的函数realTime
      // 实时预览
      realTime(data) {
        this.previews = data;
      }
会将参数data赋值给定义的对象preview
previews: {}
然后上面的布局中预览的img是
        <el-col :xs="24" :md="12" :style="{height: '350px'}">
          <div class="avatar-upload-preview">
            <img :src="previews.url" :style="previews.img" />
          </div>
        </el-col>
给img标签赋值参数的url style赋值img属性就可。可以参照其官方案例
@realTime="realTime"
// Real time preview function
realTime(data) {
  var previews = data;
  var h = 0.5;
  var w = 0.2;

  this.previewStyle1 = {
     previews.w + "px",
    height: previews.h + "px",
    overflow: "hidden",
    margin: "0",
    zoom: h
  };

  this.previewStyle2 = {
     previews.w + "px",
    height: previews.h + "px",
    overflow: "hidden",
    margin: "0",
    zoom: w
  };

  固定为100宽度
  this.previewStyle3 = {
     previews.w + "px",
    height: previews.h + "px",
    overflow: "hidden",
    margin: "0",
    zoom: 100 / preview.w
  };

  固定为100高度
  this.previewStyle4 = {
     previews.w + "px",
    height: previews.h + "px",
    overflow: "hidden",
    margin: "0",
    zoom: 100 / preview.h
  };
  this.previews = data;
},


<div class="show-preview" :style="{'width': previews.w + 'px', 'height': previews.h + 'px',  'overflow': 'hidden',
    'margin': '5px'}">
  <div :style="previews.div">
    <img :src="option.img" :style="previews.img">
  </div>
</div>
<p>中等大小</p>
<div :style="previewStyle1">
  <div :style="previews.div">
    <img :src="previews.url" :style="previews.img">
  </div>
</div>

<p>迷你大小</p>
<div :style="previewStyle2">
  <div :style="previews.div">
    <img :src="previews.url" :style="previews.img">
  </div>
</div>
下方那一排的图片的缩放和旋转都是调用的插件自带的函数
     // 向左旋转
      rotateLeft() {
        this.$refs.cropper.rotateLeft();
      },
      // 向右旋转
      rotateRight() {
        this.$refs.cropper.rotateRight();
      },
      // 图片缩放
      changeScale(num) {
        num = num || 1;
        this.$refs.cropper.changeScale(num);
      },
此插件的其他内置函数
this.$refs.cropper.startCrop() 开始截图
this.$refs.cropper.stopCrop() 停止截图
this.$refs.cropper.clearCrop() 清除截图
this.$refs.cropper.changeScale() 修改图片大小 正数为变大 负数变小
this.$refs.cropper.getImgAxis() 获取图片基于容器的坐标点
this.$refs.cropper.getCropAxis() 获取截图框基于容器的坐标点
this.$refs.cropper.goAutoCrop 自动生成截图框函数
this.$refs.cropper.rotateRight() 向右边旋转90度
this.$refs.cropper.rotateLeft() 向左边旋转90度
图片加载的回调 imgLoad 返回结果success, error
获取截图信息
this.$refs.cropper.cropW 截图框宽度

this.$refs.cropper.cropH 截图框高度

// 获取截图的base64 数据
this.$refs.cropper.getCropData((data) => {
  // do something
  console.log(data)
})

// 获取截图的blob数据
this.$refs.cropper.getCropBlob((data) => {
  // do something
  console.log(data)
})
前端上传图片的实现是使用ElementUI的el-upload实现。
        <el-col :lg="2" :md="2">
          <el-upload action="#" :http-request="requestUpload" :show-file-list="false" :before-upload="beforeUpload">
            <el-button size="small">
              上传
              <i class="el-icon-upload el-icon--right"></i>
            </el-button>
          </el-upload>
这里要对其进行一些设置
将其action设置为#不让其上传到远程url,然后重写覆盖其http-request
      // 覆盖默认的上传行为
      requestUpload() {
      },
来覆盖其默认的上传行为。
然后重写其上传前的方法进行上传预处理
      // 上传预处理
      beforeUpload(file) {
        if (file.type.indexOf("image/") == -1) {
          this.msgError("文件格式错误,请上传图片类型,如:JPG,PNG后缀的文件。");
        } else {
          const reader = new FileReader();
          reader.readAsDataURL(file);
          reader.onload = () => {
            this.options.img = reader.result;
          };
        }
      },
在方法中判断上传文件的类型是否是图片,然后获取图片的url并将其赋值给option的img属性,这样裁剪控件就能获取到上传的图片的url并能显示。
而实时预览也能通过裁剪控件的data的url获取到。
然后就是点击提交按钮裁剪后的照片提交给SpringBoot后台
     // 上传图片
      uploadImg() {
        this.$refs.cropper.getCropBlob(data => {
          let formData = new FormData();
          formData.append("file", data);
          uploadimg(formData).then(response => {
            if (response.code === 200) {
              this.open = false;
              this.options.img = process.env.VUE_APP_BASE_API + response.data;
              console.log(this.options.img)
              this.$emit('changezp', this.options.img)
              this.msgSuccess("修改成功");
            }
            this.visible = false;
          });
        });
      },
通过this.$refs.cropper以及设置的ref="cropper"来获取裁剪控件,然后调用他的内置函数获取blob数据。
然后构建一个FormData对象,并设置其file为裁剪图片的data
然后将此formData采用post请求的方式提交到SpringBoot后台
// 用户头像上传
export function uploadAvatar(data) {
  return request({
    url: '/system/user/profile/avatar',
    method: 'post',
    data: data
  })
}
这里的request是封装的axios请求对象向后台发动post请求并传递data参数。
在SpringBoot后台
    @PostMapping("/upload")
    public AjaxResult uploadProfile(MultipartFile file){
        try {
            String path = FileUploadUtils.upload(RuoYiConfig.getAvatarPath(), file);
            path = path.replaceAll("//","/");
            System.out.println("========path: " + path);
            return AjaxResult.success("success",path);
        }catch (Exception e){
            e.printStackTrace();
            return AjaxResult.error("上传失败");
        }

    }
就能通过MultipartFile file接受到图片文件并上传到服务器返回前端能访问静态资源的路径。
具体实现可以参照下面博客
https://blog.csdn.net/BADAO_LIUMANG_QIZHI/article/details/108383134