1 安装python rabbitMQ module
pip install pika
# or
easy_install pika
# or
# 源码

https://pypi.python.org/pypi/pika
实现最简单的队列通信
send端
import pika

# 生产者
credentials = pika.PlainCredentials('admin', 'admin')  # mq用户名和密码,用于认证
connection = pika.BlockingConnection(
    pika.ConnectionParameters('192.168.37.100', 5672, '/', credentials)
)
channel = connection.channel()  # 声明一个管道

# 声明queue
channel.queue_declare(queue='hello')

# n RabbitMQ a message can never be sent directly to the queue, it always needs to go through an exchange.
channel.basic_publish(exchange='',
                      routing_key='hello',  # queue名称
                      body='Hello World!')
print(" [x] Sent 'Hello World!'")
connection.close()
receive端
import pika
import time

# 消费者
credentials = pika.PlainCredentials('admin', 'admin')  # mq用户名和密码,用于认证
connection = pika.BlockingConnection(
    pika.ConnectionParameters('192.168.37.100', 5672, '/', credentials)
)
channel = connection.channel()

# You may ask why we declare the queue again ‒ we have already declared it in our previous code.
# We could avoid that if we were sure that the queue already exists. For example if send.py program
# was run before. But we're not yet sure which program to run first. In such cases it's a good
# practice to repeat declaring the queue in both programs.
channel.queue_declare(queue='hello')


def callback(ch, method, properties, body):
    print('-->', ch)    # 管道的内存对象的内存地址
    print('-->', method)
    print('-->', properties)
    time.sleep(5)
    print(" [x] Received %r" % body)


channel.basic_consume(  # 消费消息
            'hello',
            callback,  # 如果收到消息,就调用callback函数来处理消息
            auto_ack=True   # auto_ack:默认为False,auto_ack设置成 False,在调用callback函数时,未收到确认标识,消息会重回队列。True,无论调用callback成功与否,消息都被消费掉
)
print(' [*] Waiting for messages. To exit press CTRL+C')
channel.start_consuming()
2 RabbitMQ消息分发轮询
#测试目的:RabbitMQ消息分发轮询
#1. 启动两个receive端口,并在callbackup睡眠5秒。
#2. send端口发送数据。
#3. 当第一个receive端收到信息后,立刻第一个程序中止。
#4. 查看第二个receive端是否再收到(正常能收到)

#RabbitMQ 的队列信息,只会在客户端确认收到后才会取消,否则一直存在,
#并且体现了RabbitMQ的分发轮询机制,第一个收了,然后到第二个,或者第一个收不了,第二个收。
send端
import pika

# 生产者
credentials = pika.PlainCredentials('admin', 'admin')  # mq用户名和密码,用于认证
connection = pika.BlockingConnection(
    pika.ConnectionParameters('192.168.37.100', 5672, '/', credentials)
)
channel = connection.channel()  # 声明一个管道

# 声明queue
channel.queue_declare(queue='hello')

# n RabbitMQ a message can never be sent directly to the queue, it always needs to go through an exchange.
channel.basic_publish(exchange='',
                      routing_key='hello',  # queue名称
                      body='Hello World!')
print(" [x] Sent 'Hello World!'")
connection.close()
receive端
import pika
import time

# 消费者
credentials = pika.PlainCredentials('admin', 'admin')  # mq用户名和密码,用于认证
connection = pika.BlockingConnection(
    pika.ConnectionParameters('192.168.37.100', 5672, '/', credentials)
)
channel = connection.channel()

# You may ask why we declare the queue again ‒ we have already declared it in our previous code.
# We could avoid that if we were sure that the queue already exists. For example if send.py program
# was run before. But we're not yet sure which program to run first. In such cases it's a good
# practice to repeat declaring the queue in both programs.
channel.queue_declare(queue='hello')


def callback(ch, method, properties, body):
    print('-->', ch)  # 管道的内存对象的内存地址
    print('-->', method)
    print('-->', properties)
    time.sleep(5)
    print(" [x] Received %r" % body)
    ch.basic_ack(delivery_tag=method.delivery_tag)  # 确认消息被执行完毕,主动告知rabbitMQ


channel.basic_consume(  # 消费消息
    'hello',
    callback,  # 如果收到消息,就调用callback函数来处理消息
    # auto_ack=False   # auto_ack设置成 False,在调用callback函数时,未收到确认标识,消息会重回队列。True,无论调用callback成功与否,消息都被消费掉
)
print(' [*] Waiting for messages. To exit press CTRL+C')
channel.start_consuming()
3 RabbitMQ消息持久化
非持久声明的queue,在服务端宕机后,消息队列queue和消息都不复存在了
3.1 RabbitMQ消息持久化
发送端:
①队列持久化很简单,只需要在服务端(produce)声明queue的时候添加一个参数:
channel.queue_declare(queue='hello', durable=True) # durable=True 持久化
②仅仅持久化队列是没有意义的,还需要多消息进行持久化
channel.basic_publish(exchange="",
                      routing_key="hello",  #queue的名字
                      body="hello world",   #body是要发送的内容
                      properties=pika.BasicProperties(delivery_mode=2,) # make message persistent=>使消息持久化的特性
                      )
接收端:(在服务端队列消息都持久化了之后需要在客户端声明queue的时候也持久化)
channel.queue_declare(queue='hello', durable=True)
发送端代码
import pika

# 生产者
credentials = pika.PlainCredentials('admin', 'admin')  # mq用户名和密码,用于认证
connection = pika.BlockingConnection(
    pika.ConnectionParameters('192.168.37.100', 5672, '/', credentials)
)
channel = connection.channel()  # 声明一个管道

# 声明queue
channel.queue_declare(queue='hello', durable=True)

# n RabbitMQ a message can never be sent directly to the queue, it always needs to go through an exchange.
channel.basic_publish(exchange='',
                      routing_key='hello',  # queue名称
                      body='Hello World!',
                      properties=pika.BasicProperties(delivery_mode=2, )  # make message persistent=>使消息持久化的特性
                      )
print(" [x] Sent 'Hello World!'")
connection.close()
接收端代码:
import pika
import time

# 消费者
credentials = pika.PlainCredentials('admin', 'admin')  # mq用户名和密码,用于认证
connection = pika.BlockingConnection(
    pika.ConnectionParameters('192.168.37.100', 5672, '/', credentials)
)
channel = connection.channel()

# You may ask why we declare the queue again ‒ we have already declared it in our previous code.
# We could avoid that if we were sure that the queue already exists. For example if send.py program
# was run before. But we're not yet sure which program to run first. In such cases it's a good
# practice to repeat declaring the queue in both programs.
channel.queue_declare(queue='hello', durable=True)


def callback(ch, method, properties, body):
    print('-->', ch)  # 管道的内存对象的内存地址
    print('-->', method)
    print('-->', properties)
    time.sleep(5)
    print(" [x] Received %r" % body)
    ch.basic_ack(delivery_tag=method.delivery_tag)  # 确认消息被执行完毕,主动告知rabbitMQ


channel.basic_consume(  # 消费消息
    'hello',
    callback,  # 如果收到消息,就调用callback函数来处理消息
    # auto_ack=False   # auto_ack设置成 False,在调用callback函数时,未收到确认标识,消息会重回队列。True,无论调用callback成功与否,消息都被消费掉
)
print(' [*] Waiting for messages. To exit press CTRL+C')
channel.start_consuming()
3.2 队列消息持久化+公平分发示列:
发送端:
import pika

# 生产者
credentials = pika.PlainCredentials('admin', 'admin')  # mq用户名和密码,用于认证
connection = pika.BlockingConnection(
    pika.ConnectionParameters('192.168.37.100', 5672, '/', credentials)
)
channel = connection.channel()  # 声明一个管道

# 声明queue
channel.queue_declare(queue='hello', durable=True)

# n RabbitMQ a message can never be sent directly to the queue, it always needs to go through an exchange.
channel.basic_publish(exchange='',
                      routing_key='hello',  # queue名称
                      body='Hello World!',
                      properties=pika.BasicProperties(delivery_mode=2, )  # make message persistent=>使消息持久化的特性
                      )
print(" [x] Sent 'Hello World!'")
connection.close()
接收端:
import pika
import time

# 消费者
credentials = pika.PlainCredentials('admin', 'admin')  # mq用户名和密码,用于认证
connection = pika.BlockingConnection(
    pika.ConnectionParameters('192.168.37.100', 5672, '/', credentials)
)
channel = connection.channel()
channel.basic_qos(prefetch_count=1)  # 在消息消费之前加上消息处理配置
channel.queue_declare(queue='hello', durable=True)


def callback(ch, method, properties, body):
    print('-->', ch)  # 管道的内存对象的内存地址
    print('-->', method)
    print('-->', properties)
    time.sleep(5)
    print(" [x] Received %r" % body)
    ch.basic_ack(delivery_tag=method.delivery_tag)  # 确认消息被执行完毕,主动告知rabbitMQ


channel.basic_consume(  # 消费消息
    'hello',
    callback,  # 如果收到消息,就调用callback函数来处理消息
    # auto_ack=False   # auto_ack设置成 False,在调用callback函数时,未收到确认标识,消息会重回队列。True,无论调用callback成功与否,消息都被消费掉
)
print(' [*] Waiting for messages. To exit press CTRL+C')
channel.start_consuming()
4 RabbitMQ广播模式(演示时用的pika版本==0.10.0)
# pip3 install pika==0.10.0

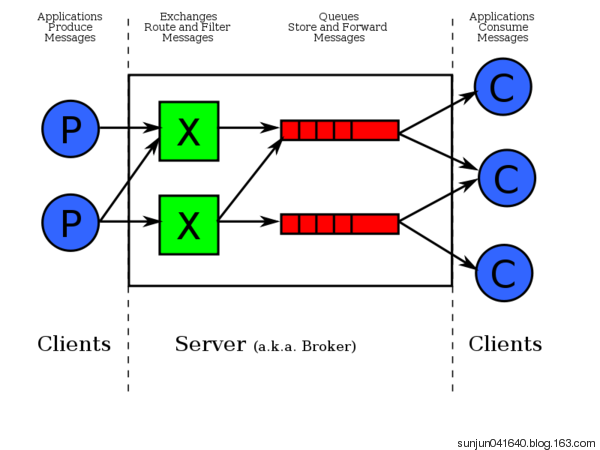
注:如上图生产端到消费端,是通过exchange转发到队列内的,消费端在队列中取的数据,并不是直接在exchange到消费端。
- fanout: 所有bind到此exchange的queue都可以接收消息
- 订阅发布:fanout 广播消息只能发给以存活的消费端,实时发送,并不能存储数据。

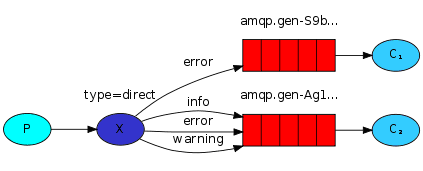
- direct: 通过routingKey和exchange决定的那个唯一的queue可以接收消息
-
direct广播 可指定级别接收端进行广播。
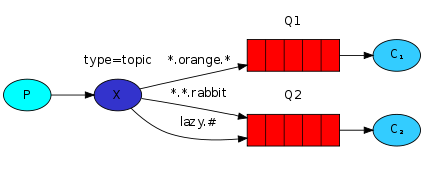
- topic:所有符合routingKey(此时可以是一个表达式)的routingKey所bind的queue可以接收消息
-
可同过发出去的多个消息设置 多个级别,消息结尾加入级别。
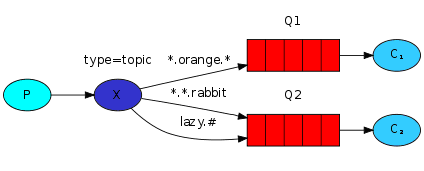
表达式符号说明:#代表一个或多个字符,*代表任何字符
#.a会匹配a.a,aa.a,aaa.a等
*.a会匹配a.a,b.a,c.a等
注:使用RoutingKey为#,Exchange Type为topic的时候相当于使用fanout
4.1 RabbitMQ fanout广播模式(实例)
send 发送端
import pika
import sys

credentials = pika.PlainCredentials('admin', 'admin')  # mq用户名和密码,用于认证
connection = pika.BlockingConnection(
    pika.ConnectionParameters('192.168.37.100', 5672, '/', credentials)
)
channel = connection.channel()

# exchange=“自定义名字”
# type = 'fanout' 定义exchange发送类型,广播类型
# exchange_type type报错就使用这个
channel.exchange_declare(exchange='logs',
                         exchange_type='fanout')

# 下面这条命令是 可通过命令行输入定义的消息 or 如果没输入就是后面这段话。
# message = ' '.join(sys.argv[1:]) or "info: Hello World!"

# 发送的内容
message = "info: Hello World!"

# routing_key 传入queue 由于是广播,不填
channel.basic_publish(exchange='logs',
                      routing_key='',
                      body=message)
print(" [x] Sent %r" % message)
connection.close()

# 注:由于是广播类型所以不需要写queue。
receive接收端:
import pika

credentials = pika.PlainCredentials('admin', 'admin')  # mq用户名和密码,用于认证
connection = pika.BlockingConnection(
    pika.ConnectionParameters('192.168.37.100', 5672, '/', credentials)
)
channel = connection.channel()

channel.exchange_declare(exchange='logs', exchange_type='fanout')
# exclusive=True 唯一的
# 不指定queue名字,rabbit会随机分配一个名字,
# exclusive=True会在使用此queue的消费者断开后,自动将queue删除
result = channel.queue_declare(exclusive=True)

# 随机取queue名字。
queue_name = result.method.queue
print("random queuename", queue_name)

# channel.queue_bind 绑定exchange转发器
# exchange=logs 由于rabbitMQ下不知一个exchange需要绑定。
#  queue_name 对列名
channel.queue_bind(exchange='logs',
                   queue=queue_name)

print(' [*] Waiting for logs. To exit press CTRL+C')


def callback(ch, method, properties, body):
    print(" [x] %r" % body)


channel.basic_consume(callback,
                      queue=queue_name,
                      no_ack=True)

channel.start_consuming()
4.2 direct广播模式
有选择的接收消息(exchange type=direct)
RabbitMQ还支持根据关键字发送,即:队列绑定关键字,发送者将数据根据关键字发送到消息exchange,exchange根据 关键字 判定应该将数据发送至指定队列。
send 生产端
import pika
import sys

credentials = pika.PlainCredentials('admin', 'admin')  # mq用户名和密码,用于认证
connection = pika.BlockingConnection(
    pika.ConnectionParameters('192.168.37.100', 5672, '/', credentials)
)
channel = connection.channel()

# exchange=“自定义名字”
# type = 'direct' 定义exchange发送类型,广播类型
# exchange_type type报错就使用这个
channel.exchange_declare(exchange='direct_logs',
                         exchange_type='direct')

# 级别:默认取执行脚本传入参数,如果取不到执行info
severity = sys.argv[1] if len(sys.argv) > 1 else 'info'

# 下面这条命令是 可通过命令行输入定义的消息 or 如果没输入就是后面这段话。
message = ' '.join(sys.argv[2:]) or 'Hello World!'

# routing_key=severity 消息发送到指定级别
channel.basic_publish(exchange='direct_logs',
                      routing_key=severity,
                      body=message)
print(" [x] Sent %r:%r" % (severity, message))
connection.close()
recv 消费端
例:python direct_c.py info
import pika
import sys

credentials = pika.PlainCredentials('admin', 'admin')  # mq用户名和密码,用于认证
connection = pika.BlockingConnection(
    pika.ConnectionParameters('192.168.37.100', 5672, '/', credentials)
)
channel = connection.channel()

channel.exchange_declare(exchange='direct_logs',
                         exchange_type='direct')

result = channel.queue_declare(exclusive=True)
queue_name = result.method.queue

# 获取执行脚本执行参数
severities = sys.argv[1:]

# 如果没有参数就会报错,提示加入参数,并退出程序
if not severities:
    sys.stderr.write("Usage: %s [info] [warning] [error]
" % sys.argv[0])
    sys.exit(1)

print(severities)
# 循环severities这个列表进行绑定
# routing_key=severity 接收端就是severity
for severity in severities:
    channel.queue_bind(exchange='direct_logs',
                       queue=queue_name,
                       routing_key=severity)

print(' [*] Waiting for logs. To exit press CTRL+C')


def callback(ch, method, properties, body):
    print(" [x] %r:%r" % (method.routing_key, body))


channel.basic_consume(callback,
                      queue=queue_name,
                      no_ack=True)

channel.start_consuming()
4.3 topic广播模式
更细致的消息过滤
Although using the direct exchange improved our system, it still has limitations - it can't do routing based on multiple criteria.
In our logging system we might want to subscribe to not only logs based on severity, but also based on the source which emitted the log. You might know this concept from the syslog unix tool, which routes logs based on both severity (info/warn/crit...) and facility (auth/cron/kern...).
That would give us a lot of flexibility - we may want to listen to just critical errors coming from 'cron' but also all logs from 'kern'.
import pika
import sys

credentials = pika.PlainCredentials('admin', 'admin')  # mq用户名和密码,用于认证
connection = pika.BlockingConnection(
    pika.ConnectionParameters('192.168.37.100', 5672, '/', credentials)
)

channel = connection.channel()

channel.exchange_declare(exchange='topic_logs',
                         exchange_type='topic')

# 级别:默认取执行脚本传入参数,如果取不到执行info
# 发送消息结尾需要加入级别。
routing_key = sys.argv[1] if len(sys.argv) > 1 else 'anonymous.info'

# 下面这条命令是 可通过命令行输入定义的消息 or 如果没输入就是后面这段话。
message = ' '.join(sys.argv[2:]) or 'Hello World!'

# routing_key=severity 消息发送到指定级别
channel.basic_publish(exchange='topic_logs',
                      routing_key=routing_key,
                      body=message)
print(" [x] Sent %r:%r" % (routing_key, message))
connection.close()
import pika
import sys

credentials = pika.PlainCredentials('admin', 'admin')  # mq用户名和密码,用于认证
connection = pika.BlockingConnection(
    pika.ConnectionParameters('192.168.37.100', 5672, '/', credentials)
)

channel = connection.channel()

channel.exchange_declare(exchange='topic_logs',
                         exchange_type='topic')

result = channel.queue_declare(exclusive=True)
queue_name = result.method.queue

# 获取执行脚本执行参数
binding_keys = sys.argv[1:]

# 如果没有参数就会报错,提示加入参数,并退出程序
if not binding_keys:
    sys.stderr.write("Usage: %s [binding_key]...
" % sys.argv[0])
    sys.exit(1)

# 循环severities这个列表进行绑定
for binding_key in binding_keys:
    channel.queue_bind(exchange='topic_logs',
                       queue=queue_name,
                       routing_key=binding_key)

print(' [*] Waiting for logs. To exit press CTRL+C')


def callback(ch, method, properties, body):
    print(" [x] %r:%r" % (method.routing_key, body))


channel.basic_consume(callback,
                      queue=queue_name,
                      no_ack=True)

channel.start_consuming()