前言
在HDFS中,所有的文件都是以block块的概念而存在的,那么在这样海量的文件数据的情况下,难免会发生一些文件块损坏的现象,那么有什么好的办法去发现呢.答案是使用HDFS的fsck相关的命令.这个命令独立于dfsadmin的命令,可能会让部分人不知道HDFS中还存在这样的命令,本文就来深度挖掘一下这个命令的特殊的用处和内在机理的实现.
Fsck命令
其实说到fsck命令本身,熟悉Linux操作系统的人,可能或多或少听到过或使用过这个命令.Fsck命令的全称为file system check,更加类似的是一种修复命令.当然,本文不会讲大量的关于操作系统的fsck怎么用,而是HDFS下的fsck的使用,在bin/hdfs fsck下还是有很多可选参数的.
Fsck参数使用
本人在测试集群中输入hdfs fsck命令,获取了帮助信息,在此信息中展示了最全的参数使用说明:
$ hdfs fsck
Usage: hdfs fsck <path> [-list-corruptfileblocks | [-move | -delete | -openforwrite] [-files [-blocks [-locations | -racks]]]]
    <path>  start checking from this path
    -move   move corrupted files to /lost+found
    -delete delete corrupted files
    -files  print out files being checked
    -openforwrite   print out files opened for write
    -includeSnapshots   include snapshot data if the given path indicates a snapshottable directory or there are snapshottable directories under it
    -list-corruptfileblocks print out list of missing blocks and files they belong to
    -blocks print out block report
    -locations  print out locations for every block
    -racks  print out network topology for data-node locations
    -storagepolicies    print out storage policy summary for the blocks

    -blockId    print out which file this blockId belongs to, locations (nodes, racks) of this block, and other diagnostics info (under replicated, corrupted or not, etc)
简单的总结一下,首先是必填参数和命令名:
bin/hdfs fsck <path>然后是一堆的可选参数:
- -move: 移动损坏的文件到/lost+found目录下
- -delete: 删除损坏的文件
- -files: 输出正在被检测的文件
- -openforwrite: 输出检测中的正在被写的文件
- -includeSnapshots: 检测的文件包括系统snapShot快照目录下的
- -list-corruptfileblocks: 输出损坏的块及其所属的文件
- -blocks: 输出block的详细报告
- -locations: 输出block的位置信息
- -racks: 输出block的网络拓扑结构信息
- -storagepolicies: 输出block的存储策略信息
- -blockId: 输出指定blockId所属块的状况,位置等信息
具体参数功能对应到相应的程序会在下文的分析中进行详细的阐述.
Fsck过程调用
Fsck过程的调用指的是从终端机器输入到最终fsck在HDFS内部被执行的整个过程.中间穿过的类的其实不多,本人做了一张简图:

上图的调用形式,可以说是三层调用的结构.DFSck就是暴露在最外层的类.我们再来规整规整中间的过程.
- 输入fsck 直接调用到的就是此类.DFSck内部会发送http请求的方式,根据参数构造URL请求地址,发送到下一个处理对象中.
- 下一个处理对象就是FsckServlet.FsckServlet在这里相当于一个过渡者,马上调用真正操作类NamenodeFsck.
- NamenodeFsck在这里会取出请求参数,然后在HDFS内部做真正的fsck检测操作.
Fsck原理分析
Fsck原理分析将会展示更加细致的fsck过程调用.按照上小节的提到的3层调用,同样我们也分为3个层次的渐近性的分析.
DFSck请求构造
你可以把此类想象成DFSAdmin.首先进入命令输入处理入口方法:
public int run(final String[] args) throws IOException {
    if (args.length == 0) {
      printUsage(System.err);
      return -1;
    }

    try {
      return UserGroupInformation.getCurrentUser().doAs(
          new PrivilegedExceptionAction<Integer>() {
            @Override
            public Integer run() throws Exception {
              return doWork(args);
            }
          });
    } catch (InterruptedException e) {
      throw new IOException(e);
    }
  }
在doWork方法中,马上就看到了对于参数的判别分类,同时开始构造不同的参数请求.
private int doWork(final String[] args) throws IOException {
    final StringBuilder url = new StringBuilder();

    url.append("/fsck?ugi=").append(ugi.getShortUserName());
    String dir = null;
    boolean doListCorruptFileBlocks = false;
    for (int idx = 0; idx < args.length; idx++) {
      if (args[idx].equals("-move")) { url.append("&move=1"); }
      else if (args[idx].equals("-delete")) { url.append("&delete=1"); }
      else if (args[idx].equals("-files")) { url.append("&files=1"); }
      else if (args[idx].equals("-openforwrite")) { url.append("&openforwrite=1"); }
      else if (args[idx].equals("-blocks")) { url.append("&blocks=1"); }
      else if (args[idx].equals("-locations")) { url.append("&locations=1"); }
      else if (args[idx].equals("-racks")) { url.append("&racks=1"); }
      else if (args[idx].equals("-storagepolicies")) { url.append("&storagepolicies=1"); }
      ...
不同类型的参数后面接的参数值也不一定相同,比如-blockId后面则会跟连续的blockId.
...
} else if (args[idx].equals("-blockId")) {
        StringBuilder sb = new StringBuilder();
        idx++;
        while(idx < args.length && !args[idx].startsWith("-")){
          sb.append(args[idx]);
          sb.append(" ");
          idx++;
        }
        url.append("&blockId=").append(URLEncoder.encode(sb.toString(), "UTF-8"));
...
请求url构造好之后,就会发起请求
URL path = new URL(url.toString());
    URLConnection connection;
    try {
      connection = connectionFactory.openConnection(path, isSpnegoEnabled);
    } catch (AuthenticationException e) {
      throw new IOException(e);
    }
然后获取响应回复,直接输出到终端上.
InputStream stream = connection.getInputStream();
    BufferedReader input = new BufferedReader(new InputStreamReader(stream, "UTF-8"));
    String line = null;
    String lastLine = null;
    int errCode = -1;
    try {
      while ((line = input.readLine()) != null) {
        out.println(line);
        lastLine = line;
      }
    } finally {
      input.close();
    }
OK,DFSck最外层面的调用过就走通了.
FsckServlet请求处理
上个步骤中url请求会转到FsckServlet中处理,类似代理人的角色,然后马上调用NamenodeFsck进行处理
/** Handle fsck request */
  @Override
  public void doGet(HttpServletRequest request, HttpServletResponse response
      ) throws IOException {
    @SuppressWarnings("unchecked")
    final Map<String,String[]> pmap = request.getParameterMap();
    ...

    final UserGroupInformation ugi = getUGI(request, conf);
    try {
      ugi.doAs(new PrivilegedExceptionAction<Object>() {
        @Override
        public Object run() throws Exception {
          NameNode nn = NameNodeHttpServer.getNameNodeFromContext(context);

          final FSNamesystem namesystem = nn.getNamesystem();
          final BlockManager bm = namesystem.getBlockManager();
          final int totalDatanodes =
              namesystem.getNumberOfDatanodes(DatanodeReportType.LIVE);
          new NamenodeFsck(conf, nn,
              bm.getDatanodeManager().getNetworkTopology(), pmap, out,
              totalDatanodes, remoteAddress).fsck();

          return null;
        }
      });
    } catch (InterruptedException e) {
      response.sendError(400, e.getMessage());
    }
  }
NamenodeFsck的fsck处理
上节中最后一个步骤最终调用的就是NamenodeFsck的fsck方法.在进入这个方法之前,先看一下,这个类的一些关键变量.
  private String lostFound = null;
  private boolean lfInited = false;
  private boolean lfInitedOk = false;
  private boolean showFiles = false;
  private boolean showOpenFiles = false;
  private boolean showBlocks = false;
  private boolean showLocations = false;
  private boolean showRacks = false;
  private boolean showStoragePolcies = false;
  private boolean showCorruptFileBlocks = false;
这些布尔类型的变量对应的就是控制fsck帮助信息所展示的各个参数.个人感觉fsck方法内部的处理顺序看起来有点乱,为了便于大家的理解,这里对指定参数进行指定分析的方式,就不转行对照的描述了.
-list-corruptfileblocks
第一个参数方法-list-corruptfileblocks,展示丢失/损坏的块.
        if (showCorruptFileBlocks) {
          listCorruptFileBlocks();
          return;
        }
然后调用到同名方法listCorruptFileBlocks.
  private void listCorruptFileBlocks() throws IOException {
    Collection<FSNamesystem.CorruptFileBlockInfo> corruptFiles = namenode.
      getNamesystem().listCorruptFileBlocks(path, currentCookie);
    int numCorruptFiles = corruptFiles.size();
    ...
    out.println("Cookie:	" + currentCookie[0]);
    for (FSNamesystem.CorruptFileBlockInfo c : corruptFiles) {
      out.println(c.toString());
    }
    out.println("

The filesystem under path '" + path + "' has " + filler
        + " CORRUPT files");
    out.println();
}此方法最终会调用到FSNamesystem的listCorruptFileBlocks方法,注意这里还传入了一个特别的参数currentCookie.这个参数的作用可是非常的巧妙的.进入FSNamesystem的方法,首先初始化对象损坏文件块对象:
ArrayList<CorruptFileBlockInfo> corruptFiles = new ArrayList<CorruptFileBlockInfo>();方法返回的对象也即是此对象.
然后进入关键的损坏文件的判断逻辑
    // Do a quick check if there are any corrupt files without taking the lock
    if (blockManager.getMissingBlocksCount() == 0) {
      if (cookieTab[0] == null) {
        cookieTab[0] = String.valueOf(getIntCookie(cookieTab[0]));
      }
      if (LOG.isDebugEnabled()) {
        LOG.debug("there are no corrupt file blocks.");
      }
      return corruptFiles;
    }
blockManager的getMissingBlocksCount方法取的就是损坏块队列的大小.
  public long getMissingBlocksCount() {
    // not locking
    return this.neededReplications.getCorruptBlockSize();
  }
如果此方法的Count返回值有值,就是大于0,则方法执行继续
      // 获取损坏块的block迭代器
      final Iterator<Block> blkIterator = blockManager.getCorruptReplicaBlockIterator();
      // 取出cookie值作为标记位,跳过标记下标之前的文件,代表已经浏览过
      int skip = getIntCookie(cookieTab[0]);
      for (int i = 0; i < skip && blkIterator.hasNext(); i++) {
        blkIterator.next();
      }

      while (blkIterator.hasNext()) {
        Block blk = blkIterator.next();
        final INode inode = (INode)blockManager.getBlockCollection(blk);
        //更新skip跳过值
        skip++;
        if (inode != null && blockManager.countNodes(blk).liveReplicas() == 0) {
          String src = FSDirectory.getFullPathName(inode);
          if (src.startsWith(path)){
            corruptFiles.add(new CorruptFileBlockInfo(src, blk));
            count++;
            if (count >= DEFAULT_MAX_CORRUPT_FILEBLOCKS_RETURNED)
              break;
          }
        }
      }
      //更新cookie标记值
      cookieTab[0] = String.valueOf(skip);
cookie的作用就是如上注释所说,获取到此返回损坏文件列表后,会在上一方法中将结果输出
for (FSNamesystem.CorruptFileBlockInfo c : corruptFiles)
    {
      out.println(c.toString());
    }
fsck -path默认处理方法
fsck的默认处理方法指的就是fsck+path的方法,为什么紧接着讲这个方法呢,因为fsck的path方法处理也包括了扫描损坏块的方法,但是在逻辑上与-list-corruptfiles竟然还不一样,这一点本人在阅读的时候,也是感到比较吃惊的.首先大家传入的path会被传入到内部方法check中处理
        Result res = new Result(conf);

        check(path, file, res);

        out.println(res);
        out.println(" Number of data-nodes:		" + totalDatanodes);
        out.println(" Number of racks:		" + networktopology.getNumOfRacks());
然后会进行目录,文件的判断,如果是目录,则进行递归调用
    if (file.isDir()) {
      // 如果快照目录包含此路径,则递归快照目录下的path
      if (snapshottableDirs != null && snapshottableDirs.contains(path)) {
        String snapshotPath = (path.endsWith(Path.SEPARATOR) ? path : path
            + Path.SEPARATOR)
            + HdfsConstants.DOT_SNAPSHOT_DIR;
        HdfsFileStatus snapshotFileInfo = namenode.getRpcServer().getFileInfo(
            snapshotPath);
        check(snapshotPath, snapshotFileInfo, res);
      }
      ...
      do {
        assert lastReturnedName != null;
        thisListing = namenode.getRpcServer().getListing(
            path, lastReturnedName, false);
        if (thisListing == null) {
          return;
        }
        HdfsFileStatus[] files = thisListing.getPartialListing();
        //递归变量此path的子文件,如果此path是目录的话
        for (int i = 0; i < files.length; i++) {
          check(path, files[i], res);
        }
        lastReturnedName = thisListing.getLastName();
      } while (thisListing.hasMore());
      return;
    }
在接下来的分析检测文件时,会进行相应指标的统计值更新
isOpen = blocks.isUnderConstruction();
    if (isOpen && !showOpenFiles) {
      // We collect these stats about open files to report with default options
      res.totalOpenFilesSize += fileLen;
      res.totalOpenFilesBlocks += blocks.locatedBlockCount();
      res.totalOpenFiles++;
      return;
    }
    res.totalFiles++;
    res.totalSize += fileLen;
    res.totalBlocks += blocks.locatedBlockCount();
下面是关键的判断path下所属的block块中的损坏块的判断逻辑:
...
for (LocatedBlock lBlk : blocks.getLocatedBlocks()) {
      ExtendedBlock block = lBlk.getBlock();
      boolean isCorrupt = lBlk.isCorrupt();
      String blkName = block.toString();
...这里直接利用了LocatedBlock内部的isCorrupt的方法,然后进行corrupt计数累加
      // Check if block is Corrupt
      if (isCorrupt) {
        corrupt++;
        res.corruptBlocks++;
        out.print("
" + path + ": CORRUPT blockpool " + block.getBlockPoolId() +
            " block " + block.getBlockName()+"
");
      }
而且在这里,missing块的判断逻辑是独立于corrupt块的.
// 重新进行块副本数的统计
NumberReplicas numberReplicas =
          namenode.getNamesystem().getBlockManager().countNodes(block.getLocalBlock());
      // 获取存在的副本数
      int liveReplicas = numberReplicas.liveReplicas();
// 如果当前副本数确实为0,则表明已经是missing块
if (liveReplicas == 0) {
report.append(" MISSING!");
res.addMissing(block.toString(), block.getNumBytes());
missing++;
missize += block.getNumBytes();
} else {重新回顾以上check方法中的这2类块判断逻辑,第二个missing块的判断逻辑,我个人认为是没有问题的,但是第一个corrupt的判断我个人感觉可能有点问题,尽管说LocatedBlock提供了内部方法isCorrupt,但是我在查询isCorrupt的调用处时发现绝大多数情况下都是false参数默认传入的,而且在数据实时性和有效性上而言,这个方法是没有-list-corruptfiles参数来的快与准的(个人观点,可能理解不同).因为-list-corruptfiles直接是从FSNamesystem类中取的,一方面代表的已经是最新的损坏数据情况了.
fsck -delete/-move
这2个命令作用是找到损坏块之后,打算要做什么事情,就是下面2行代码所控制的:
...
} else {
        if (doMove) copyBlocksToLostFound(parent, file, blocks);
        if (doDelete) deleteCorruptedFile(path);
      }
...LostFound指的是/lost+found目录,下,就是说-move参数会将损坏块文件,移至此目录下,而-delet则会调用直接删除的方法
  private void deleteCorruptedFile(String path) {
    try {
      namenode.getRpcServer().delete(path, true);
      LOG.info("Fsck: deleted corrupt file " + path);
    } catch (Exception e) {
      LOG.error("Fsck: error deleting corrupted file " + path, e);
      internalError = true;
    }
}其实这2个命令的还是比较有用的.如果集群中存在大量损坏块数据的情况时,如果不及时进行清理,会出现大量客户端读写操作的失败,因为元数据虽然存在,但是真实数据已经损坏,读写操作必然会抛出异常.
fsck辅助显示参数
以上几个是fsck的主要参数,下面是一些辅助的次要一些的参数.
-locations/-racks
if (showLocations || showRacks) {
      StringBuilder sb = new StringBuilder("[");
      for (int j = 0; j < locs.length; j++) {
        if (j > 0) { sb.append(", "); }
        if (showRacks)
          sb.append(NodeBase.getPath(locs[j]));
        else
          sb.append(locs[j]);
      }
      sb.append(']');
      report.append(" " + sb.toString());
    }
-storagepolicies
        if (this.showStoragePolcies) {
      storageTypeSummary = new StoragePolicySummary(
          namenode.getNamesystem().getBlockManager().getStoragePolicies());
    }

    ...

    if (this.showStoragePolcies) {
      out.print(storageTypeSummary.toString());
    }
-includeSnapshots
此参数会获取到namenode快照中的目录信息if (snapshottableDirs != null) { SnapshottableDirectoryStatus[] snapshotDirs = namenode.getRpcServer() .getSnapshottableDirListing(); if (snapshotDirs != null) { for (SnapshottableDirectoryStatus dir : snapshotDirs) { snapshottableDirs.add(dir.getFullPath().toString()); } } }
在这些参数执行期间,会伴随着输出结果的直接输出,所以你会看到路线的信息被展示范,输出的最末端,会给出总结报告,如下所示
Total size: 88.13 KB
Total dirs: 14
Total files: 20
Total symlinks: 0
Total blocks (validated): 20 (avg. block size 4512 B)
********************************
UNDER MIN REPL'D BLOCKS: 20 (100.0 %)
dfs.namenode.replication.min: 1
CORRUPT FILES: 20
MISSING BLOCKS: 20
MISSING SIZE: 88.13 KB
CORRUPT BLOCKS: 20
********************************
Minimally replicated blocks: 0 (0.0 %)
Over-replicated blocks: 0 (0.0 %)
Under-replicated blocks: 0 (0.0 %)
Mis-replicated blocks: 0 (0.0 %)
Default replication factor: 0
Average block replication: 0.0
Corrupt blocks: 20
Missing replicas: 0
Number of data-nodes: 0
Number of racks: 0
FSCK ended at Tue Mar 29 11:10:33 CST 2016 in 10 milliseconds
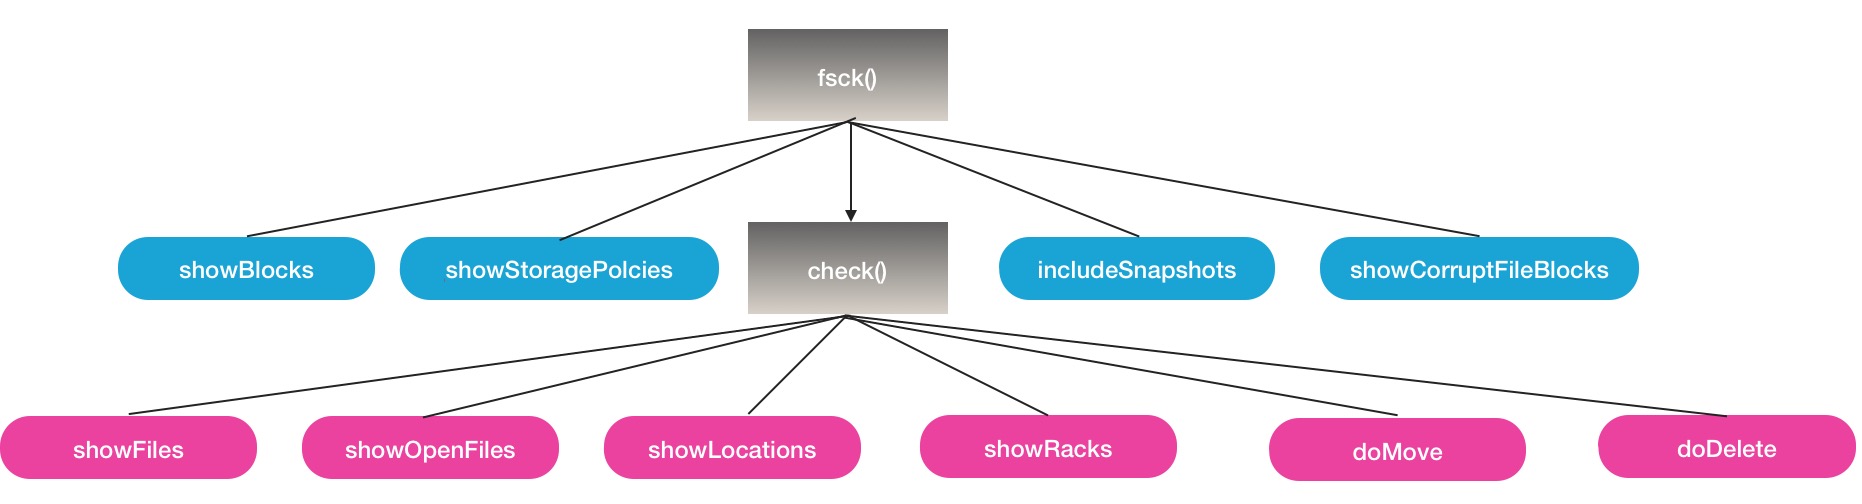
The filesystem under path '/' is CORRUPTOK,NamenodeFsck的处理过程和参数控制就是如上所述,方法集中在fsck和check2个方法内,其间根据所选参数进行选择性中间结果输出,下面是一张简图
希望本文能给大家对HDFS的fsck命令相关的理解与使用带来帮助.