在Hadoop中,启动作业运行的方式有很多,可以用命令行格式把打包好后的作业提交还可以,用Hadoop的插件进行应用开发,在这么多的方式中,都会必经过一个流程,作业会以JobInProgress的形式提交到JobTracker中。什么叫JobTracker呢,也许有些人了解Hadoop只知道他的MapReduce计算模型,那个过程只是其中的Task执行的一个具体过程,比较微观上的流程,而JobTrack是一个比较宏观上的东西。涉及到作业的提交的过程。Hadoop遵循的是Master/Slave的架构,也就是主从关系,对应的就是JobTracker/TaskTracker,前者负责资源管理和作业调度,后者主要负责执行由前者分配过来的作业。这样说的话,简单明了。JobTracker里面的执行的过程很多,那就得从开头开始分析,也就是作业最最开始的提交流程开始。后面的分析我会结合MapReduce的代码穿插式的分析,便于大家理解。
其实在作业的提交状态之前,还不会到达JobTacker阶段的,首先是到了MapReduce中一个叫JobClient的类中。也就是说,比如用户通过bin/hadoop jar xxx.jar把打包的jar包上传到系统中时,首先会触发的就是JobClient.。
public RunningJob submitJob(String jobFile) throws FileNotFoundException,
                                                     InvalidJobConfException,
                                                     IOException {
    // Load in the submitted job details
    JobConf job = new JobConf(jobFile);
    return submitJob(job);
  }
public RunningJob submitJob(JobConf job) throws FileNotFoundException,
                                                  IOException {
    try {
      //又继续调用的是submitJobInternal方法
      return submitJobInternal(job);
    } catch (InterruptedException ie) {
      throw new IOException("interrupted", ie);
    } catch (ClassNotFoundException cnfe) {
      throw new IOException("class not found", cnfe);
    }
  }
...
          jobCopy = (JobConf)context.getConfiguration();

          // Create the splits for the job 为作业创建输入信息
          FileSystem fs = submitJobDir.getFileSystem(jobCopy);
          LOG.debug("Creating splits at " + fs.makeQualified(submitJobDir));
          int maps = writeSplits(context, submitJobDir);
          jobCopy.setNumMapTasks(maps);

          // write "queue admins of the queue to which job is being submitted"
          // to job file.
          String queue = jobCopy.getQueueName();
          AccessControlList acl = jobSubmitClient.getQueueAdmins(queue);
          jobCopy.set(QueueManager.toFullPropertyName(queue,
              QueueACL.ADMINISTER_JOBS.getAclName()), acl.getACLString());

          // Write job file to JobTracker's fs
          FSDataOutputStream out =
            FileSystem.create(fs, submitJobFile,
                new FsPermission(JobSubmissionFiles.JOB_FILE_PERMISSION));

          try {
            jobCopy.writeXml(out);
          } finally {
            out.close();
          }
          //
          // Now, actually submit the job (using the submit name)
          //
          printTokens(jobId, jobCopy.getCredentials());
          //所有信息配置完毕,作业的初始化工作完成,最后将通过RPC方式正式提交作业
          status = jobSubmitClient.submitJob(
              jobId, submitJobDir.toString(), jobCopy.getCredentials());
          JobProfile prof = jobSubmitClient.getJobProfile(jobId);
至此我们知道,我们作业已经从本地提交出去了,后面的事情就是JobTracker的事情了,这个时候我们直接会触发的是JobTacker的addJob()方法。
private synchronized JobStatus addJob(JobID jobId, JobInProgress job)
  throws IOException {
    totalSubmissions++;

    synchronized (jobs) {
      synchronized (taskScheduler) {
        jobs.put(job.getProfile().getJobID(), job);
        //观察者模式,会触发每个监听器的方法
        for (JobInProgressListener listener : jobInProgressListeners) {
          listener.jobAdded(job);
        }
      }
    }
    myInstrumentation.submitJob(job.getJobConf(), jobId);
    job.getQueueMetrics().submitJob(job.getJobConf(), jobId);

    LOG.info("Job " + jobId + " added successfully for user '"
             + job.getJobConf().getUser() + "' to queue '"
             + job.getJobConf().getQueueName() + "'");
    AuditLogger.logSuccess(job.getUser(),
        Operation.SUBMIT_JOB.name(), jobId.toString());
    return job.getStatus();
  }
/**
* Start the JobTracker process. This is used only for debugging. As a rule,
* JobTracker should be run as part of the DFS Namenode process.
* JobTracker也是一个后台进程,伴随NameNode进程启动进行,main方法是他的执行入口地址
*/
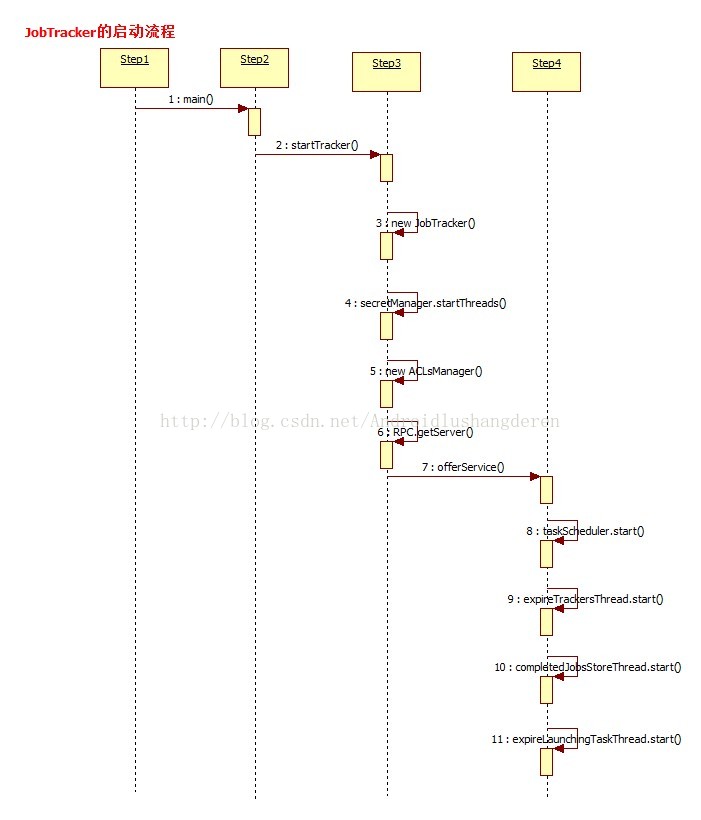
public static void main(String argv[]
) throws IOException, InterruptedException
public static void main(String argv[]
                          ) throws IOException, InterruptedException {
    StringUtils.startupShutdownMessage(JobTracker.class, argv, LOG);

    try {
      if(argv.length == 0) {
    	//调用startTracker方法开始启动JobTracker
        JobTracker tracker = startTracker(new JobConf());
        //JobTracker初始化完毕,开启里面的各项线程服务
        tracker.offerService();
      }
      else {
        if ("-dumpConfiguration".equals(argv[0]) && argv.length == 1) {
          dumpConfiguration(new PrintWriter(System.out));
        }
        else {
          System.out.println("usage: JobTracker [-dumpConfiguration]");
          System.exit(-1);
        }
      }
    } catch (Throwable e) {
      LOG.fatal(StringUtils.stringifyException(e));
      System.exit(-1);
    }
  }
JobTracker(final JobConf conf, String identifier, Clock clock, QueueManager qm)
  throws IOException, InterruptedException {
    .....
    //初始化安全相关操作
    secretManager =
      new DelegationTokenSecretManager(secretKeyInterval,
                                       tokenMaxLifetime,
                                       tokenRenewInterval,
                                       DELEGATION_TOKEN_GC_INTERVAL);
    secretManager.startThreads();

    ......

    // Read the hosts/exclude files to restrict access to the jobtracker.
    this.hostsReader = new HostsFileReader(conf.get("mapred.hosts", ""),
                                           conf.get("mapred.hosts.exclude", ""));
    //初始化ACL访问控制列表
    aclsManager = new ACLsManager(conf, new JobACLsManager(conf), queueManager);

    LOG.info("Starting jobtracker with owner as " +
        getMROwner().getShortUserName());

    // Create the scheduler
    Class<? extends TaskScheduler> schedulerClass
      = conf.getClass("mapred.jobtracker.taskScheduler",
          JobQueueTaskScheduler.class, TaskScheduler.class);
    //初始化Task任务调度器
    taskScheduler = (TaskScheduler) ReflectionUtils.newInstance(schedulerClass, conf);

    // Set service-level authorization security policy
    if (conf.getBoolean(
          ServiceAuthorizationManager.SERVICE_AUTHORIZATION_CONFIG, false)) {
      ServiceAuthorizationManager.refresh(conf, new MapReducePolicyProvider());
    }

    int handlerCount = conf.getInt("mapred.job.tracker.handler.count", 10);
    this.interTrackerServer =
      RPC.getServer(this, addr.getHostName(), addr.getPort(), handlerCount,
          false, conf, secretManager);
    if (LOG.isDebugEnabled()) {
      Properties p = System.getProperties();
      for (Iterator it = p.keySet().iterator(); it.hasNext();) {
        String key = (String) it.next();
        String val = p.getProperty(key);
        LOG.debug("Property '" + key + "' is " + val);
      }
}1.初始化ACL访问控制列表数据
2.创建TaskSchedule任务调度器
3.得到DPC Server。
4.还有其他一些零零碎碎的操作....
然后第2个方法offService(),主要开启了各项服务;
public void offerService() throws InterruptedException, IOException {
    // Prepare for recovery. This is done irrespective of the status of restart
    // flag.
    while (true) {
      try {
        recoveryManager.updateRestartCount();
        break;
      } catch (IOException ioe) {
        LOG.warn("Failed to initialize recovery manager. ", ioe);
        // wait for some time
        Thread.sleep(FS_ACCESS_RETRY_PERIOD);
        LOG.warn("Retrying...");
      }
    }

    taskScheduler.start();
    .....
    this.expireTrackersThread = new Thread(this.expireTrackers,
                                          "expireTrackers");
    //启动该线程的主要作用是发现和清理死掉的任务
    this.expireTrackersThread.start();
    this.retireJobsThread = new Thread(this.retireJobs, "retireJobs");
    //启动该线程的作用是清理长时间驻留在内存中且已经执行完的任务
    this.retireJobsThread.start();
    expireLaunchingTaskThread.start();

    if (completedJobStatusStore.isActive()) {
      completedJobsStoreThread = new Thread(completedJobStatusStore,
                                            "completedjobsStore-housekeeper");
      //该线程的作用是把已经运行完成的任务的信息保存到HDFS中,以便后续的查询
      completedJobsStoreThread.start();
    }

    // start the inter-tracker server once the jt is ready
    this.interTrackerServer.start();

    synchronized (this) {
      state = State.RUNNING;
    }
    LOG.info("Starting RUNNING");

    this.interTrackerServer.join();
    LOG.info("Stopped interTrackerServer");
  }
void close() throws IOException {
	//服务停止
    if (this.infoServer != null) {
      LOG.info("Stopping infoServer");
      try {
        this.infoServer.stop();
      } catch (Exception ex) {
        LOG.warn("Exception shutting down JobTracker", ex);
      }
    }
    if (this.interTrackerServer != null) {
      LOG.info("Stopping interTrackerServer");
      this.interTrackerServer.stop();
    }
    if (this.expireTrackersThread != null && this.expireTrackersThread.isAlive()) {
      LOG.info("Stopping expireTrackers");
      //执行线程中断操作
      this.expireTrackersThread.interrupt();
      try {
    	//等待线程执行完毕再执行后面的操作
        this.expireTrackersThread.join();
      } catch (InterruptedException ex) {
        ex.printStackTrace();
      }
    }
    if (this.retireJobsThread != null && this.retireJobsThread.isAlive()) {
      LOG.info("Stopping retirer");
      this.retireJobsThread.interrupt();
      try {
        this.retireJobsThread.join();
      } catch (InterruptedException ex) {
        ex.printStackTrace();
      }
    }
    if (taskScheduler != null) {
      //调度器的方法终止
      taskScheduler.terminate();
    }
    if (this.expireLaunchingTaskThread != null && this.expireLaunchingTaskThread.isAlive()) {
      LOG.info("Stopping expireLaunchingTasks");
      this.expireLaunchingTaskThread.interrupt();
      try {
        this.expireLaunchingTaskThread.join();
      } catch (InterruptedException ex) {
        ex.printStackTrace();
      }
    }
    if (this.completedJobsStoreThread != null &&
        this.completedJobsStoreThread.isAlive()) {
      LOG.info("Stopping completedJobsStore thread");
      this.completedJobsStoreThread.interrupt();
      try {
        this.completedJobsStoreThread.join();
      } catch (InterruptedException ex) {
        ex.printStackTrace();
      }
    }
    if (jobHistoryServer != null) {
      LOG.info("Stopping job history server");
      try {
        jobHistoryServer.shutdown();
      } catch (Exception ex) {
        LOG.warn("Exception shutting down Job History server", ex);
      }
  }
    DelegationTokenRenewal.close();
    LOG.info("stopped all jobtracker services");
    return;
  }
至此,JobTracker的执行过程总算有了一个了解了吧,不算太难。后面的过程分析。JobTracker是如何把任务进行分解和分配的,从宏观上去理解Hadoop的工作原理。下面是以上过程的一个时序图