只需要按照第三次修改版本的内容安装就可以了(水平线内的内容),主要是执行两个脚本就可以完成自动化安装了,其他内容是以前写的,仅留下来作为参考
第三次修改:(此次为zabbix4.0版本的,进一步的自动化一键安装)
共有两个脚本
第一个脚本:mysqlpasswd.sh(放在root家目录下)修改mysql密码的脚本,无需执行
#!/usr/bin/expect
spawn mysql_secure_installation
expect "Enter current password for root (enter for none):"
send "
"
expect "Set root password? "
send "Y
"
expect "New password:"
send "123456
"
expect "Re-enter new password:"
send "123456
"
expect "Remove anonymous users? "
send "y
"
expect "Disallow root login remotely? "
send "n
"
expect "Remove test database and access to it? "
send "y
"
expect "Reload privilege tables now? "
send "y
"
expect eof
第二个脚本:开始安装zabbix,脚本名为installzabbix.sh,加执行权限执行即可完成自动化安装
rpm -Uvh https://repo.zabbix.com/zabbix/4.0/rhel/7/x86_64/zabbix-release-4.0-1.el7.noarch.rpm yum clean all yum -y install zabbix-server-mysql zabbix-web-mysql zabbix-agent mariadb mariadb-server httpd php php-fpm systemctl stop firewalld
sed -i 's/=enforcing/=disabled/g' /etc/selinux/config #2019.5.6新增,不执行该语句,你会发现重启服务器后,zabbix服务器无法正常启动了 setenforce 0 systemctl start mariadb
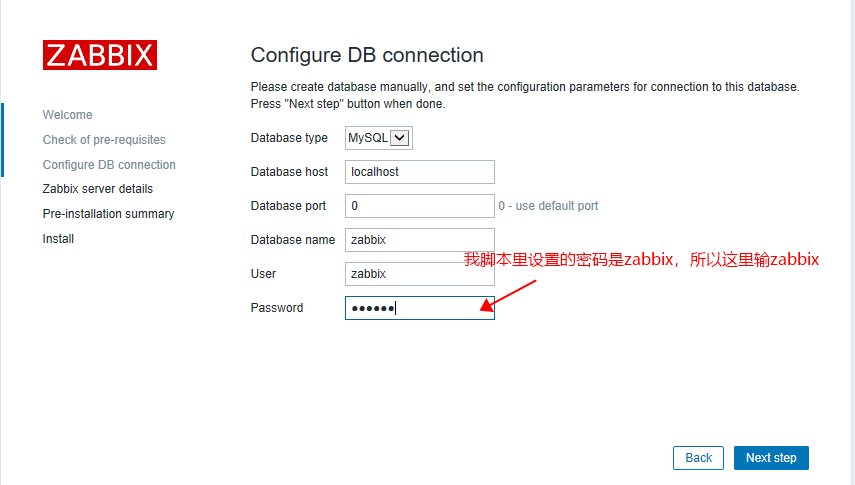
systemctl enable mariadb #新增,记住,一定要养成将服务器设置为自启动的状态,否则下次服务器重启后,你就得慢慢排错了。。。 yum install expect -y chmod +x mysqlpasswd.sh /root/mysqlpasswd.sh mysql -uroot -p123456 -e "create database zabbix character set utf8 collate utf8_bin;" mysql -uroot -p123456 -e "grant all privileges on zabbix.* to zabbix@localhost identified by 'zabbix'" zcat /usr/share/doc/zabbix-server-mysql*/create.sql.gz | mysql -uzabbix -pzabbix zabbix #如果提示文件不存在就执行find / -name create.sql.gz找到文件对应的位置 sed -i s/'# DBPassword='/'DBPassword=zabbix'/g /etc/zabbix/zabbix_server.conf sed -i s/'Europe/Riga'/'Asia/Shanghai'/g /etc/httpd/conf.d/zabbix.conf sed -i s/'# php_value date.timezone Asia/Shanghai'/'php_value date.timezone Asia/Shanghai'/g /etc/httpd/conf.d/zabbix.conf systemctl start zabbix-server zabbix-agent httpd #现在通过web访问ip/zabbix就可以看到安装界面了
访问服务器ip/zabbix就可以看到安装界面了,一直下一步,注意,到以下界面时需要输入密码,剩下的也一直是默认下一步即可
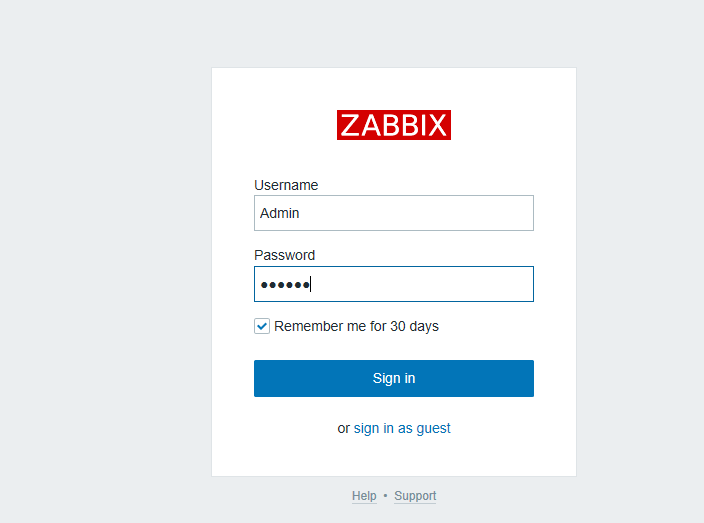
确认后会自动跳转到zabbix登录界面,账号Admin密码zabbix
第二次修改:(大部分命令直接复制即可执行)
有linux基础的,可以直接看这个(以下脚本内容后面我再优化以下,尽量使它直接复制就可以执行或者一键自动安装)
yum install httpd php php-mysql mariadb mariadb-server -y
systemctl start mariadb
systemctl stop firewalld
systemctl disable firewalld
setenforce 0
vi /etc/selinux/config #将对应的SELINUX的值修改为disabled
mysql_secure_installation #修改密码,我的密码是123456
rpm -ivh http://repo.zabbix.com/zabbix/3.2/rhel/7/x86_64/zabbix-release-3.2-1.el7.noarch.rpm
yum -y install zabbix-server-mysql zabbix-web-mysql
yum -y install zabbix-agent
mysql -uroot -p #执行create database zabbix character set utf8 collate utf8_bin;grant all privileges on zabbix.* to zabbix@localhost identified by 'zabbix'; flush privileges; quit
cd /usr/share/doc/zabbix-server-mysql-3.2.11
gunzip create.sql.gz #解压
mysql -uroot -p zabbix <create.sql #导入脚本
yum install vim -y
vim /etc/zabbix/zabbix_server.conf #修改以下参数对应的值DBHost=localhost;DBName=zabbix;DBUser=zabbix;DBPassword=zabbix
systemctl start zabbix-server
vi /etc/php.ini #修改以下参数max_execution_time 300;memory_limit 128M;post_max_size 16M;upload_max_filesize 2M;max_input_time 300;always_populate_raw_post_data -1;date.timezone =Asia/Shanghai
systemctl restart zabbix-server
systemctl start httpd
下面是比较详细一点的解说
第一版:
首先我们需要配置lamp环境
博客里有写过如何配置这个环境,这里再简单说一下
yum install httpd php php-mysql mariadb mariadb-server -y
开启mariadb服务后最好修改一下mariadb密码
输入命令mysql_secure_installation,详细过程略
另外关闭防火墙还有selinux,这里我大意了,只关闭了防火墙,导致后面查看zabbix-server和客户端的状态时报错,无法正常开启
接下来最好测试一下环境是否搭建成功
导入源:rpm -ivh http://repo.zabbix.com/zabbix/3.2/rhel/7/x86_64/zabbix-release-3.2-1.el7.noarch.rpm
安装zabbix包
yum -y install zabbix-server-mysql zabbix-web-mysql
我们给本机也安装上客户端
yum -y install zabbix-agent
初始化数据库
进入数据库mysql -uroot -p(回车后输入你的密码)
mysql> create database zabbix character set utf8 collate utf8_bin;
Query OK, 1 row affected (0.00 sec)
mysql> grant all privileges on zabbix.* to zabbix@localhost identified by 'zabbix'; //密码是 zabbix
Query OK, 0 rows affected (0.00 sec)
mysql> flush privileges; 更新权限
mysql> quit
Bye
进入到这个目录
/usr/share/doc/zabbix-server-mysql-3.2.11
可以看到里面有create.sql.gz
运行命令
zcat create.sql.gz | mysql -uroot -p zabbix //密码zabbix 对应数据库中新建的 zabbix库(这一步刚开始的时候不知道什么意思,所以直接跳过了,结果导致安装zabbix时提示无法匹配数据库The frontend does not match Zabbix database.,这是因为这一步是用来初始化数据库的。我的方法是把这个gz文件使用gunzip命令解压,然后直接进入mysql数据库里面使用source加上路径名进行导入)
编辑zabbix server配置文件
vim /etc/zabbix/zabbix_server.conf
DBHost=localhost
DBName=zabbix
DBUser=zabbix
DBPassword=zabbix
实际上我的配置文件修改的是DBHost和DBPassword去掉前面的#号(这几行都不是连着的)
启动zabbix服务,设置开机自启动
systemctl start zabbix-server
systemctl enable zabbix-server
编辑zabbix前端的PHP配合配置(/etc/php.ini)
max_execution_time 300
memory_limit 128M
post_max_size 16M
upload_max_filesize 2M
max_input_time 300
always_populate_raw_post_data -1
date.timezone =Asia/Shanghai //主要去掉# 改成上海,如果这个不修改,安装好zabbix后会有警告
启动apache服务,设置开机自启动
systemctl start httpd
systemctl enable httpd
登陆zabbix
http://IP/zabbix/
http://IP/zabbix/setup.php
默认用户名/密码:Admin/zabbix
在这个过程中我还遇到过几个问题,进入zabbix,显示zabbix没有处于运行状态。于是我重启zabbix-server,发现报limit错误,于是我修改了/etc/systemd/system.conf 修改这两行
DefaultLimitNOFILE=1024000 #这里需要修改
DefaultLimitNPROC=1024000 #这里也需要修改
貌似重启后才能生效,于是重启虚拟机
重启后发现还是报这个错,各种查看httpd,mariadb是否正常开启,firewalld是否处于关闭状态,最后getenforce,发现原来selinux还在开启,谁叫我都是使用setenforce临时关闭而已呢,那么setenforce 0搞定
上个效果图

我还遇到过一些莫名其妙的事情,那就是该开启的服务都已经全部开启了,可是在浏览器输入ip/zabbix后,提示找不到页面。我的解决思路是,首先查看防火墙和selinux,其次是查看服务的状态是不是真的在running,最后再重复上面的安装命令,因为可能是执行时少执行了那条安装命令语句导致的,我的原因就是同时安装两个软件,结果有一个报错,后面我把报错的那个软件成功安装了,但仍没恢复正常。最后发现,虽然报错的软件安装成功了,但是,另一个同时安装的软件却没有安装成功,因为我在安装时没有看到提示这个软件已经安装或者已经是最新版本
看一下
Installed:
  zabbix-web-mysql.noarch 0:3.2.7-1.el7          #就是这里,这里是提示该软件被安装

Dependency Installed:
  php-bcmath.x86_64 0:5.4.16-42.el7     php-gd.x86_64 0:5.4.16-42.el7
  php-ldap.x86_64 0:5.4.16-42.el7       php-mbstring.x86_64 0:5.4.16-42.el7
  php-mysql.x86_64 0:5.4.16-42.el7      php-pdo.x86_64 0:5.4.16-42.el7
  php-xml.x86_64 0:5.4.16-42.el7        t1lib.x86_64 0:5.1.2-14.el7
  zabbix-web.noarch 0:3.2.7-1.el7

Complete!
[root@localhost ~]# systemctl restart zabbix-server
[root@localhost ~]# systemctl restart httpd
[root@localhost ~]#
[root@localhost ~]# yum install httpd
Loaded plugins: fastestmirror, langpacks
Loading mirror speeds from cached hostfile
 * base: mirrors.cn99.com
 * extras: mirrors.cn99.com
 * updates: mirrors.cn99.com
Package httpd-2.4.6-45.el7.centos.4.x86_64 already installed and latest version                 #如果已经安装有了,其安装结果会是这样子的
Nothing to do
[root@localhost ~]#
ps:有没有注意到我老是重启那些服务。是的,有时候问题就是因为服务器没有重启,因为新增加了功能或者修改了配置文件,有时候可能不会生效,最好的办法就是重启服务