一、测试环境
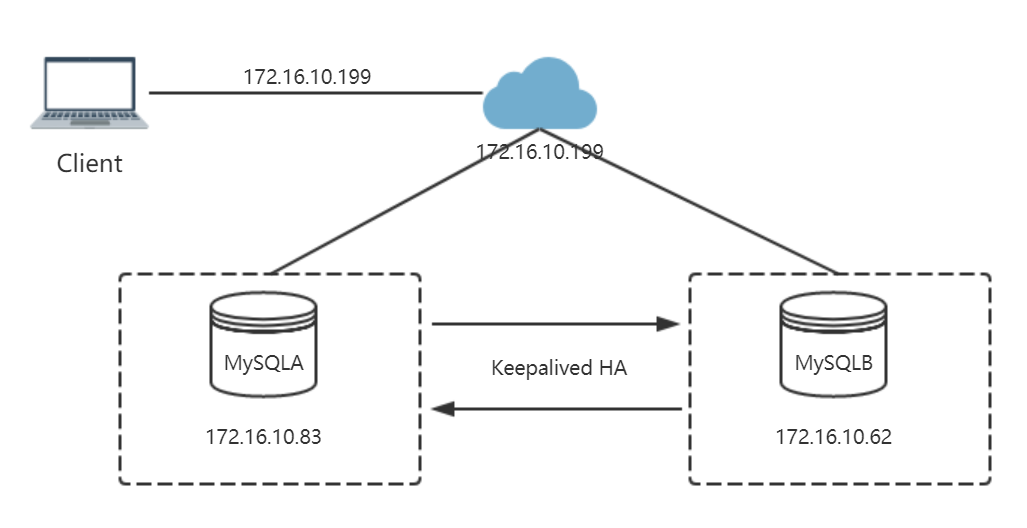
1.1 结构图
1.2 版本
- 操作系统:CentOS 7.3
- MySQL版本:5.6.35
- Docker版本:18.06.1-ce
- 使用root用户操作
- IP地址说明
| IP地址 | 用途 | 备注 |
| 172.16.10.83 | MySQL | mysqla |
| 172.16.10.62 | MySQL | mysqlb |
| 172.16.10.199 | VIP(keepalived) |
二、安装mysql
2.1 创建目录
mkdir -p /data/mysqldb
mkdir -p /data/docker-compose/mysql-compose
2.2 编写docker-compose.yml文件
cd /data/docker-compose/mysql-compose
vim docker-compose.yml

version: '3'
services:
  mysql:
    image: mysql:5.6.35
    ports:
      - "3306:3306"

    volumes:
      - ./my.cnf:/etc/mysql/conf.d/my.cnf
      - /data/mysqldb:/var/lib/mysql
      - /etc/localtime:/etc/localtime:ro

    environment:
      - MYSQL_ROOT_PASSWORD=123456

    restart: always
将自己的my.cnf文件放置在/data/docker-compose/mysql-compose目录下
my.cnf
[client]
default-character-set = utf8
port = 3306
[mysql]
port = 3306
default-character-set = utf8
[mysqld]
port = 3306
basedir = /var/lib/mysql
datadir = /var/lib/mysql
character-set-server = utf8
log-bin = mysql-bin
binlog_cache_size = 1M
expire_logs_days = 10
max_binlog_size = 128M
server_id = 1235
binlog_format=MIXED
read-only=0
auto-increment-increment=10
auto-increment-offset=1
skip-external-locking
slow-query-log = on
long_query_time = 1
slow_query_log_file = /var/lib/mysql/slow.log
lower_case_table_names = 1
max_connections=1100
max_user_connections=100
max_connect_errors=1000
innodb_buffer_pool_size = 100M
innodb_buffer_pool_instances = 8
innodb_log_file_size = 200M
innodb_log_buffer_size = 16M
innodb_log_files_in_group = 3
innodb_flush_log_at_trx_commit = 0
innodb_lock_wait_timeout = 10
innodb_sync_spin_loops = 40
innodb_max_dirty_pages_pct = 90
innodb_support_xa = 0
innodb_thread_concurrency = 0
innodb_thread_sleep_delay = 500
innodb_concurrency_tickets = 1000
log_bin_trust_function_creators = 1
innodb_flush_method = O_DIRECT
innodb_file_per_table
innodb_read_io_threads = 16
innodb_write_io_threads = 16
innodb_io_capacity = 2000
innodb_file_format = Barracuda
innodb_purge_threads=1
innodb_purge_batch_size = 32
innodb_old_blocks_pct=75
innodb_change_buffering=all
innodb_stats_on_metadata=OFF
sql_mode=ONLY_FULL_GROUP_BY,NO_AUTO_VALUE_ON_ZERO,STRICT_TRANS_TABLES,ERROR_FOR_DIVISION_BY_ZERO,NO_AUTO_CREATE_USER,NO_ENGINE_SUBSTITUTION

log-error=/var/lib/mysql/mysql.log
pid-file=/var/lib/mysql/mysql.pid
配置文件中需要增加(以上文件已加)
server-id=123
log-bin=mysql-bin
binlog_format=MIXED

read-only=0
auto-increment-increment=10
auto-increment-offset=1


read-only:标识数据库是否为只读,这里我们设置为0即非只读,该参数针对用户没有SUPER权限设置。

auto-increment-increment和auto-increment-offset这两个参数主要控制MySQL自增列的值,
用于Master-Master之间的复制,防止出现重复值。做了如上配置后,我们向该MySQLA服务中插入第一个id就是1,
第二行的id就是11,而不是2,那么在MySQLB服务插入第一个id就是2,第二行的id就是12,这样就不会出现主键冲突。
2.3 启动mysql
docker-compose up -d

#docker ps
CONTAINER ID        IMAGE                       COMMAND                  CREATED             STATUS              PORTS                    NAMES
bba3674e9c44        mysql:5.6.35                "docker-entrypoint.s…"   3 hours ago         Up 41 minutes       0.0.0.0:3306->3306/tcp   mysqlcompose_mysql_1
2.4 同样方法启动另一个mysql
# 在另一台启动mysql前,其配置文件my.cnf修改

server-id=190
log-bin=mysql-bin
binlog_format=MIXED

relay_log=mysql-relay-bin
log-slave-updates=ON

read-only=0
auto-increment-increment=10
auto-increment-offset=2
三、MySQLA - > MySQLB同步配置
3.1 创建MySQL同步账号
GRANT REPLICATION SLAVE ON *.* TO 'mysqla'@'172.16.%' IDENTIFIED BY 'mysqla';

#该同步账号主要是给MySQLB使用。
3.2 查看MySQLA的master状态
mysql> show master status;
+------------------+----------+--------------+------------------+-------------------+
| File             | Position | Binlog_Do_DB | Binlog_Ignore_DB | Executed_Gtid_Set |
+------------------+----------+--------------+------------------+-------------------+
| mysql-bin.000006 |      120 |              |                  |                   |
+------------------+----------+--------------+------------------+-------------------+
1 row in set (0.00 sec)
3.3 登入MySQLB,执行如下命令
change master to
master_host='172.16.10.83',
master_user='mysqla',
master_password='mysqla',
master_log_file='mysql-bin.000006',
master_log_pos=120;
3.4 在MySQLB中执行同步命令
mysql> start slave;
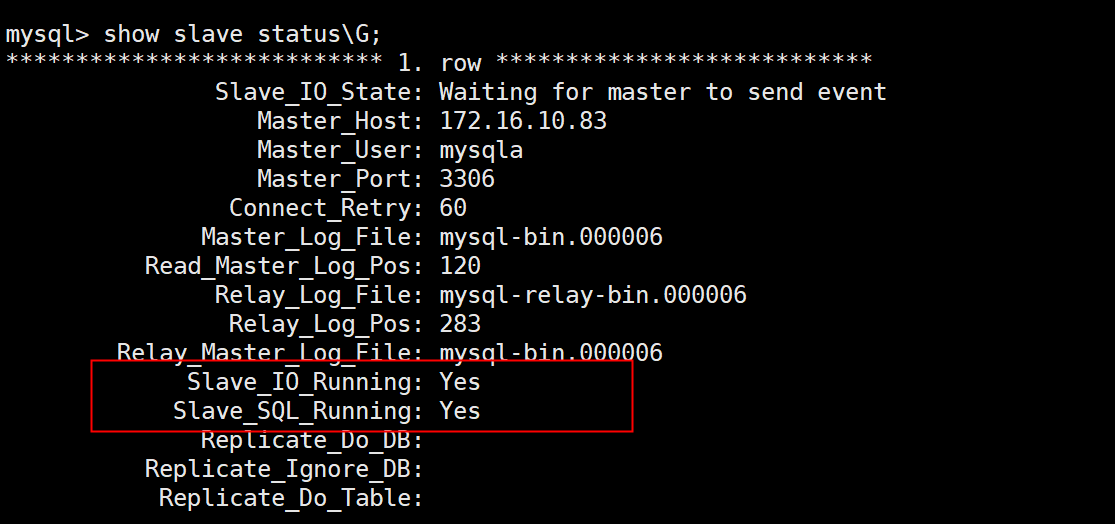
3.5 在MySQLB中执行,查看是否配置成功
mysql> show slave status G;


*************************** 1. row ***************************
               Slave_IO_State: Waiting for master to send event
                  Master_Host: 172.16.10.83
                  Master_User: mysqla
                  Master_Port: 3306
                Connect_Retry: 60
              Master_Log_File: mysql-bin.000006
          Read_Master_Log_Pos: 120
               Relay_Log_File: mysql-relay-bin.000006
                Relay_Log_Pos: 283
        Relay_Master_Log_File: mysql-bin.000006
             Slave_IO_Running: Yes
            Slave_SQL_Running: Yes
              Replicate_Do_DB:
          Replicate_Ignore_DB:
           Replicate_Do_Table:
四、MySQLB - > MySQLA同步配置
4.1 创建MySQL同步账号
GRANT REPLICATION SLAVE ON *.* TO 'mysqlb'@'172.16.%' IDENTIFIED BY 'mysqlb';

#该同步账号主要是给MySQLA使用。
4.2 登入MySQLB查看master状态
mysql> show master status;
+------------------+----------+--------------+------------------+-------------------+
| File             | Position | Binlog_Do_DB | Binlog_Ignore_DB | Executed_Gtid_Set |
+------------------+----------+--------------+------------------+-------------------+
| mysql-bin.000006 |      473 |              |                  |                   |
+------------------+----------+--------------+------------------+-------------------+
1 row in set (0.00 sec)
4.3 登录MySQLA数据库执行如下同步命令
change master to
master_host='172.16.10.62',
master_user='mysqlb',
master_password='mysqlb',
master_log_file='mysql-bin.000006',
master_log_pos=473;
4.4 在MySQLA库中执行启动同步命令
mysql> start slave;
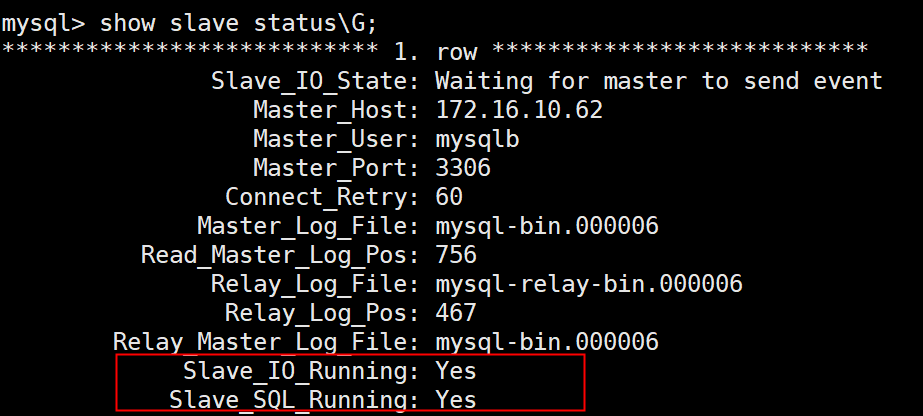
4.5 登录MySQLA验证同步命令是否执行成功
mysql> show slave statusG;
*************************** 1. row ***************************
               Slave_IO_State: Waiting for master to send event
                  Master_Host: 172.16.10.62
                  Master_User: mysqlb
                  Master_Port: 3306
                Connect_Retry: 60
              Master_Log_File: mysql-bin.000006
          Read_Master_Log_Pos: 756
               Relay_Log_File: mysql-relay-bin.000006
                Relay_Log_Pos: 467
        Relay_Master_Log_File: mysql-bin.000006
             Slave_IO_Running: Yes
            Slave_SQL_Running: Yes
五、主主互备验证
5.1 登录MySQLA数据库创建test库
mysql> create database test;
Query OK, 1 row affected (0.00 sec)

mysql> show databases;
+--------------------+
| Database           |
+--------------------+
| information_schema |
| mysql              |
| performance_schema |
| test               |
+--------------------+
4 rows in set (0.00 sec)
5.2 在MySQLB上查看新建的数据库test
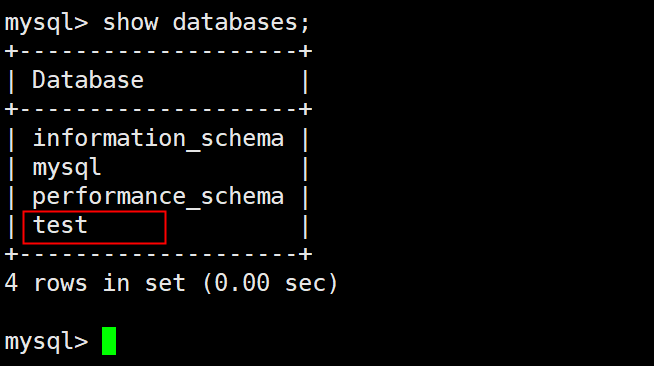
数据库同步过来了
5.3 在MySQLB上删除数据库test
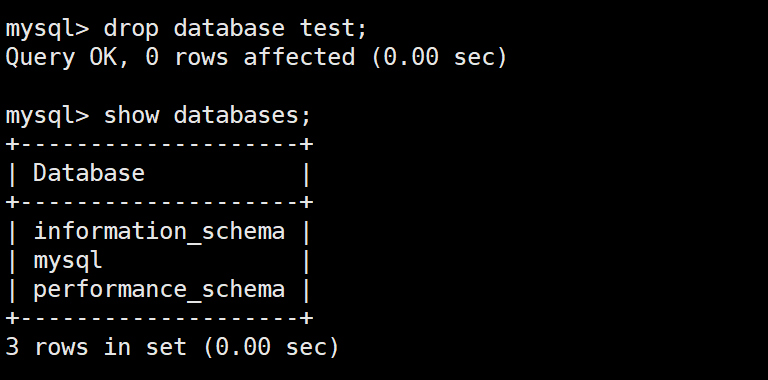
5.4 查看MySQLA中数据库test是否被删除
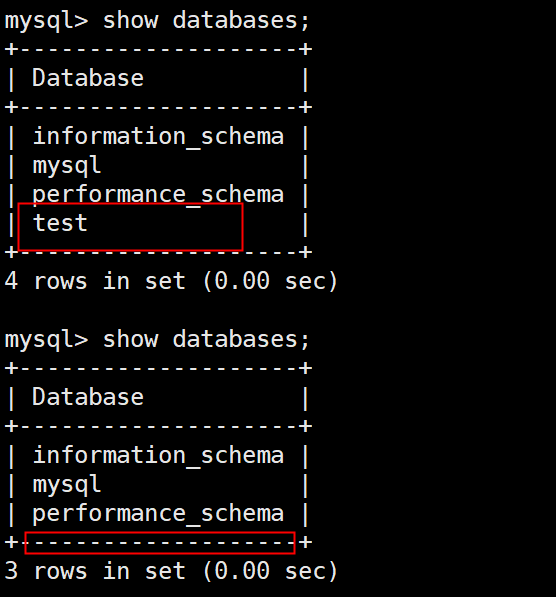
确实已经不存在了,到此MySQL主主互备完成。
六、keepalived
6.1 分别在两台mysql服务器上执行安装
yum -y install keepalived

systemctl enable keepalived
6.2 MySQL服务状态监控脚本
MySQL服务状态监测脚本,主要监控MySQL服务状态是否正常,如果不正常则将该MySQL所在服务的Keepalived服务杀死,监控MySQL服务是否正常的方法有多种可以通过端口号、进程ID以及执行MySQL命令,这里我们使用mysladmin执行命令来监测MariaDB服务是否正常,脚本内容如下(check_mysql.sh)
cd /etc/keepalived

vim check_mysql.sh

#!/bin/bash

MYSQL_PING=`docker exec mysqlcompose_mysql_1 mysqladmin -h127.0.0.1 -uroot -p123456 ping 2>/dev/null`
MYSQL_OK="mysqld is alive"
if [[ "$MYSQL_PING" != "$MYSQL_OK" ]];then
   echo "mysql is not running."
   killall keepalived
else
   echo "mysql is running"
fi

注:两台服务器都要配置
6.4 MySQLA服务器Keepalived配置
! Configuration File for keepalived
global_defs {
}
vrrp_script check_mysql {
  script "/etc/keepalived/check_mysql.sh"
  interval 2
}
vrrp_instance VI_1 {
  state MASTER
  interface eth0
  virtual_router_id 51
  priority 100
  advert_int 1
  nopreempt
  authentication {
    auth_type PASS
    auth_pass 1111
  }
  virtual_ipaddress {
    172.16.10.199
  }
  track_script {
    check_mysql
  }
}
注:这个是master
6.5 MySQLB服务器Keepalived配置
! Configuration File for keepalived
global_defs {
}
vrrp_script check_mysql {
  script "/etc/keepalived/check_mysql.sh"
  interval 2
}
vrrp_instance VI_1 {
  state BACKUP
  interface eth0
  virtual_router_id 51
  priority 90
  advert_int 1
  authentication {
    auth_type PASS
    auth_pass 1111
  }
  virtual_ipaddress {
    172.16.10.199
  }
  track_script {
    check_mysql
  }
}
6.6 分别启动keepalived
systemctl start keepalived
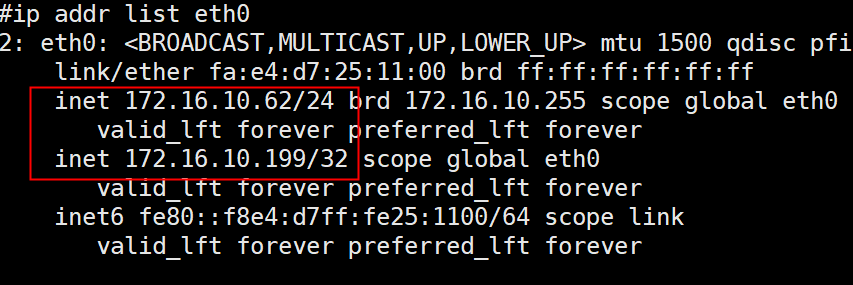
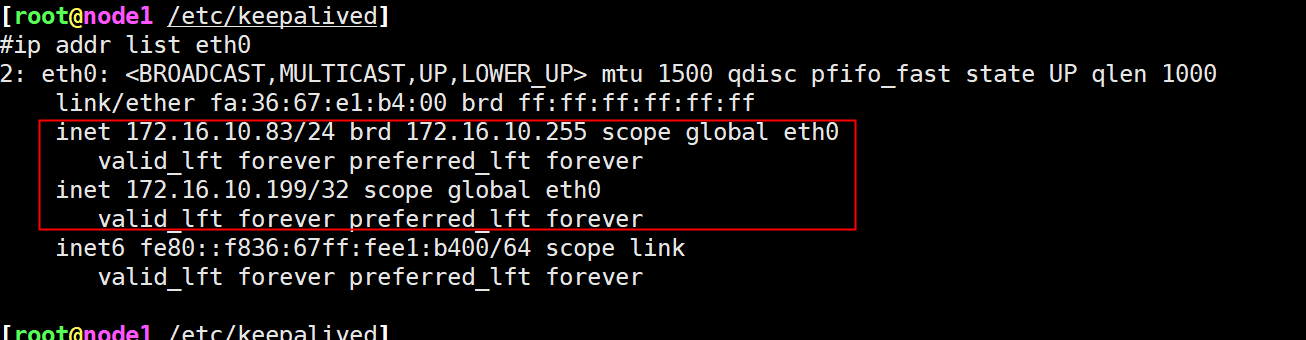
6.7 查看VIP是否被绑定在MASTER的网卡上
Master在172.16.10.83这个服务器上
七、验证
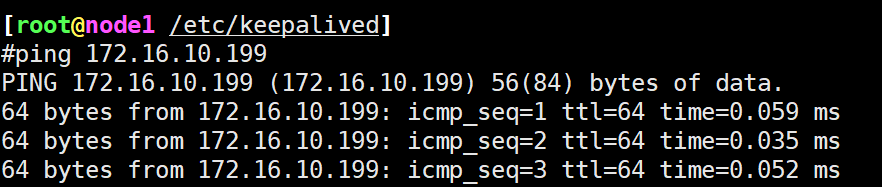
7.1 验证联通性
在两台服务器上pingVIP
172.16.10.83
172.16.10.62

7.2 验证VIP是否会漂移
将keepalive的master这个停掉,VIP就应该不在这个服务器上了
# MySQLA服务器
systemctl stop keepalived
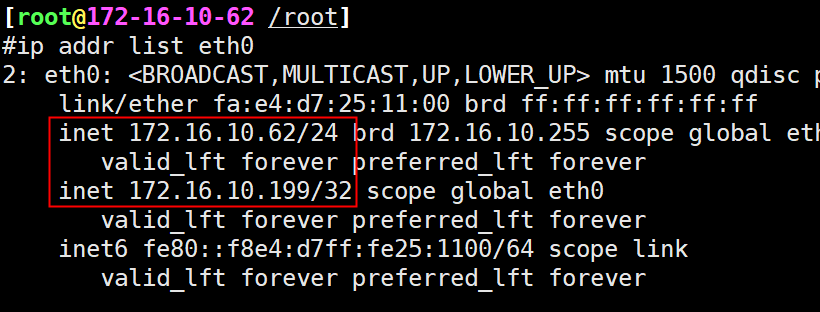
查看BACKUP服务器,确实已经漂移过来了
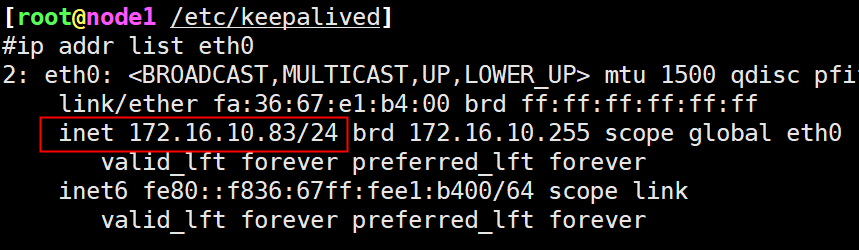
7.3 验证mysql停止VIP是否会漂移
在MySQLA服务器上停止mysql容器
#docker stop mysqlcompose_mysql_1
mysqlcompose_mysql_1

[root@node1 /etc/keepalived]
#docker ps | grep mysqlcompose_mysql_1

[root@node1 /etc/keepalived]
#ip addr list eth0
2: eth0: <BROADCAST,MULTICAST,UP,LOWER_UP> mtu 1500 qdisc pfifo_fast state UP qlen 1000
    link/ether fa:36:67:e1:b4:00 brd ff:ff:ff:ff:ff:ff
    inet 172.16.10.83/24 brd 172.16.10.255 scope global eth0
       valid_lft forever preferred_lft forever
    inet6 fe80::f836:67ff:fee1:b400/64 scope link
       valid_lft forever preferred_lft forever
可见VIP已经不在了

事实上keepalived也停止了

VIP自动漂移到MySQLB这台服务器上了