上篇我们说到如何从Github上clone出一个JBehave项目,既是为了学习JBehava,也是为了熟悉下Github。
从clone下来的项目看来,基本没什么问题,稍微捋一捋就可以运行,但是就clone下来的代码来看,自己还是遇到一个问题(不知道是代码问题,还是我自己的操作有问题),就是没有办法运行(后面会详说)。
正如上篇所说,构建一个JBehave的应用的5大步骤:
- Write story
- Map steps to Java
- Configure Stories
- Run Stories
- View Reports
这里,我们结合clone下来的项目分别对应这五个步骤了解JBehave是如何运行的并完成测试的。
1.Write story,设定一个story,给出一个情景,使用通用语言进行表示,不管是开发或是非开发的都能看懂
本项目有两个测试案例,一个是模拟登录的story:
loginYahoo.story:
Narrative:

In order to show the yahoo function
As a user
I want to login yahoo

Scenario: normal login

Given yahoo login address by.bouncer.login.yahoo.com
Then print successful
另一个是模拟浏览的story:
TestStroies.story:
Browse Etsy.com

Meta:
@category browsing
@color red


Narrative:

In order to show the browsing cart functionality
As a user
I want to browse in a gallery

Scenario: Browsing around the site for items

Given I am on localhost
Then print hello world

!--Examples:
!--|host|hello|
!--|localhost|hello world|
!--|www.baidu.com|hello baidu|
2.Map steps to Java, 将上述的每个story细分成每一个step,给出Given条件,则会得到Then的结果,从而将通用语言转换成可以通过代码逻辑描述的问题
loginYahoo.story对应的steps类TestLogin.java:
public class TestLogin {
		@Given("yahoo login address $url")
		public void getHostPage(String url){
			System.out.println("++++++++++++++++++++++++++++++"+url);
		}

		@Then("print $successful")
		public void hello(String successful){
			System.out.println("++++++++++++++++++++++++++++++"+successful);
		}
}
TestStories.story对应的steps类TestStep.java:
public class TestStep {
	@Given("I am on $host")
	public void getHostPage(String host){
		System.out.println("----------------------"+host);
	}

	@Then("print $hello")
	public void hello(String hello){
		System.out.println("----------------------"+hello);
	}
}
3.Configure Stories 配置一些映射关系,比如如何找到并加载story文件等
public class EmbedderBase extends Embedder{

	@Override
    public EmbedderControls embedderControls() {
        return new EmbedderControls().doIgnoreFailureInStories(true).doIgnoreFailureInView(true);
    }

	@Override
    public  Configuration configuration() {
        Class<? extends EmbedderBase> embedderClass = this.getClass();
      //MostUsefulConfiguration使用默认的配置
        return new MostUsefulConfiguration()
        	//设置story文件的加载路径
            .useStoryLoader(new LoadFromClasspath(embedderClass.getClassLoader()))
            //设定生成报告的相关配置
            .useStoryReporterBuilder(new StoryReporterBuilder()
                .withCodeLocation(CodeLocations.codeLocationFromClass(embedderClass))
                .withFormats(Format.CONSOLE, Format.TXT)
                .withCrossReference(new CrossReference()))
             //设定相关参数的转换
            .useParameterConverters(new ParameterConverters()
                    .addConverters(new DateConverter(new SimpleDateFormat("yyyy-MM-dd")))) // use custom date pattern
            .useStepMonitor(new SilentStepMonitor());
    }
}
4.Run Stories
public class TraderStoryRunner {
	@Test(groups={"test"})
    public void runClasspathLoadedStoriesAsJUnit() {
        // Embedder defines the configuration and candidate steps
        Embedder embedder = new TestStories();
        List<String> storyPaths = new StoryFinder().findPaths(CodeLocations.codeLocationFromClass(this.getClass()),"**/TestStories.story",""); // use StoryFinder to look up paths
        embedder.runStoriesAsPaths(storyPaths);
    }
	@Test(groups={"test"})
    public void runClasspathLoadedStories() {
        // Embedder defines the configuration and candidate steps
        Embedder embedder = new loginYahoo();
        List<String> storyPaths = new StoryFinder().findPaths(CodeLocations.codeLocationFromClass(this.getClass()),"**/loginYahoo.story",""); // use StoryFinder to look up paths
        embedder.runStoriesAsPaths(storyPaths);
    }
}
这里可以看出,声明了两个类TestStories和loginYahoo。
TestStories.java
public class TestStories extends EmbedderBase {

    @Override
    public InjectableStepsFactory stepsFactory() {
        return new InstanceStepsFactory(configuration(), new TestStep());//设定需要映射的step类
    }

}
loginYahoo.java:
public class loginYahoo extends EmbedderBase {

    @Override
    public InjectableStepsFactory stepsFactory() {
        return new InstanceStepsFactory(configuration(), new TestLogin());//设定需要映射的step类
    }

}
这两个类是一个桥梁的作用,用于设定从story到step的映射,注意这里的两个类是继承类EmbedderBase的,而EmbedderBase类又是Embedder的子类。
这是项目给出的测试类TraderStoryRunner,但是这里有一个问题,就是没有找到运行的入口,点击右键,除了一些maven的操作,并没有其他可以运行的指标,比如junit。
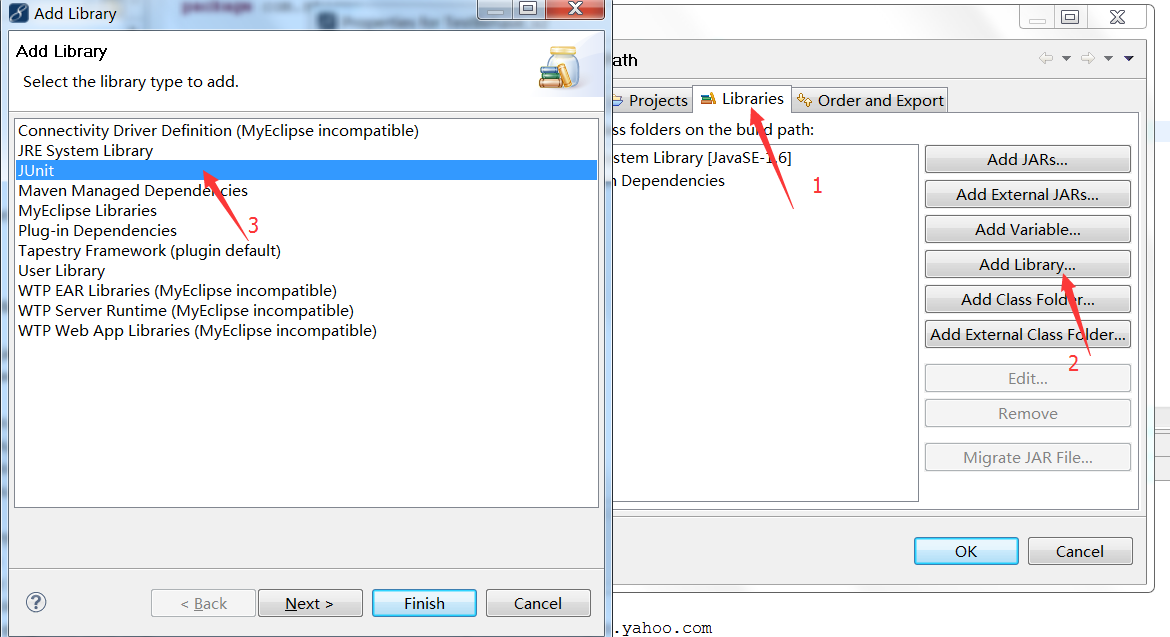
所以通过摸索,按照自己的方法,发现首先要做的就是添加junit测试库,这是必须的。具体步骤:
右键项目->Build path->Configured build path
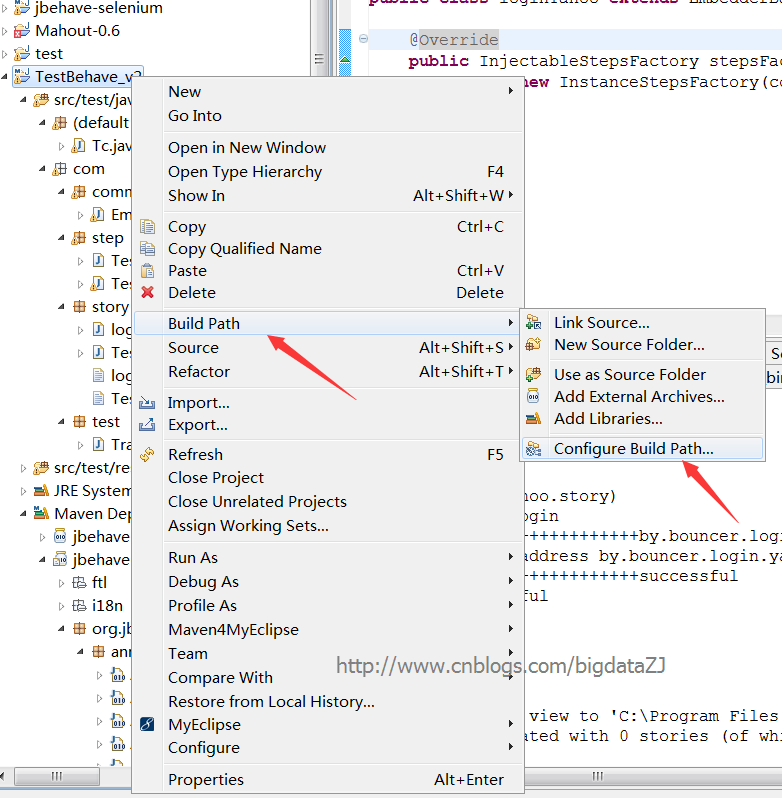
打开对话框,选择Libraries->Add Library->JUnit,点击next,选择junit4->finished。
添加完Junit后,新建一个Junit测试类

将TraderStoryRunner类的主体方法放进去,命名为Tc.java
import static org.junit.Assert.*;
import java.util.List;
import org.jbehave.core.embedder.Embedder;
import org.jbehave.core.io.CodeLocations;
import org.jbehave.core.io.StoryFinder;
import org.junit.After;
import org.junit.AfterClass;
import org.junit.Before;
import org.junit.BeforeClass;
import org.junit.Test;

import com.story.TestStories;
import com.story.loginYahoo;
public class Tc {
 @BeforeClass
 public static void setUpBeforeClass() throws Exception {
 }
 @AfterClass
 public static void tearDownAfterClass() throws Exception {
 }
 @Before
 public void setUp() throws Exception {
 }
 @After
 public void tearDown() throws Exception {
 }

 // @Test : 表示这是一个测试用例,只有标识了改符号的函数才会被执行测试

 @Test
 public void runClasspathLoadedStoriesAsJUnit() {
     // Embedder defines the configuration and candidate steps
     Embedder embedder = new TestStories();
     List<String> storyPaths = new StoryFinder().findPaths(CodeLocations.codeLocationFromClass(this.getClass()),"**/TestStories.story",""); // use StoryFinder to look up paths
     embedder.runStoriesAsPaths(storyPaths);
 }
	@Test
 public void runClasspathLoadedStories() {
     // Embedder defines the configuration and candidate steps
     Embedder embedder = new loginYahoo();
     List<String> storyPaths = new StoryFinder().findPaths(CodeLocations.codeLocationFromClass(this.getClass()),"**/loginYahoo.story",""); // use StoryFinder to look up paths
     embedder.runStoriesAsPaths(storyPaths);
 }
}
至此,这个项目是可以运行起来了。
5.View Reports
点击运行上面的Tc.java类,可以得到:
Processing system properties {}
Using controls EmbedderControls[batch=false,skip=false,generateViewAfterStories=true,ignoreFailureInStories=false,ignoreFailureInView=false,verboseFailures=false,verboseFiltering=false,storyTimeoutInSecs=300,threads=1]

(BeforeStories)

Running story com/story/TestStories.story
Narrative:
In order to show the browsing cart functionality
As a user
I want to browse in a gallery
Browse Etsy.com
(com/story/TestStories.story)
Meta:
@category browsing
@color red

Scenario: Browsing around the site for items
----------------------localhost
Given I am on localhost
----------------------hello world

!--Examples:
!--|host|hello|
!--|localhost|hello world|
!--|www.baidu.com|hello baidu|
Then print hello world

!--Examples:
!--|host|hello|
!--|localhost|hello world|
!--|www.baidu.com|hello baidu|


(AfterStories)

Generating reports view to 'C:Program Files (x86)GitJbehaveTestBehave_v2_testng	argetjbehave' using formats '[console, txt]' and view properties '{defaultFormats=stats, decorateNonHtml=true, viewDirectory=view, decorated=ftl/jbehave-report-decorated.ftl, reports=ftl/jbehave-reports-with-totals.ftl, maps=ftl/jbehave-maps.ftl, navigator=ftl/jbehave-navigator.ftl, views=ftl/jbehave-views.ftl, nonDecorated=ftl/jbehave-report-non-decorated.ftl}'
Reports view generated with 0 stories (of which 0 pending) containing 0 scenarios (of which 0 pending)
Processing system properties {}
Using controls EmbedderControls[batch=false,skip=false,generateViewAfterStories=true,ignoreFailureInStories=false,ignoreFailureInView=false,verboseFailures=false,verboseFiltering=false,storyTimeoutInSecs=300,threads=1]

(BeforeStories)

Running story com/story/loginYahoo.story
Narrative:
In order to show the yahoo function
As a user
I want to login yahoo

(com/story/loginYahoo.story)
Scenario: normal login
++++++++++++++++++++++++++++++by.bouncer.login.yahoo.com
Given yahoo login address by.bouncer.login.yahoo.com
++++++++++++++++++++++++++++++successful
Then print successful


(AfterStories)

Generating reports view to 'C:Program Files (x86)GitJbehaveTestBehave_v2_testng	argetjbehave' using formats '[console, txt]' and view properties '{defaultFormats=stats, decorateNonHtml=true, viewDirectory=view, decorated=ftl/jbehave-report-decorated.ftl, reports=ftl/jbehave-reports-with-totals.ftl, maps=ftl/jbehave-maps.ftl, navigator=ftl/jbehave-navigator.ftl, views=ftl/jbehave-views.ftl, nonDecorated=ftl/jbehave-report-non-decorated.ftl}'
Reports view generated with 0 stories (of which 0 pending) containing 0 scenarios (of which 0 pending)
大体的思路,是将story和step对应起来,将story中的条件、参数传入step对应的类中,如果满足则通过测试,得到then给出的结果,否则得不到理想的结果。
如果您觉得阅读本文对您有帮助,请点一下“推荐”按钮,您的“推荐”将是我最大的写作动力!如果您想持续关注我的文章,请扫描二维码,关注JackieZheng的微信公众号,我会将我的文章推送给您,并和您一起分享我日常阅读过的优质文章。

友情赞助
如果你觉得博主的文章对你那么一点小帮助,恰巧你又有想打赏博主的小冲动,那么事不宜迟,赶紧扫一扫,小额地赞助下,攒个奶粉钱,也是让博主有动力继续努力,写出更好的文章^^。
1. 支付宝 2. 微信

